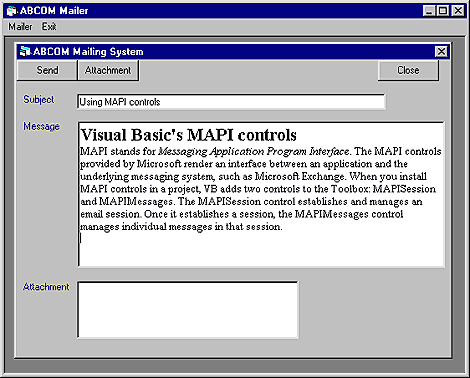

In a few short years, email has become a common and necessary marketing tool. Many companies provide email lists targeted to specific market segments. Vendors, too, develop their own mailing lists. Typically, such lists announce news, or copy mail to everybody in the list. As a result, the need for mass emailing utilities has also been on the rise. This article describes the design and development of a mass mailer utility using Visual Basic's MAPI controls, as seen in Figure A. Before we discuss the utility, however, let's investigate the important role the MAPI controls play in email applications.
Figure A: VB's MAPI controls let you create email-enabled
applications with ease.
Note: Sending bulk email to people without their consent, or spamming, is just bad form. Not only is it illegal in several states, but your ISP may cancel your service if you send bulk email without their permission. ZD Journals provides this utility as a service for legitimate uses only, and in no way condones or practices the sending of spam.
Visual Basic's MAPI controls
MAPI stands for Messaging Application Program Interface. The MAPI controls provided by Microsoft render an interface between an application and the underlying messaging system, such as Microsoft Exchange. When you install MAPI controls in a project, VB adds two controls to the Toolbox: MAPISession and MAPIMessages. The MAPISession control establishes and manages an email session. Once it establishes a session, the MAPIMessages control manages individual messages in that session.
How to determine if MAPI exists on a machine
MAPI-compliant components won't be available on every machine. If you haven't installed Microsoft Exchange, you'll need to do so before using the controls. To determine whether a machine contains these components, open the computer's Control Panel, double-click on the Mail icon and ensure that a service provider is installed on your machine.
To use MAPI controls in a VB program, select Project | Components from the menu bar. In the Components dialog box, select the Controls tab, and then choose the Microsoft MAPI controls 6.0 check box. When you click OK, VB adds the two required controls to the Toolbox. VB doesn't display these controls on a form at runtime.
Starting a MAPI session
To send or receive mail in an application, you must first start a MAPI session. To do so, call the MAPISession control's SignOn method, as in
MAPISession1.SignOn
MAPIMessages1.SessionID = _
	MAPISession1.SessionID
After you've finished sending and receiving mail, use the SignOff method to terminate the MAPI session, as follows
MAPISession1.SignOff
After you've logged on to a MAPI session and have assigned a SessionID to the MAPIMessages control, you're all set to send and receive mail. Basically, this control reads all the messages in a computer's Inbox and assigns an index value to each one. As you indicate each new index value, the control loads that message's contents and properties. Let's take a look at this in more detail.
Composing an email
The Compose method creates a new email message. After you call this method, set the RecipDisplayName, MsgSubject and MsgNoteText properties, like this:
With MAPIMessages1
	.Compose
	.RecipAddress = mailID
	.MsgSubject = Subject
	.MsgNoteText = Message
End With
Once you set these properties, you can call the Send method to dispatch the mail, which we'll discuss next.
Sending the right message
As you might guess, to send email, you call the MAPIMessages control's Send method. This method takes an optional boolean parameter, which indicates if you want to display a dialog box that allows a user to accept recipient email addresses, the message text, etc. If you set the parameter to True, VB displays the dialog box. If you choose not to show the dialog box, then you need to set the appropriate properties on the control before sending the mail.
Assigning recipients
In an email utility, you're no doubt going to want to send mail to more than one person. To accommodate this need, each MAPI message contains a collection of Recipients, or the people to whom you're sending the email. Accordingly, each MAPIMessages control has a RecipIndex property with an associated RecipAddress property. To assign multiple recipients to the same message, specify a corresponding RecipAddress value for each new RecipIndex value, like so
With MAPIMessage1
	.RecipIndex = 1
	.RecipAddress = "info@abcom.com"
	.RecipIndex = 2
	.RecipAddress = "sales@abcom.com"
End With
A recipient can be of one of three types: Primary, Copy, or Blind copy. Use the RecipType property to indicate a recipient's type. The value for the RecipType can be one of the three pre-defined constants: mapToList, which indicates a Primary recipient; mapCcList, which indicates a Copy recipient; and mapBccList, which indicates a Blind copy recipient.
Adding attachments
To send an attachment with an email, set the control's AttachmentPathName property to the desired filename. You may send multiple attachments by using AtttachmentIndex property along with the AttachmentPathName property. Just like the RecipIndex property, you set the desired file's path, for each index value, like so
With MAPIMessages1
	.AttachmentIndex = 1
	.AttachmentPathName = MyPath1
	.AttachmentIndex = 2
	.AttachmentPathName = MyPath2
End With
As you can see, a message can have one or more attachments. The AttachmentCount property indicates the number of attachments the message contains. Now that we know how to compose and send messages, let's see how to receive them.
Receiving messages
To retrieve email, call the MAPIMessages control's Fetch method, as in
MAPIMessage1.Fetch
Our eCommerce mail utility
The mail utility we developed allows you to create several mailing lists. You can also compose messages using the provided dialog box, attach multiple files if desired, and then select one or multiple mailing lists as recipients. The utility then dispatches the message to all recipients on the selected mailing lists. As you can see in Figure A, our application uses the MDI interface. It provides menus for creating master mailing lists and sending mail. In addition, it stores the email list data in an MDB file, and then uses DAO to open the database. The database contains two tables. The List table holds the names and IDs for the various mailing lists. The Address table holds recipient names, the mailing list ID to which the recipient belongs, and up to three mailing IDs.
The utility is too big to explain in its entirety in this article. We'll give a brief overview of some of its features, and then focus in on those areas that specifically use the MAPI controls. However, you can download the complete utility here.
Create the mailing listsInitially, you'll need to create the mailing lists. To do so, select Mailer | Group Master from the menu bar. You may create as many mailing lists as desired. To create members for each mailing list, select Mailer | Address Master. In the resultant entry screen, enter each user's name and three email IDs. The multi-select list box on the right side shows the available mailing lists to which you can add each member. Once you've created the list, you're ready to send a mail message.
Compose and send the message
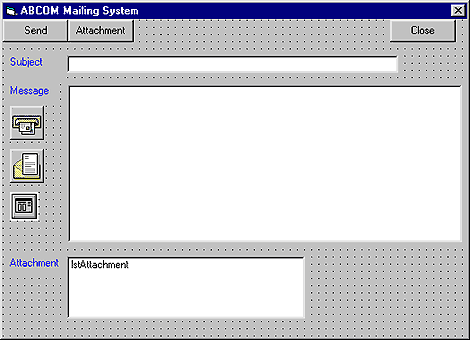
To send mail, select the Mailer | Compose And Send Mail menu option. When you do, the utility opens the familiar dialog box. Figure B shows this form's design. In this dialog box, enter the message title and the message text. We've used the Rich Text Edit control for the message text. As a result, you may type a message in your favorite word processor and paste it in this control. You can also attach files to the message. This opens a common dialog box for file selection. The selected file is added into the attachments list box shown at the bottom.
Figure B: The MAPI controls don't appear in the form's runtime
display.
Once you've composed a message, click the Send button. When you do, the utility opens a list box that displays the pre-defined mail lists. When you select the lists to which you wish to send the email and click OK, the program opens a recordset with the appropriate records. For each record in the recordset, the program calls the Compose method, sets the recipient name, message title, message text, and any number of attachments that may be present. If the user has more than one email ID specified, the message is sent to all the specified IDs. Listing A shows the code that accomplishes this task.
Listing A: cmdSend Click event
Private Sub cmdSend_Click()
Dim rsAddress As Recordset
Dim MailID As Integer
Dim SQLStmt As String
Dim count As Integer
Dim AttachmentFile As String
Dim nIndex As Integer

strSql = "

If txtSubject = " Then
	MsgBox "Subject can not be blank"
	txtSubject.SetFocus
	Exit Sub
End If

If txtMessage.Text = " Then
	MsgBox "Message can not be blank"
	txtMessage.SetFocus
	Exit Sub
End If

' select the mailing lists
Load frmMailListSelect
frmMailListSelect.Show 1

On Error GoTo err1

If Not bCancel Then
' open the MAPI session
	MAPISession1.SignOn

' assign the obtained session ID
	MAPIMessages1.SessionID = MAPISession1.SessionID

' select recipients
	SQLStmt = "select distinct " + _
		"name, emailID1, emailID2, emailID3 " + _
		"from Address Where " + strSql

	Set rsAddress = db.OpenRecordset(SQLStmt, _
		dbOpenSnapshot)
' iterate through all selected records
	Do While Not rsAddress.EOF
		With MAPIMessages1
			.MsgIndex = -1
			.Compose
		'  a recipient may have more than one e-mail Ids
			For MailID = 1 To 3
			If rsAddress.Fields("emailID" + _
				Trim(Str(MailID))) = " Then
				If rsAddress.EOF Then Exit Do
			Else
				.RecipDisplayName =
rsAddress.Fields("emailID" _
					+ Trim(Str(MailID)))
				.MsgSubject = txtSubject.Text
				.MsgNoteText = txtMessage.Text
				nIndex = 0

			' attach all selected files
				For count = 0 To
lstAttachment.ListCount -1
					AttachmentFile =
lstAttachment.List(count)
					.AttachmentIndex =
nIndex
					.AttachmentPathName =
AttachmentFile
					.AttachmentPosition =
nIndex
					nIndex = nIndex + 1
				Next count
				.Send
			End If
			Next MailID
			rsAddress.MoveNext
		End With
	Loop
	MAPISession1.SignOff
End If
Exit Sub

err1:
	MsgBox Err.Description
End Sub
Conclusion
In this article, we've described the design and development of a mass email utility that lets you create multiple mailing lists and send mail to pre-defined recipients. In addition, we've shown you the power of MAPI controls and how easy it is to develop a simple, yet powerful mail application with them.
Copyright © 1999, ZD
Inc. All rights reserved. ZD Journals and the ZD Journals logo are trademarks of ZD
Inc. Reproduction in whole or in part in any form or medium without
express written permission of ZD Inc. is prohibited. All other product
names and logos are trademarks or registered trademarks of their
respective owners.