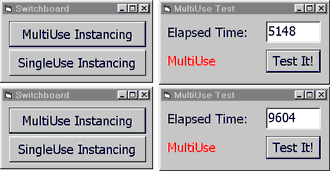
FIGURE 5: MultiUse instancing blocks the object until it's finished.
In Part II, we examined the subject of developing external components by focusing on debugging, compatibility, raising and sinking events, and in-process and out-of-process components. Still, this series has just scratched the surface in terms of the things you can do with ActiveX components, and the issues involved.
This time, we'll deal with advanced topics you probably won't run into right away, but may need to be aware of as you become more experienced. Hopefully, you've been trying out the examples presented in Parts I and II of the series, and may have created your own components as well. If so, you should be ready for this final installment, where we tackle registering components, instancing, and creating a global component.
Registering Components
As mentioned earlier, the only way this cross-application communication works is by using information about your component stored in the Windows registry. When you build the component on your own machine, Visual Basic registers it for you. All you need to do is set a reference in your client application. If you use the Package and Deployment Wizard to create an installation for the component, running the Setup program on other machines will register the component for you.
To manually register an ActiveX EXE, simply execute the program from the DOS command line. If you run it from the command line (if the component contains at least one public class), Visual Basic creates the ActiveX executable with start-up code that registers the component, then quits. To manually register an OCX or ActiveX DLL, use REGSVR32. Type the following text at the DOS command prompt to register the component, using your component's name and correct extension:
REGSVR32 YourComponent.DLLTo un-register an ActiveX EXE, run it from the command line, but append /UNREGSERVER as a parameter. To un-register an ActiveX DLL or OCX, use REGSVR32, but append the /U parameter, telling the program to un-register the component.
Tip: To make this process simpler, add a shortcut to REGSVR32.EXE to your Send To menu, i.e. drag a shortcut into your \Windows\SendTo folder. Then, simply select the component to be registered, right-click, and choose the Send To option.
Understanding Instancing
When you create a class module in an ActiveX control, DLL, or EXE, the module exposes an important property: Instancing. This property's setting determines how objects of this class type can be created.
Different types of projects support different options. The table in FIGURE 1 (borrowed from Visual Basic's online help) lists all the possible values for the Instancing property.
|
1 |
Private |
The default. Other applications can't access type library information about the class, and cannot create instances of it. Private objects are for use only within your component. |
|
2 |
PublicNotCreatable |
Other applications can use objects of this class only if your component creates the objects first. Other applications cannot use the CreateObject function or the New operator to create objects from the class. |
|
3 |
SingleUse |
Allows other applications to create objects from the class, but every object of this class that a client creates starts a new instance of your component. Not allowed in ActiveX DLL projects. |
|
4 |
GlobalSingleUse |
Similar to SingleUse, except properties and methods of the class can be invoked as if they were simply global functions. Not allowed in ActiveX DLL projects. |
|
5 |
MultiUse |
Allows other applications to create objects from the class. One instance of your component can provide any number of objects created in this fashion. |
|
6 |
GlobalMultiUse |
Similar to MultiUse, with one addition: Properties and methods of the class can be invoked as if they were simply global functions. It's not necessary to explicitly create an instance of the class first; one will be created automatically. |
FIGURE 1: Possible values for the Instancing property.
As you can see from the chart in FIGURE 2, not all the options are available for all types of projects.
|
Setting |
Applies to Project Type |
|||
|
|
ActiveX EXE |
ActiveX DLL |
ActiveX Control |
Standard EXE |
|
Private |
Yes |
Yes |
Yes |
Yes |
|
PublicNotCreatable |
Yes |
Yes |
Yes |
|
|
SingleUse |
Yes |
|||
|
GlobalSingleUse |
Yes |
|||
|
MultiUse |
Yes |
Yes |
||
|
GlobalMultiUse |
Yes |
Yes |
||
FIGURE 2: As you can see, not all the options are available for all types of projects.
How does this apply to you? Three issues come up:
Private vs. Public Instances
If you choose the Private option for instancing, no code outside the current project will be able to create a new instance of your class. If you choose the PublicNotCreatable option, the class is public, but can only be created by code in the current project. The rest of the instancing options allow code outside the project to instantiate a new object based on the class.
Try It Out!
If you're not clear on the differences between MultiUse and SingleUse instancing, you might want to step through the following experiment. Look at the following two projects:
Private Declare
Function timeGetTime _


  Lib
"winmm.dll" () As Long


Public Sub
Wait()


  Dim
lngStart As Long


  lngStart = timeGetTime


  '
Loop for about 5 seconds.


  Do
While timeGetTime - lngStart < 5000


  Loop


End Sub
FIGURE 3: The Single and Multi classes supply the Wait method.
Private Declare
Function timeGetTime _


  Lib
"winmm.dll" () As Long


Private Sub
cmdTest_Click()


  Dim
oTest As VBDemoServer.Single


  Dim
lngStart As Long


  txtSeconds =
""


  DoEvents


  ' Get the Current time.


  lngStart = timeGetTime


  Set
oTest = New VBDemoServer.Single


  '
Do the test.


  oTest.Wait


  ' Report the elapsed time.


  txtSeconds = timeGetTime
- lngStart


End Sub
FIGURE 4: MultiTest and SingleTest each tests one of the classes in Server.EXE, running code like this.
To demonstrate the issues involved with SingleUse versus MultiUse instancing, follow these steps:

FIGURE 5: MultiUse instancing blocks
the object until it's finished.

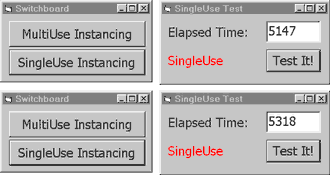
FIGURE 6: SingleUse instancing
allows two objects to work in parallel.
What do the numbers mean? In the first test (opening two forms that instantiate objects of the Multi class), only one instance of the class is created in memory, because the class' Instancing property is set to MultiUse. Because each object gets only a single thread in which to work, the second instance can't run its Test procedure until the first has finished. Therefore, the second instance finished about five seconds after the first.
In the second test (opening two forms that instantiate objects of the Single class), each form gets its own instance of the object. This way, there's no problem with thread blocking. The times should be about the same for the two forms.
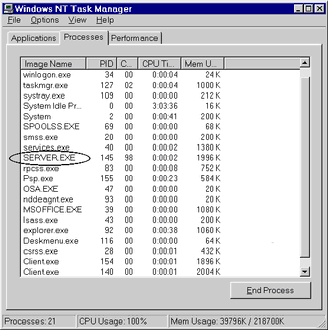
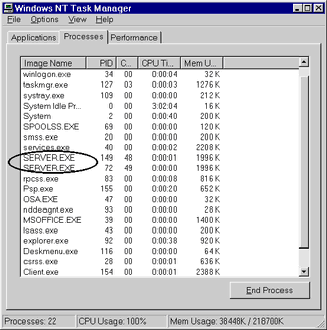
Prove it to yourself. If you're still not convinced, open the Windows Task Manager as you run these tests. When you run the MultiUse forms, you'll see only a single instance of Server on the process list. When you run the SingleUse forms, you'll see two instances (see FIGURES 7 and 8).

FIGURE 7: Running the two MultiUse
forms loads only a single instance of the Server.

FIGURE 8: Running the two SingleUse
forms loads two instances of the Server.
Creating a Global Component
When you choose either of the Global options for the Instancing property, you've told Visual Basic to create an object that's always available to host applications, without the need to be instantiated. Global instancing is useful for objects such as Visual Basic's Clipboard object, which is always available, i.e. you never have to create a new instance to use it. When your code first uses the object, it automatically instantiates the object for you.
Global instancing is useful when your object: 1) Is used with only a single instance per host application, and 2) Is useful enough that you always want it available.
The Clipboard object provides a perfect illustration. The following example makes the Visual Basic Clipboard object available to any other application. (None of the Office applications currently supply a Clipboard object, so this example is somewhat useful.) The sample project includes a class (Clipboard) that provides the simple (text-oriented) methods of the built-in Visual Basic Clipboard object: Clear, GetText, and SetText.
The Instancing property for the Clipboard class has been set to GlobalMultiUse, so it should be immediately available in any host application. The code in the class looks like that shown in FIGURE 9.
Public Sub
Clear()


  Call
VB.Clipboard.Clear


End Sub


Public Function
GetText() As String


  GetText =
VB.Clipboard.GetText()


End Function


Public Sub
SetText(Data As String)


  Call
VB.Clipboard.SetText(Data)


End Sub
FIGURE 9: The code in the Clipboard class looks like this.
Note: Because the class name is Clipboard (which conflicts with the built-in Clipboard object), you must provide the type library name in the code when you want to refer to the built-in Clipboard object. That's why you'll find the "VB." prefix on each reference to the Clipboard. If the code did not include that, it wouldn't be clear to Visual Basic whether it was referring to methods of its own class, or the built-in Clipboard class. This is an example of disambiguation.
Try It Out!
To test out the Clipboard global object, follow these steps:
Function
Test()

  Clipboard.SetText "This is a test"

  Debug.Print
Clipboard.GetText

End
Magically, with almost no work, your VBA host now contains a Clipboard object!
Is There More?
Way more. This series hasn't touched on the concept of creating object models for your components, data binding, or creating data sources. How about creating ActiveX controls? (They're simply ActiveX components with a UI, from your Office application's point of view.) We haven't even talked about using MTS (Microsoft Transaction Server) to manage the creation and use of ActiveX components in a distributed environment. In addition, Visual Basic allows you to persist your components' data between sessions, if you like.
All of these are topics for a more advanced discussion, and need to be studied if you want to create professional, robust, reusable components. We've focused on getting started with ActiveX components, but you'll need to do more research before you can move on to the "expert" level. Armed with what you've learned in this article, however, you have the tools needed to create simple components. It's up to you and your imagination what you do with the material you've learned here.
If you're interested in creating add-ins for Visual Basic, VBA, or any Office 2000 application, you'll want to dig into learning about creating ActiveX components. All these add-ins require you to create an ActiveX DLL that provides information the host applications expect to find there. In any case, it's ActiveX DLLs (and COM) that make add-ins like this possible.
References
If you want to learn more about creating classes, object models, and using ActiveX components, you might give these books a look:
Portions of this article are reproduced from Visual Basic 6.0 courseware written for Application Developer's Training Company (http://www.appdev.com) by Ken Getz. The author would like to thank Brian Randell, Paul Sheriff, and Michael Kaplan for their contributions to the examples used in this article.
Ken Getz, a senior consultant with MCW Technologies, splits his time between programming, writing, and training. Ken is co-author of several books for developers, including Access 97 Developer's Handbook [SYBEX, 1997] and VBA Developer's Handbook [SYBEX, 1997]. He also co-wrote the training materials and travels around the United States teaching Access 97 and VB5 for Application Developers Training Company. Ken is currently at work on Access 2000 Developer's Handbook, and Visual Basic Language Developer's Handbook, both from SYBEX. In addition, Ken is a Contributing Editor for Microsoft Office & Visual Basic for Applications Developer magazine.
Mike Gilbert is Technical Product Manager for Office Developer Edition and VBA Licensing at Microsoft. He is also co-author of VBA Developer's Handbook and Access 97 Developer's Handbook (with Ken Getz and Paul Litwin), both for SYBEX.
Copyright © 1999 Informant Communications Group. All Rights Reserved. • Send feedback to the Webmaster • Important information about privacy