![]()
|
This article may contain URLs that were valid when originally published, but now link to sites or pages that no longer exist. To maintain the flow of the article, we've left these URLs in the text, but disabled the links.
|

| Krishna Kotipalli |
| Shell Namespace Extensions |
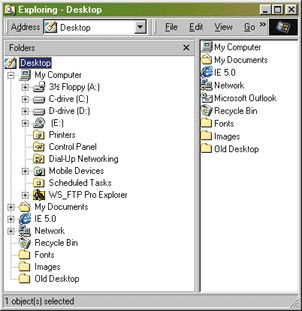
First, for those of you who don't know, a namespace is a collection of symbols like file and directory names. The Microsoft® Windows® shell uses a single hierarchical namespace to organize all objects, including files, storage devices, printers, and network resources. Windows Explorer can be thought of as the shell namespace viewer. The root of this unified namespace is the Windows desktop (see Figure 1). |
 |
| Figure 1: Root of the Shell Namespace |
A namespace extension provides a way to define a new object that a shell namespace browser like Windows Explorer can view. The extension has to provide the text the user sees while viewing the data, the menus, and the toolbars, as well as status information that applies to these data objects. The extension can provide custom context menus, drag-and-drop capabilities, and the like.
When you implement a shell namespace extension, you are just using Windows Explorer as a container to display your data. Your namespace extension has to implement a few COM interfaces that the Explorer then calls in. For example, IShellFolder is used to create folders for the Explorer treeview. Similarly, IShellView is used to create a left-hand-side view for your namespace extension. The Explorer shell in turn exposes an interface, IShellBrowser, through which you can communicate with the Explorer window for adding tool buttons, changing status text, merging menus, and so on.
If you have any data that can be shown in a hierarchical manner and you want to use Windows Explorer as the container of this data, you can make it a namespace extension. But keep in mind the user interface programming guidelines for Windows when you design your extension. It has to look like it belongs there.
A namespace extension is not part of the file system. Even though you can make your namespace extension's folders show up in standard open/save dialog boxes, if a user tries to select them, the application might behave unpredictably because your PIDLs (I'll talk about them a little later) are unrecognized by the shell.
There are two basic types of namespace extensions. Nonrooted extensions allow a user to browse up one level from the extension's root, while rooted extensions don't. There is no code difference between the two shell extensions.
The deluge of interfaces that you need to implement in a namespace extension before Explorer recognizes it is a major deterrent to writing one from scratch. I'll guide you through the steps needed to build a namespace extension, starting from just a simple view, then graduating to displaying objects, showing icons, and implementing drag and drop. The namespace extension I'll build here will mirror a local directory (or directories) of your choosing.
I've also written a NameSpace Extension AppWizard to supplement this article. (This code is available for download from the link at the top of this article.) It's used to generate the skeleton code for all the steps. Later on you'll be able to add meat to this skeleton project.
Step 1: A Simple View
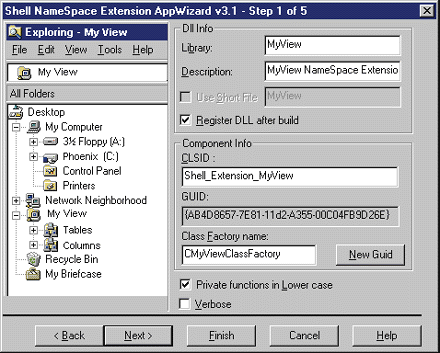
The namespace extension AppWizard is shown in Figures 2 through 6. Using the Shell NameSpace Extension AppWizard, create a new project. In step 1 you'll be asked to enter a name for the extension (see Figure 2). This will appear later on when you view the extension in Windows Explorer. In step 4 (see Figure 5), you'll get to choose the Shell View. Select None, then click Finish. The AppWizard will produce a namespace extension skeleton project.
 |
| Figure 2: NameSpace Extension AppWizard Step 1 |
Once the AppWizard generates the code, you must build the project, then register the DLL with the system by using the command "RegSvr32 root.dll" (where root is the name of the project you have chosen), or by using the Tools | Register Control command from Visual C++®.
 |
| Figure 3: AppWizard Step 2 |
Once the project is registered, it should be in action. Bring up an instance of Windows Explorer and select View | Refresh (or hit F5). Explorer will display a new tree item with the text indicated in step 1 of the AppWizard. Clicking on the icon and opening it shows what the namespace extension has implemented for its view—currently, it's nothing more than a background painted with a bitmap brush.
 |
| Figure 4: AppWizard Step 3 |
How was this achieved? The Windows shell uses COM interfaces to communicate with a namespace extension. This first step implements portions of IShellFolder and IShellView. Figure 7 shows these interfaces and the methods that were implemented in this step.
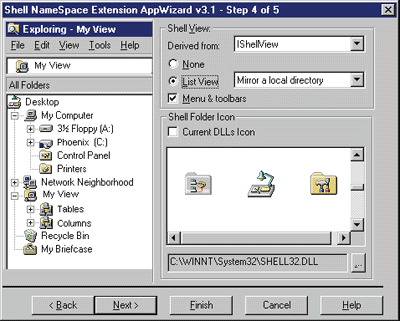 |
| Figure 5: AppWizard Step 4 |
The project structure generated by the NameSpace Extension AppWizard is only a serving suggestion. The interfaces/entry points and file names were implemented in the files root.cpp, root.h, and root.def. The project implements four other functions: DllGetClassObject, DllRegisterServer, DllUnregisterServer, and DllCanUnloadNow.
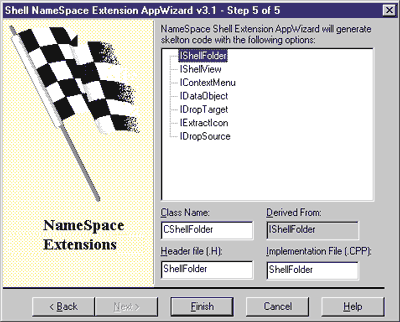 |
| Figure 6: AppWizard Step 5 |
The shell calls DllGetClassObject to retrieve the pointer to a class factory interface, which constructs objects based upon the REFIID parameter. DllRegisterServer instructs an in-process server to create registry entries for all classes supported in this DLL. In a basic namespace extension DLL, the following entries should be registered:
|
| For Windows NT® 4.0 or higher, you also need to add administrative privileges: |
|
| Finally, if you want a non-rooted namespace extension, you can choose to put it under the Desktop |
|
| under My Computer |
|
| under both, or neither. If a folder is given the name Name.{CLSID}, the namespace extension associated with CLSID is used to create the view for that folder.
Next, DllUnregisterServer instructs an in-process server to remove those entries created through DllRegisterServer. DllCanUnloadNow is called by the shell to determine whether the DLL is in use. If not, the shell can safely unload the DLL from memory. DllGetClassObject creates an instance of the CClassFactory object, which is derived from the COM Interface IClassFactory. The class factory creates objects depending on the interface identifier passed to its member function CreateInstance. Here the interface identifier is usually IID_IShellFolder. There are four files in this first sample: ShellFolder.h, ShellFolder.cpp, ShellView.cpp, and ShellView.h. The ShellFolder files contain the definition and implementation of the CShellFolder class derived from the folder management interface IShellFolder. All shell namespace extensions have to implement IShellFolder. The communication with Windows Explorer's outermost frame window is carried out through the IShellBrowser interface, which is obtained through IShellView's CreateViewObject method. Through this interface you can (among other things) translate messages, check the state of the frame window, merge menus and toolbar items, and set the status bar text. The ShellView files contain the definition and implementation of the CShellView class, which is derived from IShellView. IShellView is in turn derived from IOleWindow. IShellView is used to present a view of a folder. This first step offers little beyond a basic set of code for a namespace extension. Now let's actually make some things show up in the shell. Step 2: Folders, Items, and Enumerations In step 2 of this project, the first thing you must do is create a new namespace extension project. In step 4 of the AppWizard, select ListView | Mirror a local folder for the Shell View. When you hit Finish, the wizard creates a namespace extension project that mirrors a local folder (C:\ by default). After building and registering the project, refresh Windows Explorer. You can see the icon for the namespace extension. Now when you select the item you can see one root item named C:\. Opening this item shows a folder named C:\. You can add the folders that you want the extension to mirror by changing or adding string values to the registry key HKCR\ CLSID\{CLSID}\Settings. You can then browse the directory structure of these directories. However, there are no icons displayed for the files or folders and not all information regarding the files and folder is available. In addition to implementing a few more methods of IShellFolder and IShellView, the interface IEnumIDList is also implemented in this step (see Figure 7). The IEnumIDList interface is called by the shell to enumerate through the available IDLists in the extension. PIDL The Windows shell keeps track of every object in its namespace by associating an item identifier with it. It does this through a structure called SHITEMID. Since the parent folder of an item has its own item identifiers, any item can be uniquely identified by a list of item IDs, called an ID list (ITEMIDLIST). A pointer to an ITEMIDLIST is called a PIDL (pronounced piddle"), and is used extensively in namespace extensions. ID lists should always be allocated by the shell task allocator, which can be obtained by a call to SHGetMalloc. This ID list can then be passed across shell interfaces without any special conversion. Each item in an ID list is only meaningful to the parent folder that generated it, so all clients must treat it as opaque binary data (except the first two bytes, which identify the size of the item ID). When an ID list is passed to shell APIs like SHGetPathFromIDList, it always indicates an absolute path from the Desktop folder. When an ID list is passed to one of IShellFolder's methods, however, it always indicates a relative path from the folder (unless otherwise stated). The structures SHITEMID and IDLIST are defined in ShlObj.h and can be seen in Figure 8. ITEMIDLIST is a variable-length structure. The array of bytes can contain enough data to identify items by the parent folder. Only the first two bytes are defined, and they contain the size of the identifier list. The rest of the identifier list contains data that is implementation-specific. Since the current namespace extension mirrors a local directory, I have defined the structures shown in Figure 9 for the data part of the identifier list. szSignature is an optional data member that can be used to set and check for a signature string. By doing this, you can pass the ID list to an IEnumIDList interface function without assuming that the PIDL belongs to you. Since you're mirroring a directory, PIDLType contains the type of the PIDL you are working on, whether it's the root, a folder, or a file. dwSizeHigh, dwSizeLow, dwAttribs, and ftLastWriteTime are set from the corresponding WIN32_FIND_DATA structure members. uiSizeFile and uiSizeType contain the size of the file name and file type description strings in the szFileAndType variable string array. The helper function CPIDLMgr::CreateItem (or CPIDLMgr::createItem) in EnumIDL.cpp is used to create an item identifier, fill the variable byte array with these fields, and return a PIDL. Step 2 went beyond the shell view and put items in the treeview when a tree item is selected. Now let's add menu items to the File and Edit menus, insert toolbar buttons into the browser toolbar, and change the view settings. Step 3: Jazz up the View Until now the view didn't have any menu items, toolbar buttons, or status text of its own. In this step you will see how to add these into a namespace extension. Create a new shell namespace extension project with the AppWizard. Select ListView, for the Shell View and select Mirror Local directory from the adjoining listbox. Check the "Menus & toolbars" checkbox, and click Finish. This will produce a namespace extension project with additional code for adding menu items and toolbar buttons and for setting text in the status bar. Until now, the IShellBrowser pointer that the IShellView-derived class obtained in CreateViewWindow was unused. The IShellBrowser interface is a companion to IShellView. It allows the namespace extension to add its own UI elements and also provides the extension with a way to access storage to save its persistent view state. Derived from IOleWindow, IShellBrowser's methods are shown in Figure 10. Only one IShellView method is introduced in this step: UIActivate. This is called whenever the activation state of the view window is changed by an event not caused by the shell view itself. The Sequence of Operations Whenever the shell activates or deactivates the view, it calls IShellView::UIActivate. When your class is activated, you should add the appropriate menu items by using the IShellBrowser::SetMenuSB method. When adding menus, you can take care of enabling or disabling the menu items depending on whether the view has focus, whether or not an item is selected, or any other condition you might check. On deactivation you should remove those menus by using IShellBrowser::RemoveMenuSB. To add toolbar items or set status text, you need to use the IShellBrowser::SendControlMsg function. You can send control-specific messages using this method. You can add either standard shell toolbar bitmaps or your own bitmaps. To use a standard shell toolbar bitmap, you need to obtain an offset number. Do so by sending the TB_ADDBITMAP message to the toolbar control of Windows Explorer using IShellBrowser:: SendControlMsg and passing FCW_TOOLBAR as the first parameter. After that you can set the toolbar button images using the IShellBrowser::Set- ToolbarItems method. You can access the status text control of Windows Explorer by using standard messages for the status control—like setting the parts of the status bar to display, setting the text for these parts, and so on. You can do this by using IShellBrowser:: SendControlMsg with FCW_ STATUS as the first parameter. Step 4: UI Objects Right now, the items don't have any icons or context menus, so let's add some. You know the deal by now—start out by creating a shell namespace extension project with the AppWizard. In step 3, select the IContextMenu and Extract Icon checkboxes. In step 4, select List View | Mirror a local directory for the Shell View, then click Finish. Once you build and register the newest namespace extension, it will display a context menu when you click on the root of the namespace. In addition, the items in the namespace extension in the treeview and the listview now have their associated icons displayed. The IShellFolder::GetUIObjectOf function is implemented in this step to return pointers to IContextMenu and IExtractIcon interfaces. The methods supported by these two interfaces are shown in Figure 11. What's going on in the code at this point? Here's the sequence of operations (not including some steps from earlier project iterations). Whenever you right-click on the root of the namespace extension, the shell calls the IShellFolder::GetUIObjectOf method with the riid parameter set to IID_IContextMenu. (To be exact, it sends IID_IContextMenu3. If you don't support that interface, it asks for IID_IContextMenu2. If that's not supported either, it then sends in IID_IContextMenu.) Writing a context menu is similar to writing a generic shell context menu extension. Although you're supposed to handle a view's context menu within the view, you can delegate this handling to the view's associated shell folder by using the IShellFolder::GetUIObjectOf function. Whenever the shell wants to display icons for the folders and subfolders of the namespace extension in the treeview, it calls IShellFolder::GetUIObjectOf function with the IID_ IExtractIcon parameter. The view associated with a folder can use the same function to retrieve icons for its items. Step 5: More UI Objects And now you're at the final step. Here, you'll deal with some more UI objects and drag-and-drop methods. A namespace extension can be a drop source, target, or both, depending on your needs. As always, start by creating a new shell namespace extension project with the AppWizard. In step 3 select the Drop Source, Data Object, and Drop Target checkboxes. In step 4, select List View | Mirror a local directory for the Shell View, then click Finish. This generates a namespace extension project that acts as both a drop source and drop target. The drag-and-drop operations use several new interfaces. These interfaces are highlighted in Figure 12 . Adding drag and drop to a namespace extension should be familiar if you've ever programmed OLE drag and drop. There are three steps to implement a drop source, and four for a drop target. The listview is the drop source. On a drag notification, the PIDLs of the selected items are copied into an array and the shell view's corresponding IShellFolder:: GetUIObjectOf is called by passing in the PIDLs and riid as the IDataObject parameter. Next, a CDataObject is constructed in the IShellFolder:: GetUIObjectOf implementation. It's a class that is multiply derived from IDataObject and IEnumFORMATETC. The data object contains member functions that return information regarding the data, and the data itself when needed. The enumeration interface contains information regarding the supported clipboard data types. Finally, a CDropSource class, derived from IDropSource, is constructed and a call to the Win32® API DoDragDrop is made. Creating a drop target takes four steps. To let the shell know that your namespace extension is a drop target, you need to specify the value of SFGAO_DROPTARGET (along with the other regular SFGAO flags) in HKCU\CLSID\{CLSID}\ ShellFolder\Attributes, and also send the appropriate flags in the root item's IShellFolder::GetAttributesOf method. Once the DLL is registered as a drop target, when an item is dragged over the root item of the namespace extensions, the shell calls IShellFolder::CreateViewObject with the riid parameter set to IID_IDropTarget. Next, the IDropTarget:: DragEnter function is called to find out if a drop can be accepted and, if so, what effect it has. A pointer to IDataObject is passed in to this call so that you can use IDataObject:: QueryGetData to find out if you can handle the data in it. Finally, the IDropTarget::Drop is called when the object is dropped. You can use the IDataObject::GetData member to get the incorporated data. You can also register the listview as a drop target by calling the RegisterDragDrop API. The steps involved in handling the drop are the same as when you create a IDropTarget interface. That's it! You now have a working namespace extension that's generated by using all the relevant options in the NameSpace Extension AppWizard. It's by no means a complete namespace extension, but it provides the starting point from which you can develop a complex and much more functional extension. The NameSpace Extension AppWizard The plethora of interfaces that need to be implemented before a simple namespace extension sees the light of the day is a major obstacle to starting to learn about namespace extensions or writing one from scratch. I recently wrote a full-fledged FTP client/namespace extension. As I wrote it, it occurred to me that I was using much of the code from other samples and the core code for a namespace extension might only be a small part of the complete code. It occurred to me that for my next namespace extension, I should not resort to cutting and pasting, instead write an AppWizard to generate most of the code needed for a basic namespace extension. First, copy the file NSExt.awx into the Template directory under your Visual C++ (5.0 or 6.0) installation. When you choose to create a new project, the Shell NameSpace Extension AppWizard appears in the New dialog (see Figure 13). |
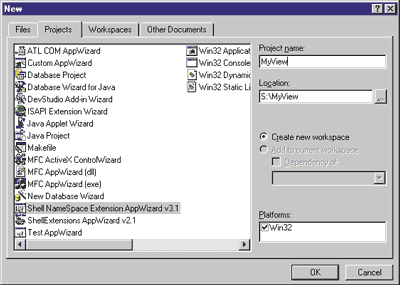 |
| Figure 13: NameSpace AppWizard for New Projects |
The AppWizard contains five steps: DLL Information, Folder Attributes, UI Objects, View Information, and Files to be Generated. The DLL Information dialog contains four fields. The DllInfo group collects information that goes into the project's .def file. Use Short File is enabled if the target file's name is more than eight characters. Checking "Register DLL after build" adds a custom build step to the project that invokes RegSvr32 on the target DLL. The Component Info group is used to obtain the variable name for the class ID. The dialog also allows the developer to create a GUID. The private functions option lets you decide whether the first letter of private functions should be lowercase or uppercase. The Verbose option toggles verbose help information for interfaces and their functions.
If you hit Finish in the first step, the wizard produces a namespace extension project with the default attributes from the subsequent steps.
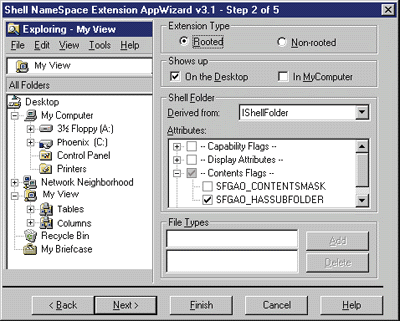
The second dialog, Folder Attributes, collects information about the namespace extension—where it shows up (Desktop or My Computer), the interfaces from which it's derived, and the attributes of the root folder.
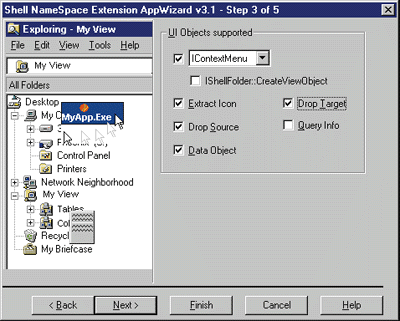
The third dialog generates sample code for an extension's UI objects. You can set up context menus, drag and drop, and icons for folders and items of the extension.
Step 4, the View Information dialog, gets information about the shell view for the folder objects of the namespace extension. For instance, you can select how it shows up in a list view, whether the extension includes menus or toolbars, and the shell folder icon. The information obtained here is used to update the registry key HKCR\CLSID\{CLSID}\ DefaultIcon.
The final step simply displays the interfaces to be generated as well as the default file names into which the definition and the implementation are generated. The names for the classes, the header files, and the implementation files can be set here, or the defaults can be used.
Epilogue
This article is a collection of the information I've gathered regarding shell namespace extensions over the past few years. With the help of two Microsoft developer support engineers, Strohm Armstrong and Hans Zeitler, I've been able to put this information to use in the form of an AppWizard that will smooth the path for other programmers.
|
From the March 1999 issue of Microsoft Internet Developer.
|