![]()
|
This article may contain URLs that were valid when originally published, but now link to sites or pages that no longer exist. To maintain the flow of the article, we've left these URLs in the text, but disabled the links.
|
 |
| John Allen and J.D. Meier |
Deployment in a Nutshell
Deploying a WebClass involves sending a CAB file to your Web server. When you run the PDW from your development machine, it sends your CAB file over the wire to Microsoft® Internet Information Server (IIS), and posts it to an isapi extension built in accordance with RFC 1867. At the Web publishing site, the Posting Acceptor (cpshost.dll) receives your CAB file, unpacks it, and registers your files. IIS Security
IIS provides three authentication settings: Allow Anonymous Access, Basic Authentication, and Windows NT Challenge/Response.
|
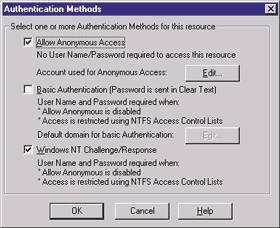 |
| Figure 1: Setting Authentication |
|
Before we dive too deep into the deployment process, we want to warn you of a few limitations of the PDW. First, when deploying a WebClass, your Web site must be running on port 80. Second, Windows NT Workstation does not support the use of the "Unpack and install server-side cab" option. Third, in order to use the "Unpack and install server-side cab" option, you must have Posting Acceptor 2.0 installed. Earlier versions of the Posting Acceptor do not support this option. Installing Posting Acceptor 2.0
If you need to verify whether you have Posting Acceptor 2.0 installed on your Web server, you can check Add/Remove Programs in the Control Panel. You should see a Microsoft Posting Acceptor 2.0 entry in the list of installed programs. If you do not see this entry, or it is not version 2.0, you will need to install Posting Acceptor 2.0. If you have an existing version of the Posting Acceptor, you should remove it using Add/Remove Programs before installing the updated version. The setup file for Posting Acceptor 2.0 can be found in a number of Microsoft products (see Figure 2). However, the Windows NT Option Pack 4.0 setup does not install version 2.0 of this package. Configuring the Server
Let's walk through the process of configuring your Web server for deployment. This process does not require making many configuration changes; you will mostly be verifying the default values. Consider this more of a checklist because your Web server should already be configured properly by default. However, while your default Web site may already be configured properly, your virtual servers will likely need some of these configurations applied. |
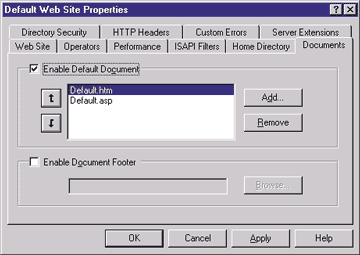 |
| Figure 3: Specifying a Default Document |
| First, you will need to verify that you have a default document specified. The PDW looks for the default document and searches the first line for a special <META> tag that tells it where the PostInfo.asp file is located. Open the Service Manager and select the Web site you are configuring for deployment. Right-click on the Web site and select Properties. Once the Properties window appears, select the Documents tab (see Figure 3). Make sure the Enable Default Document option is selected. If you do not see any documents in the list, you will need to create a default.htm file. If you see multiple documents in the list, take note of the first one. Open this file in Notepad and verify that it has the following <META> tag on the first line: |
|
|
If your default document does not have this <META> tag, you will need to add it. You should also open Windows® Explorer at this point and confirm that the PostInfo.asp and cpshost.dll files exist in the C:\InetPub\scripts directory (or in the appropriate directory for your setup). |
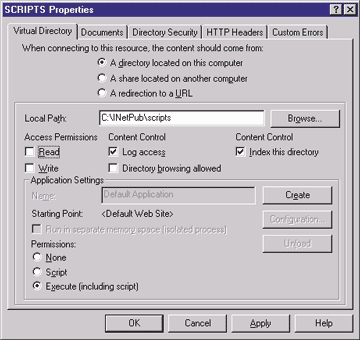 |
| Figure 4: Scripts Virtual Directory |
|
Next, you need to have a ..\scripts virtual directory with execute permissions. Open the Internet Services Manager and expand the tree to show the directories beneath the Web site that you are configuring for deployment. Confirm that you have a virtual directory called scripts that points to the physical directory C:\InetPub\scripts. If this virtual directory already exists, you will need to verify that Execute permissions are enabled. Right-click on the scripts virtual directory and select Properties. In the Virtual Directory tab verify that the "Execute (including script)" option is selected (see Figure 4). If you do not see a scripts virtual directory, you will need to create it. To create this directory, right-click on your Web site and select New | Virtual Directory. Enter "scripts" for the Alias, click Next, and then browse to your C:\InetPub\scripts directory and click Next again. Make sure that the "Allow Execute Access (includes Script Access)" option is selected and click Finish. Using Windows Explorer, confirm that the NTFS permissions for the C:\InetPub\scripts physical directory are set to read and execute (RX) for the appropriate Windows NT accounts. Remember, if you are using anonymous access, you need to assign these permissions for the IUSR_computername user account or the Everyone group. Otherwise, you need to assign these permissions to the specific Windows NT accounts that will be deploying WebClasses. Next, you need to have a directory for deployment. If you do not already have a deployment directory, create a new directory under your C:\InetPub\wwwroot directory using Windows Explorer. This directory needs to have write permissions enabled in IIS. To do this, open the Internet Services Manager and expand the tree to show the directory to which you are deploying. This directory should be located under the Web site you are configuring for deployment. Right-click on the directory and select Properties. In the Directory tab (if your deployment directory is located in a directory directly under the wwwroot directory) or in the Virtual Directory tab (if your deployment directory is located elsewhere), enable the Write option under Access Permissions (see Figure 5). If you see a Create button on this tab, click this button, which marks the directory as an application. If you see a Remove button on this tab, your directory is already marked as an application. Using Windows Explorer, set read, write, execute, and delete (RWXD) NTFS permissions for your deployment directory. |
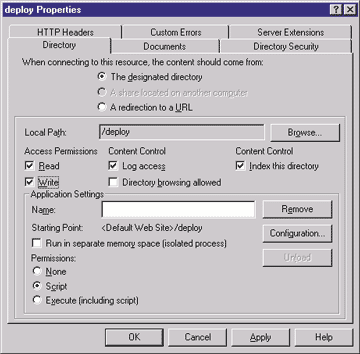 |
| Figure 5: Enable the Write Option |
|
If you plan on deploying your WebClasses via the anonymous user, you will need to add an entry to your registry.
To enable anonymous upload, create a new REG_DWORD value named AllowAnonymous under the HKEY_LOCAL_
MACHINE\Software\Microsoft\WebPost\Acceptors\CPSHost registry key. Set the value of this new entry to 1 (see Figure 6). For more information on anonymous uploads, see article Q179566 in the Microsoft Knowledge Base (http://support.microsoft.com/support/kb/articles/Q179/5/66.asp). Unless you are digitally signing your CAB files, you will need to make another registry edit. To allow unsigned CAB files to be deployed to your Web server, you will need to change the ComponentRequiresSignature registry entry under the HKEY_LOCAL_ MACHINE\Software\Microsoft\Publishing\RemoteInstaller key to the value No (see Figure 6). The final step before testing the Posting Acceptor is to update the necessary system files on your Web server (see Figure 7). Your WebClass will use these system files during runtime. Since some of these files are in use by your system, the easiest way to update them is to create a Standard Setup Package of an empty WebClass project. You will only need to do this once. When creating your Standard Setup Package, be sure to uncheck your empty project DLL in the Include Files step of the PDW. The Standard Setup Package should only include the WebClass runtime, the Visual Basic 6.0 runtime, and the OLE Automation files. When you install the Standard Setup Package on your Web server, your system may need to reboot to update these system files because they are in use. To test the Posting Acceptor, create an ASP page that uses a form-based file upload (see Figure 8). Replace deployment_directory in the <FORM> tag and in the default value of the second <INPUT> tag with the actual deployment directory name. After you make these modifications, save this file as upload.asp in your deployment directory. Next, you must follow five steps to post a file to your deployment directory:
Configuring the Client
Compared with the Web server, the client configuration is much simpler. All that you need installed on the client is Web Publishing Wizard version 1.53 or later (as of this writing, the most recent version is 1.6) and the PDW. You will probably find that your machine already has these two components installed. The Web Publishing Wizard installs the WebPost APIs. The PDW uses the WebPost APIs to communicate with the Web server. Creating the Internet Package
Before you can deploy your WebClass, you need to create an Internet package using the PDW. An Internet package is a CAB file that contains your project DLL files and all associated files. The CAB file will be unpacked on the Web server and the necessary components will be installed and registered.
The Deployment Process
At this point, you are ready to deploy your Internet package (CAB file) to your Web publishing site (your target Web server). To begin deployment, follow these steps:
|
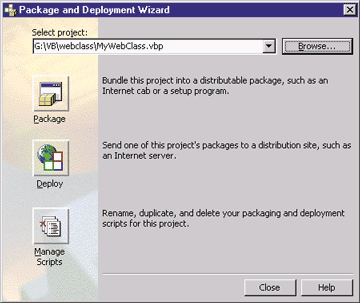 |
| Figure 9: Deploy Icon |
|
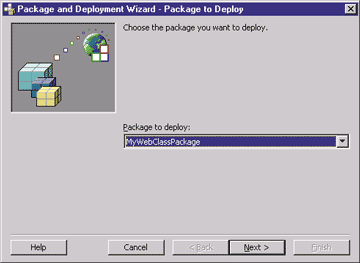 |
| Figure 10: Package to Deploy |
|
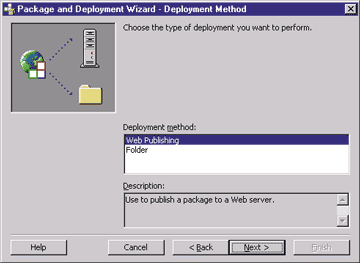 |
| Figure 11: Deployment Method |
|
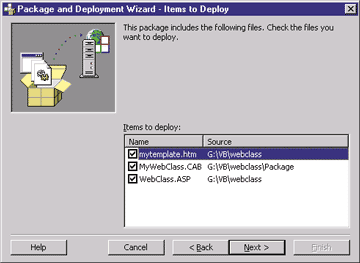 |
| Figure 12: Items to Deploy |
|
 |
| Figure 13: Web Publishing Site |
|
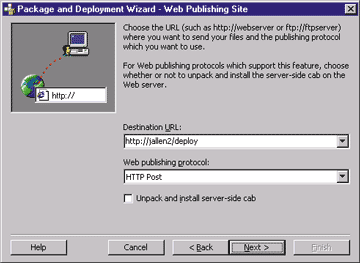
On the Web Publishing Site screen (see Figure 13), you have a few options to confirm. Enter the URL of the directory to which you are publishing. Make sure that HTTP Post is selected as the Web publishing protocol. Check "Unpack and install server-side cab" and click Next. |
 |
| Figure 14: Saving the URL Prompt |
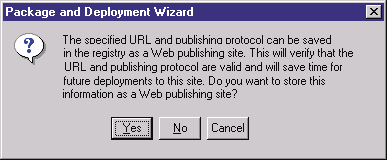
| You may see a prompt to save the URL and publishing directory in the registry (see Figure 14). Click No at this point. If your deployment is successful, then next time you may want to save the information to the registry by clicking Yes. Clicking Yes at this time will save the information under the following registry key: |
|
|
If this is the first time that you are unpacking CAB files at this site, you will see a dialog warning you that the wizard has not confirmed whether the server can unpack the CAB file (see Figure 15). Click Yes to continue. |
 |
| Figure 15: CAB File Dialog |
|
Uploading Errors At this point, you may encounter one or more of the following error messages. |
|
| This error message can indicate a number of possible problems. The most common problem is that Posting Acceptor is missing or is installed incorrectly. Please refer to the previous section, "Installing Posting Acceptor 2.0," for suggestions. You can also check to make sure that the URL matches the post type that you have chosen. In this case, we are posting to a Web site so we need to make sure that HTTP is selected as the protocol and that the destination URL begins with http://. Also, make sure you have a default document specified and that the <META> tag is specified correctly. |
|
|
This error may occur if you have typed an incorrect URL or if the URL does not refer to a correctly configured Web server. Make sure that the URL is correct and the Web server is configured properly. For proper configuration, you may need to install the Microsoft Visual Studio server-side setup on the Web server. First, check to make sure that the Web server is running. Next, confirm that you do have a PostInfo.asp file sitting in your Web publishing site's C:\InetPub\scripts directory, and that the <META> tag in the default document has the correct path to the PostInfo.asp file. This error message could also indicate that the authenticated user does not have read permissions to the C:\InetPub\ scripts directory. |
|
|
There are a few things to check when you see this error. Posting Acceptor 2.0 may not be installed correctly. You may be posting to a Windows NT Workstation that does not support CAB unpacking. PDW may be retrieving cached information from the registry that has been saved from a previous deployment. |
 |
| Figure 16: Deployment Report |
|
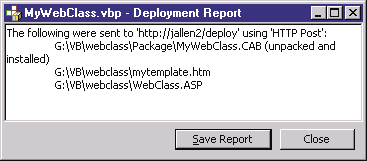
If all went well, you will see a dialog that provides you an option to save a report containing the files deployed to the server along with their location (see Figure 16). Deployment Errors Let's walk through the possible errors you may run into during deployment. |
|
| This error is addressed in Knowledge Base article Q223499 (http://support.microsoft.com/support/kb/articles/Q223/4/99.asp), and may occur if you have included files that are currently in use by the Web server, such as the Visual Basic 6.0 runtime or other system files. This error will also occur if you are trying to update your DLL without restarting the Web services of the Web publishing site. One way to stop the Web services is by entering the following command from a command prompt: |
|
| To restart the Web services, enter net start w3svc from a command prompt: |
|
| This error message usually indicates that Execute permissions have not been enabled on the scripts virtual directory. |
|
| This error suggests one of two possibilities: you do not have Write permission enabled for the deployment directory, or the directory you specified does not exist. |
|
| This error message indicates that you are only using anonymous access, and that the IUSR_computername account does not have the proper NTFS permissions. The IUSR_computername account needs read and execute (RX) permission to the C:\InetPub\scripts directory and read, write, execute, and delete (RWXD) permission to your deployment directory. |
|
| This error message indicates that the authenticated account does not have the proper NTFS permissions. The authenticated account needs read and execute (RX) permission to the C:\InetPub\scripts directory and read, write, execute, and delete (RWXD) permission to your deployment directory. It can be helpful to enable only Basic Authentication which will prompt you for credentials, so you will always know who the authenticated user is. |
|
| This is a friendly message straight from the Web server letting you know that you have to modify the ComponentRequiresSignature key in the registry. See Knowledge Base article Q225120 (http://support.microsoft.com/support/kb/articles/Q225/1/20.asp) for more information. |
|
| This is typically a client-side error and means that you need to install Web Publishing Wizard 1.53 or later. This error message also occurs if in deployment step 6 you get an error message and continue. Go back and address any error messages that you received in step 6. |
|
|
This error indicates that you do not have Posting Acceptor 2.0 installed and you are trying to unpack and install your CAB file on the server. And don't worry. If you can get past these errors the first time you deploy a WebClass, it will get easier and easier to do in the future. |
| Do you have questions for FAQ? Send mail to faq@microsoft.com. |
From the September 1999 issue of Microsoft Internet Developer.