February 1999
![]()
Code for this article: Feb99BugSlayer.exe (339KB)
John Robbins is a software engineer at NuMega Technologies Inc. who specializes in debuggers. He can be reached at http://www.jprobbins.com.
I have been under some pressure lately. Some of the small to medium column topics I have are threatening a wildcat strike if I do not give them a chance to be published. To make matters worse, several updates and tips were threatening a sympathy strike. Since I do not want to have an idea dispute on my hands, I agreed to arbitration by the National Column Topic Relations Board (NCTRB), and the verdict is that I need to let all topics have their chance. Fair enough. Bugslayer is an equal opportunity topic column! This month I want to cover a few smaller, but very useful, debugging and development topics. I will cover the latest information on IMAGEHLP.DLL, a new SUPERASSERT, and a little-known yet useful utility that comes with the Platform SDK and can speed up your code.
More IMAGEHLP.DLLI have been amazed and pleased at the volume of email I have gotten concerning the IMAGEHLP.DLL symbol engine-over 400 at last count! While some folks are just trying to figure out how to get the one that supported source and line lookup, others are looking at ways to maximize their bugslaying. While our industry as a whole gets a bad rap about bugs, I have been very encouraged by the number of developers who are doing their best to write bug-free code. Since so many people have expressed an interest in the IMAGEHLP.DLL symbol engine, I want to cover its latest and greatest changes. This is especially important since there have been, as far as I can tell, five different versions of IMAGEHLP.DLL released in the last year.
First the good news. The new source and line functions have been documented in the Windows® 2000 Beta 2 Platform SDK as well as the October 1998 MSDN, so at least you know that the functions will be around for a while. The latest IMAGEHLP.DLL, at the time of this writing, is version 5.00.1878.1, which comes with the Windows 2000 Beta 2 Platform SDK. While this is almost a drop-in replacement for previous versions, you will still need to get this SDK for the IMAGEHLP.H header and IMAGEHLP.LIB files. I have successfully used version 5.00.1878.1 on development machines running Windows 98, Windows NT® 4.0, and Windows 2000 Beta 2 . There will be a newer version that comes with Windows 2000 Beta 3.
There are some new functions in the latest IMAGEHLP.DLL, including ones for Win64 support. Only one new function is of current interest: CopyPdb. While you can tell by the name that it has something to do with copying PDB files, the magic is in the last parameter, StripPrivate.
BOOL CopyPdb(CHAR const *SrcPdb, CHAR const *DestPdb,
             BOOL StripPrivate);
Now you can strip your local and private symbols out of a PDB. So what? This API makes it much easier to get a symbol file that you can potentially distribute to beta testers that are having a problem on Windows 2000. For example, if you incorporated the CrashHandler code from my August 1998 column into your application, you can use the stripped PDB files with the StackWalk API to get your internal function names in the stack trace.
Some of the bad news with the latest IMAGEHLP.DLL is that it now hard links against MSDBI.DLL-instead of dynamically loading MSPDB50.DLL as in earlier versions- to read PDB files. The problem is that MSDBI.DLL is not redistributable. This makes it a little tough for your users to run your application when the "Unable To Locate DLL" dialog pops up. MSDBI.DLL is part of Windows 2000 Beta 2, but is not part of Windows NT 4.0 or Windows 9x. This is expected to be corrected in the next beta. Since IMAGEHLP.DLL will use DEBUGHLP.DLL there will be no dependency on MSDBI.DLL.
Like most of you, I still have to support previous operating systems. Until the next beta, the best thing to do is use IMAGEHLP.DLL version 5.00.1678.1, which dynamically links to MSPDB50.DLL. The 1678 version of IMAGEHLP.DLL does the right thing concerning different PDB formats. It first tries to load MSDBI.DLL, and if that is not found it will load MSPDB50.DLL, so it works with both Visual C++® 5.0 and 6.0. To use it with Visual C++ 6.0, copy MSPDB50.DLL to MSPDB60.DLL. If you want to get symbols from the field, you will have to compile with CodeView® symbols and use .DBG files to get them. Keep in mind that MSPDB50.DLL, like MSDBI.DLL, is not redistributable.
This month's code file includes both versions of IMAGEHLP.DLL mentioned previously. I also updated the BugslayerUtil.DLL CSymbolEngine class to return the version of IMAGEHLP.DLL and MSDBI.DLL or MSPDB50.DLL that is in memory. Since the PDB-reading DLLs do not load into memory until needed, the new GetPDBReaderVersion will fail, so you will need to load a module first to get the version. I also added to CSymbolEngine all the bug workarounds for the IMAGEHLP.DLL symbol engine that everyone has found. Future versions of CSymbolEngine should straighten out these issues. Such is life in beta-land.
This is enough about IMAGEHLP.DLL, but I have one question for everyone: how many of you are interested in having a COM interface on the symbol engine code? Please let me know.
It's a MessageBox. It's a StackTrace. It's SUPERASSERT!The other day I had an ASSERT trigger in my code. I use ASSERTs all over the place, and I always stop immediately when the ASSERT fires and fix it. This case was weird because an API call was failing and I could not see why. As usual, it only failed every once in a while, so it was hard to duplicate. I was completely stumped because it looked like everything was correct going into the function.
I put the problem on the back burner for a bit and upgraded to Visual C++ 6.0 in the meantime. When I was looking through the What's New section, I noticed the new pseudoregister ERR could be used in the watch window. ERR stands for the value in the last error field of the Thread Information Block (TIB). Make sure you type ERR with all capital letters. If you do not, you will be looking at the err C runtime error value, not the Win32® last error value. (I wish the Visual C++ team had called the new value LERR to avoid this conflict.) The ERR pseudoregister is a helpful feature because the Visual C++ debugger does not support looking at the segment registers in the memory window, which happens to be where the TIB is stored.
I worked on my application some more and the odd ASSERT fired again. In the ASSERT dialog, I pressed Retry to pop into the debugger, typed "ERR,hr" in the watch window, and it immediately told me that the input buffer was too small, error 122. If I'd seen the last error value in the ASSERT message box, I could have fixed the problem in the first place and not wasted any time.
About this same time, Vincent Chung sent me email suggesting that I look at doing an ASSERT with stack traces. As I got to thinking about ASSERTs in general, I wanted to make sure that I did three things with my new ASSERT macros. The first, obviously, is to show a stack trace in the ASSERT message box. I wanted to make it optional because you generally have an idea where the problem is from the ASSERT message alone. To me, the value of the stack trace is when you get an ASSERT you do not expect, like in the exception handler of a __try...__except block.
Second, since I was going to show the last error value, I needed a way to easily add modules that have message tables to a list so the new ASSERT could decode them as well. Some of you might be wondering why I am stressing last error values. I use them not so much to give the user information, but to give myself a hint why a problem occurred. Setting them takes just seven Intel assembler instructions and can be the difference between solving the problem in minutes or a day. They are also one of the best ways to internationalize the errors you display to the user because they support better placement syntax.
Finally, I wanted to make it possible to have the ASSERT, without always showing the message box. At first, that might seem counterproductive, but I assure you it is not! If you are working in a development shop that takes quality seriously, you probably have some people whose job is to write automated scripts to run your application. I am willing to bet big bucks that you only run these scripts on your release builds. The real benefit is to run them on your debug builds! That is where you have all the extra checking, so you should be testing those as well. Unfortunately, those nice scripts never seem to handle the random ASSERT message box that keeps you from fully testing the code and makes life difficult for the script developer. To allow for this, I let you set up the ASSERT macro to send its output through OutputDebugString instead of MessageBox. If you run one of those utilities like DBMON.EXE, you can capture and review the notifications to see if there are any problems. Since you are automating a debug version, I trust you are able to install a debug version of your program. See Tip 17 at the end of this column for more discussion of installation programs.
The code for ASSERT is included with this month's code distribution file and is contained in the continually updated BugslayerUtil.DLL. The source implementation is in the DiagAssert.h and DiagAssert.cpp files. The two important macros are ASSERT and SUPERASSERT. The ASSERT macro behaves as you would expect and, by default, shows the error in a message box as well as through OutputDebugString, but does not show the stack trace. The SUPERASSERT macro will always show the stack trace. If you want to always see the stack trace in all ASSERTs, the SETDIAGASSERTOPTIONS macro takes the OR'd, self-explanatory values DA_USEDEFAULTS, DA_SHOWMSGBOX, DA_SHOWODS, and DA_SHOWSTACKTRACE to set the global display options. If you have your own message tables that you would like to add, just pass the HMODULE of that module to the ADDDIAGASSERTMODULE macro. Figure 1 shows all of this in action with a custom error message and a stack trace in the ASSERT message box.
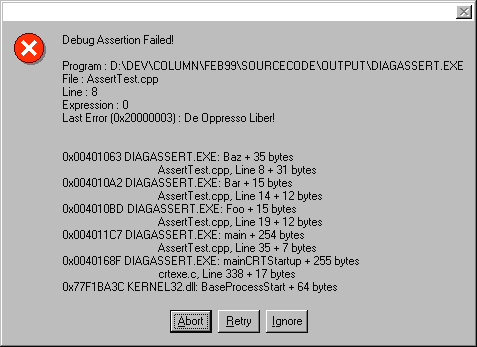
Figure 1 SUPERASSERT in Action
Now that I have told you more than you ever wanted to know about ASSERT, it is time to move on to one of my favorite utilities in the Platform SDK.
WST Finally Works!One of the best-kept secrets in the Platform SDK is the Working Set Tuner (WST). It was such a good secret that it was broken for almost a year's worth of Platform SDK releases and only a few of us noticed. I was all set to write a replacement version for a Bugslayer column when the Windows 2000 Beta 2 Platform SDK arrived and I was quite surprised to see that Microsoft had gotten around to fixing it!
The WST is important because it helps you to reduce the number of pages in your working set. It does not reduce the size of your application, but it reduces the total number of pages that need to have resident in memory when your program is running. Your application runs faster because it makes fewer page faults, which can require upwards of several hundred thousand assembler instructions each! As a very smart person once said, "A page fault can ruin your day."
WST's job is to produce what is called an order file. This file tells the linker where the functions go in your binary. The most-called functions in your binary are placed in the first memory pages. As you can guess, WST only works on C/C++ programs. WST only runs on Windows NT 4.0 and Windows 2000, but the benefits also extend to Windows 9x.
Before I go any further, I have to warn you that WST is not a panacea for your performance problems. If you have major problems before running your application under WST, you will have major problems after relinking with the WST-produced order file. Do not even think about using WST until the day after total code freeze because it will not do you much good with things in any state of flux. In addition, it is very easy to misuse WST and negate any benefit that it would provide.
The key to getting the maximum value from WST is determining, to the best of your ability, the most common code paths users will take through your application. If you run all possible scenarios, WST will only provide a minimal improvement. While all of your fellow developers always jump to the Easter egg buried in the About box so they can see their name, I seriously doubt that is the first thing your users do. It might take some research and observing typical customers, but it will pay off in the end. You will also want to consider including the user's typical machine configuration and system load. If you use an automated testing tool, you should script that scenario so that you can consistently duplicate it for multiple WST runs.
I also need to clarify some misconceptions about optimizing for speed versus optimizing for size. While you might think that the release build default that Visual C++ gives you-optimized for speed-is the proper one, that is not the case. If you have ever looked at the size differences between optimized for speed and optimized for size, you might not see that much difference. However, optimized for speed is always larger.
While you might get a very small fractional performance boost, what happens if optimizing for speed causes only one or two additional page faults? You're using WST to minimize the number of page faults because each one is very costly. With extra page faults, you will lose any performance gain and also cost yourself far more performance than you would have gained in even the most optimal case. If I have not convinced you to change to optimize for space, you might want to know that Microsoft optimizes for space. All release device drivers, and Windows NT itself, are built to minimize space. I have been told that all of their applications are built that way as well.
It's easy to explain what WST can do for you, but coming up with a truly killer app to demonstrate it is not an easy task. WST is most effective with a real-world application containing a good deal of code and, as I pointed out earlier, a very well thought out common usage scheme. After some pondering, I thought I would limit the demonstration to show how to improve the startup of the MFC WORDPAD sample. It's not only the largest code sample included with Visual C++; my test lets everyone try it without requiring an automated testing tool.
My test consisted of running WORDPAD four times from a command window with the following command
WORDPAD ..\WORDPAD.CPP and closing WORDPAD after each start. I ran from the directory where WORDPAD.EXE was built. After the fourth run, I used SPY++ to look at the working set and the number of page faults. The numbers are shown in Figure 2. Keep in mind that you are looking at optimizing an approximately one-second operation. If you extrapolate that out to a real-world application, you can imagine serious improvements in working set size.
To give you an idea about the changes WST can make to your application, Figure 3 shows you the initial portions of the map files for both builds. Please note that I manually undecorated the function names to make the tables easier to read. Why does the normal build have all the functions coming out of the same .OBJ? When resolving functions and placing them in the binary, LINK.EXE just starts with the first .OBJ on its command line and takes the functions in the order they come from that OBJ. In the order file linked map file, the first functions are what you would expect from an MFC application: all the message map functions. The first default build function, CButtonDialog::DisplayMessageBox, appears at offset 0x00003ED8 in the ordered build.
The first step to using WST is to install the Windows 2000 Beta 2 Platform SDK. You will need to put the SDK bin and bin\WinNT directories in your path so you can access the WST tools from a command window. WST needs to know what to watch, and you must create a directory called WST on your C: drive. Yes, WST uses the hardcoded path. In C:\WST, create a text file called WST.INI and put the items below in it. Instead of WORDPAD.EXE, put your binary's name. You can put as many binaries as you want under the [EXES] section. Ideally, you will place all the binaries you developed for your application there, with each binary on its own line. WST uses a basic sampling snapshot method to determine which functions are executing at a particular instant. If you would like to increase or decrease the sampling time, you can specify a number in milliseconds. If you leave it blank, the default is 1000 milliseconds. I have never had a reason to change it. The documentation erroneously says the [PATCH IMPORTS] section is for tuning import entries, but it never defines what that is. This section is actually ignored and may be safely left out of the new WST.
[EXES]
WORDPAD.EXE
[TIME INTERVAL]
With that out of the way, I want to list the steps needed to get your Visual C++ projects ready to do a WST compile. It is up to you to decide if you want to create additional configurations or put the required flags into an existing configuration. In this month's sample code, I created additional configurations for the WORDPAD project so you could try out WST quickly.
Setting up Your Project for a WST BuildFollow these steps to configure your Visual C++ project for a WST build.
1. Set your Release configuration to optimize for minimum size. In the Project Settings dialog C/C++ tab, category General, select Minimum Size in the Optimizations combobox. This will set the /O1 flag in the Project Options edit control.
2. Optionally, create a new configuration inheriting the settings from your release configuration. In the WORDPAD sample in this month's code distribution, I called this Win32 Release WST Build. Select this new configuration before proceeding to the next step.
3. In the Project Settings dialog C/C++ tab, click in the Project Options edit box. Go to the end of the option flags and type in the /Gh flag. This tells the compiler to add a call to _penter at the beginning of each function. The WST _penter function is how WST gets notifications on each function call.
4. In the Project Settings dialog C/C++ tab, category General, Debug Info combobox, select either Line Numbers Only (/Zd), C7 Compatible (/Z7), or Program Database (/Zi). I always leave it on Program Database.
5. In the Project Settings dialog Link tab, category General, "Object/library modules" edit box, type in "WST.LIB" if you put the Windows 2000 Beta 2 Platform SDK lib directory in your LIB environment variable or specified it in the Visual C++ Options Directories. If it is not, type in the complete path to WST.LIB.
6. In the Project Settings dialog Link tab, Project Options edit control, move to the end of the text and type "/OPT:
REF" to have the linker bring in only those functions that are referenced.
7. In the Project Settings dialog Link tab, Project Options edit control, move to the end of the text and type "/WS:
aggressive" to tell the operating system to aggressively trim the working set for this application.
8. In the Project Settings dialog Link tab, category Debug, check the "Debug info" checkbox and select the "Both formats" radio button.
After you build your binaries, you can execute them, performing your runs with WST collecting the data. You may notice that your application runs a little bit slower. I always run each of my common scenarios a few times and under differing conditions to ensure I get the best data possible. When you end your application, you can look in the C:\WST directory and see the WST-generated files. The files of interest are those that you specified in the [EXES] section of WST.INI. WST can support up to 255 runs worth of data, so you will see some of the files with numerically incrementing file extensions.
WST also generates data for the exports of each DLL loaded by your application that has symbols in the current directory, your _NT_SYMBOL_PATH or _NT_ALT_
SYMBOL_PATH environment variables, or the WinNT directory, but you can ignore the ones you do not want. If you decide that you do not want to include startup or shutdown code in the collected WST data, you can run the WSTDUMP.EXE utility and specify exactly when to start and stop collecting.
For example, if the critical portion of your application is to record input and then calculate results, you might want to start your application and get the data entered. When you reach the critical portion, you can select the Clear and Restart radio button in WSTDUMP.EXE and then press OK. Once you do that, the data WST records will start with your critical portion.
Another reason to use WSTDUMP.EXE is if your application is like a service and never ends. With that type of application, you do not want WST to record the shutdown and cleanup functions, so select the Dump and Stop radio button and press OK to write out the WST data.
WST does have a few quirks where it does not generate any data. After some trial and error I found that it was related to symbol information and discovered the workaround that allowed me to get data generation consistently. The trick seems to be using REBASE.EXE to create the .DBG files for your individual binaries and placing them in the directory specified by your _NT_SYMBOL_
PATH environment variable. If you installed the DBG symbols for the operating system, they are probably in your %SYSTEMROOT%\Symbols directory. For each of your binaries, run the command
REBASE -b XXXXXXXX -x dir\symbols modulename
where XXXXXXXX is the current base address, dir is your symbols directory, and modulename is the name and extension of the module. Once the .DBG file is in the proper place, you can run your tests and the data will be generated.
The real work with WST occurs after you have completed all of your scenario runs. Each run by itself can produce valuable working set data, but you will be better off combining them. The WSTCAT.EXE program combines all the individual runs into a single .WSP file. In a command window, change to the C:\WST directory and type
WSTCAT modulename
where modulename is the one you want to combine runs for. If you want to combine various WORDPAD.EXE runs, type
WSTCAT WORDPAD
WSTCAT.EXE can only combine runs for a single module at a time, so run it on each module that you specified in the [EXES] section of WST.INI.
After you combine all of your runs, it's time to use the appropriately named WSTUNE.EXE program. This program actually produces the order file that is used by LINK.EXE to reorder your binary. While you can just type
WSTUNE modulename
to produce the order file, which is written to modulename.PRF, it is probably better if you use either the /O or /N command-line parameters. Without command-line options, WSTUNE.EXE writes tons of output to the console window, so it can run for quite a while. The /O option writes out what are called the tuned (*.DT) and not tuned (*.DN) files. This same data is written to the console when no command-line options are used. The names of the output files indicate what each of the data files contains and it can be informative to look at them. If you do not care about the tuned and not tuned data, the /N command-line switch just builds the .PRF order file. The order file is really not that exciting; it is just an ASCII listing of the functions used by your application.
Setting up Your Project To Use the Order FileOnce you have your binary's order file, you need to set up your project to use it. Follow these steps:
1. Copy the WST-created order file, modulename.PRF, from the C:\WST directory to your main project directory.
2. Optionally, create a new configuration inheriting the settings from your release configuration. In the WORDPAD sample in this month's code distribution, I called this Win32 Release Order File Build. Select this new configuration before proceeding to the next step.
3. In the Project Settings dialog C/C++ tab, category Customize, check the "Enable function level linking" checkbox. This turns on the /Gy switch to the compiler, but for some reason it does not show up in the Project Options edit box.
4. In the Project Settings dialog Link tab, type
/order:@modulename.prf
in the Project Options edit control.
5. In the Project Settings Dialog Link tab, type
/IGNORE:4037
in the Project Options edit control to ignore the "XXX does not exist; ignored" warning from the linker. WST includes static symbols in the order file, but they cannot be ordered as they are not public. This is a benign warning.
If you define your test scenarios correctly, the WST documentation says you should get a 25 to 50 percent code space reduction. If you combine WST with the new linker delay-load switch, as discussed in the December 1998 issue of MSJ by both Jeff Richter and Matt Pietrek, you might be able to get some noticeable speed improvements in your applications.
Wrap-upThe NCTRB dictated that I cover some small to medium-size column topics, and I did it. Now all future ideas are happy. Hopefully, I was able to show you something to make your development easier and your code run faster.
This month's code distribution includes the latest version of BugslayerUtil.DLL. In addition to the new ASSERT and SUPERASSERT macros, I have included two bug fixes. The first is to make the CrashHandler code that I presented in August 1998 work properly with Windows 9x. The second was thanks to a bug report from Frank McGrath. In the HookImportedFunctionsByName routine I introduced in February 1998, one of the support functions did not properly handle the case when the binary to hook did not have an import section. Thanks to Frank and everyone who reported the CrashHandler problems. It is great to know that readers are finding my code useful!
TipsTip 17 After you have figured out what product you are going to develop, gotten the signoff from marketing, designed the algorithms, and done the research, what is the very first thing that you develop? The installation, of course! This is one of the most important parts of your product and can be one of the best team bugslaying tools around. Unfortunately, most teams leave the installation to the last possible moment, and that leads to massive numbers of support calls. First impressions matter, and if your users have trouble installing, they will probably not look favorably on your product. If you have been in this business for more than five minutes, I am sure you can recall an installation horror story for some product that you have purchased.
If you develop the installation as soon as you can, you get the benefit of debugging the install over long periods of time. You will also make it easier for others in your organization to actually start using your software earlier. If your technical support engineers and others in your organization have something that they can install and start playing with well before you go to beta, you not only get extra testers for free, you also get real user input when you can actually do something about it.
Also, develop your installation so that it can install a debug build as well. If you are getting reports of problems because of a particular machine configuration, you can just install a debug build and quickly start finding the problem instead of spending the day fiddling around with the registry and different files.
Tip 18 Faithful readers know I believe in turning on maximum warnings with /W4. However, if you are using the supplied STL implementation or including headers from cross-platform code, /W4 can generate a ton of warning messages. Visual C++ 6.0 now supports setting and restoring the error level through the #pragma warning directive. When I include headers that do not compile with /W4, I bracket the problem headers with the appropriate warning levels like the following:
#pragma warning( push, 3 )

#include <vector>
#pragma warning( pop )
While this new feature is not a replacement for fixing the errors in the first place, it is a great help when you need it.
Have a tricky issue dealing with bugs? Send your questions via email to John Robbins at http://www.jprobbins.com.
From the February 1999 issue of Microsoft Systems Journal.