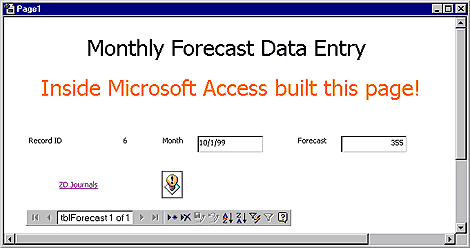
While Access 97 offers the Publish To The Web wizard to help you publish a static copy of data to the Internet, if you want to retrieve information from a Web page, it takes Herculean effort involving Active Server Pages, ODBC, and Web-based programming languages. Now, however, Access 2000 introduces Data Access Pages, or DAPs. With them, you create HTML forms in Access, publish them to the Internet, and any data that you enter into them goes directly into the database. That's all there is to it! In this article, we'll highlight a few of the DAPs' more noteworthy controls, then show you how to build a basic data entry page, like the one in Figure A.
Figure A: From this Data Access Page, we can enter data directly into the Monthly_Forecast table.

What DAPs aren't
DAPs combine the features of both forms and reports in one object. From Internet Explorer 5.0, you can enter data directly into controls, or view dynamic, statistical reports. But, while DAPs are superficially similar, they're neither a form nor a report. In reality, they're their own separate entity. As you create these pages, Access busily generates the necessary HTML and XML code behind the scenes that represents the functionality you want. Also, unlike forms and reports, Access saves these objects separately outside the main MDB file.
DAP controls
Figure B shows the Data Access Page (DAP) Toolbox. As you can see, it offers many of the same controls that are available for forms and reports: labels, textboxes, option groups, comboboxes, listboxes, and command buttons. In addition to these familiar controls, you'll find the BoundHTML, Marquee, Record Navigation, Boundhyperlink, and Hotspot Image controls. Before we create the data entry DAP in Figure A, let's quickly explore these new objects.
Figure B: The DAP Toolbox contains several new controls.

BoundHTML
On forms and reports, you use a textbox to display, enter, or change data. On DAPs, however, textboxes use more resources and should be used only when you want to enter or change data in a field. To display data, use the boundHTML control instead. For example, utilize this control to show the results of calculation.
Marquee
No doubt you've seen something like the marquee on many Web pages. This control scrolls the text you enter horizontally or vertically.
RecordNavigation
This control provides a variety of options that deal with, what else, record navigation. The left half of the control is just like the navigation buttons on a form. They let you move from one record to another. This control also offers buttons for deleting, saving, undoing, sorting, and filtering the records in a DAP.
Boundhyperlink
This control is handy when you have an existing hyperlink field in your table. Normally, with the hyperlink control, you add just one hyperlink and alias to the DAP. With the boundhyperlink, though, you set the ControlSource property to an existing hyperlink field. The hyperlink will then change accordingly from record to record.
Hotspot Image
The Hotspot Image is like the hyperlink control, only you use an image in place of the alias text. That is, you click on the image and it takes you to the indicated URL. Now that we've covered a few basics, let's use these controls to build a data entry form.
Build a data entry Web page
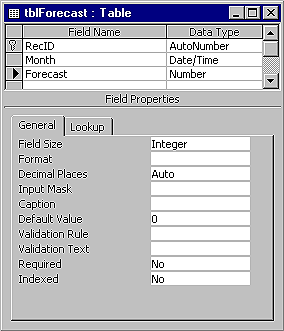
To begin, we'll create the table upon which we based our DAP. To start, select the Tables button on the Database Window, then double-click Create Table In Design View. Figure C shows the Design view of the tblForecast table. Use Figure C as a guide to build this table. The Field Properties shown in the figure are for the Forecast field. Make RecID the table's Primary Key. When you've finished creating the table, save it as tblForecast.
Figure C

Create the Data Access Page
To build the Forecast page, we could simply use the built-in wizard. However, by creating the page manually, we'll become more familiar with this new object and its controls. With this in mind, select tblForecast in the Database Window, then select Page from the New Object button's dropdown menu. Double-click Design view in the New Data Access Page dialog box to open a blank DAP. At this point, the DAP contains three sections: a title section, which says Click Here And Type Title Text; a body section, which says Click Here And Type Body Text; and an unbound section, which is where we'll place our controls. In addition to the DAP's Design view, Access probably opened the Field List dialog box. For now, either close it, or move it to one side.
Add a title
To add a title to the page, click in the title section. When you do, Access replaces the existing text with the cursor. Enter Monthly Forecast Data Entry. By default, Access centers the title, but you can change the text's alignment, as well as the font, point size, and text color. For now, we'll use the default settings. Next, let's replace the body text with a marquee.
Insert the scrolling text
To do so, click the Scrolling Text button in the Toolbox, then drop it on the left side of the page. Select one of the right sizing handles and expand the control so that it extends across the page. Now, click inside the control and type Inside Microsoft Access built this page! Next, change the font size to 24pt, and the color to red. By default, Access 2000 scrolls the text from right to left. To alter this behavior, change the control's Direction property in the property sheet.
Drop in the forecast fields
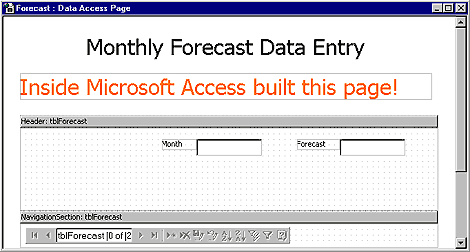
Now, we're ready to add the fields from the Forecast table. If you closed the Field List earlier, select the Field List button from the toolbar. When Access displays this dialog box, click and drag the Month and Forecast fields from tblForecast into the unbound section. After you drop the first control, Access renames this section to Header: tblForecast. Also notice that Access highlights the section as you drag controls over it. Figure D shows the page's Design view at this point.
Figure D: We added a marquee control and two textbox controls to the DAP.

Normally, you probably wouldn't add the RecID field to a data entry page, but let's do so anyway so that we can see how the BoundHTML control works. To begin, select the Bound HTML button from the Toolbox, then drop the control on the left-hand side of the header section. After Access inserts the control, click the Property Sheet button on the toolbar and choose RecID as this control's ControlSource. If you want, you can also add a label next to RecID. Enter Record ID as the label's text.
Place a hyperlink and hotspot image
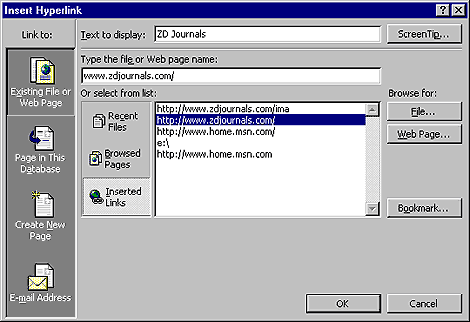
As our final step, we'll add a hyperlink and hotspot image to the bottom of the page. To do so, first select the Hyperlink button from the Toolbox and drop it in the blank area below the RecID control. When you do, Access displays the Insert Hyperlink dialog box, shown in Figure E.
Figure E: The Insert Hyperlink dialog box provides many different ways to add a hyperlink to a DAP.

This dialog box offers several different options for inserting a hyperlink. For our purposes, we'll use an existing Web page at ZD Journals. In the Text To Display field, type ZD Journals, then enter www.zdjournals.com as the Web page name. Access automatically adds the http: and backslash portions to the address. Click OK to insert the hyperlink into the Data Access Page. To add the hotspot image, click the Hotspot Image button on the Toolbox, then drop it next to the first ZD Journals link. When Access opens the Insert Picture dialog box, select Tips.gif from the C:\Windows\Web directory, then click OK. Next, Access displays the Insert Hyperlink dialog box once more. This time, enter www.zdjournals.com/ima as the Web page name. Click OK to place the link on the DAP. Congratulations, you've just completed your first interactive Web page! Now, let's enter some forecast results into the finished product.
Your first data entry Web page
To view the Data Access Page, click the Page View button on the toolbar. When you do, Access displays the DAP shown in Figure A at the beginning of this article. Of course, unlike the figure, your marquee text should scroll from right to left across the screen. Now, enter 10/1/99 as the month, then press [Tab] to move to the Forecast field; enter 355 in this field. Unlike in forms where the cursor automatically moves to the next record, in DAPs, you must save the record first. Click the Record Save button on the navigation bar, then click the New Record button to add a new record.
Verify the entry
To verify that the data actually made it into the tblForecast table, switch to the Database Window and double-click tblForecast to open it. As you can see in Figure F, the table contains the data that we entered.
Figure F: The DAP entered our data directly into the table.

To see how this DAP works on the Internet, we've placed it on our FTP site at ftp.zdjournals.com/ima/forecast.html. In order for it to work, you must use Internet Explorer 5.0.
Copyright © 1999, ZD
Inc. All rights reserved. ZD Journals and the ZD Journals logo are trademarks of ZD
Inc. Reproduction in whole or in part in any form or medium without
express written permission of ZD Inc. is prohibited. All other product
names and logos are trademarks or registered trademarks of their
respective owners.