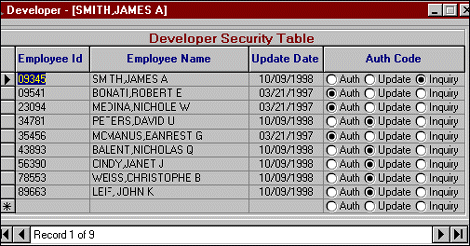
There's been a lot of talk in the computer industry about how difficult it is to access mainframe data with Visual Basic. Well, that's no longer true--the new MS ADO Data Control 6.0 that comes with VB 6.0 allows users to easily connect to any database server. In this article, we'll show you how to access IBM DB2 mainframe tables for MVS using the MS ADO Data Control, without writing any code. We'll also show you how to modify the data with a simple click of the mouse and just a few keyboard strokes. When we're done, we'll have a data grid, shown in Figure A, that allows you to insert, update, and delete records on a mainframe.
Figure A: The data grid we'll create can be used for inserting, updating or deleting records on a mainframe.

Database server connections are made easy in VB 6.0 using either OLE DB or ODBC Providers. This newest version of VB comes with an OLE DB Provider for Access, SQL Server and Oracle databases. The ODBC Provider maps OLE DB interfaces to ODBC API functions. With the ODBC Provider, OLE DB users can connect to a database server through the existing ODBC drivers. For more information about OLE DB and ODBC Providers, and ADO technology, you can download a white paper called, "ADO and SQL Server Developer's Guide," by Joyce Chen and Richard Patterson from the Web site http://msdn.microsoft.com/vbasic/.
For our project we didn't look for an OLE DB Provider for Mainframe databases--we opted to use a third-party ODBC driver instead. We currently use Shadow Direct's 32-bit ODBC driver for Windows 95/98/Windows NT 4.0 from NEON Systems, Inc. to access our DB2 mainframe tables. You can download the Shadow Direct 32-bit ODBC driver for free from the Web site www.neonsys.com/. The filename is Neonw32.exe, size 6,296 K, version V3.02 (09/15/1998). Shadow Direct ODBC drivers have proven to be very stable, are easy to set up, and provide a fast connection to our DB2 Mainframe tables.
The database table and controls
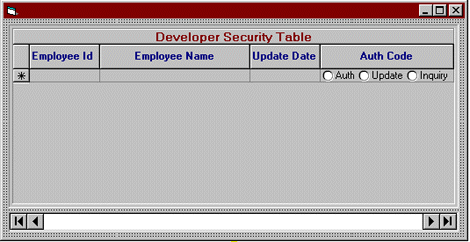
Our project is built using a simple form with an ADO Data Control for connecting to a DB2 mainframe table, as shown in Figure B.
Figure B: We used this simple form for easily accessing mainframe data.
Our example database table, called ISI_PGE_AUTH_PGM, has four fields: Employee ID, Employee Name, Update Date, and Auth (Authorization) Code. The Authorization Code specifies an employee's database privileges, and can be Authorize, Update, or Inquiry.
The Apex True DBGrid Pro 5.0 (OLE DB) grid is used for accessing the data, and the Sheridan panel control is used for creating the 3D border of the grid. The combination of these controls allows you to insert, update, or delete any records in our ISI_PGE_AUTH_PGM table.
ADO Data Control Setup
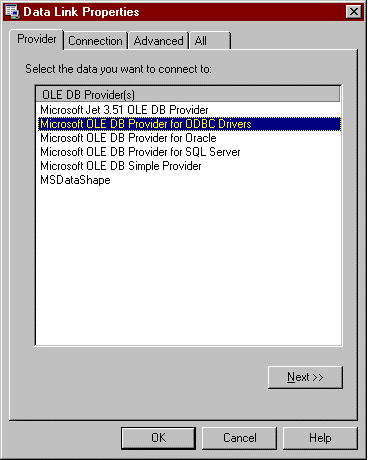
Let's start to build our project. Select Properties for the ADO Data Control and click on ConnectionString. The Data Link Properties dialog box appears with Microsoft OLE DB Provider for ODBC Drivers highlighted as a default, shown in Figure C. Click on the Next button or on the Connection tab.
Figure C: Use the Data Link Properties dialog to select the OLE DB Provider for the ADO Data Control.
In the Connection tab, shown in Figure D, select Use Data Source Name to choose an existing Data Source Name (DSN) or select Use Connection String to create a new DSN.
Figure D: The Connection tab allows you to verify if you can make a connection to the mainframe.
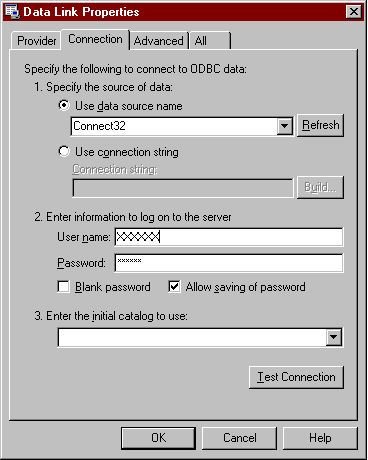
In our case, we'd already created a DSN, called Connect32, using the 32-bit ODBC Shortcut from the Control Panel. The Connect32 DSN points to the Mainframe region called PGE that contains the table ISI_PGE_AUTH_PGM and was built using Neon Client 32-bit ODBC driver.
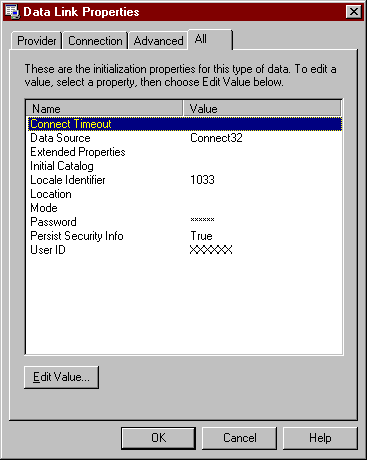
Log onto the server, and select Allow Saving Of Password. Click on the Test Connection button to make sure you can establish a connection to the Mainframe table. Then, skip the Advanced tab and click on the All tab, shown in Figure E, and you'll see the initialization properties for the defined connection data.
Figure E: Use the All tab to set the initialization properties of the data control Connection String.
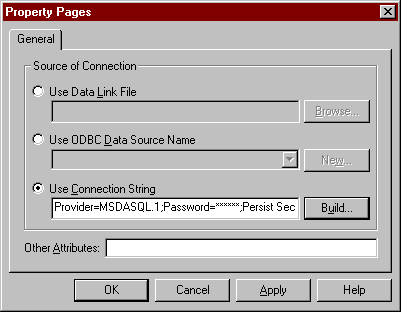
Click the OK button and the ConnectionString property will be defined, as shown in Figure F. The complete Connection String is:
Provider=MSDASQL.1;Password=******;
Persist Security Info=True;
User ID=XX;Data Source=Connect32.
Figure F: Apply the ConnectionString property that has been defined.
The next step is to define the RecordSource properties. Select Properties for RecordSource. The Property Pages dialog displays, shown in Figure G.
Figure G: Setup the RecordSource properties.
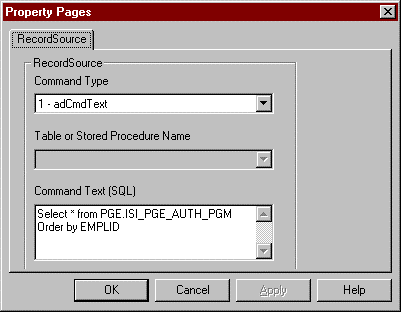
Command Type is shown as adCmdText and Text (SQL) as Select * from PGE.ISI_PGE_AUTH_PGM Order by EMPLID. In fact, this Command Text represents the RecordSource of the ADO Data Control. Click on the OK button to set up the RecordSource property. That's all you have to do to bind the ISI_PGE_AUTH_PGM table to the ADO Data Control!
A word of caution, however. If you choose the Command Type as adCmdTable and the table name as ISI_PGE_AUTH_PGM and click the Apply button, when you run the project you'll be able to view the data but not change it. For example, if you try to insert, update, or delete a record, and then click on the grid, you'll get an error, and if you click on the ADO Data Control, you'll also get the error. After experimenting with various Command Types and Command Text, I found the combination used in Figure G to be the most reliable.
True DBGrid Setup
For the True DBGrid Control (TDBGridDB2), the properties AllowAddNew, AllowUpdate and AllowDelete are set to True, the DataMode is set to Bound and the DataSource is the ADO Data Control Name (AdocdDB2). To setup the grid interface, use the Property Page available for it. I wrote some VB code in the RowColChange event to show the record position, the total, and the title of the window, shown in Listing A, but this isn't required.
Listing A: Optional RowColChange event code
Private Sub TDBGridDB2_RowColChange(LastRow As Variant, _
	ByVal LastCol As Integer)
AdodcDB2.Caption = "Record " & _
	CStr(AdodcDB2.Recordset.AbsolutePosition) & _
	" of " & CStr(AdodcDB2.Recordset.RecordCount)
	If Len(Trim(TDBGridDB2.Columns(1).Text)) Then
		Me.Caption = "Developer - " & "[" & _
			Trim(TDBGridDB2.Columns(1).Text)
				& "]"
	Else
		Me.Caption = "Developer"
	End If
End Sub
To insert a new record, go to the last empty row (indicated with an asterisk *), click on the first cell of the row and start typing. To save the record, click anywhere else in the grid or move the record position using the Data Control (left and right arrows). To update a record, highlight the cell and type over the data (and save it as described above). To delete a record, highlight the entire row and press the [Delete] key. Cool, huh?
Conclusion
As we've shown, VB 6.0's new ADO Data Control allows you to connect to any DB2 Mainframe table and modify its data without writing any VB code at all. So, the next time some hot shot tells you how difficult it is to use VB to access Mainframe data, tell `em you know different!
Copyright © 1999, ZD Inc. All rights reserved. ZD Journals and the ZD Journals logo are trademarks of ZD Inc. Reproduction in whole or in part in any form or medium without express written permission of ZD Inc. is prohibited. All other product names and logos are trademarks or registered trademarks of their respective owners.