January 1999
![]()
DirectX 6.0 Goes Ballistic With Multiple New Features And Much Faster Code
Ron Fosner
This article assumes you're familiar with C++, DirectX
One of the best things about DirectX 6.0 is the new framework supplied with all the immediate-mode examples. The D3DFrame library is a collection of C++ classes that encapsulate the basic initialization and message handling functions required by all the Direct3D programs.
Ron Fosner, who lives and breathes 3D graphics, runs Data Visualization, a 3D graphics consulting group specializing in creating fast OpenGL and Direct3D applications. You can reach him at Ron@directx.com.
DirectX 6.0 offers a whole slew of new features, cleaned-up samples, and new documentation, along with greatly refined code that runs much faster. One article to cover all that? Hold on to your pocket protectors; it's going to be a fast and furious ride!
The New Direct3D FrameworkOne of the best things about DirectX® 6.0 is the new framework that is supplied with all the immediate-mode examples. The D3DFrame library is a collection of C++ classes that encapsulate the basic initialization and message handling functions required by all the Direct3D® programs. In the previous version's samples, the Direct3D initialization code was unique to each program. Teasing out the functionality required by your program required you to already have a comprehensive understanding of how Direct3D initialization and device selection worked-which you are unlikely to have if you are perusing the samples.
The Direct3D framework provided with the DirectX 6.0 SDK changes all this. It provides a collection of useful utilities that wrap up all the functions for device initialization, device selection, surface management, render state, and other basics into an easy-to-use library. The D3DFrame library routines are prefaced by D3DUtil. You can use the library as is or, since the source code is provided, tailor it to your own needs.
The only other thing you'd need is a set of Windows® initialization and message handling routines. These are easily handled by another source file called winmain.cpp, which is duplicated in all the immediate mode samples. This file handles the Direct3D initialization, destruction, and rendering calls.
All the calls that make a program unique are wrapped in calls prefaced by App_. It's up to the unique application code to actually provide these calls. For example, there are calls like App_OneTimerSceneInit, App_FrameMove, App_Render, and App_FinalCleanup. If your application (like the sample programs) simply renders a static or animated scene into a window, then this framework is probably just what you need.
If you require a bit more user control, then you can add to the program menu. The File menu or the right mouse button will bring up a menu or dialog that will allow on-the-fly selection of the current rendering options, including switching between windowed and full-screen mode. This is probably the best starting point for novice Direct3D programmers since the burden of learning about device enumeration, surface creation, restoring lost surfaces, and just dealing with all the minutiae of Direct3D has turned off more than one programmer to 3D graphics. Even if you're an experienced Direct3D programmer, you can still learn a thing or two by examining the D3DFrame library.
The Reference RasterizerAn historical problem with Direct3D has been that the level of hardware support for Direct3D features was all over the map. This caused massive headaches for both Microsoft support and folks writing applications that depended upon a set of features being implemented. With the introduction of all the new features found in DirectX 6.0, the engineers at Microsoft decided that they should include a Reference Rasterizer that would implementæin softwareæmost of the new features found in the Direct3D API, as implemented in DirectX 6.0.
If you peruse the DirectX 6.0 version of the d3d.h header file, you may notice a new, fifth device identifier: IID_IDirect3DRefDevice. This is the ID for the Reference Rasterizer. As the online documentation notes: "The Reference Rasterizer is not intended for retail applications, and should only be used for reference or feature demonstration purposes." This means that it's not that fast, and Microsoft doesn't support it for retail use. But unless you've gotten a brand new video board in the last month or two, there's no way other than the Reference Rasterizer to see some of the new features of DirectX 6.0. If you'd like to see these new effects, you can go out and buy a new video board, or you can read on.
If you see artifacts when running your application hardware-accelerated and you don't see them when running the Reference Rasterizer, then the cause is a driver bug and you should contact the video board manufacturer to let them know. If they don't give you a response after repeated attempts, report the DirectX compliance problem to Microsoft.
The Reference Rasterizer is not normally enumerated when DirectX 6.0 is installed. It runs about half the speed of the RGB driver. Perhaps Microsoft will tune it a bit so that it can replace the RGB rasterizer and give the folks running non-hardware-accelerated PCs a chance to see what the folks with the latest hardware can see.
If you'd like to enable the Reference Rasterizer, there are two ways to do it. One way is to set the EnumReference key in the HKEY_LOCAL_MACHINE\SOFTWARE\Microsoft\Direct3D\Drivers key to a nonzero DWORD value. (Setting it to either zero or deleting the key will disable its enumeration.) The second way is to run the SDK program \Mssdk\Samples\Multimedia\D3dim\Bin\Enablerefrast.reg, which will edit the registry for you. There's a corresponding file called Disblerefrast.reg that will turn it off.
Since I haven't yet decided which video card that supports DirectX 6.0 features to buy, the screen shots you see here were all generated with the Reference Rasterizer. If you're targeting a software application for delivery in late 1999, then my guess is that video boards with support for DirectX 6.0 features will be readily available. Three are shipping as I write this. During development, you can use the Reference Rasterizer.
Texture Map CompressionFirst, a bit of introduction is required if you're new to 3D graphics. A texture map is simply a bitmap image that is applied to a surface of a polygon. It's a way of inexpensively adding visual detail to a scene. It's done to make the surface look like a complex object when in reality it is usually a simple shape with a picture painted on it. The picture is supplied via a bitmap image. Texture mapping is one of the most visually rewarding techniques available. Even if you are only interested in creating a 3D bar chart, that chart can be much more visually interesting when you can make the bars look like they are made out of marble, bricks, wood, grass, sand, feathers, or clouds.
Texture mapping is so popular that over the past year or two, texture memory (which is different from regular video memory) and texture management have become important features in the latest crop of video boards. To see why let's look at an example.
A typical high-quality bitmap has dimensions of 512¥512 pixels with 16-bit color per pixel. That means this single bitmap requires over 500KB of storage. If you have a typical video board with only 4MB of texture memory and your application uses more than seven texture maps of this size, you'll run out of texture memory. This is why the current crop of video boards typically support 16MB of dedicated video memory, or are AGP (accelerated graphics port) slot boards that are capable of using system memory as video memory.
But simply adding more texture memory is the brute force approach. New in DirectX 6.0 is support for texture map compression. Microsoft licensed the compression algorithm used in DirectX 6.0 from S3 Inc. (makers of the new Savage 3D graphics chip). This compression algorithm, called S3TC, is capable of generating several different formats, depending on the requirements of the image. Which format you choose depends on whether the texture is opaque, contains masking information, contains transparency information, or uses color-key transparency.
The importance of texture compression is only going to grow. As more programmers take advantage of texture mapping, applications will commonly run out of texture memory. Now that Microsoft has offered DirectX support for a group of texture compression formats, you will start to see hardware support for those formats. Compression lets you double or even quadruple the texture memory available to your program. Another advantage of compressed textures (for hardware that supports them) is that the driver needs to send only the compressed bits to the card, resulting in a faster data transfer over the bus to the card's local video memory.
Assuming that the video hardware and drivers support it, to use compressed textures you need only create a compressed texture surface and then load the texture image. When you create the surface, you'll specify the compressed texture format you want in the dwFlags member of the DDPIXELFORMAT structure. The image you load can be either uncompressed (in which case you'd either use BltFast or Blt) or already compressed in the correct format. Using compressed textures is no more difficult than using regular textures.
For software and hardware renderers that don't directly support compressed textures, you can still load and store compressed textures, but the compressed surface must be blt'ed to an uncompressed surface (typically via the function BltToUncompressedSurface) before it can be used as a texture.
Automatic Texture ManagementAnother feature of DirectX 6.0 is texture management. Although compressed textures apparently give you more texture memory, you'll still probably run into a situation where there just isn't enough texture memory. The only solution to this prior to DirectX 6.0 was to manage your own texture memory.
If you choose to have DirectX manage your textures, you lose the ability to specify if the textures are created in system or video memory. In other words, you can't specify the flags DDSCAPS_SYSTEMMEMORY or DDSCAPS_VIDEOMEMORY when creating a texture that you want DirectX to manage. Depending on the sophistication of your app, you may choose to have some critical textures loaded into video memory and manage them yourself. It's perfectly reasonable to have some textures that you manage yourself and another group that you let DirectX 6.0 manage for you.
Textures that DirectX manages are referred to as managed textures. To create a managed texture, you create a texture surface that includes the DDSCAPS2_TEXTUREMANAGE flag in the dwCaps2 member of the DDSCAPS2 structure. After creating the managed texture, you can optionally call the IDirect3DDevice3::SetTexture method to set it to a "stage" in the rendering device's texture cascade. A stage is one of the multitexture operations that I'll describe later on.
Once a texture is handed off to DirectX to manage, you don't have any control over how that texture is managed. DirectX might cache a managed texture in local memory, or in non-local (AGP) video memory if it's available. Exactly where your managed textures reside is not accessible to you. If you're familiar with OpenGL and how it transparently manages your textures for you, then this scheme will sound familiar.
If your application uses more textures than can fit in video memory, old textures will be flushed from video memory to make room for the new textures. If you reuse a previously flushed texture, the system will use the original Direct Draw-created system memory texture surface to reload the texture in the video. The texture manager is smart enough to know that if you have touched a texture surface, either explicitly via unlock or implicitly via a blt (which calls lock and unlock), then the texture manager will automatically update the video memory copy of the texture. Note that anytime you cause a texture to be reloaded, it will incur a minor performance hit.
If you are done with your managed textures, you can unload all managed textures from video memory at once by calling IDirect3D3::EvictManagedTextures. DirectX will destroy any cached local or AGP video memory textures, but will not touch the system memory copy. Textures that were bound at creation time to a specific stage in the texture cascade are also left untouched.
Range-based FogFog is one of those interesting effects that, once you try it, you wonder how you got along without it. Fog is typically used when rendering an outdoor scene, or a scene that has a lot of depth. Objects that get rendered many miles away from the viewpoint are reduced to a few pixels in size, wasting valuable CPU cycles. Conversely, objects that are suddenly rendered into the scene when they are close enough to be viewed appear to pop into the scene. This is visually disturbing. As an alternative you can use fog to gradually bring objects into the scene to prevent these kinds of artifacts.
While typically used in games and in flight simulators, fog is useful for just about any scene that requires depth-cueing information. Figure 1, from the game Battlezone by Activision Inc., shows one of the nicest uses of fog that I have seen. The game takes place on different planets, and uses fog to differentiate between them. For example, there is no fog on the moon and dense fog on Venus (shown in Figure 1).
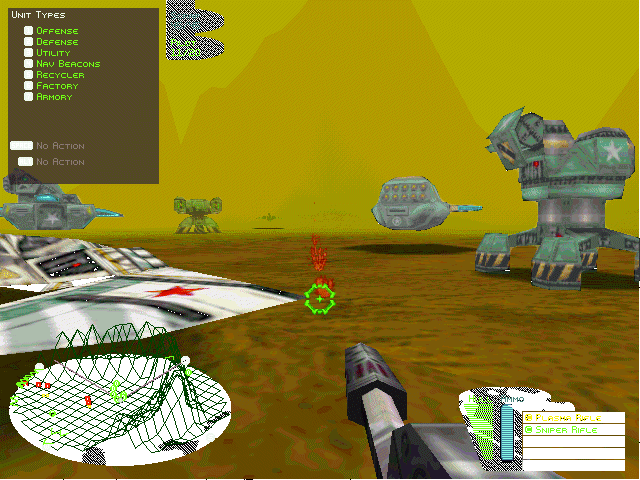
Figure 1 Using Range-based Fog
Unfortunately, in order to simplify the fog calculations, most fog is based on the z-distance of an object rather than on the actual distance from the viewpoint. The z-distance of an object is simply the distance of an object along the viewpoint's z-axis. The calculation does not incorporate the distance from the z-axis itself.
This distinction is illustrated in Figure 2, which shows two objects. On the left-hand side you can see that the object is outside the fog. If the viewpoint is rotated as it is on the right-hand side, then the object suddenly is covered by fog. In real life, fog does not decrease the further it gets from your line of sight. Thus Direct3D introduced range-based fog as a more accurate way to determine fog effects.
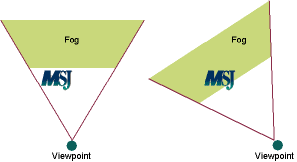
Figure 2 Determining Fog Effects Poorly
In range-based fog, Direct3D avoids rotational artifacts by using the actual distance from the viewpoint to a vertex in its calculations. Thus the effects of fog increases with the distance between the two points, rather than with the depth of the vertex within the scene.
Range-based fog is not supported in software, and only the latest hardware supports this feature. If your hardware supports range-based fog, you can use it in your application by setting the D3DRENDERSTATE_RANGEFOGENABLE state to TRUE.
How to be CooperativeIf you've done any DirectDraw® or Direct3D programming, you're probably familiar with the function SetCooperativeLevel. IDirectDraw4::SetCooperativeLevel now has a new interface with a few new settings. The first provides support for multiple-monitor systems, which is very useful when debugging full-screen, exclusive programs. For single-monitor applications, there is no distinction between the device window used for rendering and the focus window, which contains the message loop. If you have multiple monitors, DirectX 6.0 lets you create separate windows for each.
To do this, you set a device window for each monitor, and let each DirectDraw object know about the application's focus window. The focus window can also serve as the device window for one of the monitors. Other device windows should be children of the focus window so that the application does not minimize when the user clicks on one of them.
While I think that multimonitor systems are going to become more commonplace and that programs should be written to take advantage of them, you don't have to worry about them if you don't want to. Your application will work by default on the primary display. A windowed DirectDraw application will work automatically with multimonitor systems as long as it is created on the null device and doesn't render directly to the primary surface. The user will be able to drag the window from one monitor to another. However, DirectDraw will take advantage of hardware acceleration only when the window is entirely within the primary display.
On my multimonitor system I can drag a windowed Direct3D application from one monitor to another (even across color bit depths), and the only noticeable difference is the switch to software rendering when the window starts to go into the second display. There can be some instability, however, with word processing applications and other software. If you decide on a multimonitor system, you may need to get two video cards with recent drivers to avoid system crashes.
If you are using DirectX with MFC, the window handle given to the method SetCooperativeLevel should identify the application's top-level window, and not a derived child window. You can get the top-level window by calling AfxGetMainWnd()->GetSafeHwnd();.
I'm a big believer in multithreading applications. As long as you don't have a ton of threads, it can make your program much easier to code with only a small performance hit. If you are like-minded, then you should be aware of the DDSCL_MULTITHREADED flag. You only need this flag if your application uses DirectDraw/Direct3D calls across multiple threads of the same application. (If you do this, you're braver than I am.) If you're adventurous, yet careful, and you only make Direct3D calls from a single thread of your multithreaded application, then you probably don't need to use this flag. It makes DirectDraw more careful by taking global critical sections more frequently, with the resulting performance hit. If you aren't making DirectX calls from multiple threads, or if you are only using single-precision floating point in your app, previous to DirectX 6.0 you still had to pay the price of DirectX performing these safeguards. DirectX 6.0 now gives you the ability to turn this off if you don't need it, thereby increasing your app's performance.
The last flag is perhaps the most interesting one. It's not widely known, but internally Direct3D twiddles the control flags of the FPU, switching from whatever setting the program is running in to single precision with exceptions disabled. This is done with each rendering cycle to increase rendering speed. By default, Direct3D checks the precision state of the FPU (usually it's set for double precision), sets it to single precision, performs the necessary operations, then sets the FPU back before returning control to your application.
You can use this same technique of setting the FPU to single precision. As long as you don't do many repetitive calculations with the same variables (for example, incrementally rotating an object's vertices instead of maintaining an absolute rotation), then the only difference you'll notice is that your floating point operations take about 60 percent of the time they previously did. To set the FPU to single precision, use the assembly routines in the DirectX help to set and restore the FPU control word, and use the flag DDSCL_FPUSETUP to tell Direct3D not to bother with its own internal checks.
Here is one last thought on floating point math in Direct3D: run-of-the-mill Direct3D accelerator cards focus on eye candy features like multiple textures and range-based fog. These let you render sophisticated scenes in the same amount of time it takes to render the background objects, the vertex calculations, triangles, and so on. The high-end graphics cards (currently only OpenGL-based ones) offer a feature called geometry acceleration that lets you render complex scenes in terms of the actual geometry of the scene.
A typical scene in a current application has 2000 to 2500 triangles per frame. In DirectX 7.0, Direct3D is slated to support geometry accelerators. These are essentially dedicated FPUs designed specifically for 3D calculations. Whether this means a real piece of silicon on the graphics card or some hand-coded assembly in the driver for 3DNow! or Katmai, these new API features will allow you to at least double the scene complexity that current cards can handle.
Single-pass Multitexture SupportHave you noticed that there are many new texture features in DirectX 6.0? This is no accident. Textures are the hot topic this year in 3D graphics. There are many creative ways to use them. Have you had a chance to play Quake 2 yet? Have you noticed the cool lighting effects in the corridors? These are actually light textures. It turns out that programmers use textures for two reasons. The first was mentioned previously; texture mapping lets you add detail to a surface more quickly and easily than actually modeling the details. The second reason has to do with performance.
Most effects that modify the appearance of a surface are calculated on what's called a "per-vertex" basis. This means that the actual calculations are done for each vertex of a triangle, as opposed to each pixel that gets rendered. Per-vertex calculations are interpolated for each pixel rendered for that triangle. Sometimes this looks fine, but other times you get noticeable artifacts. The classic example is a large triangle with a light source close to the surface. As long as the light is close to one of the vertices of the triangle, you can see the lighting effects on the triangle. If the light moves towards the center of the triangle, then the triangle gradually loses the lighting effect. When the light is directly in the middle of the triangle, you see a triangle with very little light shining on it instead of a triangle with a bright spot in the middle. This is because there's no light shining on the vertices, and it's the vertices that are used to calculate the surface properties.
The brute force method of fixing this is simply to add more vertices-that is, break the big triangle up into a bunch of smaller, connected triangles. This provides more vertices for the lighting calculations and thus fixes the lighting problems, but the program must spend more time performing transformations and lighting calculations.
It turns out that there is a way to generate the illusion of pixel-based lighting that is actually quite fast. The technique uses a texture map (usually called a brightness, luminance, or dark map) that's nothing more than the image of the desired type of light shining on a dark surface. This technique works by replacing the per-vertex lighting calculations with per-pixel texture calculations. It's typically faster because most 3D hardware accelerates texture mapping.
If you're using one texture on a surface for a light map, this usually precludes using another texture on that surface since there is no way to specify more than one texture map for use on a surface. What is possible-and what Quake and some other games have done-is to use what's called multipass rendering. The first pass typically renders with all surfaces textured. Then the scene is rendered again, but this time the light maps are used. The light map textures are blended (typically this means multiplied) with the textures that are already there. The net result is to darken the original texture except where the light map was brightest-hence the term dark maps.
Since this approach has many advantages, it has become quite popular. But rendering the scene twice has a significant impact on the rendering time. Thus there has been a big push for multitexture support in both Direct3D and OpenGL. Multitexture support is in DirectX 6.0 and will be in OpenGL 1.3.
DirectX 6.0 provides new IDirect3D3 and IDirect3DDevice3 interfaces. With these interfaces, Direct3D can blend up to eight textures in a single pass. This provides greatly improved performance for applications that previously used multipass techniques. Unfortunately, it will be a while before you see full support. Most 3D graphics boards only support a single texture, and the ones that do support multiple textures typically only support two or three simultaneously.
As you can imagine, supporting multiple textures in a single pass is not a trivial feature. Multitexturing in DirectX 6.0 introduces two new terms: texture stage and texture blending cascade. A texture stage is when the two textures of a surface are blended. A texture blending cascade is the sequence of operations that is performed, in order, on each of the specified textures of a surface. The output from one cascade is blended with the texture of the following cascade.
For example, let's say that you want to create a space simulation and you need to fly by the moon. The easiest way to make something that looks like the moon is simply to stick an image of the moon's surface (see Figure 3) onto a sphere. Now, let's say that you want to light the moon. No problem, I'll just add a light map texture stage, like the one in Figure 4. But, that's still not good enough. It still looks like a flat picture of the moon instead of a real moon image.
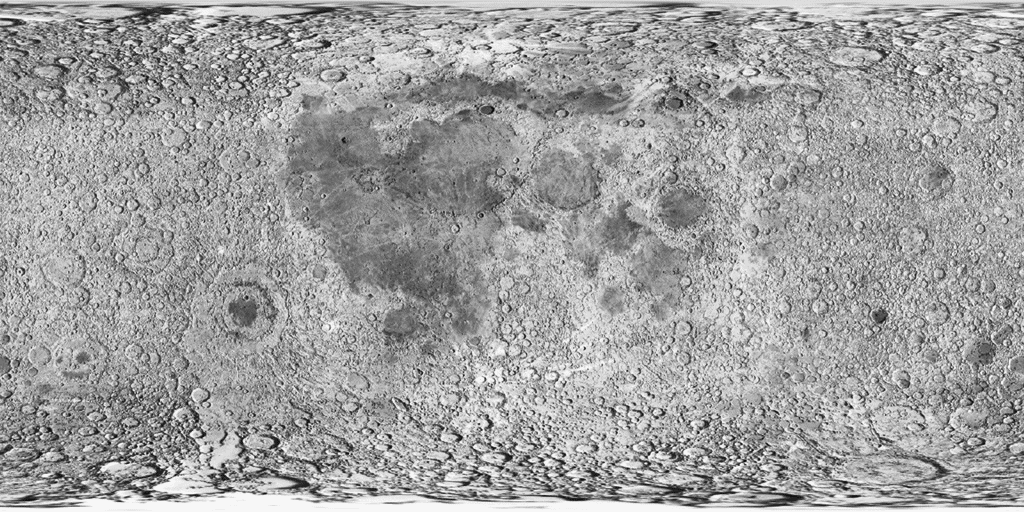
Figure 3 Moon Surface Texture

Figure 4
You can use textures to fix this through a technique called bump mapping. Bump maps are similar to light maps, but instead of taking the image of a light shining on a surface, you use a gray scale image of where you want the bumps to be. These values are then used to alter lighting on surface features. Bump maps are fairly easy to generate from the original image. Figure 5 shows one that goes with the moon image. Correctly blended, this introduces bright and dark areas onto an image. If they are placed correctly, it will look like parts of the surface are actually sticking out slightly, catching light, while other parts are in shadow. The final image is shown in Figure 6Íýýýý. Three texture passes without even trying!
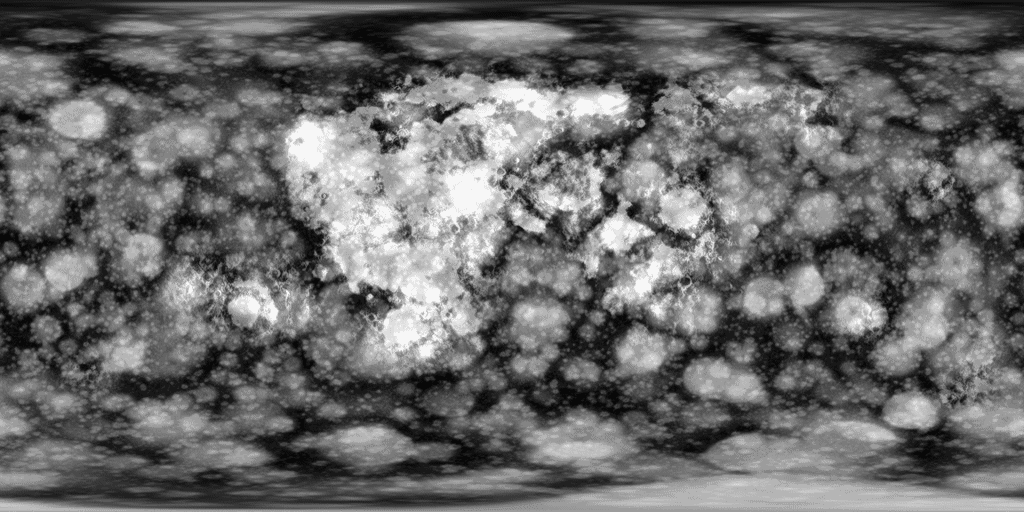
Figure 5 Bump Map for Moon Texture
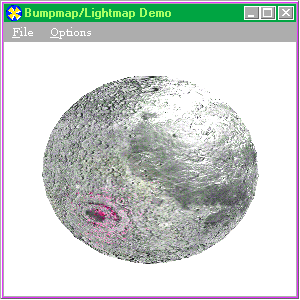
Figure 6 Moon Surface
Another complication is that there's more than one way a texture can be applied to a surface. I won't discuss the filtering issues here-the texture minification or magnification settings. These adjust how the texel (texture element) is generated, depending on whether the base image is being minified or magnified.
Texture mapping is one of those areas where you can't just sit down, read the manual, and come away with a good grasp of the technique. The reason is the huge number of effects you can generate with different combinations of texture operations. So let's take a look at some of the things you can do.
First, let's see how you go about loading, selecting, and setting the parameters for a texture. The code snippet in Figure 7 shows how to create a texture stage and set the parameters for it. You can set the parameters of each texture stage independently of the other stages. If you disable a texture stage, you disable that stage and all the following stages. The stage indices are zero-based, and the default texture stage is stage zero. If you have legacy code from DirectX 5.0, for example, then that code will still work. The old commands that worked when there was just a single texture will map to new commands that operate on the default texture stage.
An important point to note is that texture handles from DirectX 5.0 and previous versions are obsolete. DirectX 6.0 introduces texture interface pointers. All new code should be written to use interface pointers rather than texture handles. In other words, you should not use the now-obsolete interfaces IDirect3D and IDirect3D2 in new code.
To operate on a different texture, just change the index. For example, to assign a texture to stage 3, you could use the following code:
// Set the third texture.
pd3dDev->SetTexture(2,                        pd3dTexture );
Note that the index value is 2.
Typically, you'll be changing all the parameters of a stage's operation at once. There are macros you can use to simplify setting the parameters of a texture stage:
#define SetTextureColorStage(dev, i, arg1, op, arg2)  \
  dev->SetTextureStageState(i, D3DTSS_COLOROP, op);\
  dev->SetTextureStageState(i, D3DTSS_COLORARG1, arg1);\
  dev->SetTextureStageState(i, D3DTSS_COLORARG2, arg2);
#define SetTextureAlphaStage(dev, i, arg1, op, arg2)  \
  dev->SetTextureStageState(i, D3DTSS_ALPHAOP, op);\
  dev->SetTextureStageState(i, D3DTSS_ALPHARG1, arg1); \
  dev->SetTextureStageState(i, D3DTSS_ALPHARG2, arg2);
There are two macros because there are two types of blending operations: those that involve the color elements (RGB), and those that involve the alpha (A) element. In a blending operation, you'll usually do something different with these different types of elements.
Before I examine how to blend multiple textures using the texture stages, let's go over some basics of texture blending. The next section is applicable to both single textures and multiple texture stages.
Texture Rendering Blend StatesMost of the operations done with textures deal with a texture's color values in combination with its alpha values. For example, in a tank game you might just have one tank model (or geometry), but you might have a blue team and a red team. By simply applying a reddish texture and a bluish texture, you get one model to do double duty. (Note that you could also have a gray-scale camouflage pattern and simply blend that with tanks colored red or blue by specifying the triangle color.)
Now suppose that you're writing an interactive Internet game and you want each tank of each team to have a unique, identifying number. The simplest way to do this is to have each tank's number in a bitmap. But remember, each bitmap is rectangular. To get just the actual numbers out of the bitmap while excluding the background surrounding each number, you have to cut out the number. This is most easily done by providing the number images as RGBA bitmaps, where the alpha is zero (transparent) for the background, and 1 (opaque) for the numbers.
With this RGBA image, you'd choose a blending operation that would paste the image into the existing blending stage, depending on the alpha value of the incoming image. When the incoming image is transparent, the original image will be untouched. When the incoming image is opaque, the original image will be overwritten by the incoming image. Using the tank game example, for each tank in your platoon you'd simply swap the correct number texture and render to draw tanks with the correct numbers on their sides.
This technique is an example of a blending equation. Let's look more closely at how blending works. In this case, you're taking two images-the existing image and the incoming image-and processing them in a certain manner, depending on the incoming image's alpha. If an application enables texture blending, Direct3D must then blend the texel colors of one or more textures with the primitive's current colors. This is how texture blending works. There is some combination of an existing image (called the destination) and an incoming image (called the source) and you vary how these images are blended by setting the blending state via the parameters of the blending equation.
Direct3D uses the following formula to determine the final color for each pixel in the primitive's image:
FinalColor = PixelColor * DestBlendFactor + TexelColor * SourceBlendFactorIn this formula, FinalColor is the pixel color (the RGBA quadruplet) that is output to the target rendering surface. PixelColor is the color of the current pixel in the primitive's image. TexelColor is the color of the texel that corresponds to the current pixel of the source image. SourceBlendFactor is a calculated value that Direct3D uses to determine the percentage of the texel color to apply to the final color. DestBlendFactor is the percentage of the current pixel's color that will be used in the final color. The values of SourceBlendFactor and DestBlendFactor range from 0.0 to 1.0.
The tricky part is understanding that the equation actually represents four different equations-one for each element of the RGBA value-and that the blend factor is the description of how these four values are combined with the corresponding element from the other color pixel. Note that it's possible to have a color element cross over and influence another color element. This is typically done with just the alpha value influencing how strongly a color value comes out.
As you can see from the preceding formula, a texture has zero transparency if the SourceBlendFactor is 1.0 and the DestBlendFactor is 0.0. It is completely transparent if the SourceBlendFactor is 0.0 and the DestBlendFactor is 1.0. If an application sets these factors to any other values, the resulting texture will be blended with some degree of transparency. Every texel in a typical texture has a red, a green, and a blue color value. By default, Direct3D uses the alpha values of texels as the SourceBlendFactor. Therefore, applications can control the transparency of textures by setting the alpha values in their textures.
You control the blending factors when you invoke the method IDirect3DDevice3::SetRenderState with the enumerated values D3DRENDERSTATE_SRCBLEND and D3DRENDERSTATE_DESTBLEND as the first argument. The second parameter must be a member of the D3DBLEND enumerated type. Figure 8 describes the types of blending operation that you can perform for the source or destination. The four numbers given in the table refer to the RGBA values in a pixel or texel. For example, the letter R refers to the red component, A refers to the alpha, and so on. The subscript indicates the source or destination. Thus Rs refers to the red component of the source, while Ad refers to the alpha of the destination. The values are [0,1] (between 0 and 1). So if you see, for example, the expression 1-Gs, it means the inverse of the green source value.
This is a lot of technical information. How would you use it? Let's say you want to blend two images with 50 percent of each image showing. You'd render the first image with both the source and the destination set to D3DBLEND_ONE, and render the second image with the source set to D3DBLEND_SRCALPHA and the destination set to D3DBLEND_INVSRCALPHA. Then you'd set the first image's alpha value to 1.0 and the second image's alpha value to 0.5.
After the first rendering, you'd have the first image's unmodified RGBA values in the buffer. This is what D3DBLEND_ONE indicates. The second rendering step can be thought of in three parts. In the first part, the destination calculation, the destination values (the RGBA values from the first image) are multiplied by your destination blending value, D3DBLEND_INVSRCALPHA (1-As). That is, the RGBA values are multiplied by the source's alpha. In this case, you multiply the first image's RGBA values by 0.5, so for a destination pixel RGBA = [1, 0.8, 0.25, 1.0] you'd end up with [0.5, 0.4, 0.125, 0.5].
The second step is to factor in the source blending value, D3DBLEND_SRCALPHA, by multiplying the source RGBA values by As. So for a source pixel RGBA = [1, 0.5, 0.666, 0.5], you'd end up with [0.5, 0.25, 0.333, 0.25]. The final step is to add these values together. Thus the source value [0.5, 0.25, 0.333, 0.25] plus the destination value [0.5, 0.4, 0.125, 0.5] results in a pixel with a value of [1.0, 0.65, 0.458, 0.75]. Note that some calculations can result in values over 1.0. All values are adjusted to reside between 0 and 1.
Another way to get the same result is to require the destination to have an alpha value of 0.5 instead of 1.0, and draw both images with the source set to D3DBLEND_SRCALPHA and the destination set to D3DBLEND_ONE. If you want 75 percent of the first and 25 percent of the second, you could set the alpha values correspondingly. If you want three images equally blended, blend all three as above but set the alphas to 0.333.
These are the basic blending operations. You need to understand them before tackling multitexture rendering. If you had only a single texture pipeline and you wanted to render the examples given above, you'd simply rerender with each separate image. Remember, you're simply stuffing values in a buffer somewhere-there's no magic involved with 3D images. You can tweak those values as much as you like before you're done. Actually, it's quite instructive to view the separate stages as you build up your finished image.
Once you've selected the operations that you want to use, you can use the multitexture interfaces to select the blending operations for the different texture stages. You can set the color operations using D3DTSS_COLOROP and the alpha operations using D3DTSS_ALPHAOP. With just two textures, you can perform literally hundreds of blending operations. There are 24 different settings to choose from for a texture stage blending operation. These settings are listed in Figure 9.
Some of these settings, like D3DTOP_MODULATE and D3DTOP_SELECTARGn, are pretty standard. But most of them are new. For example, D3DTOP_MODULATE2X and D3DTOP_MODULATE4X ease the use of light maps by making the resulting image brighter. Others, like D3DTOP_BUMPENVMAP, make it easier to implement features like bump mapping. Still others, like D3DTOP_ADDSMOOTH, D3DTOP_ADDSIGNED, and D3DTOP_DOTPRODUCT3, are simply available to produce interesting effects.The ease with which you can now play with multiple textures and the sheer number of combinations that you can select make for a very rich, but intimidating, environment. Microsoft has thoughtfully provided some help by way of a sample program called MFCTexture. MFCTexture is shown in Figure 10, where I've taken a brick image, a spotlight light map, and the bump map for the brick image and blended them all together. The program lets you select up to three textures, and select most of the different settings for blending operations. Once you've hit upon a combination of settings that you like, you can tell the program to generate the source code required to duplicate the blending operations for pasting into your application. How much easier could it be?
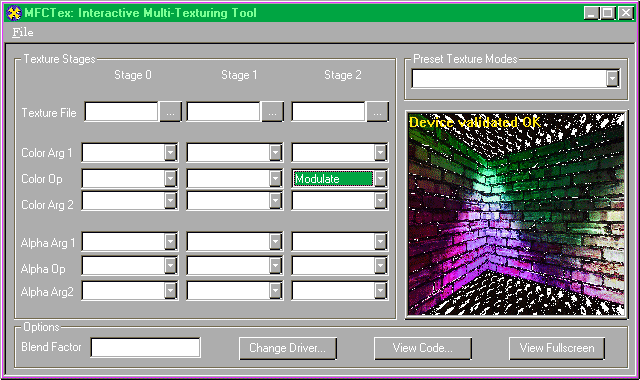
Figure 10 MFCTexture
New Rendering CommandsIn my last Direct3D article, I discussed the new IDirect3DDevice2::DrawPrimitive methods introduced with DirectX 5.0. DirectX 6.0 offers some additional improvements. The new IDirect3DDevice3::DrawPrimitive interface is used in much the same way as the IDirect3DDevice2 interface, but instead of specifying the format of your vertices as one of the D3DVERTEXTYPE types, you must specify a flexible vertex format.
Direct3D no longer forces you to munge your data into a format that it accepts, but allows you, within certain restrictions, to format your data however you like. There is no longer a requirement that all vertex information be the same size. Vertex formats let you specify which pieces of the data you actually need. The only restriction, aside from the basic information types, is the order in which the values are stored.
The formats are encoded as bits inside a DWORD that is passed to IDirect3DDevice3::DrawPrimitive to indicate the format of the data. Basically, these flags tell the system which vertex components (position, normal, colors, and the number of texture coordinates) you'll be providing. It's easy to provide up to eight texture coordinates using this format. Here are some examples of vertex formats:
// Untransformed, Gouraud-shaded, Untextured
dwFVF = ( D3DFVF_XYZ | D3DFVF_DIFFUSE );

// Duplicate the D3D_VERTEX format
dwFVF = ( D3DFVF_XYZ | D3DFVF_NORMAL | D3DFVF_TEX1 );

// Unlit, colored content with two textures
dwFVF = ( D3DFVF_XYZ | D3DFVF_NORMAL |
         D3DFVF_DIFFUSE | D3DFVF_SPECULAR | D3DFVF_TEX2 );
If you're interested in porting your DirectX 5.0 DrawPrimitive code, there are macros that can assist you in creating formats that duplicate the original three Direct3D vertex formats.
For more independence in how you store your data, DirectX 6.0 offers two new DrawPrimitive methods with the IDirect3DDevice3 interface: DrawPrimitiveStrided and DrawIndexedPrimitiveStrided. A strided vertex is a structure that contains pointers to the vertex components rather than to the components themselves.
You describe strided vertices using the same combinations of flexible vertex format flags as you'd use with a nonstrided vertex. However, unlike nonstrided vertices, the flags you use don't indicate the presence of a given field in memory. Instead, they indicate which of the structure members you're using. The restrictions for these flags are identical to nonstrided vertices.
You set up a pointer to your data by using a D3DDRAWPRIMITIVESTRIDEDDATA structure. This structure contains 12 D3DDP_PTRSTRIDE structures, one structure each for the position, normal, diffuse color, specular color, and eight texture coordinate sets for the vertices. In addition to a pointer to the actual data array, each D3DDP_PTRSTRIDE structure also contains the stride of that array. The stride is simply how much to increment the passed-in pointer to get the next set of data.
To see the flexibility of this arrangement, let's look at some examples. You might use distinct arrays for every vertex component-say three separate arrays for position, normal, and textures values. Thus you would pass in the three array pointers, and the stride for each array would contain the amount to increment to get the next set of data. For example, the position data consists of three floats, so the positions stride would be 3*sizeof(float).
If you wanted to store all of the various data in one large array (that is, OpenGL's interleaved array), then this is just as easy. Let's say the position data is followed by the normal data and then the texture data. The array pointers you pass in would correspond to the first data element of that type in the array. Note this does not mean the interleaved array address, but the address of the first element of the position, normal, and texture data. The stride for each one is the offset to the next set of elements of the same type. So, for example, the stride for the position would be the size of a position element plus the sizes of the normal and texture elements. Like all good things, there's a catch, but it's a small one: you can't use the strided vertex format for transformed vertices. But with geometry acceleration coming soon, you really didn't want to anyway, did you?
SummaryI think you'll agree that there are plenty of cool new things in DirectX 6.0. I'm finally starting to see the kinds of features and improvements that are necessary to make DirectX-and Direct3D, in particular-a really viable platform. Based on my discussions with the folks at Microsoft, I'm certain that DirectX 7.0 will be even stronger. And as 3D graphics accelerators become commonplace, more and more programs will use 3D elements. To obtain the latest DirectX bits, see http://msdn.microsoft.com/downloads/sdks/default.asp.
To obtain complete source code listings, see the MSJ Web site at http://www.microsoft.com/msj.
Texture mapping is one of the most visually rewarding techniques available. Even if you're only interested in creating a 3D bar chart, that chart can be much more interesting when you can make the bars look like they are made out of marble, bricks, wood, grass, sand, feathers, or clouds.
For related information see The Microsoft DrawPrimitive API at http://msdn.microsoft.com/library/backgrnd/html/msdn_drawprim.htm. Also check http://msdn.microsoft.com for daily updates on developer programs, resources, and events.
Battlezone image courtesy of Activision Inc. © 1998 Activision Inc.
From the January 1999 issue of Microsoft Systems Journal.