September 1999
![]()
| Multidimensional Expressions and ActiveX Data Objects Multidimensional can be used to construct Web apps for querying OLAP data. My sample app offers two means of querying the OLAP data, either by selecting dimensions for each axis or by selecting from a set of predefined queries. |
| This article assumes you're familiar with MDX, ASP, ADO, and DHTML |
|
Code for this article: OLAP ASP Code.exe (10KB)
Carl Nolan works for Microsoft Consulting Services
(http://www.microsoft.com/norcal). He is an MCSD and
MCP + Site Builder who specializes in SQL Server.
He can be reached at carlnol@microsoft.com. |
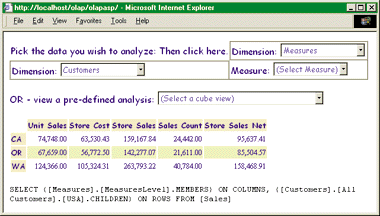 |
| Figure 1 Retrieving Data in the Browser |
|
Figure 1 shows how the application will look once data has been retrieved. Having drilled down into the USA customers, the view shows the customer dimension on the rows and measures on the columns. Although the final MDX statement is shown, the user only has to make a few mouse clicks to get at this display. Application Architecture The application consists of two sections contained within a frameset. The first section is where you can either select the axes or choose from the list of predefined MDX queries. The second section presents the data and allows the user to click on any member or cell to drilldown into that specific data. The same presentation page and frame is used when making an initial data selection or drilling down into the cube.
Drilldown
|
|
| The obvious means of data display is an HTML table. Figure 7 outlines this process for an MDX statement that has both rows and columns. The table is constructed within a local string variable, which can then be output using the ASP Response.Write function. Although this method requires an understanding of HTML tags, it does allow the code to be easily ported into a compiled object, such as a Visual Basic® ActiveX DLL or ATL COM DLL.
The HTML table is constructed row-by-row, the first row being the column headings. You get these by taking the caption of the first member of the column axis positions. Remember, the first column heading needs to be blank. Access to the actual data derived from the MDX expression is through the Cellset object. You can access a Cell object within the Cellset using standard array notation. In the case of a two-axis query, it will be a two-dimensional array. The key here is to iterate through the positions of the axes. Each position has a property called Ordinal that represents its location along the axis. The Ordinal property is used in extracting the Cell from the Cellset: |
|
| Now, let's incorporate the drilldown functionality. The key is stamping each cell within the table with two properties, the row and column axis definitions. This will enable the construction of a new MDX statement with the appropriate hierarchy drilldown.
There are many ways to perform this task, such as making each table detail an anchor, and then using a query string to pass the new MDX components to the processing page (in this case, the same page). I chose to use DHTML because it has the ability to extend a tag with custom attributes. Each cell will have one attribute that represents the new axis definitions and another to indicate whether the cell supports drilldown capabilities. When a user clicks on a cell that supports drilldown, the custom attribute's values are retrieved and saved into the form variables. Afterward, a manual form submission is executed. But how do you calculate these custom attributes? When you're constructing the column axis table heading, you iterate through the positions of the appropriate axis. The default member has two important properties: UniqueName and ChildCount. The UniqueName property is the fully qualified name of the current member. To perform a drilldown into this level, the MDX statement would need to take the children of this unique name. To determine whether or not a particular level has children, the ChildCount property needs to be validated. If a ChildCount property returns zero, then the application should not support drilldown into this member. As a result, a customer attribute called nodrill is defined as such: |
|
| The situation is very similar for row axis table headings, but gets a little more complicated for the data cells. A data cell should only support drilldown if both the row and column members do. New definitions will be required for both the row and column axes to support the construction of a new MDX statement. To determine if drilldown is supported, you only have to validate the ChildCount property of the position's member on both axes: |
|
| Similarly, to calculate the value of the property to support member drilldown, the UniqueName of the position's member on both axes is derived: |
|
| That takes care of the case where both row and column axis definitions are given. When only a column is specified the situation is slightly different, but the same rules for drilldown apply. Figure 8 contains the code for creating an HTML table given the appropriate MDX statement components. This example uses class definitions to separate functionality and style—a must if you're going to encapsulate the code within compiled objects. A separate stylesheet defines the formatting for each of the classes. For completeness, the stylesheet definition used to achieve the output from Figure 1 is listed in Figure 9. The classes not only help define the style, but
also indicate if the HTML tag contains information pertaining to a dimension of measure value.
In this code, a function called ReturnConnection returns an ADO Connection object to the required OLAP database. If the application is being created for a few users, it would be beneficial to save the connection as a Session variable, created in the global.asa file. This would reduce the overhead of connecting to the OLAP database for each data query. On the other hand, this technique would be inappropriate for a moderate to large user base. Submitting the Data
|
|
| Before the user request is processed, you must determine if the clicked member actually has children, as indicated by the absence of nodrill, a custom property. Whether or not this property is present depends on whether the getAttribute function evaluates to null. Prior to this, the class of the item is also validated to ensure it contains either dimension or measure information.
Finally, cells that sport drilldown should indicate this to the users. Once again, this is where the item's class and custom nodrill attribute come into play. When a user moves the mouse over a cell that supports drilldown, the style of the cell is modified. The cell data is underlined and formatted with a red font and, more importantly, the cursor is changed to a hand. Obviously, the default values are returned once the user moves the mouse from over the cell. This action mimics the behavior of an anchor href tag, but you could just as easily define custom behaviors. Office 2000 Web Components
|
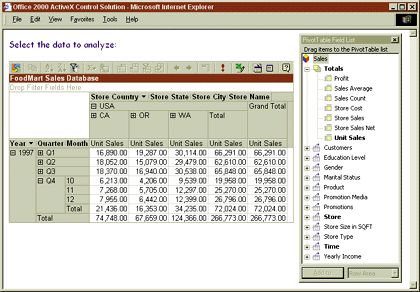 |
| Figure 11 Hosting the PivotTable Control |
|
The control has a few interesting features. The obvious one is the PivotTable Field List window. You can select dimensions and measures using a simple drag and drop operation. You can also select a filter field, which lets you drag and drop to perform slicing on a cube. The PivotTable control has a simple toolbar that includes buttons for displaying the field list window, exporting the selected data into a Microsoft Excel PivotTable, and filtering and sorting. The plus signs make it easy for the user to see where they can drill into a dimension.
Since this is an ActiveX control, the first thing you must do is place an <OBJECT> tag on the Web page. The easiest way to do this is by using FrontPage® 2000, as the Office 2000 components are contained within the toolbar. The complete definition of the <OBJECT> tag is as follows. |
|
| The ID assigned to the object in this case is FoodMartCube. The only omission from this definition is the <CodeBase> tag. This will need to be included, pointing to your local installation file.
The rest of the work for controlling the cube data is done in code, albeit very little. The only operation that needs to be performed is defining the database connection information, much in the same way as you do for ADOMD: |
|
| At this point, the control is connected to the sales cube. To make things simpler for the user, it may be helpful to define a set of default axes and enable useful properties.
When working with the PivotTable control, two objects are important: the ActiveView and the FieldSets associated with the view. These are easily derived from the object reference: |
|
| The object view has three important properties relating to data selection: RowAxis, ColumnAxis, and DataAxis. When defining a predefined view of a cube, methods on these properties will need to be executed. For RowAxis and ColumnAxis, a method named InsertFieldSet is executed, which takes a field definition as its parameter. This adds the specified field into the appropriate axis. The field definition is derived from the previously defined FieldSets collection. |
|
| A similar process occurs for defining the cube slice on the required measure. Here the function to call is InsertTotal, which takes as its parameter a special field called a total, derived from the Totals collection. The Totals collection represents the collection of measures: |
|
| Although in this example both axes and the measure are predefined, this does not restrict a user from selecting other dimensions and measures. In some situations, after a connection is made to the cube, it may be beneficial to present the user with a clean slate. The user is then free to select the data he or she wants to view.
At this point, the PivotTable is fully connected to the cube and has a set of defined axes. Certain properties can be set to make the user experience easier. One thing to note about displaying cube measures is that the values do not have a consistent display format. This can be remedied by defining a format for the required totals using a property called NumberFormat. The NumberFormat property takes a value similar to the Visual Basic Format function, as the following example shows: |
|
| One other useful property of the control's view is the TitleBar. This property allows you to assign a caption to the title bar: |
|
| To end this brief discussion on the PivotTable object, it is worth mentioning some properties of the control itself. A property called DisplayFieldList controls whether the field list window is displayed. In addition, to ensure that the expansion indicator and toolbar are displayed, the appropriate properties can also be set: |
|
| As mentioned earlier, the PivotTable control allows a drag and drop selection of a dimension for defining a slice on a cube. To enable this functionality, all you have to do is define a property called AllowFiltering: |
|
| As you can see from this simple example, the PivotTable control very quickly allows a Web browser to be used as a client for OLAP analysis. There are many other features to this control, but the ones I mentioned should be sufficient as a starting point.
Conclusion
|
|
For related information see: Microsoft ADO MD Programmer's Reference at http://msdn.microsoft.com/library/psdk/dasdk/adom1647.htm. Also check http://msdn.microsoft.com for daily updates on developer programs, resources and events. |
|
From the September 1999 issue of Microsoft Systems Journal.
|