
All about menu bars, toolbars, and shortcut menus
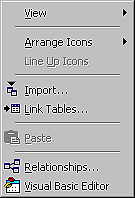
Just to get some lingo straight: the menu bar is the common menu you find at the top of most Office applications. It consists of named items that run along the top of the screen. In Access, you're no doubt familiar with the Database menu, as shown in Figure A. This menu is a menu bar. The Standard command bar shown in Figure B is called a toolbar. Usually, toolbars consist of buttons, but they're not limited to these. Finally, you're probably familiar with a shortcut menu. Right-click in any Office application, and Windows displays a shortcut menu like the one shown in Figure C. These command bars are also knows as Popups.
Figure A: Typically, a menu bar has text buttons and is docked at the top of the application window.

Figure B: Toolbars have image buttons and can be docked or free-floating, like the Toolbox.

Figure C: Shortcut menus, or Popups, appear when you right-click on an object.

In Access, you can customize which built-in buttons you want on a command bar just like you can in any of the other Office applications--you select Customize from the Tools menu option, and then add the commands and buttons you need. To create a custom item on a menu bar in Access, though, the procedure's a little different. The basic principle is that you create a macro that will perform the actions you want the command button to execute, and then use the special Access converter that creates the menu bar, toolbar, or pop-up menu for you.
Create the example
For our example, we'll create several macros to display various messages. We'll then convert this macro group into a menu bar, then a toolbar, and finally a shortcut menu. We'll then attach each one to a form so you can see the command bars in action. To begin, let's quickly create the macro we want to execute when we select the button.
Create the macro group
When you build a custom command bar, it's best to create a macro group that contains all the individual macro commands that you want on the command bar. With this in mind, in the Database Window, click the Macros button, and then click New. Once Access opens a new, blank macro, click the Macro Names button. When you do, Access displays the Macro Name column. Each individual name that we place in this column will translate into a button on your command bar. Now, in the first row, enter HelloMom as the macro's name, and then select MsgBox from the Action dropdown list. In the Action Arguments section, enter Hi, Mom! as the message. That's all we'll need for the first macro.
To create the second command for our menu bar, enter Goodbye in the next blank row of the Macro Name column. Select MsgBox from the Action list, and then enter Goodbye, Mom! as the message.
At this point, our macro group's complete, so click the Save button on the toolbar and name the macro CustomCommand. Now it's time to convert the macro into a command bar.
Access' macro conversion tools
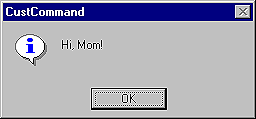
The CustomCommand macro should already be selected, so choose Tools/Macro/Create Menu From Macro from the Access menu bar. When you do, Access adds the docked menu bar to the top of the application window. Figure D shows our undocked command bar. To test it, click the HelloMom button. Access displays the message in Figure E. Next, let's create a custom toolbar.
Figure D: Use Access' built-in conversion process to create this menu bar.
![]()
Figure E: When you click the HelloMom button, Access runs the Hello macro that we created earlier.

Construct a new toolbar
To create a toolbar based on our macro group, we can either modify the existing menu bar, or build an entirely new command bar. For now, let's create a new one. To do so, in the Database Window's Macros section, hold down [Ctrl] and drag the CustomCommand macro to another area of the Database Window. When you release the mouse button, Access creates a copy of the CustomCommand macro. Right-click on this copy and select Rename from the resulting shortcut menu. Name the macro CustomCommand-Tool. Now, select Tools/Macro/Create Toolbar From Macro from the menu bar. Once again, Access displays the toolbar for your review. You'll notice, however, that it has text buttons, whereas normally toolbar buttons contain icons, so let's add some icons now.
Adding button images to the toolbar
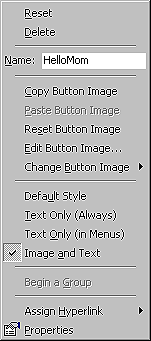
To start, right-click on the new toolbar and select Customize from the shortcut menu. After Access displays the Customize dialog box, right-click again on the HelloMom button. When you do, Access shows the shortcut menu in Figure F. Select Change Button Image and choose the yellow smiley-face from the cascading menu. Access places the image next to the button's text. If you want to remove the text from the button, select Default Style from the same shortcut menu.
Figure F: This shortcut menu only appears after you open the Customize dialog box.

Now, follow the previously outlined steps and add a frowning face to the Goodbye button. Finally, close the Customize dialog box to complete the process. At this point, your toolbar should look like the one shown in Figure G, if you didn't delete the text.
Figure G: We added an icon image to each toolbar button.
![]()
Making the Messages to Mom shortcut
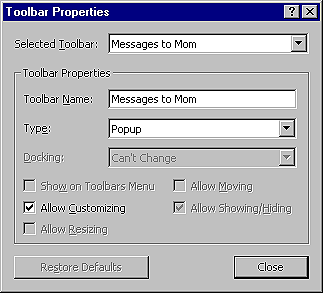
A toolbar and a menu bar with the same options is a little much, if you ask us, so let's convert the toolbar into a shortcut menu. To do so, we'll follow a slightly different procedure. Just as you normally would, right-click on the CustomCommand-Tool toolbar and open the Customize dialog box. Once there, select the Toolbars tab, if necessary, and then select CustomCommand-Tool from the bottom of the list. Now, click the Properties button. Access displays the Toolbar Properties dialog box. As you can see, you use this section to alter command bar properties. To transform the toolbar into a shortcut menu, select CustomCommand-Tool from the Selected Toolbars dropdown list. Next, change the Toolbar Name to Messages to Mom, and select Popup from the Type dropdown list. After you apply these settings, the dialog box should look like Figure H. When you change the Type field from Toolbar to Popup, Access displays the warning message; click OK. When you've finished, click Close to return to the Customize dialog box.
Figure H: We used the Toolbar Properties dialog box to change our toolbar into a shortcut menu.

How to find a shortcut menu
You won't find the new shortcut menu in the list of toolbars. Instead, Access has placed it in the Shortcut Menus group. When you select the check box next to this option, Access displays a menu bar of shortcut menus, as shown in Figure I. Our new Messages to Mom command bar is now part of the Custom group, with the actual command buttons cascading from that. To modify one of these buttons, right-click on it just like we did with the toolbar. Access will display the familiar shortcut menu shown in Figure F. Now that we've created a few command bars, close both the Customize dialog box and the shortcut menu, and let's attach our menus to a blank form to see how they work.
Figure I: All custom shortcut menus appear on this menu bar under the Custom group.

Attaching command bars to Access forms and reports
Click the Forms button on the Database Window, and then double-click on Create Form In Design View to open a new, blank form. Next, click the Properties button to open the form's property sheet. When you select the Other tab, you'll notice three properties--Menu Bar, Toolbar, and Shortcut Menu Bar. Access makes these same properties available for reports. You use these three properties to indicate which command bars you want your form or report to display when in Form/Report view or Datasheet view. To attach one of our command bars, in the Menu Bar field, select CustomCommand from the dropdown list, and then choose Message to Mom as the shortcut menu bar. Now, click the Form View button on the toolbar. When you do, Access displays the original menu bar with the HelloMom and Goodbye buttons. To view the shortcut menu, right-click anywhere on the form.
Add cascading menus to a command bar
Cascading menus offer a way to present a compact, organized menu that doesn't take up a lot of screen real estate. For example, suppose we wanted to add Copy, Cut, and Paste commands to the Messages to Mom shortcut menu. Instead of presenting them as individual options on the shortcut menu, we can add a cascading menu. To do so, return once more to the Customize dialog box. Select the Shortcut Menus check box, and select the Commands tab. Next, choose Built-in Menus from the list of Categories. When you do, Access displays a list of available commands. Drag the Edit group button to the Custom portion of the Shortcut Menus toolbar. As the mouse moves over each button, Access automatically expands the menu to show the associated pop-up menu. While still holding down the left mouse button, move the mouse pointer over Custom, Messages to Mom, and then the two command buttons. A black bar appears indicating where the Edit button will show up on the menu, as seen in Figure J. Position the black bar at the bottom of the menu and release the mouse button. Access places the Edit button beneath the Goodbye button. Now when you view the shortcut, the Edit commands will cascade out from the Edit button.
Figure J: The black bar indicates where Access will place the new button.

To add a custom cascading menu, select New Menu from the Categories list in the Customize dialog box. Drag the New Menu button from the Command list onto the command bar and use the steps we outlined above to position it. To change the button's name, right-click on the New Menu button and enter the desired name in the Name field.
Deleting custom shortcut menus
Once you've created a custom menu bar or toolbar, to delete it, simply select it in the Customize dialog box and click the Delete button. However, to delete a shortcut menu, you must first change it into either a toolbar or a menu bar. To convert the shortcut menu, click the Properties button in the Customize dialog box, and then find the shortcut menu in the Selected Toolbar field's dropdown list. Once you've chosen the custom shortcut menu, change the Type from Popup to either Menu Bar or Toolbar. When you close the Properties dialog box, the custom command bar will now appear in the list of toolbars, and you can delete it normally.
Conclusion
Often, the built-in Access command bars don't provide the full functionality that's needed, so you may need to build your own. In this article, we've shown you how to quickly convert macros into custom menu bars, toolbars, and shortcut menus.
Copyright © 1999, ZD
Inc. All rights reserved. ZD Journals and the ZD Journals logo are trademarks of ZD
Inc. Reproduction in whole or in part in any form or medium without
express written permission of ZD Inc. is prohibited. All other product
names and logos are trademarks or registered trademarks of their
respective owners.