![[ Microsoft WebBuilder logo ]](mitlogo.gif)
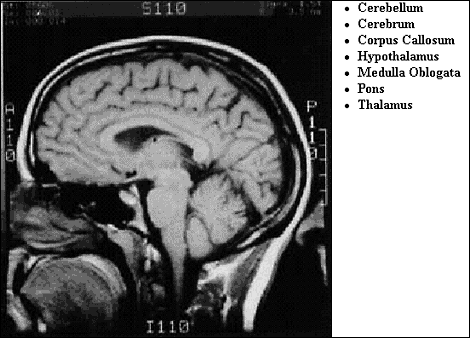
In a previous issue, we used the Clip attribute to hide and reveal images. In this issue, we'll show you a simpler way to do that, and we'll illustrate it with a different application. To make our images appear and disappear, we'll dynamically change the z-index of each image. And, although we'll again start with an image of the brain, this time we're conducting an anatomy class. Images of pointers identifying different anatomical parts of the brain will be made to appear and disappear as the user clicks on the anatomical names from a list. Figure A shows our brain image, along with the list of anatomical names.
Figure A: This is the brain image before the user clicks on an item from the list.

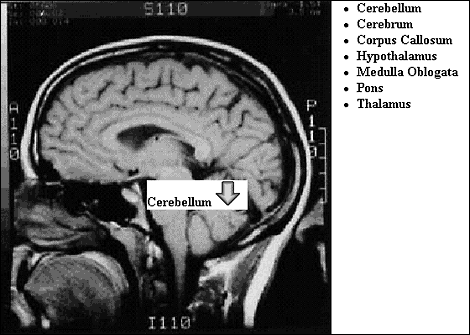
Figure B shows what happens when the user clicks on Cerebellum, the first item on list. A pointer, with the appropriate label, appears, pointing to that part of the brain.
Figure B: Here, the user has clicked on the first item in the list.

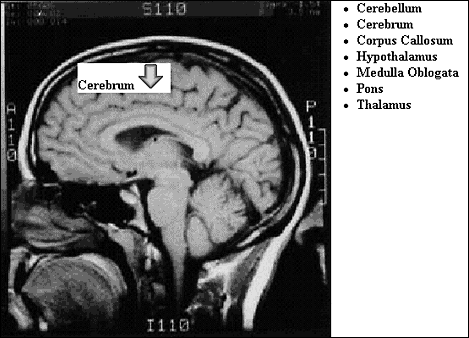
When the user clicks on the second item on the list, Cerebrum, as shown in Figure C, the first pointer disappears and the new pointer takes its place.
Figure C: Clicking on the second item on the list causes the first pointer to disappear and a new pointer to take its place.
 BODY parts
The code for the BODY of our page can be found in Listing A.
Listing A: BODY code - The code for the BODY of our page can be found in Listing A.
<BODY>
<DIV  STYLE="top:220;left:180"> Cerebellum
        <IMG SRC = "Darrow.gif" ></IMG></DIV>
<DIV STYLE="top:80;left:100"> Cerebrum
        <IMG SRC = "Darrow.gif" ></IMG></DIV>
<DIV STYLE="top:130;left:80"> Corpus Callosum
        <IMG SRC = "Darrow.gif" ></IMG></DIV>
<DIV STYLE="top:200;left:80"> Hypothamus
        <IMG SRC = "Uarrow.gif" ></IMG></DIV>
<DIV STYLE="top:280;left:70"> Medualla Oblogata
        <IMG SRC = "Uarrow.gif" ></IMG></DIV>
<DIV STYLE="top:230;left:140"> Pons
        <IMG SRC = "Rarrow.gif" ></IMG></DIV>
<DIV ID="point11" STYLE="top:180;left:100"> Thalamus
        <IMG SRC = "Rarrow.gif" ></IMG></DIV>

<IMG SRC="midsaggital.jpg"
        STYLE="position:absolute;top:5;left:0;z-index:2"
        height="400" width="400" border="0" >

<DIV style = "top:5;left:390;color:black" >
<UL>
        <LI onclick = "showPart(0);" > Cerebellum </LI>
        <LI onclick = "showPart(1);" > Cerebrum </LI>
        <LI onclick = "showPart(2);" > Corpus Callosum </LI>
        <LI onclick = "showPart(3);" > Hypothalamus </LI>
        <LI onclick = "showPart(4);" > Medulla Oblogata </LI>
        <LI onclick = "showPart(5);" > Pons </LI>
        <LI onclick = "showPart(6);" > Thalamus </LI>
</UL>
</DIV>


</BODY>
The first part of the code places all of our pointer images, with their labels, on the page. Note that the text and image for each pointer are placed within DIV blocks. This is necessary since IE 4 doesn't support absolute positioning for regular text blocks; however, surrounding each with a DIV tag and then positioning the DIV block solves that problem for us. Also, surrounding our pointer images with DIV tags allows us to easily access them with a script. More on that later.
We next place the image of the brain on the page:
<IMG SRC="midsaggital.jpg"
        STYLE="position:absolute;top:5;left:0;
        z-index:2" height="400" width="400"
        border="0" >
Note that initially the z-index for each of the pointer images has the default value of 1, but that the z-index for the brain image is set to 2. Recall that the images with a lower z-index are hidden by images with a higher z-index, which means at the outset the pointer images are hidden by the image of the brain.
We then put our list of anatomical parts on the page, which you'll find within the <UL></UL> tags in Listing A. When clicked, each item on the list sends a value up the showPart function that identifies which item sensed the click.
Our page also needs a Style Sheet, to help reduce some of the redundancy in our code. The style sheet appears, of course, within the <HEAD> block:
<STYLE>
        DIV {color:white;font-weight:bold;
                position:absolute}
</STYLE>
Now, all we need to do is to write the showPart function, shown in Listing B.
Listing B: Script for showing brain parts
<SCRIPT LANGUAGE = "JSCRIPT">
function showPart(num) {
        var tempptr;
        for (temp=0; temp<=6; temp++) {
                tempptr = document.all.tags("DIV").item(temp);
                tempptr.style.zIndex = 1;
        }

        var mypointer = document.all.tags("DIV").item(num);
        mypointer.style.zIndex = 4;
}
</SCRIPT>
The script begins by using a for loop to reset the z-index for all of the pointer images to 1. This puts us back to our initial state, displaying only the brain image. Using IE 4's tags and item methods, the for loop is able to access each of the first seven DIV blocks, which are the ones that hold the pointer images. For more information on the tags and item methods, see "Accessing elements using the tags collection." All that's left to do is to give the pointer image that corresponds with the user's selection a higher z-index, so that it will be displayed on top of the image of the brain. To access the correct pointer image, we use the value num, which was passed up to the showPart function, as an index into the tags collection with the statement:
var mypointer =
        document.all.tags("DIV").item(num);
Once we have the correct pointer image, we can raise its z-index using the DHTML style object attribute zIndex with the statement:
mypointer.style.zIndex = 4;
This month's article presents an easier way of hiding and revealing images by simply changing an image's z-index dynamically. That's made possible by using the style object attribute zIndex. Next month, we'll look at other attributes you can change dynamically using the DHTML style object.