This article may contain URLs that were valid when originally published, but now link to sites or pages that no longer exist. To maintain the flow of the article, we've left these URLs in the text, but disabled the links.


October 1999

Microsoft Systems Journal Homepage

Writing MTS-style Transactions with Visual Basic and SQL Server 7.0

Ted Pattison

If you plan to run Microsoft Transaction Server-style transactions, you should know how SQL Server works with the MTS runtime and the Windows NT Distributed Transaction Coordinator. Understanding how all these pieces fit together will improve your ability to optimize your application.

This article assumes you're familiar with SQL Server, MTS, and Visual Basic

Ted Pattison is an instructor and researcher at DevelopMentor (http://www.develop.com), where he manages the Visual Basic curriculum. Ted is the author of Programming Distributed Applications with COM and Visual Basic 6.0 (Microsoft Press, 1998).

Let's say that you're planning to create an online transaction processing (OLTP) application using Microsoft® SQL Server 7.0, Microsoft Transaction Server (MTS), and Visual Basic®. Maybe you're creating a forms-based desktop application that will connect to MTS objects from across a LAN. Maybe you're creating a browser-based application where you'll be instantiating MTS objects from ASP scripts. Whatever you have in mind, if you plan to run MTS-style transactions, you should know how SQL Server works with the MTS runtime and the Windows NT Distributed Transaction Coordinator (DTC). Understanding how all these pieces fit together will improve your ability to optimize your application.
      I'll examine the most significant aspects of controlling SQL Server transactions from a set of middle-tier MTS objects. You'll see a few new features of SQL Server 7.0 that provide you with better control and the potential for greater scalability. My objective is to arm you with the knowledge required to effectively tune your applications between concurrency and consistency.
      I'll start out by reviewing a little transaction processing theory and explaining the motivation for the SQL Server lock manager. Next, I will lay out the various isolation levels supported by SQL Server and discuss when each is appropriate. Finally, I'll dive into the murky waters of MTS and the DTC and discuss how to control a distributed transaction from an MTS application. The discussion will include various other topics, such as SQL Server hints and how to avoid deadlocks.

A Quick Flashback: ACID Rules
      A typical command in an OLTP application must read and write several pieces of data to complete its work. It would be incredibly difficult to write the code for an OLTP application without transactional support from your database or from the underlying platform because every transaction has many strange failure modes. If you didn't have any assistance, you'd be the one writing the code to deal with all these failure modes. Moreover, in a multiuser system you'd have to write all sorts of logic to deal with concurrency and synchronization.
      Fortunately, most of you will be able to take advantage of the transactional services provided by the underlying infrastructure. Relational DBMSs such as SQL Server and Oracle provide extensive support for transaction processing. Other types of data sources, such as mainframe applications and message queues, often provide their own forms of transactional support as well. This built-in support makes writing a transaction much simpler. A programmer starts a transaction, conducts a series of read and write operations, and finishes by committing or aborting the transaction. Most of the difficult work of dealing with failure and synchronization is handled by the system.
      If you've read anything about the theory behind transaction processing, you have no doubt heard of the ACID rules: a transaction must be atomic, consistent, isolated, and durable. When you write a transaction for an OLTP system, it is important that all participants adhere to these rules. You've probably seen a definition of these four terms countless times before, but just to be redundant over and over again, let's review them one more time.

Atomic A transaction must be an all-or-nothing proposition. Everything must be updated successfully or nothing should be updated.
Consistent Individual operations within a transaction may leave data in such a state that it violates the system's integrity constraints. Before a transaction completes, the system's data as a whole must be returned to a valid state.
Isolated The system must hide the uncommitted changes of a transaction from all the other transactions. The act of hiding or isolating changes is typically accomplished through locking.
Durable When a transaction is committed, the data sources involved must keep all changes in stable storage and these changes must be recoverable in the event of a system failure.
      Take a moment to consider what the I in ACID really means. The system needs to isolate a transaction's uncommitted changes from other transactions because uncommitted changes may be rolled back. Let's look at an example of a system that doesn't provide isolation. When transaction A makes a change, there is an interval of time before the change is committed. If transaction B is able to see and use the uncommitted changes from transaction A, problems can occur. What happens if transaction A is rolled back? Transaction B can be infected with data that never really existed. As you can see, if a system runs transactions concurrently, it must isolate uncommitted changes to enforce data consistency.
      Programmers rely on the underlying system to provide this isolation through locking. SQL Server incorporates a built-in lock manager that provides isolation by acting as a blocking agent. If transaction A modifies a data item, all other transactions that attempt to read this data item will be blocked until transaction A is released. Once transaction A is committed, the lock manager allows transaction B to read the data item in its new state. Once transaction A is aborted, transaction B can read the data item in its initial state. You should note that in both cases the lock manager prevents transaction B from seeing uncommitted changes. Transaction B must wait until transaction A has been released.
      At this point, it's important to make a few observations. Data consistency requires isolation, and isolation requires locking. Locking decreases concurrency because it results in blocking. Blocking reduces the system's overall responsiveness and throughput. From this you can formulate two important rules for optimizing an OLTP application. First, don't acquire locks on data items that aren't necessary. Second, try to minimize the time that any lock is held.

Locking and Granularity
      Most lock managers use more than one level of granularity when placing locks on data. Coarse-grained locks (such as table locks) isolate larger amounts of data. Finer-grained locks (such as record locks) isolate smaller amounts of data. If a transaction attempts to modify every record in a table, the lock manager can perform its work faster by acquiring and releasing a single table lock, as opposed to acquiring and releasing many individual record locks. This is especially true for a table that has 100,000 rows.
      Coarse-grained locks have a definite downside: they degrade concurrency. Once transaction A acquires a table lock, transaction B must wait to access any record in the table. This is true even when the two transactions aren't interested in the same records. With record-level locks, a transaction only locks the data it's actually using. Record-level locks are preferred in situations where a transaction is modifying a single record in a large table. Finer-grained locks have a much lower impact on concurrency.
      SQL Server adds one additional level of locking, known as a page lock, which is somewhere between a record lock and a table lock in terms of granularity. SQL Server stores records in pages, as shown in Figure 1. A standard page size helps SQL Server optimize disk I/O when moving data back and forth between memory and storage. Note that SQL Server 7.0 uses a page size of 8KB, while all previous versions used a page size of 2KB.

Figure 1  SQL Server Record Pages
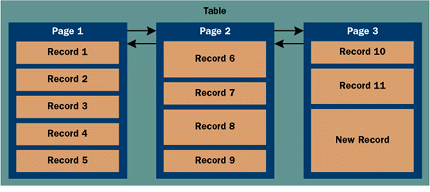
      Figure 1: SQL Server Record Pages

      SQL Server 6.0 and earlier supported only page and table-level locking. SQL Server 6.5 introduced a scheme where record-level locks could be used at the last page in a table when inserting rows. However, this feature was not turned on by default in SQL Server 6.5 and had to be explicitly enabled on a table-by-table basis. Version 7.0 is the first version of SQL Server to offer true record-level locking.
      SQL Server 7.0 has a built-in optimizer that determines which locking granularity to use for each read and write operation. If you are running an INSERT or an UPDATE that involves a single row, the optimizer will typically elect to use record-level locking. If you have an update that involves many rows, the locking optimizer may decide to escalate to page locks or possibly a table lock.
      In most cases you can rely on the SQL Server optimization to choose a locking granularity for you. In rare situations you may want to explicitly tell SQL Server to use row-level locking or a table lock. SQL Server includes a set of locking hints that influence locking granularity (see Figure 2). You can place one of these hints into your SQL code, like this:
 UPDATE Employee WITH (ROWLOCK)     
 SET Salary=Salary*1.25 
 WHERE Title='Programmer'
      The SQL Server lock manager uses two primary lock types: write locks and read locks. SQL Server uses write locks (also called exclusive locks) on data items to isolate the uncommitted changes of a transaction. SQL Server places read locks (also called shared locks) on data items while they are being read.
      A write lock conflicts with other write locks and with read locks. A transaction that has a write lock blocks all other transactions from reading or writing to the data item in question. The data item remains locked until the transaction is committed or rolled back. This makes sense because the system must isolate uncommitted changes to ensure data consistency. But this isolation has a price: the blocking reduces overall system concurrency and throughput.
      Read locks don't conflict with other read locks. Many transactions can obtain a read lock on the same data item concurrently. A transaction can't obtain a write lock on a data item that has outstanding read locks. This ensures that a transaction doesn't overwrite a data item while another transaction is reading it.

Understanding Isolation Levels
      It's not all that difficult to determine how SQL Server uses write locks. When a transaction makes a change, the data item in question is exclusively locked from all other transactions. The system knows to hold this exclusive lock to the very end of the transaction. What isn't as obvious is the timing with which SQL Server acquires and releases read locks. Here's the one question that you must ask: when a transaction reads a data item, how long should the system hold a read lock? Should the read lock be held for the entire transaction, or just for the duration of the read operation?
      While longer read locks help enforce data consistency and transaction isolation, they also degrade concurrency and throughput. You have the option of adjusting the amount of time a read lock is held by choosing the transaction's isolation level. There are four isolation levels supported by SQL Server 7.0: Read Uncommitted, Read Committed, Repeatable Read, and Serializable.
      With Read Uncommitted, the transaction can read any data items regardless of whether they have outstanding write locks. Additionally, the transaction will not acquire read locks. This isolation level provides the fastest access, but is highly vulnerable to data inconsistency.
      With Read Committed, transactions can only read data items that have been committed. A transaction running at this isolation level must wait until a write lock is released before accessing a data item. Read locks are held for the duration of read operations, but they are released before the end of the transaction. This is the default isolation level used by both SQL Server and ActiveX® Data Objects (ADO) when you run a transaction without MTS.
      The Repeatable Read level is like Read Committed except that all read locks are held for the lifetime of the transaction. You're guaranteed that any data item that's read in any stage of a transaction can be read later with the same results. That is, all data read by the transaction remains in the same state until the transaction is committed or rolled back. SQL Server 6.5 does not support this level, but instead escalates such requests to an isolation level of Serializable. The Repeatable Read level of isolation is supported by SQL Server 7.0.
      The Serializable level is like Repeatable Read with one extra qualification: a query that runs multiple times in a serializable transaction must always have the same result. Phantom data items can't be inserted by other transactions until the transaction has completed. For example, if a transaction running at this level runs a query to determine the number of records in a table, no other transaction can insert a row into the table until the transaction is completed. The system typically enforces this isolation level through the use of table locks or index locks. This is the default isolation level used by SQL Server when called by a transactional MTS object.
      Every isolation level except Serializable compromises isolation to improve concurrency and throughput. When you run transactions with an isolation level of Serializable, the data source attempts to provide the best level of concurrency and throughput without compromising consistency and isolation. A transaction is said to be serializable if it isn't affected by other transactions. When every transaction is serializable, it has the same effect on an application as running the transactions one at a time.

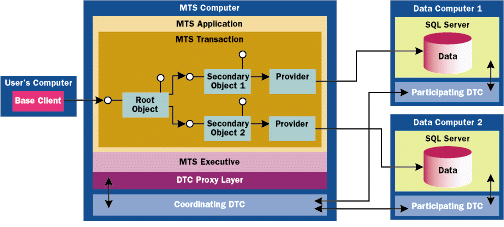
Running Distributed Transactions with MTS
      A single database server can enforce the ACID rules when it holds all the data involved in a transaction. For example, SQL Server supplies its own internal transaction manager and can provide commit and rollback behavior. OLTP systems that run distributed transactions are far more challenging to implement. Commit and abort behavior for each transaction must be coordinated across several data sources.
      Microsoft uses a Windows NT service known as the DTC to run transactions in a distributed environment. A session of the DTC typically runs on each computer that runs MTS components or SQL Server, as shown in Figure 3. Data sources such as SQL Server that provide support for DTC-style transactions are called resource managers.

Figure 3  Using the Distributed Transaction Coordinator
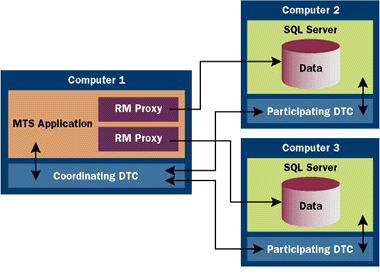
      Figure 3: Using the Distributed Transaction Coordinator

      While it's possible to write a DTC-based transaction without the help of MTS, such an undertaking involves quite a bit of system-level coding. Furthermore, some of the DTC interfaces are inaccessible to higher-level languages such as Visual Basic. MTS adds value by making it possible to run distributed transactions without having to get involved with the low-level details of the DTC.
      MTS hides all DTC interaction by providing a programming model based on declarative transactions. You are responsible for creating one or more objects inside the scope of an MTS transaction. When you invoke a method on transactional objects, MTS interacts with the DTC on your behalf to run distributed transactions. What you as a programmer are responsible for is not overly complicated. After you create your objects inside an MTS transaction, you use a handful of methods supplied by the ObjectContext interface. This allows you to control the flow of the transaction and to make sure the transaction is released as soon as possible. Let's examine how you create one or more objects inside an MTS transaction.
      Every MTS component has a transaction support attribute. The MTS Explorer allows you to read and modify this setting on a component-by-component basis. Visual Basic 6.0 added the MTSTransactionMode setting to the property sheet of each public class module inside an ActiveX DLL project. When you set this property, Visual Basic publishes the corresponding MTS transaction support attribute in your server's type library. When installing (not importing) your DLL with the MTS Explorer, MTS automatically configures your components with the appropriate transaction support attributes. The person installing a DLL into an MTS package doesn't have to set these attributes by hand, as is the case with DLLs created with Visual Basic 5.0 or when importing components.
      You might notice that there is a difference between the transaction support setting in MTS and the MTSTransactionMode setting for a Visual Basic class module. Don't let this bother you; it's just a slight inconsistency in the wording used by the MTS team and the Visual Basic team. Every transaction support property has a corresponding MTSTransactionMode setting.

Creating Objects Inside a Transaction
      There's only one way to place an object inside a transaction. You must ask the MTS runtime to place the object inside the transaction when the object is created. When the MTS runtime creates a new object, it examines the component's setting to see whether the new object should be created inside a transaction. You use the transaction support setting to tell the MTS runtime what to do.
      You can't add an object to a transaction after the object has been created. Likewise, you can never disassociate an object from the transaction in which it was created. Once an object is created inside a transaction, it spends its entire lifetime there. When the transaction is committed or aborted, the MTS runtime destroys all the objects inside it. As you'll see, this cleanup activity is essential to achieving the proper semantics of a transaction. The objects must be destroyed to enforce the consistency requirement of the ACID rules.
      An MTS object can be created by a base client or by another MTS object. When the MTS runtime receives an activation request to create a new object, it determines whether the object's creator is running inside an existing transaction. The MTS runtime also inspects the transaction support attribute of the component. From these two pieces of information, it can determine how to proceed.
      A component can have a number of transaction support settings. With Requires a Transaction, the object is created within the context of a transaction. The object is placed inside the transaction of its creator if one exists. If the creator isn't running in a transaction, the MTS runtime creates a new transaction for the object. The setting Requires a New Transaction means the MTS runtime creates a new transaction for the object. With Supports Transactions, the object is placed inside the transaction of its creator if one exists. If the creator isn't running in a transaction, the object is created without a transaction. And finally, Doesn't Support Transactions means that the object isn't created within the context of a transaction.
      A base client can initiate a transaction by activating an MTS object from a component marked as Requires a Transaction or Requires a New Transaction. The MTS runtime determines that the new object must run inside a transaction and that the creator isn't running inside a transaction. The MTS runtime therefore creates a new MTS transaction and then creates the new object inside it. The first object created inside a transaction is known as the root.
      The root object can create additional objects inside its transaction. If you're writing a method for an MTS object and you want to propagate another object inside that transaction, you must follow two rules. First, you must create the object from components marked as either Requires a Transaction or Supports Transactions. The MTS runtime will create the new object in the same transaction as its creator with either setting. Second, you must create additional objects with CreateInstance. The scope of every transaction is always contained within the scope of a single MTS activity. CreateInstance always creates the new object inside the same MTS activity and it gives the new object its own context wrapper.

How Does MTS Interact with the DTC?
      In most cases, you create several objects inside an MTS transaction. But let's take a look at a transaction that involves only the root object. Once you have an understanding of how the root object works, you'll be ready to examine what happens when you have several objects running inside a transaction.
      When a base client creates an MTS object from a component marked as Requires a Transaction, the MTS runtime creates a new MTS transaction in which to place the new object. The MTS runtime also calls down to the DTC to create a new distributed transaction on your behalf. You should think of the MTS transaction as the logical transaction and the DTC transaction as the physical transaction. It's important to understand that the MTS runtime doesn't create the physical transaction when it creates the logical transaction.
      The MTS runtime creates the logical transaction when it creates the root object, but it defers creating the physical transaction until the root object is activated. An MTS object isn't activated until the client invokes the first method call. Thus, there can be a short or a long delay between the creation of the object and the start of the DTC transaction. The MTS runtime delays creating the DTC transaction as long as possible.
      When the root object is activated, the MTS runtime calls down to the DTC to begin the transaction by obtaining an ITransactionDispenser reference and calling BeginTransaction. The MTS runtime creates the physical transaction with an isolation level of Serializable and a timeout interval of 60 seconds. This means that you work with the highest level of isolation and have one minute to complete your work. (The timeout interval is adjustable. You can modify this machinewide setting using the Properties dialog box in the MTS Explorer.)
      When the MTS runtime calls down to create the physical transaction, the DTC creates a transaction object and passes the MTS runtime an ITransaction reference. The MTS runtime holds onto this reference for the lifetime of the logical MTS transaction. The ITransaction interface lets the MTS runtime call Commit or Abort. As you can see, the MTS runtime is in control of the transaction's outcome.
      In Visual Basic, you cannot obtain an ITransaction reference to the transaction object and call Commit or Abort yourself. So now you're asking, "How do I control the transaction?" The answer lies in knowing when the MTS runtime calls Commit and Abort and seeing how you can influence its decision. The MTS runtime decides to commit or abort the transaction when the root object is deactivated. Before this, you can do quite a lot to change the state of the transaction. You can invoke methods on the object context that allow you to vote on whether you think the transaction should succeed or fail.

Understanding Commit/Abort Behavior
      Figure 4 shows a diagram of the root object, its context wrapper, and the MTS transaction in which they are running. It also shows some important internal flags maintained by MTS. These variables aren't directly exposed to you, but you should understand how they influence the MTS runtime's decision to commit or abort the transaction.

Figure 4  The Root Object and its Context Wrapper
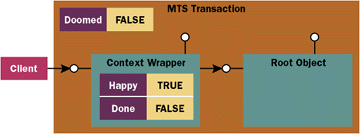
      Figure 4: The Root Object and its Context Wrapper

      The transaction as a whole maintains a Boolean value that indicates whether the transaction should be aborted. I'll call this the doomed flag. This value is initially set to False when the MTS transaction is created. When this flag is set to True, the MTS runtime knows to abort the transaction. Now, when does the MTS runtime inspect the doomed flag? And how can you change the value of the doomed flag?
      To answer these questions you must understand that the root object plays a very important role in every MTS transaction. There are two cases when the MTS runtime inspects the doomed flag: when the root objects returns control to its caller and when the root object is deactivated. Let's look at these two cases and see what the MTS runtime does after inspecting the doomed flag.
      The first case is when the root object returns control to its caller. The flow of execution always passes through the context wrapper first. When control passes through the context wrapper, the MTS runtime inspects the doomed flag. If the doomed flag is False, the MTS runtime doesn't do anything. If the MTS runtime finds that the doomed flag has been set to True by one of the objects inside the transaction, it aborts the transaction and deactivates all of its objects except for the root object. As you will see, this situation is undesirable. The transaction has been aborted, but the root object remains activated in a futile state. You can avoid this by following the rules I'll outline later.
      The second case when the MTS runtime inspects the doomed flag is when the root object is deactivated. When the root object is deactivated during an active transaction, the MTS runtime inspects the doomed flag and releases the transaction by calling either Commit or Abort. If the doomed flag is set to False, the MTS runtime calls Commit; if the flag is set to True, the MTS runtime calls Abort. Note that the deactivation of the root object should always cause the end of the transaction's life cycle. When the root is deactivated, the transaction will always be released. As long as the root object remains activated, the transaction can stay alive and hold onto its locks. Remember, you want to minimize the amount of time that any lock is held.
      There are two flags maintained inside the context wrapper for every MTS transactional object. The first one is the happy flag. It has an initial value of True when the context wrapper is created. When an object running inside an MTS transaction is deactivated, the MTS runtime examines its happy flag. If the happy flag is set to False, the MTS runtime sets the transaction's doomed flag to True. Once the transaction's doomed flag is set to True, it can't be reversed. This has a powerful implication: if the root object or any other object inside a transaction is deactivated in an unhappy state, the transaction is doomed to failure.
      Let's look at a few scenarios to see how all this works. First, imagine that a base client creates an object from a component marked as Requires a Transaction and invokes a method call. This results in the creation of an MTS transaction and triggers the MTS runtime to call the DTC to create the physical transaction as well. What happens if the base client simply releases its reference to the MTS object? When the MTS object is deactivated, the MTS runtime inspects its happy flag. The happy flag still has its initial value of True. Therefore, the MTS runtime doesn't change the doomed flag. The doomed flag remains False and the MTS runtime calls Commit on the transaction. You can run a simple example and confirm these results by examining the Transaction Statistics in the MTS Explorer.
      So that's pretty easy. You create an object inside a transaction, activate it, and then release it. All it takes is three steps to successfully begin and commit a transaction with the DTC. Even though you haven't done anything interesting yet, such as writing to a database, this example shows how and when the MTS runtime interacts with the DTC. You didn't write any code to explicitly begin or commit the transaction; the MTS model of declarative transaction does all of that for you.
      To abort a transaction all you do is set the happy flag inside the root object's context wrapper to False. One way to do this is by calling DisableCommit in a method of the root object:
 Dim ObjCtx As ObjectContext
 Set ObjCtx = GetObjectContext()
 ObjCtx.DisableCommit()
When the base client invokes a method on the root object with this code, the MTS runtime changes the value of the happy flag to False. Now, when the base client releases its connection, the root object is deactivated. During the object's deactivation, the MTS runtime sees that the happy flag is False and changes the value of the transaction's doomed flag to True. When the root object is deactivated, the MTS runtime calls Abort on the transaction.
      DisableCommit is complemented by another method named EnableCommit, which simply returns the happy flag to True. You can call each of these methods repeatedly. The happy flag is just a Boolean value, so whichever method is called last before the object is deactivated determines how the MTS runtime handles the transaction. When you call one of these methods, you're simply voting on whether you think the transaction should succeed. Note that because MTS only looks at these bits after your method has returned control to the context wrapper, you can call EnableCommit and DisableCommit as many times as you like within a given method. Only the last call prior to returning from your object's method will actually matter.

Calling SetComplete and SetAbort
      In addition to DisableCommit and EnableCommit, two other important methods let you control your transaction: SetComplete and SetAbort. Like the other two methods, these cast a vote by modifying the happy flag. SetComplete sets the happy flag to True, while SetAbort sets it to False. SetComplete and SetAbort are different from the other two methods because they set the done flag to True. As you'll see, the done flag has a dramatic effect.
      The context wrapper provides a basis for interception. Interception lets the MTS runtime conduct preprocessing and postprocessing on a call-by-call basis. When a method call returns from an MTS object through the context wrapper, the MTS runtime inspects the done flag. If the done flag is set to True, the MTS runtime deactivates the object. Therefore, when an MTS object calls SetComplete or SetAbort, the MTS runtime deactivates it upon return of the method call. Because SetAbort also sets the happy bit to False, this has the effect of dooming the transaction. If an object that is the root of a transaction calls SetComplete, the context wrapper will no longer wait for the client to release its reference and will then attempt to commit the transaction immediately.
      The way in which the MTS runtime inspects the other flags and decides whether to commit or abort the transaction works the same way it does when calling EnableCommit and DisableCommit. A call to SetComplete or SetAbort simply forces the MTS runtime to end the transaction much sooner, which means those restrictive locks your transaction was holding get released earlier. This optimization allows for much higher levels of scalability; you don't have to wait for the client to release the root object.
      It's important to use SetComplete and SetAbort at the appropriate times. When you cast your vote by calling DisableCommit or EnableCommit, the transaction and all its locks are held until the base client releases the root object. Calling SetComplete or SetAbort is much better because the root object forces the MTS runtime to release the transaction—it's faster and more reliable. When you work in an OLTP environment, the most important thing you can do to improve concurrency and throughput is to reduce the amount of time that any transaction holds its locks.
      You've seen that the MTS runtime deactivates the root object and releases the transaction when you call SetComplete or SetAbort. This leads to another important question: how does deactivation of the root object affect the client? When a base client invokes a method that includes a call to SetComplete or SetAbort, the object is deactivated and destroyed. If the client had to deal with the fact that the object has died, you'd have a messy problem. Fortunately, the MTS runtime can hide the object's demise from the client. Let's look at how this is possible.
      The base client thinks that it's connected directly to the object, but it's really holding a reference to the context wrapper. This allows the MTS runtime to perform a little trickery. When the object is deactivated, the client remains connected to the context wrapper. When the base client invokes another method call, the MTS runtime creates another instance from the same component and activates it inside the context wrapper. This just-in-time activation policy makes the base client think that it's dealing with a single object across method calls. However, behind the context wrapper, the MTS runtime creates and destroys objects on every call.
      If a base client continues to call methods that call either SetComplete or SetAbort, the MTS runtime creates and releases a new root object and a new transaction each time. All of this occurs within the window of time that starts with the method call's preprocessing and ends with the postprocessing. This is how you should write your MTS transactions. An MTS transaction and the objects that are inside it should be flashes in the pan. In the world of OLTP, shorter transactions will almost guarantee better concurrency and increased throughput.
      Next, I'll examine how to add secondary objects to an MTS transaction. The core concepts are the same. The root object still calls SetComplete or SetAbort. This forces the MTS runtime to release the transaction and all the locks that it holds before returning control to the base client. When you program in an OLTP environment, you must adopt a "get in and get out" philosophy. Acquire your locks late and release them early. The MTS programming model gives you plenty of support for this new mindset.

Programming Multi-object Transactions
      The root object can create secondary objects inside the same transaction by calling CreateInstance on components that are marked as either Requires a Transaction or Supports Transactions. Figure 5 shows a root object and three secondary objects inside an MTS transaction. If you create these secondary objects correctly, each will have its own context wrapper. It will therefore also have its own happy flag and done flag.

Figure 5  Root and Secondary Objects
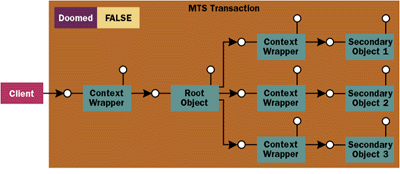
      Figure 5: Root and Secondary Objects

      An MTS transaction is a democratic community in which each object gets to vote on whether the transaction should succeed. A secondary object follows the same rules as the root object. When it is deactivated, the MTS runtime inspects its happy flag. If the happy flag is set to False, the MTS runtime sets the transaction's doomed flag to True. When this happens, the transaction is doomed to failure. There is nothing that any other object can do to set the doomed flag back to True. As you can see, any object inside a transaction can prevent the transaction from committing.
      You'll often write methods in the root object to create secondary objects. Once the secondary objects have been created, the root object can call their methods to complete the work for the transaction. It's important to understand how things work inside a transaction so you can coordinate communication between all these objects.
      Let's look at the case in which the root object makes several successful method calls on a secondary object. As long as the secondary object doesn't call SetComplete or SetAbort, it remains activated until it is released by the root object. The root object can make several successful calls on the secondary object and then call SetComplete to commit the transaction. When the root calls SetComplete, both objects are deactivated. The secondary object is deactivated first, followed by the root object. As long as neither object sets its happy flag to False by calling SetAbort or DisableCommit, the transaction is committed.
      What happens if the secondary object wants to abort the transaction? If the secondary object calls SetAbort and returns, the MTS runtime deactivates the object and sets the doomed flag to True. At this point, the root object regains control and must decide how to deal with the situation. Since the doomed flag is set to True, the root object can't save the transaction. Once a secondary object has been deactivated and sets the doomed flag to True, the root object shouldn't call SetComplete. If it does, the base client receives an mtsErrCtxAborted error from the MTS runtime. Moreover, if the root object tries to activate another object inside the transaction after the doomed flag is set to True, it experiences an mtsErrCtxAborting error.
      If the root object simply returns control to its caller at this point without calling SetComplete or SetAbort, the MTS runtime sees that the doomed flag has been set to True and it releases the transaction and deactivates all the secondary objects. This results in an unfortunate situation. The root object is left activated in a crippled state. Future method calls on the root object will more than likely result in mtsErrCtxAborted and mtsErrCtxAborting errors raised by the MTS runtime.
      These problems should lead you to one conclusion. When a secondary object calls SetAbort, the root object should also call SetAbort and halt any attempt to complete additional work. However, there's one small hitch: the root object cannot examine the doomed flag—it can't ask the MTS runtime whether a secondary object has called SetAbort. Therefore, your secondary objects must communicate with the root object when they call SetAbort. You can use the return value or output parameters in the methods of your secondary objects to indicate whether they called SetAbort, or you can raise errors from the secondary objects back to the root object.
      For example, if a secondary object decides to roll back the entire transaction in Method1, it can use the following sequence of calls:
 Dim ObjCtx As ObjectContext
 Set ObjCtx = GetObjectContext()
 ObjCtx.SetAbort
 Dim ErrorCode As Long, Desc As String
 ErrorCode = vbObjectError + 1024
 Desc = "The employee's salary couldn't be updated"
 Err.Raise ErrorCode, , Desc
If you follow this convention, a method in the root object can assume that all secondary objects raise an error after calling SetAbort. This means that an error handler in the root object should call SetAbort and raise its own error to forward the secondary object's error message back to the base client. If the root object can call methods on the secondary objects without experiencing an error, it can assume that everything is fine and call SetComplete. Here's what a method call in the root object looks like:
 Sub MyRootMethod()
   On Error GoTo ErrorHandler
   Dim ObjCtx As ObjectContext
   Set ObjCtx = GetObjectContext()
   Dim Secondary1 As CSecondary
   Dim ProgID As String
   ProgID = "MyDll.CSecondary"
   Set Secondary1 = ObjCtx.CreateInstance(ProgID)
   Secondary1.Method1
   ' commit TX if call completes successfully
   ObjCtx.SetComplete
 Exit Sub
 ErrorHandler:
   ' rollback tx and get out ASAP
   ObjCtx.SetAbort
   ' forward error information back to base client
   Err.Raise Err.Number, , Err.Description
   Exit Sub
 End Sub
      Of course, this code shows only one of many possible approaches. If you take a different approach, be sure to carefully coordinate the communication between the secondary objects and the root object.

Enlisting Connections to SQL Server
      Now that I've covered the basics of how to commit and roll back an MTS transaction, I'll discuss how to connect to SQL Server and make changes inside the scope of a DTC-based transaction. Once you have created an object inside an MTS transaction and established a connection to your database, the connection must be enlisted with the DTC. Every connection to any resource manager in the transaction must be enlisted so that the DTC can coordinate commit/abort behavior. You should note that the DTC commits distributed transactions by executing a special protocol known as two-phase commit.
      Enlisting a SQL Server connection in an MTS application is actually quite simple. When you establish a typical connection using ADO, OLE DB, or ODBC, your connection is automatically enlisted as long as you're running inside a transaction. All your write and read operations will be charged against the current DTC-based transaction.
      Let's look at an example. If you're connecting to SQL Server through ADO with the native OLE DB provider or an ODBC driver, you can connect and enlist with the following code:

 Dim conn As ADODB.Connection
 Set conn = New ADODB.Connection
 conn.Open "<your connection string here>"
As you can see, this is the same code that you'd write to create any ADO connection. In the MTS runtime, your connections are automatically configured for automatic enlistment. All you have to do is open the connection from an object running inside an MTS transaction. The OLE DB provider (or the ODBC driver) interacts with the DBMS to establish a connection between multiple sessions of the DTC, as shown in Figure 6. You simply make your connections and begin accessing data. All of your changes are charged against a DTC-based transaction being controlled by the MTS runtime.
Figure 6  Coordinating DTC Sessions
      Figure 6: Coordinating DTC Sessions

MTS and Isolation Levels
      When you create a connection from an object running inside an MTS transaction, the MTS runtime always moves your isolation level to Serializable. Conducting your read operations with an isolation level of Serializable gives you the highest level of data consistency. However, it can also have a significant impact on concurrency and system throughput in the cases where it isn't required. There are times when you want to turn the isolation level in some operations down to either Read Committed or Repeatable Read. Running some operations at lower levels of isolation can improve your application's responsiveness and overall throughput.
      One option for running at a lower isolation level is to open connections from nontransactional MTS objects. In such a case, your connections will not be enlisted by the DTC. When you submit a SQL statement, SQL Server will create an implicit transaction with an isolation level of Read Committed. If you want to execute multiple SQL statements together inside the scope of a single transaction, you must begin and control the transaction with either Transact-SQL commands or methods provided by the ADO Connection object. Both Transact-SQL and ADO give you the ability to explicitly start a transaction and to adjust the isolation level to any of those supported by SQL Server. Transact-SQL and ADO also give you the ability to commit or abort the transaction.
      One thing to note about running a transaction explicitly from nontransactional MTS objects is that you must begin and release the transaction with code. This style of programming is very different from the MTS declarative model. Mixing these two programming styles into one project can be confusing. This might lead you to the conclusion that it's better to write all your transaction logic inside the scope of declarative MTS transactions. If you take this approach, you should learn how to lower the isolation level of a SQL command inside an MTS transaction.
      SQL Server 7.0 has added a few more SQL hints so you can adjust a command's isolation level as you see fit. Figure 7 shows a list of the hints that affect the isolation level. If you want to run a SELECT statement using one of these hints, you can write the following SQL code:


 SELECT CreditLimit 
 FROM Customers WITH (READCOMMITTED)
 WHERE Customer='Bob'
Watch out for Deadlocks
      Creating an OLTP application typically requires balancing two antagonistic forces. On one hand, you want the highest possible levels of concurrency; on the other hand, you must have isolation to guarantee the consistency of your data. As you know, this means the system must place locks on data items to block certain transactions while other transactions perform their work. Unfortunately, in an OLTP application concurrency and consistency are always in conflict.
      An MTS application runs its transactions with a default isolation level of Serializable. This means that the integrity of the system's data is the primary concern. As long as you do your part and write your business logic and data access code correctly, MTS and the DTC will make sure that your data stays in a consistent form. Most of the time when a transaction is blocked, it simply waits its turn and then gets to do its work. However, sometimes the locks acquired by a transaction don't have the desired effect.
      In some situations, the locks held by two or more transactions conflict in such a way that things can't be resolved by waiting. This is known as a deadlock. For example, suppose transaction A has acquired a write lock on data item X and is attempting to acquire a write lock on data item Y to complete its work. If transaction B has acquired a write lock on data item Y and is blocking on the write lock held on data item X, the two transactions have hit a stalemate. Without intervention, both transactions will wait indefinitely for the other to release its locks.
      A single DBMS such as SQL Server can detect a deadlock situation. SQL Server resolves a deadlock by terminating one of the transactions and sending an error message to the victim. When the locks of the victim are released, the other transaction can complete its work. In a distributed transaction, some deadlock situations cannot be detected by a single DBMS. This is why MTS transactions have a timeout of 60 seconds. If a transaction cannot be completed within that time, the DTC assumes that a deadlock situation has occurred. In either case, your code must be ready to deal with deadlock errors when they arise.
      You can employ a few techniques to prevent deadlocks in your MTS applications. For example, a cyclic deadlock can occur when two programmers have written separate transactions for the same system. Say a programmer writes a transaction that modifies the Products table and then the Customers table. If another programmer writes a second transaction that accesses the same tables in the reverse order, the chance of a deadlock is greater. This is especially true in a distributed environment when two tables can live in different databases on different computers. You can reduce the chances of cyclic deadlocks by maintaining a consistent flow of data access across all the transactions that run in a single system.
      Deadlocks resulting from lock conversion are also common and require your attention. Say you're writing a transaction that removes a specific quantity of a product from inventory. Your transaction starts by running a SELECT statement against the Products table to find out whether the requested quantity is in stock. If the inventory quantity is equal to or greater than the requested quantity, you then run an UPDATE statement to remove the quantity from inventory. Let's assume that the SELECT statement and the UPDATE statement are both run against the same record in the Products table.
      In a high-volume OLTP application, there's a good chance that two separate transactions will both run the SELECT statement and acquire read locks before either can acquire the write lock needed for the UPDATE statement. This results in a deadlock. Each transaction waits for the other to remove its read lock so that it can acquire a write lock. The problem is the transaction initially acquires a read lock on a data item and then tries to convert the lock to a write lock. If two transactions acquire the read lock at the same time, neither party can convert the lock to a write lock.
      SQL Server supports read locks and write locks, as well as another type of lock called an update lock, which solves the problem of deadlocks due to lock conversion. You should use an update lock whenever you need to escalate a read lock to a write lock during a transaction. An update lock conflicts with write locks and with other update locks. A transaction will block while trying to acquire an update lock if another transaction has already acquired a write lock or an update lock. However, unlike a write lock, an update lock doesn't conflict with read locks. If a transaction holds a read lock on a data item, another transaction can acquire an update lock. Likewise, if one transaction holds an update lock, other transactions can acquire read locks.
      You can explicitly ask for an update lock by using the (UPDLOCK) hint in a SELECT statement.
 SELECT AccountBalance
 FROM Customers WITH (UPDLOCK)
 WHERE Customer = 'Bob'
You can get the same effect with SQL Server by using a special type of ADO cursor. That is, if you open an ADO recordset on a table using a pessimistic server-side cursor, SQL Server will also acquire an update lock instead of a read lock. Both of these examples show how to eliminate deadlocks that are caused by lock conversion.
      While you can write your applications to eliminate some types of deadlocks, other types are unavoidable in a large OLTP system. Some deadlocks will be caught by the DBMS; others will occur when an MTS transaction reaches its timeout value. You must plan to trap deadlock errors when they occur and handle them as gracefully as possible. Sometimes you can handle a deadlock by resubmitting the transaction. This can hide a deadlock situation from the user of the application. At other times, you might be forced to return an error to the caller, along with instructions to "try again later."

Summary
      If you've spent time writing transactions inside SQL Server stored procedures, you're probably used to calling BEGIN, COMMIT, and ROLLBACK. The MTS model of declarative transaction is very different. It may take you some time to get used to it—this new programming model isn't that intuitive at first. However, in time you'll see that it requires less code than the older procedural-based model of transaction programming. If you really want to master MTS-style transactions, one thing is certain: your understanding of how MTS and the DTC interact with SQL Server is crucial.
      SQL Server 7.0 has added quite a few new features to enhance scalability. Row-level locking is a significant improvement because it allows the system to conduct locking at much finer levels of granularity. This can significantly improve the responsiveness and throughput of a high-volume OLTP application. What's more, SQL Server 7.0 provides more control over isolation levels. This allows you to tune your applications to get the best balance between consistency and concurrency. Using MTS together with SQL Server makes it possible to create an OLTP application that can grow along with your company.


For related information see: Getting Started with SQL Server 7.0 at: http://msdn.microsoft.com/library/psdk/sql/8_gs_00.htm.
  Also check http://msdn.microsoft.com for daily updates on developer programs, resources and events.

From the October 1999 issue of Microsoft Systems Journal.