

Figure A: When you see this message, you know someone is
accessing your computer.
You can easily stop intruders from remotely accessing your PC. However, before you do, you should probably find out who the intruder is. Microsoft has included with Windows a tool called Net Watcher that you can use for this sort of detective work.
What's Net Watcher?
Net Watcher is basically the Windows equivalent of NetWare's Monitor or Windows NT Server's Server Manager. It allows you to see who's connected to your computer and what files they have open. You can also use Net Watcher to see who has files open on a remote computer.
Installing Net Watcher
To install Net Watcher, go to Control Panel and double-click the Add/Remove Programs icon. When you see the Add/Remove Programs Properties dialog box, select the Windows Setup tab and then click on Accessories. (Be sure to click on the word Accessories and not the check box beside it. If you deselect this check box, you'll remove any accessories you currently have installed.) Now, click the Details button and you'll see a list of available accessories. Click the check box beside Net Watcher to select it, as shown in Figure B, and click OK. At this point, Windows may ask for your installation media. After the operating system copies the necessary files, it will return you to the Add/Remove Programs Properties dialog box, where you should click OK to return to Control Panel.
Figure B: Select Net Watcher from the Components list box.
![[ Figure B ]](w9p99a1b.gif)
Create a shortcut
When you install Net Watcher, Windows doesn't automatically create a Start Menu shortcut to it. To do so manually, select Start | Settings | Taskbar & Start Menu. When you see the Taskbar Properties dialog box, select the Start Menu Programs tab. Next, click the Add button, and Windows will start the Create Shortcut wizard. At this point, type the path of your Windows directory followed by Netwatch.exe in the Command Line text box, as shown in Figure C.
Figure C: In the Command Line text box, type the path to your
Windows directory, followed by Netwatch.exe.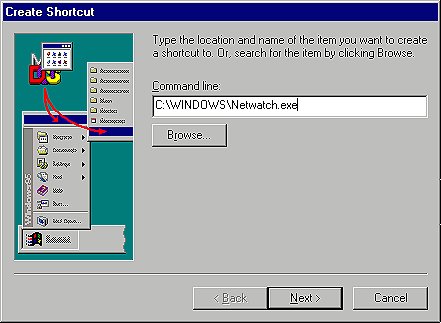
Now, click the Next button and you'll see the Select Program Folder dialog box. You can place the shortcut anywhere you want on the Start menu, but we recommend putting it on the System Tools submenu. To do so, select System Tools, as shown in Figure D, and click the Next button.
Figure D: Select the System Tools icon to add Net Watcher to the
System Tools submenu.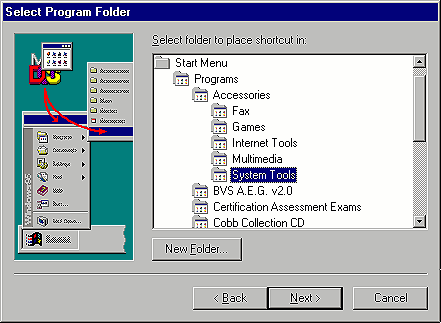
The Create Shortcut wizard will now display the Select A Title For The Program dialog box. Simply type Net Watcher in the text box and click the Finish button. Windows will return you to the Taskbar Properties dialog box, where you should click OK to finish the procedure.
Using Net Watcher to see open files
To catch your intruder, launch Net Watcher by clicking the Start button and selecting Programs | Accessories | System Tools | Net Watcher. The utility will open and display a screen similar to the one shown in Figure E.
Figure E: The Net Watcher display shows which users have files
open on your machine.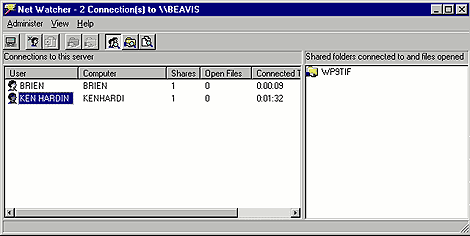
As you can see, the Net Watcher window is divided into two areas. The left panel shows everyone who's currently connected to your computer. If you click on a name, Net Watcher will show you the shared resources that user is accessing.
For example, in Figure E we've selected the user KEN HARDIN. The pane to the right shows that he's connected to a folder called WP9TIF. The utility also reports that KEN HARDIN doesn't have any of our system's files open. However, this display can be deceiving, since Net Watcher won't report any open files unless the intruder is trying to run an executable file directly from your computer. So, in our example, even though Net Watcher says KEN HARDIN doesn't have any files open, he could actually be using one of our word processing documents or spreadsheets.
Disconnect the intruder
Now, let's suppose you recognize the name of the connected user and you want to get that person out of your system as quickly as possible. You could immediately disconnect the intruder by clicking on his name in Net Watcher's left pane and choosing the Disconnect User command from the Administer menu. When you do, you'll see a confirmation box, shown in Figure F
, warning you that the user may lose data if you go ahead and disconnect the person from your machine. Click Yes.
Figure F: Windows will display this warning when you try to
disconnect someone from your PC.
Viewing current conditions
While Net Watcher is a very handy utility, it's important to understand that it doesn't register real-time readings. Instead, it examines network connections at pre-programmed intervals. So, if you've had Net Watcher open for a while and you want to see your machine's current status, you'll have to press [F5] or use the Refresh command on the View menu.
Preventing unauthorized access
Now that you've used Net Watcher to learn who's breaking into your computer and you have some idea of what files are at risk, you can easily prevent the intruder from getting back in. To do so, open My Computer and double-click on your hard drive to get an overview of all the folders on the drive. As you can see in Figure G, some of the folder icons may include a picture of a hand holding the folder. These folders are shared, which means other users on your network can remotely access the resources in them. In our example, the user KEN HARDIN was accessing a share on our hard drive called WP9TIF. As you can see in Figure G, the WP9TIF folder is shared.
Figure G: Folder icons that include a picture of a hand indicate
that that folder is a shared resource.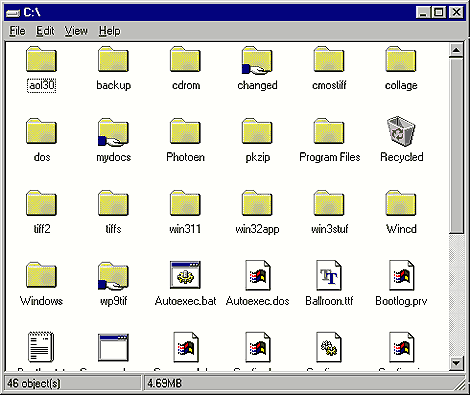
To prevent someone from accessing this resource, begin by right-clicking on the folder's icon. From the resulting menu, select Sharing, and you'll see the Sharing tab of the folder's Properties dialog box, as shown in Figure H.
Figure H: The Sharing tab of the Properties dialog box controls
shared access.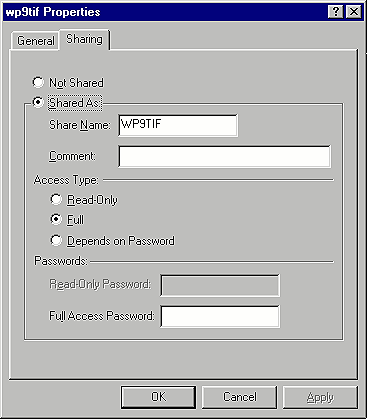
If you don't want anyone to use the folder's contents, you can select the Not Shared option and click OK. However, if you need certain people to have access to the folder, you should simply limit access privileges rather than revoke them entirely.
Limiting access privileges
You can use two different methods to limit remote users' access to a share. The first is to make the share read-only. This is a good approach if the folder doesn't contain any confidential information and you just don't want someone to erase or modify any of your files. To make a share read-only, simply select the Read-Only option in the Access Type section of the Sharing tab. Keep in mind that setting the share to read-only doesn't change the local attributes of the files within the folder. For example, suppose we flagged the WP9TIF share as read-only for users on a remote computer. Users on the local machine would still have full privileges to the files.
The second way to limit remote access to a share is to password protect the resource. As with read-only access, Windows will ask you for a password only if you're trying to access the folder from a remote machine. The local machine will still have full privileges to the folder.
To password protect a share, you must first decide what access level you want to give remote users: read-only or full. You can even create two separate passwords, giving one to users who should have just read-only access and the other to users who require full access to the share.
When you've decided what access level you want users to have, click the option that corresponds to that access type. As you can see in Figure H
, the Passwords section lets you enter a password for the access type you've specified. When you've made your selection, click OK. Now when unauthorized users try to access your folder, they'll be blocked by Windows' demand for a password.
Conclusion
Net Watcher is a valuable tool for network security. In this article, we've shown you how to install Net Watcher and use it to identify and disconnect an intruder. We've also shown you how to assign access to folders to prevent unwanted users from accessing them. Your network has never been safer.
Copyright © 1999, ZD
Inc. All rights reserved. ZD Journals and the ZD Journals logo are trademarks of ZD
Inc. Reproduction in whole or in part in any form or medium without
express written permission of ZD Inc. is prohibited. All other product
names and logos are trademarks or registered trademarks of their
respective owners.