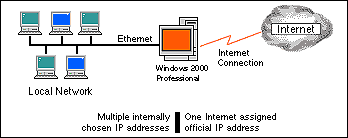

Figure A: Windows 2000 Professional lets you share an Internet
connection across your LAN.
Setting up your hardware
The first task at hand is to install two network interface cards (NICs) in the workstation running Windows 2000 Professional. One NIC will serve as the connection to the Internet; the other NIC will serve as the connection to your LAN. Once you've installed the two NICs, restart your workstation. In order to enable shared access, you'll need to have administrative rights. So, make sure you have the appropriate rights before logging on to your workstation.
Ensuring your NICs don't conflict with any hardware
Once you've logged on to your workstation, the next step is ensuring your NICs don't conflict with any other hardware devices you may have installed in your workstation. The best way to check for device conflicts is to look at Device Manager. Right-click on My Computer, and then select Properties. Next, click on the Hardware tab in the System Properties window, as shown in Figure B.
Figure B: Click on the Hardware tab in the System Properties
window.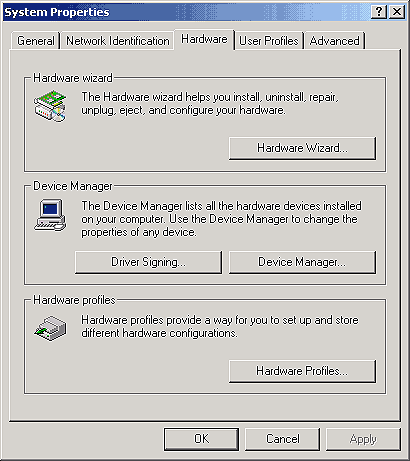
Lastly, click the Device Manager button to display the Device Manager window, as shown in Figure C. Look for any device conflicts and resolve them before proceeding.
Figure C:Using Device Manager, check for any device conflicts in
your workstation.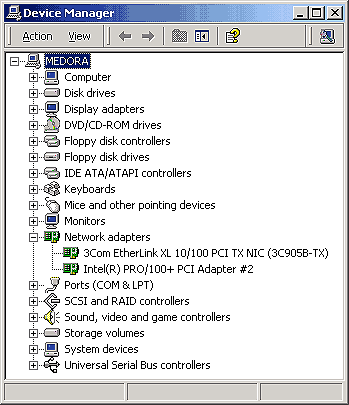
In our example, we're using two NICs provided by different manufacturers. This lets us easily identify which NIC is being used for the Internet connection and which NIC is being used for the LAN connection. While using different NICs isn't a requirement, we suggest using NICs from different manufacturers or, at the very least, using different NIC models from the same manufacturer.
Specifying your Internet connection NIC and your LAN connection NIC
Once you've installed your NICs without any device conflicts, you can specify which NIC will serve as your Internet connection and which NIC will serve as your LAN connection. To do so, right-click on My Network Places on your workstation desktop and select Properties. You'll see that you have two connection icons in the Network and Dial-up Connections window--one for each NIC you've installed. So that you can easily identify the purpose of each connection, you'll want to rename them. Right-click on each connection icon and select Rename. As you can see in Figure D and in Figure E, we've named our connections Internet and LAN, respectively.
Figure D:Use a meaningful name for your Internet
connection.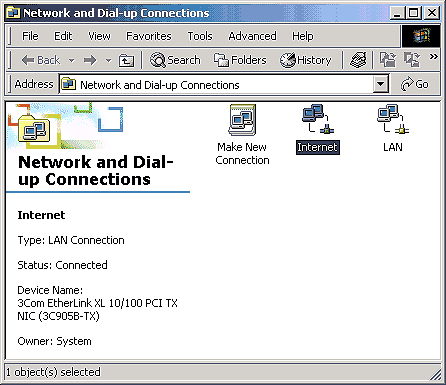
Figure E: Use a meaningful name for your LAN connection.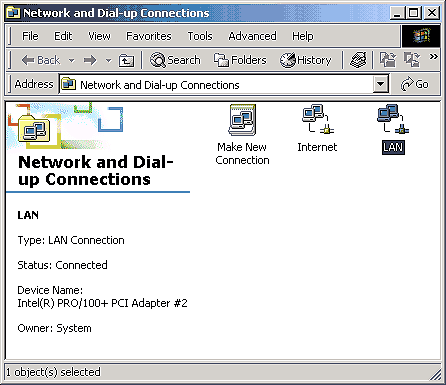
Enabling shared access
So far, you've installed two NICs. You've also determined which one you'll use for your Internet connection and which one you'll use for your LAN connection. The next step is to actually enable shared access on your Internet connection. With the Network and Dial-up Connections window open, right-click on your Internet connection icon and select Properties. Click on the Shared Access tab in the Internet Properties window, and select the Enable Shared Access For This Connection check box, as shown in Figure F.
Figure F: Enable shared access on the Shared Access tab of your
Internet connection.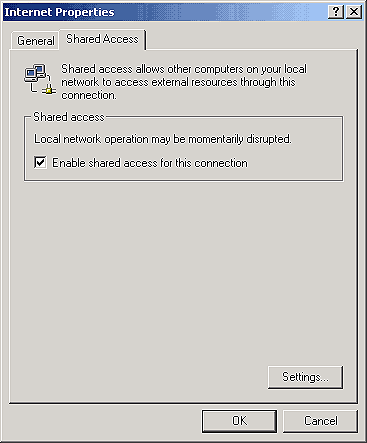
When you enable shared access, Windows 2000 Professional automatically configures certain protocols, services, interfaces, and routes. For example, when you click OK, you'll see an alert indicating that your LAN adapter will be given a static IP address of 169.254.0.1. For now, you can simply click OK to accept the default IP address and corresponding subnet mask.
Configuring IP addresses for each connection
In our example, we're going to configure our Internet connection for dynamic IP addressing and our LAN connection for static IP addressing. The DHCP server provided by our Internet Service Provider (ISP) will issue a dynamic IP address to the NIC on our Internet connection. For our LAN connection, we'll use a static IP address from the private IP address space. With the Network And Dial-up Connections window open, double-click on the Internet icon. Next, click Properties, and then double-click on Internet Protocol (TCP/IP) Properties. Configure the properties as shown in Figure G. Then, click OK.
Figure G: Configure your Internet connection for dynamic IP
addressing.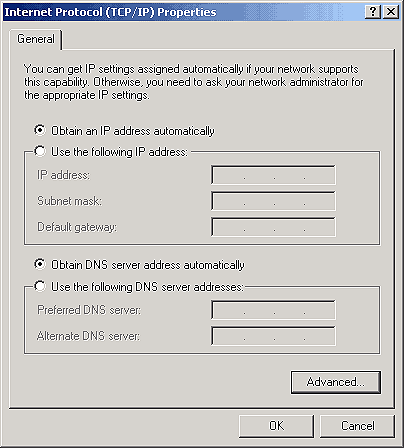
With the Network And Dial-up Connections window open, double-click on the LAN icon. Click Properties, and then double-click on Internet Protocol (TCP/IP) Properties. Configure the properties as shown in Figure H. Now, click OK
Figure H: Configure your LAN connection for static IP
addressing.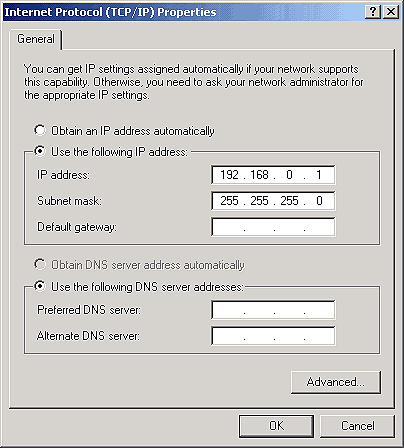
Testing your connections
To test your Internet connection, simply log on to your ISP as you normally would. To test your LAN connection, start a DOS session and ping another workstation on your LAN. In our example, shown in Figure I, we're pinging a workstation whose IP address is 192.168.0.4.
Figure I: To test your LAN connection, ping another workstation
on your network.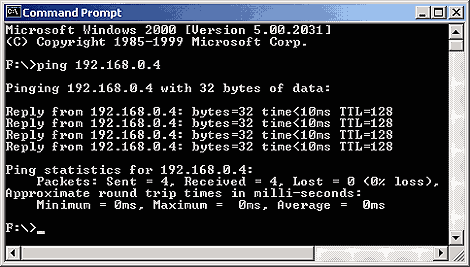
If you're unable to ping another workstation on your network, double-check all the TCP/IP settings on both your Windows 2000 Professional workstation and the other workstations on your LAN. Make sure all the workstations have the same network ID and that each has a unique host ID.
Accessing the Internet from a workstation on your LAN
Assuming you've been able to get all your workstations communicating with each other and that your connection to the Internet is also working, you can now see if the workstations on your LAN can access the Internet through the shared connection on your Windows 2000 Professional workstation. In our example, shown in Figure J, we're going to see if our NT 4.0 server, residing on our LAN, can access a Web site through the shared access connection we've established.
Figure J: The NT 4.0 server on our LAN uses the shared access
connection as its default gateway.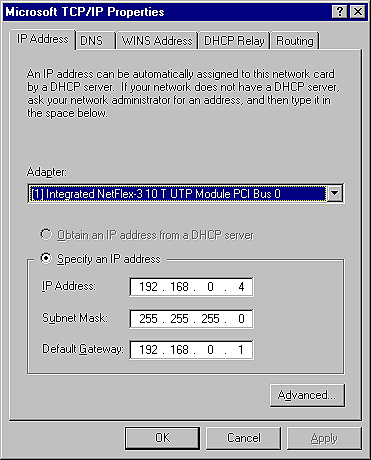
Notice that the IP address for our NT 4.0 server is 192.168.0.4 and its subnet mask is 255.255.255.0. In the Default Gateway text box, we've specified the IP address of the Windows 2000 Professional workstation. On the DNS tab of the Microsoft TCP/IP Properties windows, you'll also have to specify 192.168.0.1 in the DNS Service Search Order text box. Once these items have been configured, you should be able to access Web sites from your LAN.
Configuring LAN-based Internet services
Besides allowing workstations on your private LAN to access the Internet through a shared connection, you can also allow Internet users to access services on your LAN. For example, you can host a Web server on your LAN and allow users on the Internet access to it. To enable shared services, right-click on your Internet icon and select Properties. Next, on the Shared Access tab, click Settings. In the Shared Access Service dialog box, shown in Figure K, enter the name of the service, the port number, and the name or address of the server on your LAN. Next, click OK.
Figure K: You can configure Internet services on your
LAN.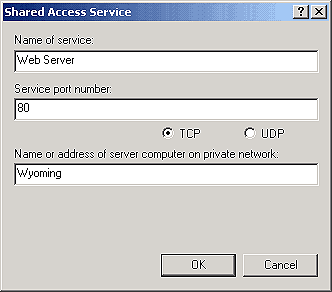
Conclusion
It's relatively easy to configure shared access in Windows 2000 Professional. All you need to do is install two NICs, and then configure one for your Internet connection and one for your LAN connection. With shared access, your LAN users will be able to access the Internet and Internet users will be able to access your LAN. As you've seen in this article, Windows 2000 Professional provides an elegant solution for shared Internet access.
Copyright © 1999, ZD
Inc. All rights reserved. ZD Journals and the ZD Journals logo are trademarks of ZD
Inc. Reproduction in whole or in part in any form or medium without
express written permission of ZD Inc. is prohibited. All other product
names and logos are trademarks or registered trademarks of their
respective owners.