Establishing a trust relationship between domains
One of the central concepts to Windows NT network architecture is the trust
relationship, but just what is it? Simply put, a one-way trust
relationship between two domains means that one domain (the trusting domain)
will allow users who have accounts on the other domain (the trusted domain) to
access its resources. The trusting domain, also known as a resource
domain, may or may not have users of its own, but when a user tries to
access a file or printer in its domain, it will treat that user as one of its
own. The trusted domain, also known as the account domain, won't
recognize the users from the trusting domain, and, in fact, the trust
relationship has little effect on the domain.
While the one-way trust relationship described above can be helpful in master
domain models, the article, NT Domains: which model is right for your
network?," discusses that they aren't the only kind of trusts.
When two one-way trusts are established between domains, it's known as a
two-way trust. In two-way trusts, each domain will treat the users from
the trusted (and trusting) domain as one of its own users.
It's important to note, however, that trusts aren't transitive. If domain A
trusts domain B, and domain B trusts domain C, domain A won't trust users from
domain C. This means that if all three domains are master domains, you'll need
six trust relationships--two between A and B, two between B and C, and two
between A and C--before users from any one domain will be able to access any of
the other domains.
Now that you have some idea of what trusts are, just how do you establish them?
In this article, we'll show you how to set up a two-way trust between two
domains.
Establishing a one-way trust
To establish any trust, you must log on to the trusted domain as a user with
Administrator rights, and launch User Manager For Domains from Administrative
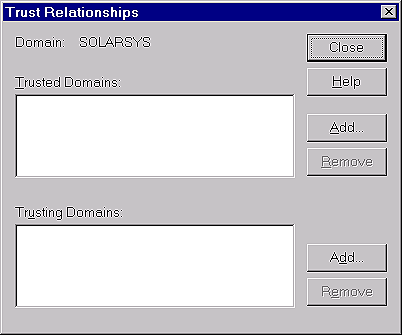
Tools on the Start menu. Select Policies | Trust Relationships from the menu
bar to launch the Trust Relationships dialog box shown in Figure A.
Since we're configuring the trusted domain first, you want to add to the
Trusting Domain list by clicking the lower Add button.
Figure A: The Trust Relationships dialog box displays all trust relationships
established with other domains.

In the Add Trusting Domain dialog box, shown in Figure B, enter the name
of the trusting domain and select a password. The password will be used later
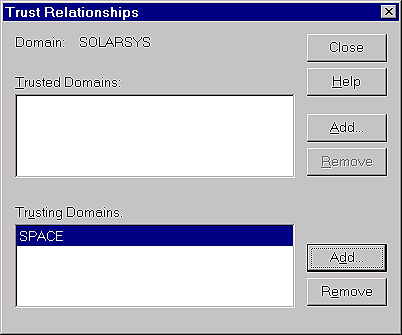
to complete the trust. Click OK and the trusting domain will be added to the
Trusting Domains list, as shown in Figure C. Next, we need to configure
the trusting domain.
Figure B: You'll need the password you enter to complete the trust relationship.

Figure C:The domain you added will appear in the Trusting Domains list.

To complete the trust, log on to the trusting domain as a user with
Administrator rights and launch User Manager for Domains. Again, select
Policies | Trust Relationships to launch the Trust Relationships dialog box, as
seen in Figure A. This time, however, click the upper Add button to add
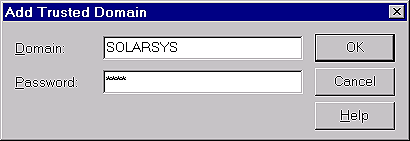
a trusted domain in the Add Trusted Domain dialog box. Enter the name of the
trusted domain and the password you selected, as shown in Figure D.
Click OK and you'll see a dialog box confirming the establishment of the trust
relationship.
Figure D:Enter the password you selected when configuring the trusted domain.

Completing the two-way trust
To finish establishing the two-way trust, you need to perform the same steps as
if establishing a one-way trust, this time starting with the domain you just
configured as the trusting domain. Log on as a user with administrative
privileges and launch User Manager For Domains. Select Policies | Trust
Relationships to launch the Trust Relationship dialog box and click the Add
button in the Trusting Domains section of the dialog box. Enter the name of the
domain you configured as the trusted domain and select a password and click OK
to close the Add dialog box.
Next, log on to the trusted domain and launch the Trust Relationships dialog
box. Click the Add button in the Trusted Domains section and enter the trusting
domain and the password you selected. Click OK and NT will display a
confirmation dialog box, verifying the establishment of the trust relationship.
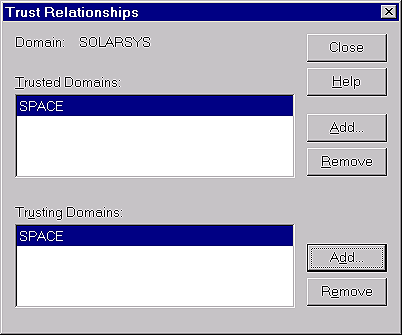
When you've formed both trust relationships, your Trust Relationships dialog
box should appear as in Figure E.
Figure E:
When you complete a two-way trust, the other domain will appear in both the
trusted and trusting domain list.

Conclusion
With the establishment of the two-way trust relationship, any users who have
accounts on either domain will be able to access the trusting domain's
resources as if they were a user on that domain. This doesn't mean they inherit
any other rights than those assigned to everyone, so if you wish to allow
administrators from other domains administrator access, you'll need to add them
to a global administration group.
Copyright © 1999, ZD Inc. All rights reserved. ZD Journals and the ZD Journals logo are trademarks of ZD Inc. Reproduction in whole or in part in any form or medium without express written permission of ZD Inc. is prohibited.
All other product names and logos are trademarks or registered trademarks of their respective owners.


