![]()
This article assumes you're familiar with SQL, VBScript, and
Dynamic HTML
Download the code (7KB)
|
This article may contain URLs that were valid when originally published, but now link to sites or pages that no longer exist. To maintain the flow of the article, we've left these URLs in the text, but disabled the links.
|
|
Creating HTML Pick Lists with Remote Data Services
Johnny Papa and Mike Gasperino |
| The standard HTML listbox control lacks lots of advanced functionality, like multicolumn display and data binding. You can use RDS to overcome these limitations and give your Web app the interface it needs. |
|
Have you ever designed a Web site that would benefit from a multicolumn listbox? If you're a designer, you know that the main problem with an HTML listbox is that it only supports a single column of information (unless you use a monotype font and space—but that's a real third-rate solution).
For example, if you want your user to select a client number from a list, your users may not be able to quickly associate these numbers with a client's actual name. What then? Well, the friendliest way to solve this situation is to let your users select a client number from a list that includes the client's number, name, and maybe their address, city, and state. This way, users can select the client number (what you need) by looking at information that makes sense (the client name and address). Sounds great, huh? But how do you accomplish this over the Web when you don't even have a multicolumn listbox at your disposal? Create one! We're not talking about creating an ActiveX® control here—although that would do the trick. The problem with ActiveX controls is that they're not completely browser-independent and they take a while to download. There are also security settings that can get in the way. Users show more resistance when they have to accept a download before they use a page. In this article, we're going to discuss how to use Remote Data Services (RDS)—the sister technology of Active Data Objects (ADO)—to channel data to the client and create a dynamic pick list. Keep in mind that RDS requires that the client use Microsoft® Internet Explorer. Before we begin looking at the pick list tool, we should point out that you could create it using only ADO and Active Server Pages (ASP), which would make it a cross-browser tool. However, doing that would limit some of the features that the RDS pick list presents, such as dynamic paging, sorting, and simple data binding, that reduce traffic across the Web and make the tool more responsive. We chose RDS for its features, realizing that it's only a valid solution for Internet Explorer clients on intranets or extranets. RDS is part of Universal Data Access (UDA), a new Microsoft architecture that provides high-performance access to a variety of data formats (both relational and nonrelational) on multiple platforms across the enterprise. UDA is the central component of the Windows DNA data storage strategy. In fact, UDA was designed to provide all data services to Windows DNA-driven applications. We'll start off by showing you how to use the RDS pick list in a real-world situation, and then we'll move into the code behind the scenes. We have chosen to keep this article's code relatively short in order to concentrate on using the RDS data control. However, we could have added several essential features, so we will discuss some of them at the end of this article. Beyond Comboboxes So you've got a Web page on which the user needs to choose a value from a list. Sounds like a job for a combobox. But wait; you want the user to select the name of the contact person for a particular company. A combobox won't do the trick here because you need to display a list of all contact names, their companies, and other pertinent information. Before we show the solution in action, it is always good to take a step back and look at what you are really trying to accomplish. What you need is a way for a user to choose a value from a list (such as a contact name), without being restricted to only seeing the values they are choosing. Additional useful fields could be company name or phone number. An even more basic design goal is that users should only be able to select a contact's name, not enter it themselves. Self-entry leaves room for misspelled words and "dirty data" that reduces your chances of keeping your database clean. |
 |
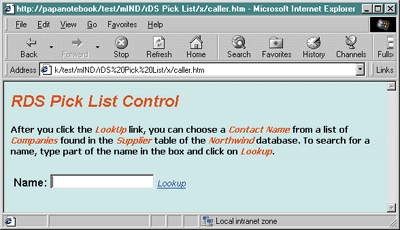
| Figure 1: Selecting a Contact Name |
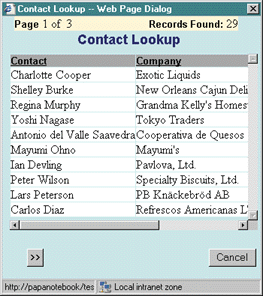
With these points in mind, let's take a look at the output of the caller.htm page, shown in Figure 1. We have oversimplified this code example to stress the pick list's features. Here, we prompt the user to enter part of the contact person's name so we can narrow the search for the pick list contents. The user can enter the first few letters of the contact's name, or they can leave the field blank to search for all contact names. If you leave it blank and click on the Lookup hyperlink, the results will then appear in a modal window (see Figure 2). If there are more than 10 results, you can navigate to the second page of results by clicking the >> button. The total number of matching records is displayed in the upper-right corner. A bonus feature of the pick list tool is that you can sort it by clicking on the column headings. If you click the same heading twice, the results will be sorted in descending order.
 |
| Figure 2: Search Results |
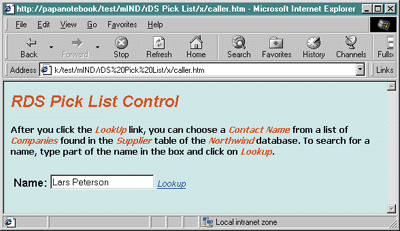
When you place your cursor over a row, the row is highlighted and the cursor turns into a hand. We used some Dynamic HTML (DHTML) and Cascading Style Sheets (CSS) to produce this effect. To select a row, simply click on the name that you want and it is returned to the calling Web page, as shown in Figure 3.
 |
| Figure 3: A Selected Contact |
Behind the Scenes
Now that you've seen what the tool does and how it can be used, let's look at some code. We used RDS, DHTML, and data binding to create the pick list tool. (We've also included CSS info for formatting our pages.)
The caller page is appropriately named caller.htm. This is a standard HTML page with client-side script to call the pick list tool. When the Lookup link is clicked, the code in Figure 4 is executed.
After setting up the procedure variables, we can configure the connect string. Most of the time you would want to hide this value from being shown in the browser, especially if it contains any sensitive information such as a password. You may want to consider putting your connect string in a business object that resides on the server. We've elected to populate the connect string and pass it as a parameter of the QueryString to the pick list page.
We already know what we want to select from our database table, but what if a user wants to search the table for a specific contact name? Typing any part of or the entire contact name into the text box will provide the desired result. If the text box has a value, we will add a Where clause to our SQL statement. The following code shows how to utilize the Like operator to fine-tune our resultset:
|
| Now that we've got our connect string and SQL statement all ready to go, we can build the query string that will contain all the parameters for formatting the pick list tool's appearance. For flexibility, the pick list can be built dynamically. Five parameter strings will provide all we need to accomplish the task. The FieldNames parameter contains the names of the fields as they appear in the database, and the FieldCaptions parameter contains the names that will appear in our table column headers. The HiddenFields and HiddenFieldsCount parameters contain the name and number of the columns that will be hidden from view. Finally, the FieldCount parameter holds the number of columns our table contains, and the Title contains the title that will be displayed at the top of the pick list page.
For our demo we'll be creating an HTML table with four columns: SupplierID, Contact, Company, and Phone. The SupplierID field will be hidden from view, but the value for each will be available for subsequent lookups. This code shows how to build the query string: |
|
| We want the new window to look like a popup-style select control. To accomplish this, we'll open our new window as modal by using the ShowModalWindow command. Populating the strFeatures variable allows us to complete our window's appearance: |
|
| Now that we've called our modal page, caller.htm will sit patiently, waiting for the pick list to return control and the value that the user has selected.
On the Flip Side The returned value contains all cell values from the table's selected row. You decide which value the text box is populated with by extracting the desired cell from the string. Since we used the | character to separate the values, we can execute the RetrieveValue function to extract any field in the string. By executing the following line of code found in the FillData function, the txtRetValue.value will contain the value of contact name: |
|
| After the QueryString is built, it's passed back to picklist.asp. From here, we can take a closer look at the HTML and client-side script used to build the pick list table. A simple <OBJECT> tag defines the RDS data control and sets the ID equal to mobjADC. |
|
| The parameters passed in the QueryString will be used to dynamically build the pick list table. Using the FieldCount parameter, we'll loop through all three sets of passed parameters. Again, notice that the FieldNames, FieldCaptions, and HiddenFields parameters are separated by | characters. Just as described earlier, we'll pass the string to the RetrieveValues function (see Figure 5) to extract values based on ordinal position using the following line of code: |
|
| We've added two events to the <THEAD> tag for the table columns. Onclick will be used to sort table columns, and onmouseover will change the appearance of the mouse as it passes over the columns. A second loop creates the table's detail rows. Notice that in each cell we've added a <DIV> tag that lets us bind the fields found in the Supplier table to the <DIV> tag's datafld property, as shown in Figure 6.
Except for the navigation and Cancel buttons at the bottom of the page, that's all the HTML we need. We're left with a mixture of client-side script and DHTML. We'll use these tools to tailor the appearance and behavior of the pick list. Load it Up Our first task in picklist.asp will be to load the list with the requested data. The window_onload event is comparable to the Visual Basic® Form_Load event, and it's one of the first events to fire when a page is requested. This is the perfect place to do our initialization chores. Using the Request object, we extract the SQL statement and the Connect string from the QueryString that caller.htm passed in. The server variable SERVER_NAME provides the name of the server. After populating the properties of the data control with these values, we set the execute option to complete the load of the recordset before executing any DHTML. The fetch option is set to synchronously retrieve the data records so that an accurate record count is returned. Once all the properties are set, the Refresh method populates the RDS data control: |
|
| Now, using DHTML we add the banner at the top of the page to display the page count and the total number of records in the list. The navigation buttons on the bottom of the page are displayed only as needed. So when we're at the beginning of the table, only the >> button is displayed, and at the end of the table only the << button is displayed. The last loop will check for any HiddenFields and set the style.display property to none to hide them from view. Figure 7 outlines the functions, SetPageDisplay and SetNavigationDisplay, called from the code in Figure 8.
Navigating the List Now that we've completed the load process, our pick list displays the requested list of contacts. Using the onmouseover and onmouseout events for the table allows us to change the highlights on the current row. We can use them to let users know where they are in the recordset and how to move around the records. The following code demonstrates how changing the className property with values defined in the style sheet turn the highlights on and off. |
|
| The following code can be found in the DetermineLastRecordNumber function. Since the SrcElement.RecordNumber contains the row number from our table, it is necessary to calculate the displayed row number based on the datapage size. |
|
| Navigating the table is easy using the table's PreviousPage and NextPage methods. We again use the mouse events to prompt the user that the buttons at the bottom of the page are used to move around the table. Figure 9 outlines the code that lets a user move between the recordset's pages.
In addition to the navigation features that are provided by the table's methods, you can change the data display. When the user clicks the column heading hyperlink, the data is displayed in ascending order. Clicking the same column again displays the data in descending order. |
|
| Now that the user has found the data they want, clicking the row returns the data to the calling page. After determining the current record, we loop through the selected row cells and build a string containing the values separated by the | character. Once we have all the data, we populate the returnValue property of the window object and close the window (see Figure 10). This sends the value back to the caller page, where will we use the RetrieveValue function to extract the contact name and populate the text box.
One Step Further We promised that we would let you in on some other useful applications for the RDS pick list. There's no magic formula here, just some simple methods that let you employ the pick list as a powerful tool for your Web applications. One key place we have used the RDS pick list is when we want a user to choose an item like a customer name. Some users may want to choose the customer by searching within a particular city and state, some may want to search by customer name, and others might already know the customer's unique number. This is a common need within a system that can easily be accommodated with the RDS pick list. The calling form only requires the customer number and name, but we need to be able to search by several combinations of data. In this case, we usually call a search criteria form first, allowing the user to enter their preferred values. This simple HTML form is displayed modally. When the user enters the criteria and submits the modal form, we close it, capture the criteria, and open the RDS pick list based on the user input. Here we have simply inserted an extra screen to capture the criteria before we display the RDS pick list tool. We can employ this great feature in lieu of crowding our calling screen with several search criteria fields. RDS is a pleasant alternative to using JScript arrays and objects or even ActiveX components. There are probably many creative uses for the RDS pick list that are spinning through your mind after reading this article. We hope we've planted the seeds for you to take the next step.
|
|
|
|
http://www.microsoft.com/data/ado/adords15/docs/adctut01.htm
http://www.microsoft.com/data/ado/adords15/docs/adcdg01.htm
|
|
From the May 1999 issue of Microsoft Internet Developer.
|
|
|