![]()
This article assumes you're familiar with Microsoft PowerPoint and
Visual Basic for Applications
|
This article may contain URLs that were valid when originally published, but now link to sites or pages that no longer exist. To maintain the flow of the article, we've left these URLs in the text, but disabled the links.
|
|
Control PowerPoint 2000 with Voice Commands
Ed Hess |
You've probably used PowerPoint to create business presentations. Wouldn't it be great to give the show a little zip with a hands-free presentation? The Microsoft Speech API can help.
|
I needed to do a presentation on speech recognition and thought that it would be helpful to navigate through the presentation using speech commands. This method is much more powerful than simply using a wireless mouse because I can gain access to the PowerPoint® object model and use an unlimited number of speech commands to manipulate the slides. I also wanted to be able to walk around without being tethered to my notebook. I did some investigation into wireless microphones and came up with a good one—the Shure Wireless TCHS.
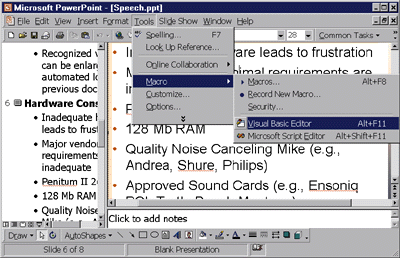
If you want to follow along, you'll need the following Microsoft® software: the Direct Speech Recognition control, the Direct Speech Synth- esis control, and PowerPoint 97 or PowerPoint 2000. The redistributable ActiveX® components are currently available under license as part of the Microsoft Speech API (SAPI) SDK, which is available at http://www.microsoft.com/Mind/0799/PPT2000/ppt2000.htm. Rest assured, there is nothing unique to PowerPoint in the Visual Basic® for Applications (VBA) code that is provided with this article. All of the code can reside in Microsoft Excel, Word, a Visual Basic-based program, an HTML Web page, or any other related container. PowerPoint is supported by VBA with a development environment similar to the Visual Basic IDE. You start the Visual Basic Editor from the Tools menu as shown in Figure 1, or by using the keyboard shortcut Alt+F11. The project window and the properties window will appear inside the editor's work area. |
 |
| Figure 1: Accessing the Visual Basic Editor |
|
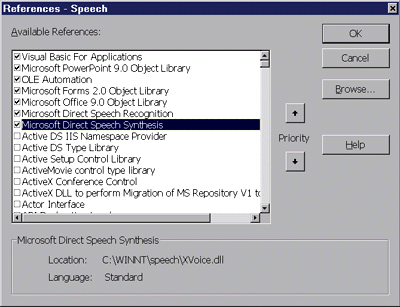
Enter a name for your project using the Name field in the properties box. To reference the Direct Speech Recognition control and the Direct Text to Speech control, use the Tools menu in the Visual Basic Editor window and select the Look Up Reference menu item. The Available References listbox will appear (see Figure 2). Click on the previously mentioned controls and you will be able to reference the speech objects in your project (assuming that you have already installed the SAPI SDK). |
 |
| Figure 2: Referencing Speech Controls |
|
The Speech Class Module
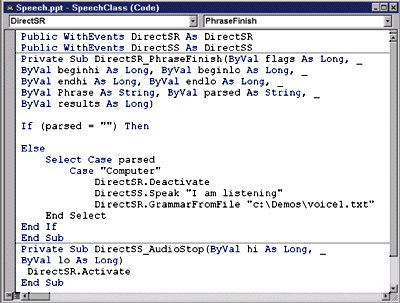
Since I'm not going to be developing a form-based application, I need a class module to intercept events for the speech objects. VBA and Visual Basic require a class module for an object created at runtime for handling events. Create the class module from the Visual Basic Editor by selecting Insert | Class Module from the menu. A class module window will be added to your work area and the Properties box will contain the information about the new module. Go to the Name field and change the name to SpeechClass in order to follow the rest of my code. The class module is shown in Figure 3. |
 |
| Figure 3: The SpeechClass Class Module |
|
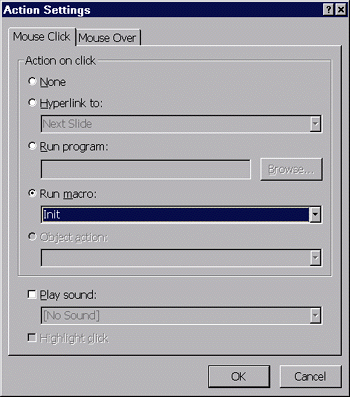
The SpeechClass class module defines two objects: DirectSR and DirectSS. Both objects are defined using the WithEvents clause to intercept events. The first event defined below the objects is called when the speaker finishes a phrase. The second event handles the action when the text-to-speech engine is finished speaking and reactivates the speech recognition engine. I'll return to the DirectSR event later when I develop the code module and initialization subroutine. I did not include any code to perform an action when the event doesn't recognize something that has been spoken; this situation is parsed as a blank string. You might want to have the event do something when it receives this blank string, since things can get pretty annoying when the program doesn't recognize a phrase. Notice that the speech recognition control needs to be deactivated before the text-to-speech engine begins speaking. Most sound cards cannot multiplex recording and playing, so you must disable the listening state of the speech recognition software before attempting to generate sound, and vice versa. Otherwise, you will get an error when you try to speak. Defining PowerPoint and Speech Objects Let's call the next code module SpeechModule. To create this module, select the Insert menu item from the Visual Basic Editor and then insert a new module. Go to the Properties box and change the name of the module to SpeechModule. The first section of the new module will define the objects necessary for speech and to navigate through the PowerPoint slides. The code in Figure 4 shows the definitions and the initialization subroutine you need. The App object provides access to the top of the object hierarchy used by PowerPoint. The SClass object variable provides access to the SpeechClass code that I developed. The second section of the SpeechModule controls the initialization process. The Init subroutine creates an instance of the speech control and connects it to the speech server. Once you have the speech object variables in place, you need to set the SpeechClass so it will be able to intercept speech events. First I set the Speech variable in the class module to point to the speech instance that I have just created, then I initialize the PowerPoint objects. The App variable is created first to enable access to the active presentation. Defining the Grammars You may have noticed the GrammarFromFile method of the DirectSR object. The computer.txt file referenced in the DirectSR.GrammarFromFile method contains my grammar, or list of recognized voice commands. I created a simple file because I wanted my computer to stay asleep until I gave it the magic word. The word I chose, computer, can be replaced with one of your choosing. Here is the code for computer.txt: When the PhraseFinished event fires, it must do three things: deactivate the speech recognition engine, use the text-to-speech engine to tell the speaker that "I am listening," and load a new grammar with more commands for navigating through the PowerPoint presentation. The new grammar, voice1.txt, looks like the following: This brings up one of the nice features of the Shure Wireless TCHS microphone: it has a mute switch that lets you turn it off, which comes in really handy if you need to do a lot of talking and may need to say your magic word in another context. Providing Access to the Speech Session PowerPoint has two different ways to allow you to turn on speech recognition. The easiest way is to designate a keyword within the text that serves as a link, activating the session. Position the mouse anywhere inside the selected keyword and right-click. Select Action Settings from the popup menu. In the Action Settings dialog, click on the "Run macro" radio button and select Init from the listbox (see Figure 6). Click OK and the keyword will be selected, underlined, and displayed in the default color, red. When you click on the keyword at presentation time, the link will activate the Init procedure. |
 |
| Figure 6: Configuring Action Settings |
|
The second technique places a button on the surface of the slide and programs it to call the session when the button is pressed (Click event). Placing the button is done via the Control Toolbox (see Figure 7), one of the toolbars available with
To add the button, select the button icon (third from the left in the second row) and then draw and size it on the surface of the slide. Double-click on the button to invoke the Visual Basic Editor. If this is the first button you place on the slide, the editor will take two actions. First, the editor will add the slide to the project list. Second, a code window for the slide will open and the skeleton of a subroutine for capturing the Click event will be ready for coding. Simply code Init as the body of the subroutine: The Windows Sound System One of the most important parts of getting all of this to work well is setting up the Windows Sound System and positioning the microphone properly. You can choose among a number of different sound cards and microphones. The Ensoniq PCI and Turtle Beach Montego sound cards have received good reviews for speech recognition. The most common microphones are a close-talk or headset microphone that is held close to the mouth, a handheld model such as the Philips SpeechMike (which I highly recommend, as it includes a trackball and programmable buttons), or a medium-distance microphone that rests on the computer 30 to 60 centimeters away from the speaker. A headset microphone is needed for noisy environments. A microphone setup wizard, micwiz.exe, comes with the SAPI SDK (usually found in C:\Program Files\Microsoft Speech SDK\Misc\). You should run this program to make sure your microphone and sound system are working properly. I set up a shortcut to the wizard on my desktop so that I can run it before I give a presentation. It sets the volume levels and gives readings on background noise levels. In case the wizard fails to give you an OK on your setup, you must adjust your sound system settings manually. The following is a very lengthy and detailed set of instructions, but will often fix the problem. If you do not already have the Volume Control applet running, follow these steps:
Check the playback volume:
If the microphone element moves even slightly away from the optimal position, your recognition accuracy may significantly deteriorate. For optimal speech recognition, make sure you position the microphone carefully and consistently every time you use it. To position a close-talk microphone such as the Shure Wireless TCHS:
Presenting . . . You are now ready to start your presentation. When you click your button or linked keyword, your Init subroutine will start and turn on the speech recognition engine. If all goes well, it will definitely impress your friends. Best of luck with other audiences! |
|
|
|
http://msdn.microsoft.com/library/psdk/englishquery/eq02_1.htm
|
From the July 1999 issue of Microsoft Internet Developer.