
Getting started
The real secret to creating roving profiles is that you must use either a Windows NT Server or a NetWare server to validate your users' logons. You must then create a special directory, which we'll refer to as a home directory, for each user. How you create this directory depends on which server you're using. Because of this, we'll provide separate instructions for creating roving profiles in a Windows NT and a NetWare environment. Simply read the section that corresponds to your network operating system, and then skip to the "Adding the Profile" section. Keep in mind that any procedure we tell you to perform on a Windows workstation must be performed on all Windows workstations.
Creating a home directory in Windows NT
You may have already assigned a home directory to each of your users so they'll have a place to store their data. If this is the case, you should still read through this section to confirm that your home directories are set up in a way that will allow them to store user profiles. Begin by creating a directory called Users on your hard drive's partition with the most free space. Next, create a subdirectory for each user. Although you can call these subdirectories anything you want, you should typically name them to match each user's logon name.
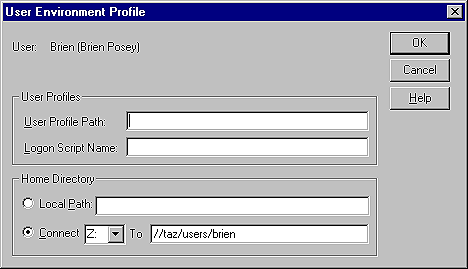
Now, you must configure Windows NT Server to recognize these subdirectories as home directories rather than just normal subdirectories. To do so, you'll have to grant everyone rights to the directories. If you plan to use these directories as a place where users can store data, you should make each directory a share and assign each user rights to their own individual subdirectory. However, if you intend to use these directories only to store profiles, you can just give everyone rights to the Users directory. Remember that a user must have full access to the home directory, because Windows will make updates to the profile each time the user logs off. After you've granted the appropriate rights to the directories, open User Manager for Domains and double-click on a user who you're creating a roving profile for. When the User Properties dialog box appears, click the Profile button to open the User Environment Profile dialog box. Most of the items in this dialog box relate to a Windows NT Server profile, which is incompatible with a Windows 9x profile. However, you do need to use the Connect To option.
First, select the Connect option and choose an unused drive letter from the dropdown list. To simplify administration, we recommend using the same drive letter for all users. Next, enter the path to the user's home directory in the To text box, as shown in Figure A. Click OK twice to return to the main screen. Repeat this process for each user who you're creating a roving profile for.
Figure A: Type the path to the user's directory in the To text
box.
Now, go to a Windows workstation and double-click on the Network icon in Control Panel. When you see the Network dialog box, make sure that the Primary Network Logon option is set to Client For Microsoft Networks, as shown in Figure B. Then, double-click on Client For Microsoft Networks in The Following Network Components Are Installed list box. When you do, you'll see the Client For Microsoft Networks Properties dialog box. Make sure the Log On To Windows NT Domain check box is selected, and provide the domain name in the Windows NT Domain text box, as shown in Figure C. Click OK twice, and restart your computer. You can now skip to the "Adding the Profile" section.
Figure B: Set the Primary Network Logon option to Client For
Microsoft Networks.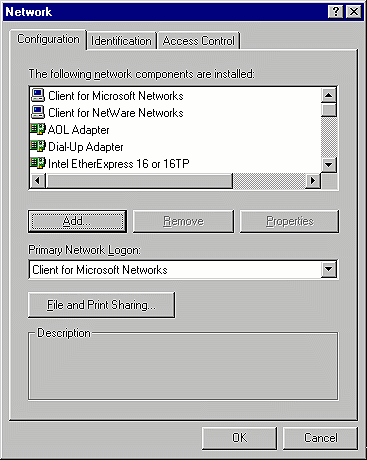
Figure C: Check that the workstations are logging on to a
Windows NT domain.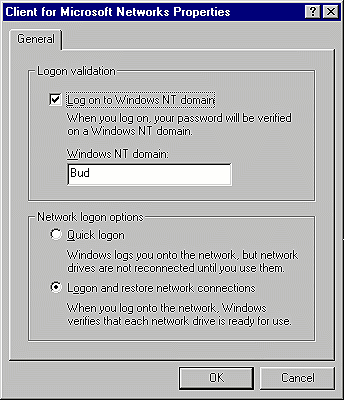
Creating a home directory in NetWare
Setting up roving profiles in NetWare is much easier than in Windows NT Server, because NetWare automatically creates a directory you can use to store the profile. To see this directory, open the SYSCON utility and select User Information from the Available Topics list box. Next, select the logon name of the user who you're creating a roving profile for and press [Enter]. Now, select Other Information from the User Information panel and press [Enter]. Windows will display the information shown in Figure D.
Figure D: The User ID lists the name of the Mail
directory.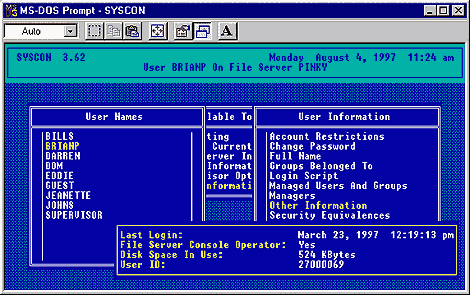
As you can see, there's an eight-digit hexadecimal number listed as the User ID. Each user has a unique ID number. NetWare uses these ID numbers to create a subdirectory for each user in the Mail directory. If you look in your Mail subdirectory, you'll see directories that correspond to each User ID. Windows stores profile information in these subdirectories. For example, in Figure D, the User ID is 27000069. As you can see in Figure E, NetWare creates a subdirectory in Mail called 27000069, in which Windows stores profile information.
Figure E: NetWare stores a user's profile in a subdirectory that
corresponds to that user's ID number.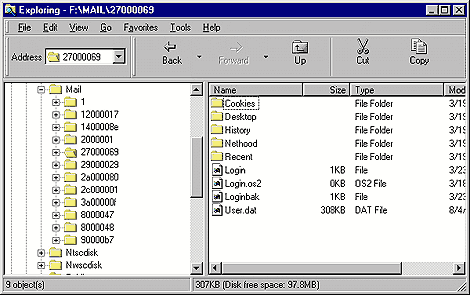
Adding the profile
Now that you've configured your home directory, it's time to establish the actual profile. To do so, go to a Windows workstation and double-click on the Passwords icon in Control Panel. When you see the Passwords Properties dialog box, click on the User Profiles tab, select the Users Can Customize Their Preferences And Desktop Settings option button and both check boxes in the User Profile Settings section, as shown in Figure F. Finally, click OK. Now, restart the computer.
Figure F: Make the selections shown here.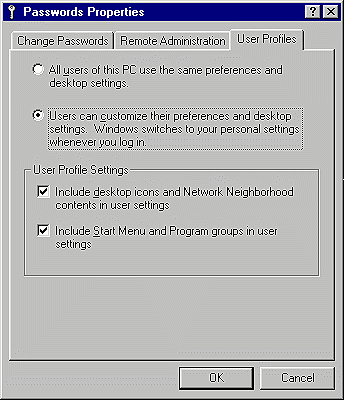
Testing the profile
To test a roving profile, have a user log on and log off. In response, Windows should place a User.dat file, along with several directories, in the user's home directory, as shown in Figure G. You should now be able to log on to another Windows workstation as that user and see his desktop (assuming you've configured that workstation to accept roving profiles).
Figure G: Windows automatically places profile information in
the user's directory.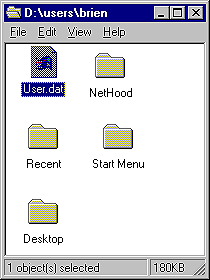
What can go wrong?
When you sometimes log on to a different PC, your desktop may look slightly different. For example, your icons may be in a different location. This happens because the PC you're logging on to is set at a different screen resolution than the one that you normally use. You may also notice that icons look different or that your wallpaper is missing. These problems occur because your profile looked on the computer's hard drive for the icon files or the wallpaper. To avoid this, we recommend keeping all your applications on the network rather than on your local hard drive. If a shortcut is programmed to look on the network for a program, the icon will usually remain the same, and the program will still run, regardless of where you log on (assuming the PC meets the program's minimum hardware requirements).
Conclusion
Roving profiles allow your users' desktop settings to follow them from PC to PC. In this article, we've demonstrated how to create roving profiles in a Windows NT Server and a NetWare environment. We also explained some common pitfalls and how to avoid them.
Copyright © 1999, ZD
Inc. All rights reserved. ZD Journals and the ZD Journals logo are trademarks of ZD
Inc. Reproduction in whole or in part in any form or medium without
express written permission of ZD Inc. is prohibited. All other product
names and logos are trademarks or registered trademarks of their
respective owners.