![]()
|
This article may contain URLs that were valid when originally published, but now link to sites or pages that no longer exist. To maintain the flow of the article, we've left these URLs in the text, but disabled the links.
|
|
Step Up to Site Server Commerce
Alan Saldanha |
| In the second of two articles, Alan Saldanha shows how to make an existing ASP-based project take the leap to Site Server 3.0 Commerce Edition. |
|
In the November 1998 issue of MIND, I developed an ASP-based workflow application that used Microsoft® Access 97. The application was designed to streamline the process of recruitment within a company. It enabled a hiring manager to create a job request through a browser interface and then forward it to a human resources manager, a recruiter, and a Web manager. When the process reached the Web manager, he or she could then select a template file and the location where the request needs to be posted (Web site, intranet, or both). In this article, I will explore the steps that I went through in moving the ASP-based app to one based on Microsoft Site Server 3.0 Commerce Edition. I will assume you've read my previous article. You can find complete source code for my sample app as part of the source sode for this month. This article should give you a good understanding of some of the more difficult concepts of developing Site Server Commerce applications like the OrderForm object, Pipelines, and the Scriptor Pipeline component. You will find this especially useful if you are looking to develop a customized solution for your enterprise along the lines of the Microsoft Market sample that comes with Site Server 3.0 Commerce Edition.
Basic Site Server Commerce Concepts
|
|
| and retrieve |
|
|
a message based on a message constant. In the first code listing, the message constant is WorkFlowNote1, which is also used in the second line to retrieve the information from
the object. Connecting to a database is a more organized process with Site Server Commerce. You connect by using the information in the site configuration file, site.csc. This file is created by the Site Foundation Wizard based upon the information you provide while creating the site using the wizard (DSN, login ID, password, and so on). The site.csc file contains all the configuration information about your site, including the path to the site directory, the secure host, the unsecure host, and connection strings. Since the site.csc file is a stored dictionary, a specific method of the FileDocument object will be needed to read the contents of the file into a dictionary. That is done in the file application's Global.asa as follows. In the listing, the Dictionary object MSCSSite will contain the structured information that was in site.csc: |
|
|
OrderForm
OrderForm is a very important storage object in Site Server Commerce. If you've done any ASP work in which you used the Session object, you are already on familiar territory when you start to work with the OrderForm object. The structure of the OrderForm object reflects the fact that it will be used in electronic commerce transactions. A transaction generally consists of order information with a list of items to be processed. Order information usually includes buyer information, shipping information, and payment information. Buyer information consists of the buyer's name, address, and so on. Item information includes the product's name, price, and so on. The default structure of the OrderForm is indicated in Figure 1. You are not limited to the default structure inherent when you create an OrderForm object—that is, you are not limited to just the variables noted in Figure 1, which is the standard structure of the OrderForm. So how do you add a new variable to the OrderForm object? In this regard, the OrderForm is very similar to the Session object in that, if you want to add a new variable called NewVarName, you need to use the following script to assign the string "This is a test" to NewVarName in the Session. |
|
| Similarly, if you want to add a new variable, attribute, or key to an instantiated OrderForm object, you just have to add this script: |
|
|
This concept will be used a great deal in my sample app-lication when an OrderForm with different variables needs to be created and filled with information from an HTML form submitted by a user. You are not limited to storing just strings and numbers in the OrderForm; you can also store whole objects.
Pipeline
Now let's suppose you want to automate the process of credit card processing using, say, CyberCash (see Figure 2). You would just have to add the component at the right place (the payment verification stage), and maybe tweak some input parameters to get the new functionality you want. So Pipelines give you plug and play electronic commerce. More importantly, you can remove functionality from an application without touching script or code.
The Scriptor Component
|
|
|
OrderForm, Pipeline, and Scriptor
Now let's pull the three concepts together. The Scriptor component will be used to process the contents of the OrderForm object in the Pipeline. The Scriptor event MSCSExecute has the following parameters: config, a dictionary-type object that can contain user-defined configuration parameters; OrderForm, which I introduced previously; context, a dictionary-type object whose use I will explain later; and additional flags that you pass to the Pipeline. To understand what part context plays in the application, you may want to think of the Web application without the Pipeline and what happens within the Pipeline as separate application spaces. The OrderForm object is the transport mechanism that moves data into the Pipeline. But how do you move an instantiated object into the Pipeline? As an example, I created an instance of the MessageManager object in the Global.asa file and assigned error messages to it: |
|
|
Since these messages are needed in the Pipeline (I opted to do the HTML form input error checking there), you need a way to get this object into the Pipeline. The context serves the purpose of making the MessageManager object available in the Pipeline.
Application Overview
|
|
|
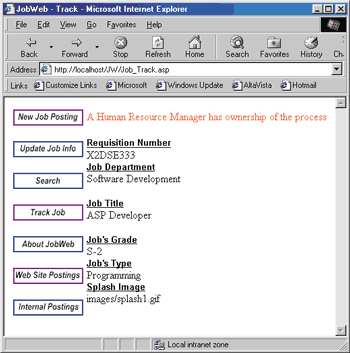
The OrderForm object is used to store all the information created in x_job_add_update.asp, then load the object with information from the form so it can be processed by the Pipeline, and then return it to x_job_add_update.asp, where error reporting takes place before sending the response to the user. As before, the file include\Request.asp is responsible for reading the information from the form and placing the value in variables. Figure 3 shows how information, including the value of the submit button, is assigned, rendering the order form. By the time the app enters the Pipeline (in this case JobWeb.pcf), all the information it needs for processing is located in the OrderForm object. Earlier I noted how I wanted to do the error checking in the Pipeline. To do that, I needed to send an object into the Pipeline to collect all the form input errors that must be processed and sent back to the user after the Pipeline processing is complete. How did I decide to do that? I created a SimpleList object that I assigned to the context (an object that's also sent into the Pipeline). If any errors are encountered in the error checking stage of the Pipeline, messages will be added to the SimpleList object, named FormErrors in this case. On completion of the Pipeline processing, code in x_job_add_ update.asp will track the message count in the SimpleList object, as shown in the following code. If no errors are found, the user will be redirected to a file with information about the successful completion. |
|
|
At this point I have the data that I need in the Pipeline. Now the context needs to know the objects needed in the Pipeline itself (I'll be creating additional ones later). Let's get down to the processing that takes place within the Pipeline. The Pipeline processing is controlled by a Pipeline configuration file, usually given a .pcf extension. These files start out as templates with stages. The Pipeline editor lets you assign components to each stage of the Pipeline, choosing from the available components that ship with Site Server Commerce or third-party components (for instance, the CyberCash example I mentioned earlier). In the initial development of the application, I used the SubmitViaMail.pcf Pipeline that comes with the Market sample. Further on, I created my own template for the application, JobWeb.pcf. I did this by running |
|
|
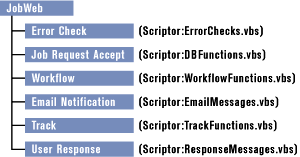
from the command prompt, selecting New, and using empty.pce as the template. After adding six stages (Error Check, Job Request Accept, Workflow, Email Notification, Track, and User Response), I saved the template as JobWeb.pcf (see Figure 4). |
 |
| Figure 4: JobWeb |
|
Now let's look at what the stages do, as well as how you can add components to each stage so you can get going writing your own Pipelines. Error Check At this stage, I check to make sure that all the information that I need is in the OrderForm object. I realize that doing it on the server is overkill. But considering the ease with which you can add or remove the functionality (two clicks in the Pipeline editor), it may be something that is worth considering. A Scriptor component is inserted into the Error Check stage, which points to an external file (config\ErrorCheck.vbs). This file checks the contents of the OrderForm object based on the contents of OrderForm.Action, which in turn has been assigned to the value of the submit button in x_job_add_update.asp. Since the equivalents of the constants used in the ASP application are now being stored in the MessageManager object, it first needs to be retrieved from the context as shown in Figure 5. Note that the context was passed in when mscsOrderPipeline.execute was called in x_job_add_update.asp. From now on all references to constants used in the application will really reference the MessageManager object, as indicated in Figure 5. The value returned by the function mscsexecute depends upon whether error messages were added to the FormErrors dictionary object that was passed in. If mscsexecute is set to 3, it indicates to the Pipeline that an error has taken place. Job Request Accept The basic job request information is added to or updated in the database table JobWeb. A Scriptor component needs to be added at this stage, pointing to the external script file DbFunctions.vbs. Just as in the ASP version, this is accomplished with the Add and Update functions. The only difference is that in this case the information being added or updated comes from the OrderForm object. Within the Scriptor component, you can establish an ADO connection to insert or update a record: |
|
|
Workflow
At this stage, the workflow information needs to be added to or updated in table TblWorkFlow. Another Scriptor component is added, pointing to an external script file WorkFlowFunctions.vbs. The CreateWorkFlow function creates the workflow record, and UpdateWorkFlowStage is used to update it. As in the previous application, SetFlowStatus updates the WorkFlowStage as the application moves from one stage to another (see Figure 6). |
 |
| Figure 6: Updating Workflow |
|
Email Notification
Next, email messages need to be sent. A new Scriptor component is added that points to an external script file called EmailMessages.vbs. The functions used to email the messages in this Site Server Commerce application are similar to the ASP version, except for an additional function called GetWFInfo that updates the contents of the OrderForm object with information from the TblWorkFlow table. Note the SendMail function in EmailMessage.vbs. It shows how you can send email from within a Pipeline component. |
|
|
Track
At this stage, the basic job request information is added to the TblTrack table. A Scriptor component is added that points to the external script file TrackFunctions.vbs. It contains the function AddToTrack that adds the information to the tracker table. |
 |
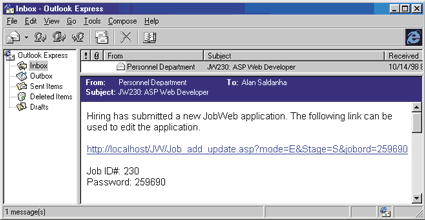
| Figure 7: Sending a Message to the User |
| User Response In this final stage, the message that needs to be sent back to the user is generated and added to the OrderForm object (see Figure 7). A final Scriptor component is added; it points to the file ResponseMessages.vbs. Here, depending upon the user, the password can be embedded in the response messages, which are assigned to the OrderForm variable: |
|
| If FormErrors contains any errors, the messages are also redirected to the page that displays the message. |
|
|
Conclusion
When viewed from the vantage point of an ASP project, I found that I underused the Dictionary object in my first project. Had I opted to use the Dictionary object, the transition between ASP and Site Server Commerce would have been really easy— the Dictionary object could morph into the OrderForm directly. Other than the inability to use the include statement in the Scriptor component, very little changed in how the application was developed. On the other hand, Site Server Commerce offers a number of new objects, like the MessageManager object and the OrderForm object, that will make your application development easier and more fun. What I found most interesting in working with Site Server Commerce is what I kept doing to the ASP application—I had to make changes that ended up improving the design of the ASP application. I don't know about you, but sometimes I get into a rut as far as development methods are concerned. Developing with Site Server Commerce gave me insight into techniques and methods that I was able to take back into the ASP application. |
|
|