![]()
This article assumes you're familiar with SMTP
|
This article may contain URLs that were valid when originally published, but now link to sites or pages that no longer exist. To maintain the flow of the article, we've left these URLs in the text, but disabled the links.
|
|
Manage Your Company’s E-mail with the Windows 2000 SMTP Service
Davide Marcato |
| With a flood of new capabilities, the SMTP service in Windows 2000 is a solid, well-integrated component of the operating system. |
|
Despite the steady growth of the Web as the primary platform for technical developments on the Internet, the most widely used Internet service is still email. This should come as no surprise. In today's wired world the vast majority of information and communication travels through the information superhighway, following its rules and complying with its technological standards. The well-known SMTP (Simple Mail Transfer Protocol) protocol is used by email clients and servers to deliver electronic messages over a TCP/IP network—at a far greater volume than people send traditional hardcopy mail. Finding powerful and visually appealing clients on the Windows® platform has never really been a problem, but what about the inner workings on the server side? Until the release of the Windows NT® 4.0 Option Pack and its included SMTP support, Internet administrators working with Windows NT had little choice but to plug in third-party software. With Windows 2000 Server the hole has been filled once and for all: SMTP service is now a solid, built-in component that integrates well with the operating system. I will walk you through the Windows 2000 SMTP service so you can understand its capabilities and learn how to effectively administer it. Installing the SMTP service for Windows 2000 is a quick and straightforward process. Because the service is included as part of the Microsoft® Internet Information Services (IIS) version 5.0 installation, you can instruct the system to add it to your machine either when you first install the operating system or at a later date. If you decide to add it later, simply open the Control Panel, launch Add/Remove Programs, and click on the Add/Remove Windows Components button. In the Windows Components Wizard, select the IIS item and click on the Details button. A new dialog box will open listing all the services of IIS, including SMTP. Enable the corresponding checkbox and the Windows Installer will add the files and registry keys needed by the service. A Bit of SMTP Theory
Before delving into the nitty-gritty details of the product, I'll quickly review the fundamental concepts underlying the workings of SMTP, and go over some of the jargon you'll encounter when configuring the service. Setting Up a New SMTP Server
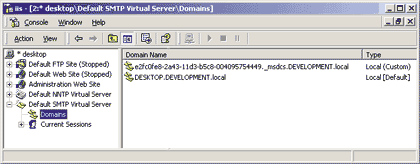
Let's jump in and configure a fully functional mail server with Windows 2000. The SMTP service allows you to configure it through a Microsoft Management Console (MMC) snap-in inside the Internet Services Manager window,
which you'll find by selecting Programs | Administrative Tools from the Start menu. |
 |
| Figure 1: SMTP Virtual Servers in the MMC Snap-in |
|
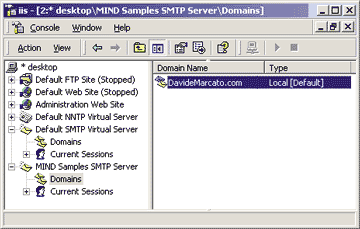
That same list also includes the remote domains whose mail should follow custom delivery rules that override the default settings. In other words, all the domains listed there are under the direct jurisdiction of the local server and will receive special attention. Every virtual server can support more than one local domain. Only one of them will be designated as the primary local domain, identified on the screen by the [Default] string in the Type field; the other local domains will be designated as alias domains, must share its properties, and are displayed as local [Alias] domains in the right pane of the dialog. The other item in the MMC hierarchy, Current Sessions, provides the administrator with a snapshot of the clients connected to the server at any point in time, displaying the user name, source IP address, and length of the connection for each in a readable table format. In case of emergency, you may decide to interrupt all active sessions at once by selecting the Terminate All context menu item. If you right-click on the name of the default virtual server and select the New submenu, you can add a new domain within the current virtual server or create a new virtual server to handle SMTP services. What is a virtual server in this context? Well, it's an SMTP server that listens on a particular TCP port of a particular IP address and manages its mail business according to the parameters configured by the administrator. Does it make sense to have more than one virtual server on a single machine? Yes, it does. If you associate the network cards of your computer with more than a single IP address (which is perfectly legal), or if you want differently tailored versions of the SMTP service listening on different TCP ports, managing multiple virtual servers will help. If, on the other hand, you want to run the classic single-address, standard-port SMTP server, you will probably never need to consider this option. So let's put this into practice. Create a new virtual server and give it the human-readable name "MIND Sample SMTP Server." The service will ask you what IP address and TCP port you want it to listen on; for this example I chose All Unassigned, which means that it will cover all the IP addresses of the machine's network cards that have not been assigned to specific virtual hosts (that's also what the default server does), and the nonstandard TCP port 1025, to distinguish it from the default server. Keep in mind that when you intend to use a custom TCP or UDP port for your services, you should always pick a number greater than 1000. As the home directory for the configuration and storage related to this server, I chose E:\Inetpub\MindSmtp; I chose DavideMarcato.com as the default local domain. Click on the Finish button and you'll see your brand new virtual SMTP server in the left pane of the window, as shown in Figure 2. |
 |
| Figure 2: Creating a New Virtual Server and Local Domain |
|
Now that your new virtual SMTP server is up and running (that is,
listening) on port 1025, it's time to configure it. To do so, right-click on the server's name in the left pane and select the Properties pages. I'll analyze each of the property tabs
in detail. General Properties
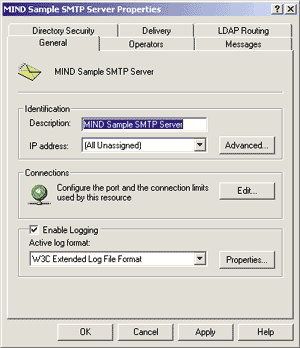
The first dialog you see contains some general working parameters, as shown in Figure 3. The Description field contains the name displayed in the MMC snap-in to identify the
specific virtual server, so it carries no particular relevance outside this environment. The IP address field specifies the addresses to which this virtual server will respond, with All Unassigned catching all those not otherwise handled. Clicking on the Advanced button will open up a dialog box to customize the TCP port, too. Notice how you can have the exact same virtual server responding to requests on different ports simply by adding entries in this list. |
 |
| Figure 3: SMTP Server Settings |
|
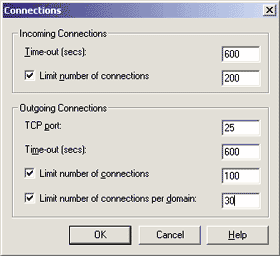
The Connections settings specify the workload limitations imposed on the virtual server during its operations. As shown in Figure 4, the first field of the Connections dialog sets the number of seconds of inactivity after which the server will consider a client session to be expired and take the liberty of shutting it down. The default value of 600 seconds (10 minutes) is reasonable. The second field allows you to define a cap on the number of concurrent users, but it is turned off by default. Let's assume that I have a moderately powerful server running with average incoming bandwidth, so I'll turn it on and set the threshold to 200 users. |
 |
| Figure 4: Connection Settings |
|
The bottom half of the dialog box permits you to set those same options for the output connections—that is, those established by the SMTP server to deliver messages to remote domains. An additional parameter that influences these output connections is the TCP port. This setting has no use in the real world and should never be changed from its default value of 25 because that is where almost all of the SMTP servers on the Internet are listening. By modifying that number you basically render your system incompatible with the Internet email system! You can also limit the number of concurrent connections per distinct remote domain; the default value is 100, but I've set it to 30 for this example. The last group of options under the General tab controls logging operations. The administrator can request the generation of logs for every operation performed by the server, tailoring the output to the level of detail she finds adequate. Even the format of the log files is configurable. You can choose from several standard Internet logging formats: W3C Extended Log File Format, Microsoft IIS Log File Format, NCSA Common Log File Format, and Database on Registered ODBC Data Source. The ODBC option produces logs that are very easy to manipulate through standard database tools, but the choice also introduces a significant performance hit because writing to a text file is faster than adding records to a database. Therefore, be careful and do some real-world tests before deciding which option to choose. In general, if you decide to take the ODBC path, be sure to have a scalable and reliable DBMS like SQL Server™ behind your back. The best performance solution would be to turn off logging altogether, but I strongly discourage you to do so because you would lose track of your service's activity. I chose the W3C Extended Log File Format. By clicking the Properties button you can customize the exact items that will be recorded in your log files, the generation frequency of distinct log files, and the location where they are saved on the disk. The default setting of a daily log placed in the System32\LogFiles directory should fit your needs nicely. Operators
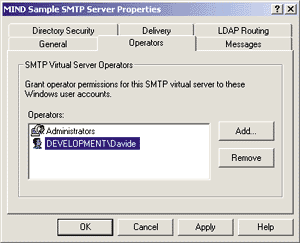
Figure 5 shows the Operators tab. The Operators listbox contains the names of the security principals (valid users are identified by the Windows NT domain name, followed by the official name of the account) who have been granted the rights to modify the parameters of this virtual SMTP server. |
 |
| Figure 5: Virtual Server Operators |
|
As you've probably realized
by now, all of the configuration options are applied at the virtual host level and do not extend to the global machine level. Consequently, you might decide to grant some users access to the configuration options of a secondary virtual server, while preventing them from tampering with the settings of the default SMTP relay. The default security policy is to consider the members of the Administrators group to be server operators, which is a reasonable setting for small to middle-sized servers. If you are running a large corporate server, you might not be comfortable with having to grant your mail administrator (often called the postmaster of the domain) full rights in the Windows domain. If this is the case, you should consider adding this person's account to the operators list or create a new group in User Manager that consists of the users with this particular kind of privileged access to the SMTP service. For example, I opted for the first solution and added user Davide from the Development domain to the Operators group. Messages
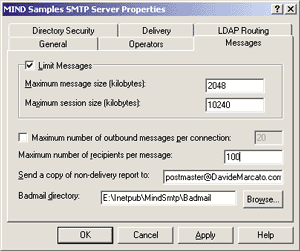
The Messages tab sets the parameters of the incoming and outgoing messages that the virtual server deals with, as shown in Figure 6. By checking the Limit Messages box you can limit the maximum size of each incoming message and the maximum total size of the messages that a client sends in a single session. The default values, 2048KB and 10240KB respectively, are a little too restrictive for serious email usage within a company, especially if the employees need to send or receive big attachments. For this example, I'd change the limit for single messages to 8192KB and the limit for a single SMTP session to 20480KB. |
 |
| Figure 6: Message Settings |
|
Next, you'll run into the "Maximum number of outbound messages per connection" checkbox (turn it off for this sample), the maximum number of recipients every message can have (keep the default value of 100), and the address to which the automatically generated notifications of failed message delivery should be sent. This field is blank by default; fill it in with the address of the postmaster if you want her to be informed whenever a message handled by
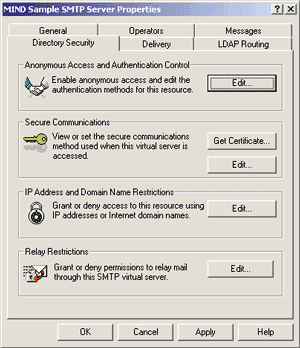
the server can't get through for some reason. The last field in the Messages tab shows the path to the directory where undelivered messages (colorfully called Badmail) should be placed. Notice that you can't leave this textbox empty, which means that you cannot simply discard undelivered mail automatically. These are messages that can't be delivered to any recipient or returned to the original sender, usually due to a badly configured client address. Directory Security The next tab, Directory Security, deals with several facets of security control (see Figure 7). |
 |
| Figure 7: Security Settings |
|
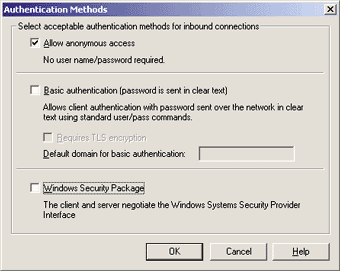
The Edit button in the Anonymous Access and Authentication Control group box specifies the authentication mechanisms to accept for inbound connection attempts (see Figure 8). The first, "Allow anonymous access," is the default and should always be checked if your SMTP server must communicate with clients and remote SMTP servers on the Internet. Basic authentication uses the SMTP commands to permit the client to authenticate itself before sending email. Notice that security can be put at risk with this method because the password travels over the wire in plain text. Checking "Requires TLS encryption" forces the client to use stronger encryption, alleviating this problem. The last option is the most flexible of all, encouraging the client and the server
to negotiate the best security mechanism that they both support through the Windows Security Support Provider Interface (SSPI), upon which technologies like RPC and DCOM rely for their security features. |
 |
| Figure 8: Authentication Settings |
|
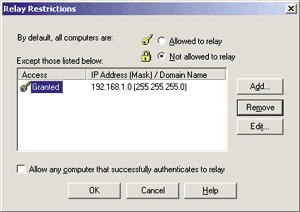
The default configuration enables all three of these authentication approaches—probably not what you want. If you want to enforce security, check Basic authentication and/or Windows Security. If you don't want to impose authentication on your SMTP clients, then only check the "Allow anonymous access" box. Keeping both (or all three) signifies that security-aware clients can obtain access—and so can anonymous clients—which defeats the purpose of enabling the secure channel in the first place. For this sample, select "Allow anonymous access" only. The Secure Communications group box in the Directory Security tab allows you to configure the server for fully secure communication channels, based on key certificates obtained from trusted certificate authorities and 40-bit (or 128-bit) encryption of the data. This subject is beyond the scope of this article. Access restrictions can also be placed on the basis of the client's IP address. This approach, when applicable, has the undoubted advantage of retaining full compatibility with any standard SMTP client, whereas authentication-based security control can work only with the cooperation of the client. Clicking on the IP Address and Domain Name Restrictions Edit button, you will be able to choose to grant access to everyone except those whose IP address you selectively want to blacklist, or you can deny access to everyone except the IP addresses you include on the list. The logic of the Relay Restrictions configuration is similar to IP Address and Domain Name Restrictions. You are allowed to restrict the set of clients granted the right to relay messages through that virtual server on the basis of their IP address or DNS domain (see Figure 9). The DNS domain option requires a reverse DNS lookup query each session to translate the client's IP address into a textual domain name, and this operation may take a long time, so you probably won't want to turn it on. Relaying email means sending messages destined to non-local accounts. If a client is allowed to access the server, but not to relay mail, all it can actually do during the SMTP session is send email to local recipients. Accurately tuning this security feature is the easiest way to impede spammers who want to utilize your servers to distribute their bulk mailings. (For more information on spam fighting, see "Tracking and Fighting Spam: A Primer for Postmasters," by R'ykandar Korra'ti, in this issue of MIND.) |
 |
| Figure 9: Configuring Relay Restrictions |
|
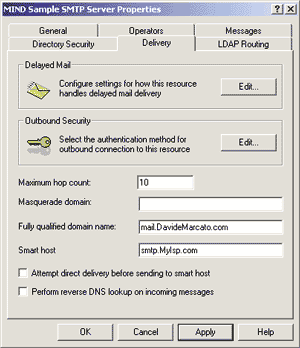
If you check the "Allow any computer that successfully authenticates to relay" box on the bottom of the dialog box, you will unify access security with relay security. In this case, you cannot enforce access security because you need to retain maximum compatibility with your clients and thus you must consent to anonymous access. On the other hand, you want your server protected from outside abuse. What can you do? The flexibility of the Microsoft SMTP service comes into focus here. The clever solution involves turning off access security by letting in anonymous clients while denying relay rights to everybody except those whose IP addresses belong to the local network. (They can be distinguished through a subnet mask-based filter in the Relay Restrictions dialog box.) The checkbox that grants relay rights to everyone who passes the authentication phase must also be unchecked, as shown in Figure 9. A final note: if you restrict relay rights to your LAN, you might run into the paradoxical situation of being incapable of sending email from the server machine itself. The reason is that the server will detect that your client is coming from the IP address on which the service is answering. Hence, if you contacted localhost (the loopback alias for the local machine in TPC/IP), you'll be seen as 127.0.0.1, which by definition cannot match with the subnet mask of your LAN. You can work around this by either remembering to always test your local server using its real-world IP address, or by granting relay rights to IP address 127.0.0.1, too. This is safe because nobody can use the special loopback address network-wide. Delivery As you can see in Figure 10, the first set of configuration settings in the Delivery tab has to do with delayed mail delivery. |
 |
| Figure 10: Mail Delivery Settings |
|
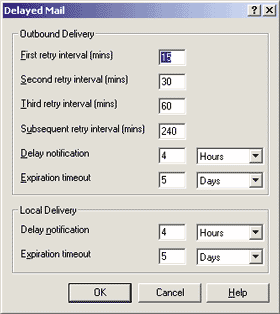
Clicking the Edit button opens up a dialog box containing the variables that can be fine-tuned (see Figure 11). The descriptions associated with the fields should be self-explanatory. After the amount of time specified in the "Delay notification" field has elapsed, if the message hasn't yet reached its destination, the server sends an automatic message explaining what is happening and will keep trying for as long as the "Expiration timeout" field dictates. The default values are sufficiently reasonable, but you may want to decrease the first-retry interval to less than 15 minutes (say five minutes). The second group of options has a similar meaning, only it applies to messages delivered (well, not delivered) locally. |
 |
| Figure 11: Handling Delayed Mail |
|
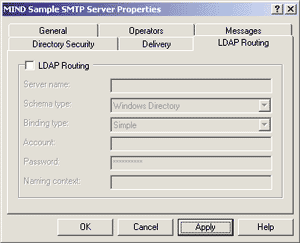
The Outbound Security option on the Delivery tab resembles the inbound security parameters I analyzed earlier, but this time the authentication policy chosen influences how the server will contact remote SMTP servers (thereby playing the role of the SMTP client). If you want to be able to relay mail on the Internet, you have to select no authentication, which is the standard for SMTP sessions and is also the default value. The "Maximum hop count" setting prevents erroneously prepared messages from traveling back and forth through the network of SMTP servers indefinitely. Every time a message passes through one of them, its hop count gets increased by one. When it reaches the maximum number expressed in this field, it is likely that something has gone bad and the message is considered undeliverable. "Masquerade domain" is the domain you want the recipients of your messages to see. It can be handy to set an automatic alias for your domain outside of your local network, but it is blank by default and you probably won't change it very often. There's a lot to say about fully-qualified domain names in Windows 2000, but for the purpose of this article, you should put the complete DNS name of the host in the box, including its domain (in this case, mail.DavideMarcato.com). A smart host is another SMTP server that your server contacts to send all of the email that your users relay through you. Use it only if for some reason you don't want your local SMTP server to try to deliver mail to remote servers itself, but rather to act as a collector of internal outbound email to pass on to another computer, which will in turn do the real work. A checkbox lets you choose whether you want your server to try to perform the actual delivery itself prior to resorting to delegating the job to the smart host. Here, I set mail.MyIsp.com as the smart host and instructed the service to contact it up front, without attempting direct delivery. The last checkbox in the window controls whether the server will make sure that the domain of the alleged sender of incoming messages (the ones specified in the From field) matches the DNS domain of the client sending them. This is very powerful as a safety measure, but the necessity to trigger a reverse DNS lookup on each client's IP address renders it dramatically expensive on high-volume servers, so you need to use it with care. LDAP Routing The last property tab sets the Lightweight Directory Access Protocol (LDAP) routing options. If you want your virtual SMTP server to interoperate with an existing directory service (such as the Windows 2000 Active Directory™ service) through the LDAP protocol, check the box shown in Figure 12 and fill in the empty fields. |
 |
| Figure 12: LDAP Routing Options |
|
The information you need to provide includes the name of the server to contact, the type of directory service (a built-in or custom service—bear in mind that LDAP is a generic protocol), the user name, domain and password to authenticate, and how the authentication data should be sent over the network (the binding type). This topic is beyond the scope of this article and is not essential in setting up a functional SMTP service, so I won't use it here. Mail in Action
So far you've seen that it's easy to set up a full-fledged SMTP server that is perfectly tailored to your taste, supporting the mail delivery needs of a practically unlimited number of virtual servers and domains. You can conduct some simple tests using your favorite email client or even a geek-style telnet session. Just fire up telnet.exe at the command line and connect to your configured machine on port 1025. You'll be able to relay email to just about anybody and have the server deliver it for you. Conclusion
The need for flexible mailing services that are well-integrated with the operating system is steadily increasing, not only in today's corporate world, but also in small-office and home-networking scenarios. |
|
|
|
http://msdn.microsoft.com/library/devprods/ vs6/vstudio/vsentpro/veconsecurityexchangeserver.htm |