Create COM Add-Ins With VBA in Office 2000Use Office Developer and VBA6 to create a reusable add-in DLL that works across Office 2000 applications.
by Stan Schultes
|
Reprinted with permission from Visual Basic Programmer's Journal, November 1999, Volume 9, Issue 11, Copyright 1999, Fawcette Technical Publications, Palo Alto, CA, USA. To subscribe, call 1-800-848-5523, 650-833-7100, visit www.vbpj.com, or visit The Development Exchange.
|
With the release of Microsoft Office 2000, Microsoft has finally delivered a suite of applications that looks, feels, and programs the same across each tool. Before Office version 4, each application in the suite was very distinct. Microsoft was essentially trying to cobble together a disparate set of applications, yet the idea caught on with users. Office version 4 added the Access database along with a common look and feel between the applications. For developers, however, it still wasn't easy to create integrated solutions using multiple Office applications, because each application had a unique programming environment.
The news we hear most about Office 2000 is its continued improvement of Web integration across the suite. As a programmer, though, I think the biggest enhancement is the new level of programmability. Microsoft has finally completed the integration of VBA across the entire suite, significantly improving the object model of each application in the process. The top-shelf version of Microsoft Office 2000 is called Microsoft Office Developer (MOD). MOD, a descendant of Office 97's ODE, provides a whole range of useful tools and information. Included is the excellent Microsoft Office 2000/Visual Basic Programmer's Guide (see Resources), and a set of time-saving add-ins to the VB Editor (VBE) for reusing code, editing strings, adding comments, and inserting error handlers. Whereas Office 97's ODE was really only useful to Access programmers, MOD is a must-have for any programmer building solutions with Office 2000. You'll be tickled with the tools, but MOD's real gem is that it lets you write Component Object Model (COM) add-ins for Office and the VBE itself. Despite a somewhat cryptic name, a COM add-in is a tool for getting the most out of the Office applications. A COM add-in is simply a software component built to consistently extend the functionality of Office applications. Technically, a COM add-in is a DLL (or an EXE) that is specially registered so Office applications using COM can load and host it. COM is a platform that provides specific interface rules on which to build parts of an application so they work well together. COM can be considered the foundation of a modern Windows application (see www.microsoft.com/com for the lowdown on COM).
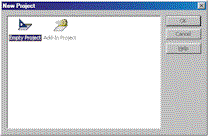
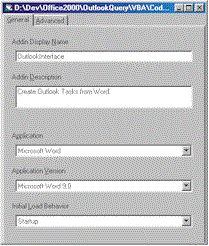
Create a Skeleton COM Add-In You build add-ins with VBA differently than you would with VB. For example, you can deploy the add-in as either a DLL or an EXE when using VB6, but you can build it only as a DLL when using VBA6. You can build Property Pages for the host application with VB6, but not with VBA. You must implement the IDTExtensibility2 interface within a class module when using VB, while VBA provides a designer that handles the interface implementation. IDTEx-tensibility2 is a programming interface for integrating COM add-ins with their host applications. There are templates on the MOD CD for VB, VC++, and VJ++ in the ODETools\V9\Samples\Unsupprt\MkAddin directory, but no template is provided for VBA. There is also a VB template in the ODETools\V9\Samples\OPG\Samples\Ch11\VB_COM_ADDIN directory. Note that both VB5 and VB6 come with a template called Add-In, which you can use only to create an add-in for the VBE, not to create COM add-ins.
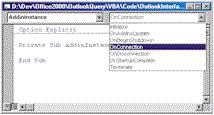
Add message boxes in the AddInInstance OnConnection and OnDisconnection events so you can see how the add-in interacts with its host:
Click on the new COM Add-Ins item you added. The OutlookInterface add-in is listed in the COM Add-Ins dialog. Click on the OutlookInterface checkbox to load the add-in, and click on the OK button. The application switches to the VBE, and the OnConnection message box pops up (the Initialize message box pops up first if you added one in the Initialize event). Click on OK, switch back to Word, click on Tools | COM Add-Ins, and uncheck the OutlookInterface checkbox to unload the add-in. Click on OK, and you will see another quirk (read: bug) in the VBA COM add-in environment. The OnDisconnect message box never pops up! If you add a message box to the Terminate event, it never pops up either. The add-in actually unloads, as you can see if you add it once more in the COM Add-Ins dialog (the OnConnection event fires as the add-in loads again). If you build a DLL at this point and try the same experiment, the OnDisconnect and Terminate events fire as expected. The fact that the OnDisconnect and Terminate events don't fire in design mode is bothersome because the code in these two events must be debugged noninteractively, which you shouldn't have to do in VBA. Switch back to the VBE and stop the project to complete the debug cycle. You will follow this process each time you want to start the add-in in design mode and run it in an Office host application: Run the project in the VBE, load the add-in in the host app, debug the code in the VBE, unload the add-in in the host app, and finally stop the project in the VBE. All code is stored in a single VBA file whenever you save the project. Each file (designers, forms, modules, and classes) in the VBA project's code can be reused in other projects by going to File | Export File. You can also import code for use in a project. Import and Export simply convert between the external ASCII file format and the VBA binary format.
Lions and Tigers and
Command Bars, Oh My!
These definitions globally store the references needed by the add-in. You can't create or reference an add-in from the host application, so using global variables like this is not publicly exposing the internals of the add-in project. Add this code to the code window of the WordOutlookInterface designer to store references and handle hookup of the CBC:
The Application object saved in the OnConnection event lets you call any available property or method of the host application from the add-in. This enables you to control the host application in any way you want within the bounds of its object model. Declare the module-level m_cbbMenu variable as WithEvents, allowing the object to react to CBC actions, such as button clicks, taken by the user. You can declare objects WithEvents only inside a class module, and the add-in designers are a special type of class module called an add-in class. Add an event procedure for the Command Bar button to the WordOutlookInterface designer's code window:
There are minor differences in the object model for command bars between Office applications, but you can handle these easily in the shared code by checking the type of g_oHostApp. The ConnectCommandBar function first tries connecting to an existing command bar; when it fails, it adds a new one. The function removes any existing buttons and adds the Outlook Task button. The Programmer's Guide refers to the CBC.OnAction property. Be warned: Don't set it to any value in VBA; if you do, only bad things will happen to your add-in! OnAction is not needed because the m_cbbMenu object is declared WithEvents, which automatically hooks up the event for you. Save the project and run it. Switch to Word and load the add-in. A new custom toolbar (actually, the command bar) appears with a button labeled Outlook Task. Clicking on the button brings up the CBB Click! message box. Unload the add-in from Word, and stop the project in the VBE. The toolbar doesn't disappear when you unload the add-in because the OnDisconnect event is not fired from design mode. You can leave the toolbar because the ConnectCom-mandBar function always tries to connect to an existing command bar when starting. If you want to remove the Outlook Interface toolbar from Word, go to Tools | Customize, select the Toolbars tab, find the Outlook Interface toolbar, and click on Delete. You can build code for any of the Office applications from the same host app (targeting Excel but built with VBA in Word, for example), but you need to run the target application to debug the application-specific code. In the Word VBE, add another designer for Excel by selecting Insert | Add-In Class and filling in the display name (OutlookInterface), description, application, and initial load behavior. Copy the code from the WordOutlookInterface code window and paste it into the ExcelOut-lookInterface code window. The code needed to reference the host application and create the CBC is identical in each application at this point because there are no host-specific actions in the code. In order to test in Excel, you must exit from Word completely because a Permission Denied error occurs when you try to open the project from VBA in Excel if Word is still running. Run Excel 2000, start the VBE (Alt-F11), and open the same OutlookInter-face.vba project you've been working on. Set a breakpoint in ExcelOutlookInterface's AddInInstance_OnConnection event and run the project. Switch to Excel and load the add-in. Note that you might need to add the COM Add-Ins command to the Tools menu the same way you did in Word. When the add-in loads, the code stops at the breakpoint in the Excel designer code rather than in the Word designer. Press F5 to continue running the project, switch back to Excel, and you'll see the same Outlook Interface toolbar that appeared in Word. Clicking on the Outlook Task button produces the On Click! message box as before. Unload the add-in from Excel, stop the project in the VBE, exit Excel, and reload Word and the VBE to continue development of the add-in. At this point, you have a minimally functional add-in that displays a custom command bar in Word and Excel. As noted earlier, no template is provided for building a COM add-in with VBA. Before going further, save the VBA file as a great starter project for building other add-ins with VBA.
Finish Implementation of the Add-In In the COutlook class, read-only properties OutlookApp and Namespace expose references for the rest of the add-in code to the Outlook Application and Namespace objects. In the Properties window for COutlook, also note the choices for the Instancing property—it can either be Private or Public Not Creatable. This limits the use of the class to the add-in itself, and doesn't let you create general-purpose DLLs with VBA6. This limitation is by design because creating general-purpose DLLs is one of VB6's jobs, which Microsoft is happy to sell you separately. Microsoft includes code in VBA to allow only the Private and Public Not Creatable instancing values at build time, even if you were to do some black-belt hacking to try and change the property value internally to make the class public and creatable. The only changes needed in modOutlookInterface from Listing 1 are the addition of two declarations at module level to store a global reference to the COutlook object and to give a title to the form that will be added:
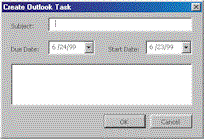
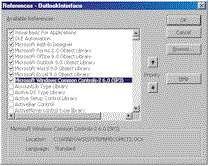
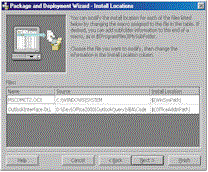
There are several changes to the WordOutlookInterface add-in class to add functionality for the sample add-in (see Listing 3). A hidden instance of a UserForm (frmTask) is created when the add-in class is initialized (see Listing 4). When the add-in connects to the host application, an instance of the COutlook class is created to manage a connection to Outlook. When you click on the Command Bar button, you log on to Outlook and frmTask is made visible. Add any code specific to Word as the host application, such as inserting information into a document, in the Word-OutlookInterface add-in class. Code unique to each target application is now isolated in the designer for that application, while the rest of the code in the project is shared amongst all host apps. Finally, add the user-interface form by selecting Insert | UserForm, naming it frmTask, and adding the basic controls needed for creating an Outlook Task Item. You can add the Date and Time Picker control to the toolbox by right-clicking on the toolbox and selecting Additional Controls. Select the Microsoft Date and Time Picker control (file MSCOMCT2.OCX in the Windows System directory). If you normally develop add-ins or apps in VB, you'll notice that a few of the events in VBA are named differently than in VB. For instance, Form_Load is called Form_Activate, and a textbox has an Enter event rather than GotFocus. The Cancel button on frmTask simply clears and hides the form, leaving the OK button with all the action. When you click on the OK button, the input fields are validated and a task is created in the default Tasks folder in Outlook. This is a simple example, so feel free to add more task properties to suit your own needs. Save and run the project (I'm glad for the Require Variable Declaration option in VBA, but why didn't Microsoft include Prompt to Save Changes before running?). Switch to Word, load the add-in, and click on the Outlook Task button to see the form appear. Fill in a subject, dates, and body, then click on OK. Start Outlook manually if it isn't already active, and look in the default Tasks folder (within your default mailbox) to see the new task item. Note that there is a reminder set by default when you open the task, but there aren't any Contacts or Categories defined. These and other properties are available to you for implementation. Take time to explore Outlook's object model—it is greatly enhanced over Outlook 98's object model. COM add-ins allow you to easily extend Outlook 2000 to a much greater extent than the "item-level only" events and VBScript behind forms in Outlook 98. Keep in mind that building an add-in as a DLL has both advantages and disadvantages. A DLL runs in-process in the host application, which makes it faster than using an EXE (which you can't build with VBA anyway). Running in-process also makes the host application susceptible to crashing if your DLL dies—something that can happen due to an unhandled error. Therefore, it is imperative that you use error handling throughout the add-in to keep it and the host app from crashing if a problem occurs. In the sample code, I simply used On Error Resume Next and message boxes in most procedures to save space. This is fine for a demo, but production code needs more thorough testing and error handling to cope with the real-world failure situations that occur when automating other applications.
Build and Deploy the Add-In When finished testing, verify that Outlook exits when the add-in unloads (provided you are not also running Outlook in interactive mode). A reference to Outlook remains within the add-in if Outlook doesn't exit when you try to unload the add-in, and Outlook and the add-in stay in memory as long as the host application is active. It takes careful examination of the code, and even commenting out code until the problem is isolated to find the remaining references. You can check to see if Outlook is still active by pressing Ctrl-Alt-Del and looking for Outlook in the Close Program dialog in Windows 95 or 98, or by choosing Task Manager and looking at the Applications tab in Windows NT.
As seen in this article, building a COM add-in with VBA and Office 2000 MOD is not a difficult process, but it does take some work. There are a few differences between building COM add-ins using VBA as opposed to using VB, along with a few quirks in the VBA environment to keep things interesting. If you have only Office (and not Visual Basic or Visual Studio), MOD provides the capability of building powerful add-in applications using just VBA. MOD ships with a number of its own add-ins that can help you during the code development process, including the Code Librarian, Error Handler, and Code Commenter. I encourage you to experiment with each of these add-ins; they're nice additions to MOD. Using your new knowledge and these tools, you are well on your way to building powerful and reusable COM add-ins for the Office 2000 application suite.
|
