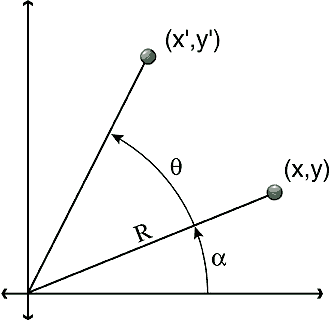
Figure 1: Rotating a point through the angle q around the origin.
The Abstract Window Toolkit (AWT) includes a Graphics class that can satisfy most of your basic drawing needs. It lets you draw lines, ovals, polygons, and an assortment of other simple objects. For any really tough chore, however, you're on your own. For example, the Graphics class will not help you rotate an image.
This article explains how to rotate images using the Graphics class. Not only will this amaze your friends and make you the life of the party, but it also paves the way for making more general image transformations.
A Little Trig
Consider the point (x, y) in Figure 1.

Figure 1: Rotating a point through
the angle q
around the origin.
If R is the distance from the point to the origin, you can write the coordinates of this point as:
x = R * Cos(a)
y = R * Sin(a)
Now suppose you want to rotate the point through the angle q around the origin to get the new point (x', y'). This point is the same distance R from the origin, so its coordinates are given by:
x' = R * Cos(a + q)
y' = R * Sin(a + q)
Things are a little more complicated if you want to rotate around some point (x0, y0) other than the origin. In that case, the program should subtract x0 and y0 from the point's coordinates to translate it to the origin. It can then rotate around the origin as it normally would, and add x0 and y0 to the result to translate the point back to its final destination.
You can use this technique to rotate an image one pixel at a time. One approach you might take is to consider each pixel (x, y) in the original image. Use the rotation equations to find the pixel's rotated position (x', y') in the output image. Then set the color of (x', y') in the output image to the color (x, y) in the input image.
Unfortunately, when you rotate a point at (x, y) to the point (x', y'), the coordinates x' and y' are rarely integers. The result image only has pixels at integral locations, so you can't simply set the value of a pixel at (x', y').
You could set the value of the nearest location that does exist. That will sometimes make more than one input pixel rotate to the same output pixel. Sadly, it also means some output pixels won't get mapped by any input pixels. That will leave holes in the output image.
To solve these problems, you should consider the problem backwards. For each pixel (x', y') in the output image, use the inverse of the rotation functions to figure out which input-image pixel (x, y) maps to it. Finding this inverse transformation is easy, because we're working with rotation. The inverse of a rotation by q degrees is simply a rotation by -q degrees.
When you map the point (x', y') back to the input pixel (x, y), the coordinates x and y will probably not be integers. This time, however, you can use the nearest existing neighbor pixel with a little more safety.
Sometimes you'll map more than one output pixel back to the same input pixel. Then the two output pixels will have the same color, but that's okay. In a photograph, it can be very difficult to tell that two adjacent pixels have the same value. This is much better than having pixels in the output image that aren't mapped.
A Little Java
Listing One shows Java code for rotating an image. It begins by finding the desired angle of rotation and the dimensions of the original image. It uses those values to decide how big to make the output image. Figure 2 shows how the angle and dimensions determine the new image's size.
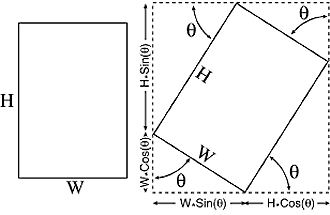
Figure 2: Determining the size of a
rotated image.
Next, the program examines each pixel in the output image. For an output pixel at position (new_x, new_y), the code finds the coordinates (old_x, old_y) in the input image that maps to it.
To rotate around the center of the output image, the program subtracts the coordinates of that position from the point's coordinates. It then uses the Math.atan2 function to find the angle a for the point. It uses Math.sqrt to calculate the distance R from the translated point to the origin.
The program then adds the angle of rotation q to the angle a. It uses the distance R and the sine and cosine functions to find the coordinates of the point in the original image. The program adds the coordinates of the center of the input image to center the rotation around the middle of the image. Finally, the program copies the input pixel's color to the output pixel.
Program Rotate, shown in Figure 3, uses this code to rotate images. As the figure shows, it does a good job of rotating photographs.
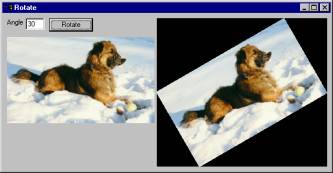
Figure 3: Program Rotate rotates
photographs nicely.
Aliasing
Unfortunately, program Rotate does not do as well on line drawings, such as the one shown in Figure 4. Some of the lines have gaps and others have jagged edges. The lines outlining the hat are quite rough.
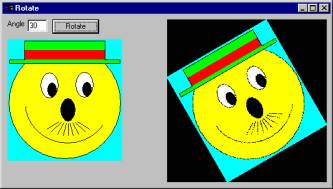
Figure 4: Program Rotate does not do
as well on line drawings.
These problems are caused by aliasing. Aliasing occurs when an image is transformed in such a way that some of the information is lost. In this case, some adjacent pixels are mapped to the same value. When the pixels lie near a thin line, they may both be mapped to the background color behind the line, which causes a gap. Near other lines, they may create a jagged edge where the line should be smooth. You can prevent these problems by using a more sophisticated method for selecting pixel colors.
Consider each pixel (x', y') in the output image and map it back to an input location (x, y), exactly as before. The coordinates x' and y' are probably not integers. Instead of using the color of the nearest pixel in the input image, take a weighted average of the nearby pixels with integral locations.
Let (xi, yi) be the integral pixel position with the next smaller coordinates as shown in Figure 5. Suppose the nearby integral pixels have values C00, C01, C10, and C11. The values dx0, dx1, dy0, and dy1 give the differences between the integral pixel coordinates and the desired coordinates (x, y) as shown in the figure. Because these are the closest integral pixel locations, dx0 + dx1 = 1 and dy0 + dy1 = 1.
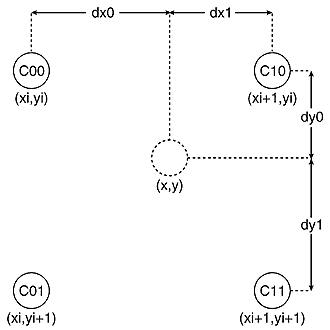
Figure 5: Calculating a pixel value
using bilinear interpolation.
You can use the values of the nearby pixels to calculate the value for the output pixel using bilinear interpolation. In this example, the resulting color value is:
C = C11 * dx2 * dy2 + C21 * dx1 * dy2 +
C12 * dx2 * dy1 + C22 * dx1 * dy1
A program must apply this formula three times: once each for the pixel's red, green, and blue components. Program Rotate2, shown in Figure 6, uses this technique to rotate images. You can see the result is much smoother than the image produced by program Rotate. The lines outlining the hat are smooth, and the other lines show no unsightly breaks.
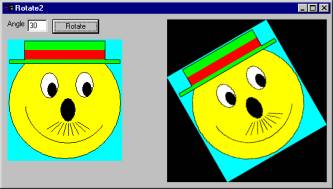
Figure 6: Program Rotate2 uses bilinear
interpolation to rotate images smoothly.
A Warped Mind
Once you have the basics down, you can easily extend these techniques to make other transformations. The Warp program, shown in Figure 7, uses the same techniques to warp images into wavy patterns. The only difference between this program and program Rotate2 is in the mapping from output pixels to input pixels. Program Warp uses the statements:
x_factor = 2 * Math.PI / period;...old_x = new_x;old_y = new_y + Math.sin((double)new_x * x_factor) * magnitude;The period value you enter in the program's text box tells how often the wavy pattern should repeat in pixels. The magnitude value tells how great the vertical displacement should be.
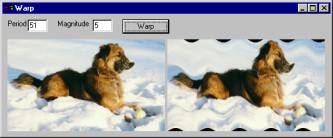
Figure 7: Program Warp
transforms images in a wavy pattern.
Conclusion
By mapping output pixels to input pixels and using bilinear interpolation, you can rotate images. With the same techniques, you can enlarge, stretch, twist, and otherwise transform mundane images in bizarre ways. Once you get the hang of it, there's almost no end to the interesting things you can do with pictures of your friends and family. If you stumble across a particularly interesting transformation, let me know. If it's strange enough, perhaps I'll post it for others to enjoy.
The example solutions referenced in this article are available for download.
Rod Stephens is the author of several books, including Visual Basic Graphics Programming [John Wiley & Sons, 1997]. See what else he's up to at http://www.vb-helper.com, or drop him an e-mail at mailto:RodStephens@vb-helper.com telling him about your warped images.
Begin Listing One - Java code for rotating an image
private void btnRotate_click(Object
source, Event e)
{ double theta, cos_theta, sin_theta, alpha; Bitmap new_bitmap; Graphics old_graphics, new_graphics; int frm_hgt; int old_wid, old_hgt, old_xmid, old_ymid; int new_wid, new_hgt, new_xmid, new_ymid; double old_x, old_y, old_dx, old_dy, dist; int new_x, new_y, new_dx, new_dy; // Get the angle alpha. theta =
(Double.valueOf(txtAngle.getText())).doubleValue(); theta = theta * Math.PI
/ 180; cos_theta =
Math.cos(theta); sin_theta =
Math.sin(theta); // Get the original picture's dimensions. old_wid =
picOriginal.getWidth(); old_hgt =
picOriginal.getHeight(); old_xmid = old_wid / 2; old_ymid = old_hgt / 2; // Make picResult big enough. new_wid = (int)(old_wid
* Math.abs(cos_theta) + old_hgt
* Math.abs(sin_theta)); new_hgt = (int)(old_wid
* Math.abs(sin_theta) + old_hgt
* Math.abs(cos_theta)); new_xmid = new_wid / 2; new_ymid = new_hgt / 2; picResult.setWidth(new_wid); picResult.setHeight(new_hgt); // Make the form big enough. setWidth(picResult.getLeft() + picResult.getWidth() + 14); frm_hgt =
picResult.getTop() + picResult.getHeight(); if
(frm_hgt < picOriginal.getTop() + picOriginal.getHeight()) frm_hgt =
picOriginal.getTop() + picOriginal.getHeight(); setHeight(frm_hgt + 34); // Make the new image big enough. new_bitmap
= new Bitmap(new_wid,
new_hgt); new_graphics =
new_bitmap.getGraphics(); old_graphics =
picOriginal.createGraphics(); // Display the as yet blank image. picResult.setImage(new_bitmap); picResult.update(); Cursor.WAIT.setCurrent(); // -------------------- // Transform the image. // -------------------- for
(new_y = 0; new_y < new_hgt; new_y++) { for (new_x = 0; new_x < new_wid; new_x++) { // Find the pixel in the old image // that maps to this one. new_dx = new_x -
new_xmid; new_dy = new_y -
new_ymid; alpha =
Math.atan2(new_dy, new_dx); dist =
Math.sqrt(new_dx * new_dx + new_dy * new_dy); old_dx = dist *
Math.cos(alpha + theta); old_dy = dist *
Math.sin(alpha + theta); old_x = old_dx +
old_xmid; old_y = old_dy +
old_ymid; // Set the new pixel value. new_graphics.setPixel( new_x, new_y, old_graphics.getPixel((int)old_x, (int)old_y)); } } // Display the finished image. picResult.setImage(new_bitmap); Cursor.DEFAULT.setCurrent();}End Listing One
Copyright
© 1999 Informant Communications Group. All Rights Reserved. • Send feedback to the Webmaster