![]()
This article assumes you're familiar with Visual Basic, ASP, and
COM
Download the code (7KB)
|
This article may contain URLs that were valid when originally published, but now link to sites or pages that no longer exist. To maintain the flow of the article, we've left these URLs in the text, but disabled the links.
|
|
Write COM Components for ASP in Visual Basic
Bryan MacFarlane and Donovan Smith |
| Visual Basic is an easy way to create robust COM-based objects quickly. This can be especially useful when extending the capabilities of ASP. |
|
When developing Web applications, you often need to incorporate technologies beyond ASP or even simple HTML. Scripts can become hard to read and maintain as they get more complex. Instead of having an ASP page that is thousands of lines long, the ASP code can serve as the glue that holds COM objects together in a logical fashion. Remember that ASP is an interpreted language, rather than a compiled language like Visual Basic®. This is something to keep in mind when considering the scalability of your application. For large pages or popular sites, the more code that can be taken out of raw ASP, the better.
There are several more reasons to use COM objects over pure ASP and HTML. First, Visual Basic has a richer set of tools and language syntax than VBScript, which gives you more options when building your application. Second, COM objects can be used over and over again. Third, you can protect your intellectual property by hiding your product's logic from users. If you will be distributing your development, you can keep users from getting all your source code by distributing it in a compiled DLL. In addition, COM objects allow you to separate your business logic from the page design. If your business logic lives in components, your Web page design team can build the framework of the page and call the objects from within the Web page framework. a perfect example of this would be a menu object that queries a database and draws the menu. The logic is abstracted to the Web page designer. Therefore, as the designer builds the framework of the Web pages, a simple reference to the object is all that's needed. We will be creating a server-side Visual Basic-based COM object, which is also called a server-side ActiveX® DLL. Our examples in this article will use Visual Basic 6.0. To follow the sample you'll need the Windows NT® Option Pack (Microsoft® Internet Information Server 4.0), Visual Basic 5.0 or greater (We used Visual Basic 6.0), and Windows NT Service Pack 4 (if you're using Visual Basic 6.0 but haven't installed it on the server).
Getting Started
|
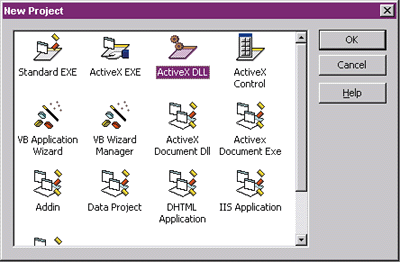 |
| Figure 1: Getting Started |
|
HTTP
|
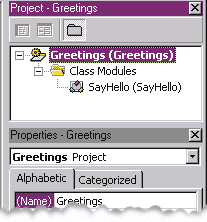 |
| Figure 2: Greetings |
| A Visual Basic project can contain multiple classes. Each class module provides an interface that is a collection of methods and properties. We are using only one interface, so we have only one module class. More class modules could be added from the Project menu. All you need to do is highlight the class in the Class Modules folder and change the Name property to SayHello (see Figure 3). |
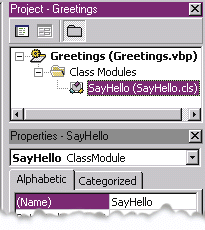 |
| Figure 3: SayHello |
| When you register the DLL (we'll cover this later), one GUID is created in the registry per interface. a GUID is a 32-character string that is guaranteed to be unique and is generated randomly. If the GUID is too much to memorize, you can use the ProgID instead. The ProgID is the friendly name for an object; the one for our sample is Greetings.SayHello. The ProgID value is the name you supply when you instantiate the object from the class in your ASP. For example, in ASP code you could add: |
|
| After registering the DLL on the system, you can search the registry for the interface name of Greetings.SayHello and find the GUID for our interface. Figure 4 shows the GUID with the (Default) data value of Greetings.SayHello. |
 |
| Figure 4: Greetings.SayHello GUID |
| After expanding the GUID folder, you can also explore the ProgID. As shown in Figure 5, the ProgID value has a value of Greetings.SayHello. This is the friendly name for the GUID and will be the name we reference when creating the object from within our ASP pages. |
 |
| Figure 5: Greetings.SayHello ProgID |
|
Creating Properties and Methods
|
|
| The Let property procedure is executed when you assign the property a value. An ASP page using this property would include these lines: |
|
| This passes the value of True to the IsBold Let property. The value is passed to argument tmpBold. The Let procedure assigns the value of tmpBold to the m_blnIsBold variable that has a scope of the class module.
The Get property procedure is executed when ASP reads the value of a property. The following code might exist in your ASP application: |
|
| a method is a member function of an object that performs an action. In our object, the one method is named WebOutput (see Figure 6). The WebOutput method performs the action of outputting our string, which is then passed to the browser. The style in which it outputs the string is based on the value of the m_blnIsBold variable, which is set by the property procedures.
Note that the strWebOutput argument is being accepted as a string variable to Response.Write. To provide output from the object, we must pass the Response object that is inherent to ASP, even though it's not part of Visual Basic. We could similarly pass the other objects that are inherent to ASP: Request, Server, Application, Session, and ObjectContext. Interaction with an ODBC database can be performed via ActiveX Data Objects (ADO), which is built into Visual Basic. There is no need to pass in any objects to use ADO in your Visual Basic-based COM objects. You could create the connection to the database in your ASP code and pass in that connection object as a variant. But this is a bad idea because these connections can be pooled, degrading performance. So we will use a Microsoft Transaction Server (MTS) package to wrap the object and manage its connections, significantly enhancing overall performance.
Compiling and Registering a DLL
|
|
Create an MTS Package
|
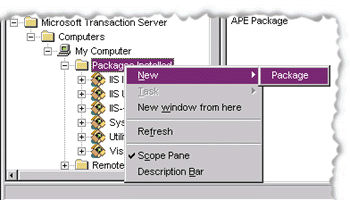 |
| Figure 7: Creating an Empty Package |
| Now that you've created an empty package, you need to create a component within it. Expand the Packages Installed folder and you should see your Greetings package. Right-click on the Components folder and select New, then Component (see Figure 8). At the next dialog box, select "Import components that are already registered," since you registered the DLL in an earlier step. |
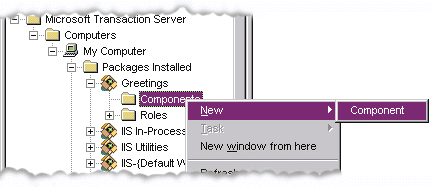 |
| Figure 8: New Component |
|
The next dialog box will produce a list of all ProgIDs that are registered on the server (see Figure 9). Scroll down the list and select the proper ProgID, Greetings.SayHello. When you click Finish, you should see a Greetings.SayHello component under My Computer in the component list (see Figure 10). |
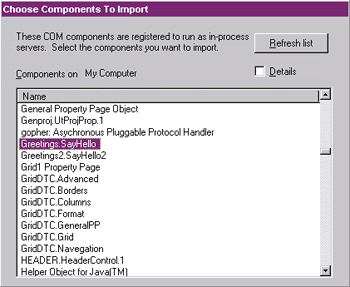 |
| Figure 9: Registered ProgIDs |
|
Creating the ASP Page
From the Internet Services Manager, run the virtual server or directory in which this file will reside with the "Run in separate memory space" option. (This option can be found if you select the virtual directory's properties from within the Internet Services Manager.) The reason you run this component in its own memory space is so you can edit and replace it in a development environment. If it's not in its own space, the system will not allow you to overwrite the DLL since the page that called it is running in the Web server's memory space. You would need to shut down and restart the server to free the DLL before overwriting it. |
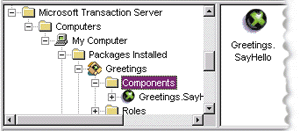 |
| Figure 10: Greetings.SayHello Component |
|
Using Visual InterDev™, Notepad, or your favorite editor, create the ASP page shown in Figure 11 and save it as default.asp in the vbtest directory on the Web server.
On the second line of server-side code, the class is instantiated as an object using Server.CreateObject. The class module we created is a template that is used when creating the object within the ASP environment. You can think of the class module as a stamp; stamping the class in your environment creates the object. The objGreetings object is an instance of the class. The third line of server-side code assigns a value of True to the IsBold property. Testing the application is as simple as opening a browser and pointing it at the ASP page. It should produce the output shown in Figure 12. |
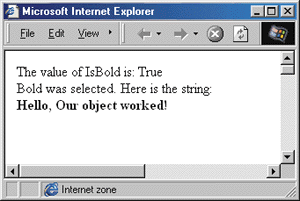 |
| Figure 12: Testing the ASP Page |
|
Edit and Replace the DLL
|
|
| Recompile your edited component. Next, copy the component to the Web server and replace the old copy. Finally, register your DLL with the command: |
|
| It can get tedious to continually make changes to your component. The ASP script shown in Figure 13 uses ADSI to toggle the site to run in its own memory space.
Note that the path to the Web site is hardcoded as IIS://myservername/W3SVC/4/ROOT. This could be changed to pass the Web site instance number as a variable, or it could be changed to match your Web site instance number. After installation, the default Web site is Instance 1 and the administrative Web site is Instance 2. Virtual servers you create after installation are counted sequentially, starting with 3. These settings are stored in the metabase. To view the metabase, you can use the IIS Resource Kit utility called metaedit. In our example, the name of this ASP page is hardcoded as ADSI.asp, but can easily be changed to any name you want to use.
Accessing Intrinsic ASP Objects
|
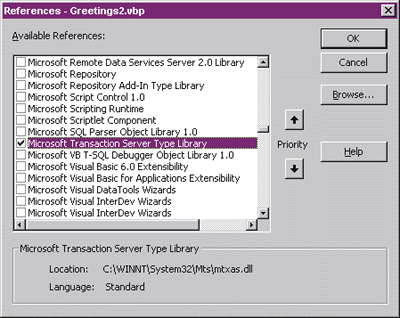 |
| Figure 15: Adding the MTS Type Library |
|
Since you are not passing the Response object to the component, the ASP code will also have to be adjusted. Notice that when we call the WebOutput method, we do not pass the Response object (see Figure 16).
Because we are using the MTS Library, we can take advantage of all the features in MTS. Most of these features are beyond the scope of this article, but you can look at Troy Cambra's article, "Developing a Visual Basic Component for IIS/MTS," at http://msdn.microsoft.com/library/psdk/iisref/crtc0ees.htm for more information.
Conclusion
|
|
|
|
Implementing Your Component at http://msdn.microsoft.com/library/psdk/iisref/crtc0ees.htm Also check http://msdn.microsoft.com/ for daily updates on developer programs, resources, and events. |
From the September 1999 issue of Microsoft Internet Developer.
|
|