Keith Bugg
Sometimes, you're tasked with putting a square peg in a round hole. Validating the contents of a slew of edit boxes can be just such a task. In this article, Keith shows you a sneaky way to validate an edit box and circumvent the tabbing order.
On a recent project, which dealt with performing a lot of heat loss equations on a building or other structure, I built a dialog box with a number of edit boxes. Rather than validating the entire dialog box when the user clicked OK, the customer asked me to check each entry as the user moved to the next edit box. Furthermore, the validation was two-level: I needed to reject values outside the possible range and warn about values outside a "reasonable" range. For example, consider the "R" value of a wall's insulation: A range of 0-100 was valid, but 8-32 might be considered reasonable. This all sounded simple enough, I thought-I'll just trap the EN_KILLFOCUS message for each edit box. If it's not valid or not reasonable, I'll put up a message box and then set the focus back to the offending edit box. Otherwise, I'll move on to the next edit box.
What's wrong with this picture? As it turns out, plenty! As I tested my solution, I was surprised to see that I was getting the error message for the next control in the tabbing order, not the one that I was validating. My confusion vaporized when it dawned on me what was happening: When I left one control (EN_KILLFOCUS), I was implicitly setting the focus to the next one (EN_SETFOCUS). When I displayed my error message box and tried to move back to the offending control, I was losing the focus of the next edit box. In effect, Windows was "ping-ponging" back and forth between the two controls-not a pretty picture.
The solutionAfter a lot of head-scratching, I suspected that the solution might lie in posting a custom message and responding to it. As it turns out, I found a similar solution at the MSDN Web site, but it didn't do everything I needed, so I rolled my own. In a nutshell, the basic steps to perform this type of custom validation are as follows:
1.Create a custom message.
2.Override the EN_KILLFOCUS message handler, and post the custom message from here.
3.Use DDX/DDV in the custom message handler to perform the validation.
4.Allow the "Cancel" button to abort any validation.
Naturally, there's a lot more to it than this, but this gives you a flow chart as to what needs to be done. Now I'll walk you through the actual implementation of the solution, using the sample code as the model.
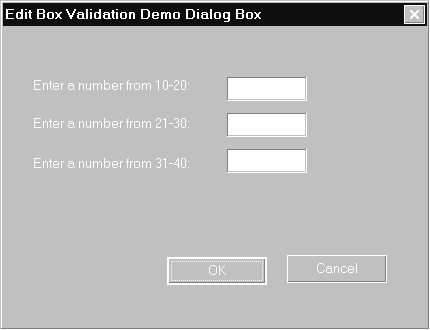
Implementing the validationThe first step is to have some edit boxes to validate. Figure 1 shows the dialog box from my sample code-I have three edit boxes, each one accepting an integer within a certain range. To further illustrate what you can do, I've added checks to see whether the values are "reasonable," as described previously. Next, we need a custom message. I defined it in the dialog box's header file, DemoDlg.h:

#define WM_VALIDATEEDITBOX (WM_USER + 0x16)This simply creates a new message equal to the value of the WM_USER message plus 96 (hex 16). Although I'm going to defer a discussion of the associated message handler, let me give you its prototype now:
afx_msg void OnValidateEditBox(UINT id);The only argument is the resource ID of the edit box being validated. This message is triggered by each of the three handlers I added for the EN_KILLFOCUS notification, like this:
void CDemoDlg::OnKillfocusEdit1()
{
   PostMessage(WM_VALIDATEEDITBOX, IDC_EDIT1,0);
}
Here, the PostMessage() API is used to post the custom message. Why Post rather than Send? Because Post tacks the message on the end of the queue and lets other messages clear through. If you use SendMessage() instead, sometimes your mouse-up or similar messages don't "get through" properly. Using Post gives your application some time to get out of the state of flux the change of focus creates.
Before we get too far downstream, let me show you how to handle a click on the "Cancel" button. If the user clicks "Cancel," there's no need to perform any validation, even though by clicking the button, they've removed focus from their most recent edit field. When Cancel is clicked, the dialog box receives a WM_PARENTNOTIFY message, and I can set a global flag called m_bValidate to FALSE, preventing any validation from occurring in the custom message handler. But, by default, the Cancel button has the WS_EX_NOPARENTNOTIFY style, which prevents the message from being sent. To get around this, you'll need to remove this style when the dialog box is initialized:
GetDlgItem(IDCANCEL)->ModifyStyleEx(
           WS_EX_NOPARENTNOTIFY,0);
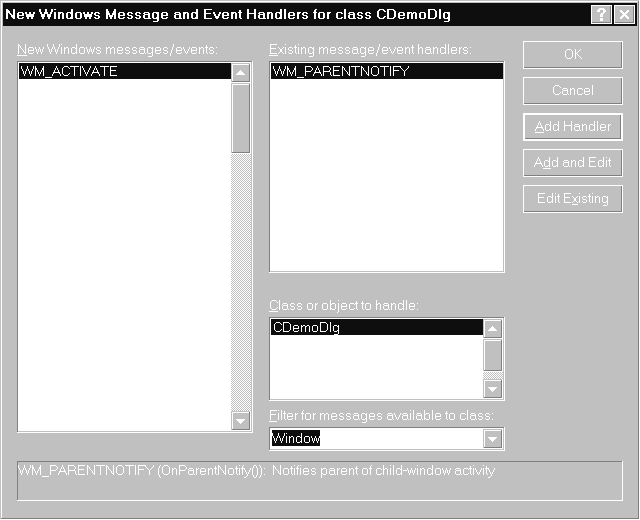
The other half of the problem is actually trapping the message. First, you need to right-click the dialog box and select "Events" from the context menu. This brings up the dialog box shown in Figure 2. By default, the combo box labeled "Filter Messages Available for Class" is preset to "Dialog." You need to change this to "Window," then select the WM_PARENTNOTIFY message from the message list. This makes OnParentNotify() available in Class Wizard. Here's the code for your override:

void CDemoDlg::OnParentNotify(UINT message,
                              LPARAM lParam)
{
   CDialog::OnParentNotify(message, lParam);

   // Check whether the Cancel button was clicked.
   // First, extract the point where the click occurred
   // from lParam.
   CPoint ptButtonDown(LOWORD(lParam),HIWORD(lParam));

   // If Cancel left-clicked, no validation.
   if ((message == WM_LBUTTONDOWN)
     && (ChildWindowFromPoint(ptButtonDown)
          ==  GetDlgItem(IDCANCEL)))
        m_bValidate = FALSE;
}
No rocket science here-just find the point where the WM_LBUTTONDOWN message was received. If it's inside the region claimed by the Cancel button, set the global m_bValidate flag to FALSE and continue on your merry way.
Before we get into the heavy lifting that's performed by the custom message handler, there are a few housekeeping chores to perform. For openers, you'll need to change the dialog box's message map and point it to the handler. First, in the source code:
BEGIN_MESSAGE_MAP(CDemoDlg, CDialog)
   //{{AFX_MSG_MAP(CDemoDlg)
   ON_WM_PARENTNOTIFY()
   ON_EN_KILLFOCUS(IDC_EDIT1, OnKillfocusEdit1)
   ON_EN_KILLFOCUS(IDC_EDIT2, OnKillfocusEdit2)
   ON_EN_KILLFOCUS(IDC_EDIT3, OnKillfocusEdit3)
   //}}AFX_MSG_MAP
   ON_MESSAGE(WM_VALIDATEEDITBOX, OnValidateEditBox)
END_MESSAGE_MAP()
Since you're adding this entry by hand, put it outside the ClassWizard comments. In the corresponding header file, add this:
// Generated message map functions
//{{AFX_MSG(CDemoDlg)
afx_msg void OnParentNotify(UINT message,
                            LPARAM lParam);
afx_msg void OnKillfocusEdit1();
afx_msg void OnKillfocusEdit2();
afx_msg void OnKillfocusEdit3();
virtual BOOL OnInitDialog();
//}}AFX_MSG
afx_msg void OnValidateEditBox(UINT id);
DECLARE_MESSAGE_MAP()
Now for the real work-the actual validation handler. Before we dive into that, let's recap what's happened so far:
1.We have a global flag (m_bValidate) that controls validation.
2.We have a custom message and message handler for the EN_KILLFOCUS message.
3.We can handle the case when the user decides to cancel the dialog box.
Now, roll up your sleeves and get ready to get down and dirty . . .
The custom validation methodWhen you try to leave one of the edit boxes, the custom message is posted, and eventually the method OnValidateEditBox() gets called. The only parameter is the resource ID of the edit box-this is saved in a member variable because it will be used later. Here's the entire function:
void CDemoDlg::OnValidateEditBox(UINT id)
{
   m_iControlToValidate = id;
   UpdateData();
   m_iControlToValidate = 0;
}
UpdateData() does a lot of interesting work. One of the most important tasks it performs is to lock out notifications while validation is ongoing. That's a benefit we really need in this application. As you might already know, UpdateData() calls DoDataExchange() eventually, and by overrriding DoDataExchange(), you can nestle your validation code inside the notification lockout that UpdateData() arranges. Right-click the classname in ClassView, and choose Add Virtual Function from the shortcut menu. Select DoDataExchange from the column on the right, and click Add Handler. Here's the code for DoDataExchange():
void CDemoDlg::DoDataExchange(CDataExchange* pDX)
{
   CDialog::DoDataExchange(pDX);
   if (m_iControlToValidate != 0)
   {
      OnEditLostFocus(m_iControlToValidate);
   }
   else
   {
      //{{AFX_DATA_MAP(CDemoDlg)
         // NOTE: the ClassWizard will add DDX
         // and DDV calls here
      //}}AFX_DATA_MAP
   }
}
Simply check that member variable to see whether we got to UpdateData() as a result of a focus loss, or for some other reason. If m_iControlToValidate is non-zero, call the special validator function. That function is mostly a giant switch statement. Here's a look at one of the cases; since the others all work the same, this is all you need to see to understand what's going on:
void CDemoDlg::OnEditLostFocus(UINT id)
{

// value user typed into edit box
   int nIntRange;

    if (m_bValidate)   // must validate!
    {
        CDataExchange dx(this, TRUE);
        // Choose an appropriate validation routine
        // based on the control that just lost focus.

        switch (id)
        {
            case IDC_EDIT1:
            {
               // Exchange the data into our local
               // variable and then use the standard
               // validation routines to check the
               // range or length. If there's an
               // exception thrown, then we can do our
               // SetFocus() safely.

               try
               {
                  // Exchange
                  DDX_Text(&dx, IDC_EDIT1, nIntRange);
                  // Validate
                  DDV_MinMaxInt(&dx, nIntRange,
                                10, 20);
                  if(nIntRange < 13 || nIntRange > 17)
                  {
                     if(AfxMessageBox("Data ok, but _
      reasonable range is 13-17.\nDo you want to _
      change it now?",MB_YESNO)== IDYES)
                     {
                        // Reset the focus
                        GetDlgItem(id)->SetFocus();
                        return;
                     }
                     else
                        SetCursor(LoadCursor(NULL,
                                          IDC_ARROW));
                  }
               }
              catch(...)
               {
                  // Validation failed - user already
                  // alerted, SetFocus() back to the
                  // original control.
                  GetDlgItem(id)->SetFocus();
                  return;
               }
            }
            break;
This is all pretty simple-the method uses a CDataExchange object to retrieve and validate the value in the edit box. If the user tries to leave an edit box without entering anything, you get the message from the Afx framework "Please enter an integer," so we don't have to worry about that case. Next comes the tricky part-I use a try-catch block to validate the results. The DDV functions will, if the user's value is outside the range passed to them, put up a message box to warn the user, and throw an exception. When you catch the exception, you know the user has been notified.
From here on it's all vanilla coding. If the value is completely invalid, the Afx framework has taken care of reporting the error for you. If it's in range but not "reasonable," tell the user, and offer a choice of returning to the edit box or using the unreasonable value. In the latter case, the cursor is restored by the call to SetCursor(). (The cursor was changed to the text insertion cursor when the user entered the edit box.) Failure to add this line would mean the cursor wouldn't be the arrow until the user clicked on something-not a good design feature, to say the least.
ConclusionThat's a wrap for custom edit box validation. Granted, not every application will benefit from this-if you only have one edit box, you can stick all of the validation in your OnKillFocus() method or defer all validation until the "OK" button is clicked. But if you have a lot of edit boxes that need validating, and you want to catch errors as they occur, this is the way to go. Until next time, happy programming!
Keith "D." Bugg is the Visual C++ trail boss for Q Systems, Inc., a consulting firm in Oak Ridge, TN. He's just completed a new book on MFC user interfaces for John Wiley & Sons called Building Better Interfaces with MFC. kbugg@qsystems.net.