
The cloning of Windows 95 and Windows NT Workstations is a hot topic in the halls of most large IS shops. The only problem is, the use of cloning software such as the popular Ghost, DriveImage Professional, or Imagecaster for cloning Windows 95 workstations is currently unsupported by Microsoft. The cloning of Windows NT 4.0 workstations, however, is supported with the use of Microsoft's System Preparation Tool--a utility to help mitigate (and legitimize) the nefarious task. Until then, to be fully "blessed" by Microsoft, you need to actually perform an installation from some sort of official distribution point. In order to qualify as an official distribution, original files must be used for your installation. These can come from the Setup floppies, the Windows 95 or Windows NT CD-ROM, or a network distribution point.
Of all our possible distribution methods, the most popular is via a network distribution point. This method allows the luxury of setting up one place (per operating system) to connect to, and you get the added benefit of not having to cart around packs of floppies or CDs. You'll more than likely be able to start off the entire show with a single network boot disk. In this article, we'll show you how easy it is to automate the Windows NT and Windows 95 installation process using one centralized network distribution point.
The technique
In order to use a network distribution point, three steps need to take place. First, you need to get the operating system distribution files on to a server share point. Next, customize the automated installation files. Finally, you may also wish to install the latest service releases for the specific operating system.
Windows NT distribution points
Setting up the Windows NT Workstation distribution is relatively easy. To begin, you need to know how to create a share point on your server. To create a share point, copy the i386 directory and all its subdirectories from the Windows NT Workstation CD to the server. Next, simply share the i386 directory with a name such as ntdistro. When you've finished, your share point should be similar to \\server\ntdistro.
Windows NT automatic scripting
For Windows NT Workstation (or Server for that matter), once you've created the share, you can start your automated adventure by running Windows NT Setup Manager (Setupmgr). Setupmgr is located on the Windows NT Resource Kit in the \i386\setup folder for use on Intel machines. There's also a version that comes standard with Windows NT Server, but the Resource Kit version is much better. The purpose of Setupmgr is to provide a graphical interface in which you can answer all the possible setup questions in advance, and therefore minimize input required from the user. Most people can't remember the thousands of possible configurable options for an unattended file, so Setupmgr makes the task a bit easier. After answering the questions, you'll save the answer file and then call it from your installation routine.
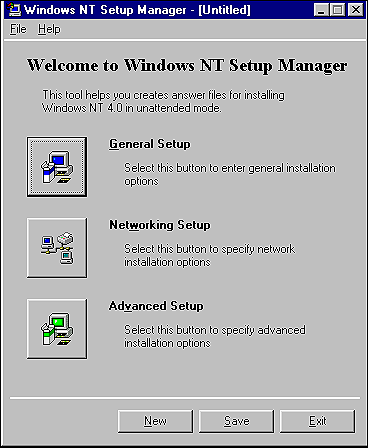
As you can see in Figure A, there are three options in Setup Manager. Since the options are self-explanatory, we'll highlight some important points that will help to ensure a smooth automatic installation.
Figure A: Windows NT Setup Manager allows you to automate your workstation installations.

When you click the General Setup button, we recommend entering nothing at all in the Computer Name text box on the User Information tab. This forces the installation routine to prompt you for a computer name and ensure that each of your machines is uniquely named. On the General tab, also note that you can perform an automatic upgrade from Windows 3.1 or Windows for Workgroups 3.1.1. Unfortunately, there's currently no upgrade path from Windows 95 to Windows NT available.
If you wish to have the computer automatically become a member of the domain, then click on the Computer Role tab and select the appropriate role of the computer (Workstation In Domain) from the Computer Role dropdown list. Then, enter the domain name you wish to join in the Domain Name text box.
You can also select the Create Computer Account check box and enter a domain administrator account and password in the corresponding text boxes. Take note, however, that this presents the domain administrator account name and password as clear text in the script file for anyone to get their hands on!
So, instead, we recommend pre-registering the computer accounts in the domain by using Server Manager to add each workstation that will be joining the domain. This way, the domain administrator account and password information remains a well-guarded secret.
Under the Networking Setup option, you should be particularly careful if you select the Automatically Detect And Install First Adapter option button on the General tab. If the installation fails while doing an automatic detection, you may have to do the "three-disk-shuffle" and perform the installation manually. If you have more than five machines with the same exact network card type (and setup with the same IRQ, DMA, etc.), then we recommend you select the Specify Adapter To Be Detected option button and add it to the List Of Adapters on the Adapters tab.
When you've finished configuring your options, Microsoft recommends that you save the file as Unattend.txt. Now, to use the Unattend.txt file you just created, copy it to a place where it will be read. We recommend the same folder on the server where you placed the \i386 files.
Starting a Windows NT installation
Before you're ready to install Windows NT on the workstation, create a network boot disk that will map a drive letter to the share point you created on the server, and execute the following command:
K:\winnt /b/u:k:\unattend.txt /s:k:\/t:c
In English, this translates to: Run the Windows NT Setup program (winnt) as a floppy-less installation (/b) using the unattended script file (/u). The script file lives on k:\, is named Unattend.txt, and uses the source files (/s) located on k:\. And, use the local C drive as a temporary storage place for (/t).
Automatically installing the Windows NT Service Pack
If you want to be extra crafty, you can also automatically run the Service Pack Setup program. If you pre-copy the Service Pack installation files to a folder on the hard disk such as C:\sp\, you can simply tack on
e:\"c:\sp\update/U/Z"
to the above statement. This causes the Service Pack install routine to automatically execute when the graphical part of the Windows NT installation is complete.
Rolling out Windows 95
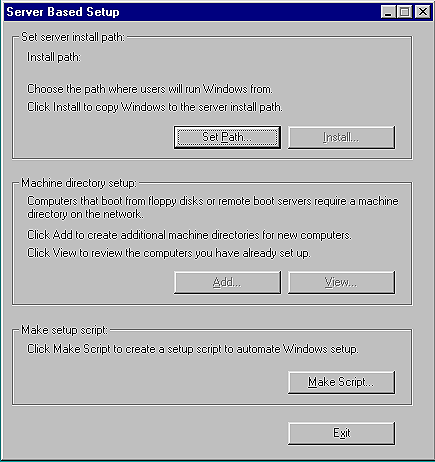
To set up a network distribution for Windows 95, you need to run the Netsetup.exe utility that's located only on the Windows 95 CD in the Admin\Nettools\Netsetup folder. Double-click on the Netsetup.exe icon in Windows Explorer to launch the Server Based Setup dialog box shown in Figure B.
Figure B: The Server Based Setup utility Netsetup.exe can be found on the Windows 95 CD.

Begin by clicking the Set Path button. Next, in the Server Path text box, enter a Universal Naming Convention (UNC) path that specifies a server and share on which the user you're logged in as has sufficient write rights. You can also map a network drive over to the share you wish to install the distribution point on. For our example, we'll use \\server\win95distro just to keep it simple. Click OK to close the Server Path dialog box.
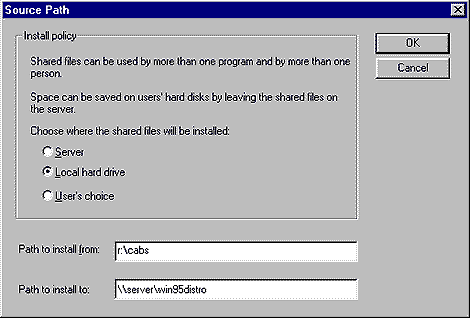
Next, click the Install button to open the Source Path dialog box shown in Figure C. While it's possible to run all your Windows 95 workstations from the server, doing so is usually too taxing on networks for any medium- to large-size organization. By selecting the Local Hard Drive option shown in Figure C, you're choosing to have all the Windows 95 files copied to and run from the user's hard drive.
Figure C: Windows 95 workstations run more efficiently if the files are installed on the local hard drive.

You now need to specify the directory where the original August 95 distribution is contained in the Path To Install From text box. You could also, theoretically, use the Windows 95B (Service release 2) of the CAB files, but, this practice is unsupported by Microsoft. This is because Windows 95B is supposed to only be distributed with newer PC hardware, and, thus, can't be installed on multiple computers. However, a little later in the article, we'll explain how to massage the Windows 95 distribution point to automatically install Service Pack 1 on each desktop.
Once you have all the information entered in the Source Path dialog box, click OK. At this point, Server Based Setup will display the Create Default dialog box shown in Figure D. Click the Don't Create Default button, as you'll be using an alternative script generation program.
Figure D: You don't want to create default scripts because you'll be generating your own script.

Next, you're prompted for the Product Identification Number. After entering the Product ID in the corresponding text box, the CABs specified in the Path To Install From text box are expanded into a "flat" file on the server, where nearly all the files in the cabs are placed into various directories on the specified server share point.
This takes quite a while to finish, and toward the end, there might be times when you'll be absolutely convinced the process has crashed--but, we've never seen it actually hang. It's simply finishing the distribution installation without any screen output. Once the Windows 95 distribution is complete, click OK and exit the Server Based Setup program.
Windows 95 Automatic Scripting
To get your automated wheels turning, you need to set up the file that automatically answers the setup questions: the Msbatch.inf. Upon examination of the share point specified earlier (in our example, it's \\server\win95distro), you'll notice that the CAB files have all been expanded and many of the files have been placed into their corresponding directories. Also, notice that at the root point of the share, there's a file called Msbatch.inf. This is the default script file used for automated installation. If you view it with a text file, you'll notice that it's nearly empty. This is because you clicked the Don't Create Default button when prompted for the creation of the script. At this point, you may wish to rename the current Msbatch.inf to Msbatch.old because you'll be creating a new one.
Decisions, decisions, decisions...
There are three separate tools that you could use to assist in your automated installation. The fist one was integrated into the Netsetup utility. The second is called Batch.exe and can be found on the Windows 95 Resource Kit. The last is an improved update to Batch.exe, called Batch V2.0. Batch V2.0 has a much-improved tabbed interface for many of the selectable options. It can be downloaded from Microsoft at http://support.microsoft.com/support/kb/articles/q142/7/94.asp. All three utilities mentioned previously are simply a comfortable way of getting into the guts of the Msbatch.inf file. However, because there are some options that aren't available in these front-end Msbatch.inf utilities, you may have to manually edit and tweak the Msbatch.inf file by hand.
After downloading, unpacking, and installing Batcb0.exe to a folder on your hard disk, you'll be ready to explore the many customizable options available when using this program. Batch 2.0 for Windows 95 has three main setup options. Once again, most of the entry boxes are self-explanatory, so we'll stress only some of the points that you may wish to pay special attention to.
Let Windows 95 do its job
Since Windows 95 has a fairly robust hardware detection routine, it can usually detect your network card during installation (provided it's not a wacky PCI card). If you click the Network Options button and then select the Netcard Options tab, there's an Ignore Detected Net Cards check box. This option is necessary if you should have two network cards--one of them being dormant. This is common in Compaq machines with a Netflex Ethernet card.
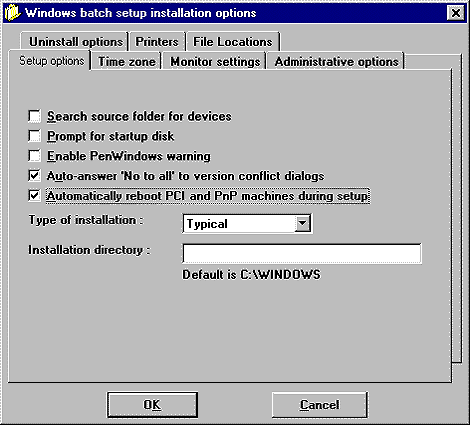
Many organizations turn the Netflex card off in the BIOS and then add a second card, perhaps a 3COM Etherlink III card. Even though the Netflex card is turned off in the BIOS, it's usually detected anyway during the Windows 95 hardware detection routine. To work around this, you'll need to manually edit the Msbatch.inf file and add the card under the [networks] section. See the Windows 95 Resource Kit on page 1191 for the excruciating details. On the Windows Batch Setup Installation Options properties sheet, click on the Setup Options tab, and, for expedience, be sure to select the Automatically Reboot PCI And PnP Machines During Setup check box, as shown in Figure E. This will reboot the machine after the first round of files is copied.
Figure E: The Windows Batch Setup Installation Options properties sheet allows you to expedite the Setup process.

While you're there, also deselect the Prompt For Startup Disk check box. You'll only need one emergency startup disk for the whole installed base, so feel free to create it later. Click OK to close the Windows Batch Setup Installation Options properties sheet, and then click Done to save the INF file. Save the file as Msbatch.inf, preferably in the same place in which we found the original: the root of the distribution point.
Automatically installing the Windows 95 Service Pack 1
While Windows 95 is loading, you'll also probably want to install the latest Service Pack. You can do this with the greatest of ease. First, get the Windows 95 Service Pack 1 update from the Microsoft Web site at http://support.microsoft.com/support/kb/articles/q142/7/94.asp and expand it. Next, find Infinst.exe--also located in the Netsetup folder of the Windows 95 CD--and double-click on the icon to launch it. Click the Set Path button and specify the UNC of the Windows 95 distribution point in the Server Path text box. (In our example it was \\server\win95distro). Click OK, and then click the Install INF button and specify the location of the Updates1.inf file. This same Infinst.exe program can be used to integrate most applications that have INFs associated with them, such as Office 97. Be sure to make a backup of your Windows 95 distribution directories (and all the subdirectories) before you try to integrate new applications. If it doesn't work properly, there's no "undo" and you'll end up desperately trying to remove the changes.
And ladies and gentlemen, they're off!
Finally, you'll need to start this whole process in motion. First, you'll want to map a drive letter to your Windows 95 distribution point. Then, start the process going with a simple one-word command: Setup. If you saved it to the distribution point, Setup automatcially detects the presence of the Msbatch.inf file and uses it. If you saved Msbatch.inf somewhere else (or didn't call it Msbatch.inf), then type
Setup <driveletter>:\name.inf
and it'll work exactly the same.