 To change the color and size of standard screen elements
The Accessibility Options icon in Control Panel controls most of the accessibility features in Windows 98. Users can customize display, keyboard, mouse, and sound operation for their own particular needs. This section presents each feature in detail. Most users will find it easier to configure their settings using the Accessibility Wizard. See "Configuring Accessibility Features with the Accessibility Wizard" later in this chapter.
A few features are available only through Control Panel settings. These include:
This section describes the specific accessibility features that Windows 98 provides to make the display easier to see for users with limited vision, including:
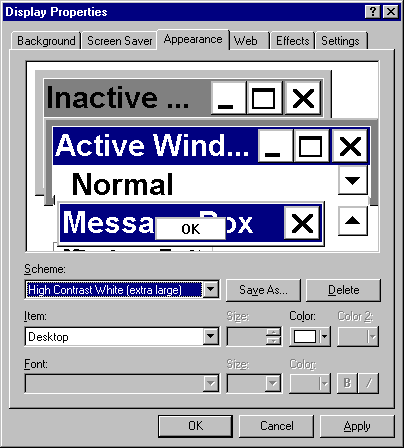
Users who have limited vision or who suffer eyestrain during normal use of a video display can now adjust the sizes of window titles, scroll bars, borders, menu text, and other standard screen elements.
 To change the color and size of standard screen elements
Use the Scheme list to select sample schemes. The selected schemes will be displayed. You can customize item and font choices in the Item and Font lists after selecting an entry in the Scheme list.

Users who have difficulty seeing or following the mouse pointer can now set the following characteristics to improve visibility of the mouse pointer:
Customizable mouse pointer display schemes are loaded automatically when you install Windows 98 from the compact disc using the Typical setup. If another setup option was chosen, use the Add/Remove Programs option in Control Panel to install the mouse pointer display schemes from the compact disc. In addition, with the Windows 98 compact disc, the user can install color schemes and select from red, gray, yellow, green, or violet 16-color schemes for the mouse pointer.
 To change the pointer size and color

Sample pointers appear in the lower list.
 To change pointer speed or add trails

Use the Pointer Speed slider to set the speed of the pointer. Select the Display pointer trails check box to display pointer trails, and use the slider to set the length of the pointer trails.
Note
Not all displays support mouse pointer color schemes. Windows 98 features an animated hourglass pointer for better viewing.
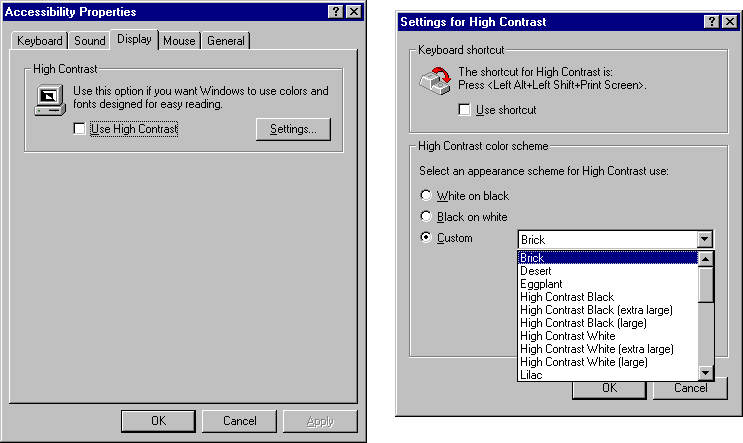
Many users with low vision require a high degree of contrast between foreground and background objects to distinguish the objects. For example, some users may not be able to read black text on a gray background, or text drawn over a picture easily. By setting a global flag, users can instruct Windows 98 and applications to display information with a high degree of contrast. Activating high-contrast mode automatically selects the user’s preferred color scheme.
Through both Control Panel and the Accessibility Wizard, Windows 98 offers 12 high-contrast screen selections optimized for individuals with low vision.
 To set screen colors in high-contrast mode
The Settings for High Contrast dialog box appears.
 To set the High Contrast hot key
The Settings for High Contrast dialog box appears.

The shortcut key for High Contrast (left ALT+left SHIFT+PRINT SCREEN) is enabled.
Note
You can also activate High Contrast mode using Magnifier.
This section describes accessibility features that assist users who may have difficulty using the keyboard or the mouse. Notice that even without installing accessibility features, you can use the TAB key in dialog boxes to move the focus (that is, the outline that indicates where you are currently working in the dialog box), and you can use the arrow keys to select items in a list. In property sheets that have multiple tabs, you can press CTRL+TAB to select each property sheet in order from left to right. Or you can press the TAB key until the focus is in the tab for the current property sheet, and then press an arrow key to select the next sheet. See "Using Keyboard Navigation" later in this chapter for lists of shortcut keys to use throughout Windows 98.
Many software programs require you to press two or three keys at a time. For people who type using a single finger or a mouthstick, that is not possible. StickyKeys allows you to press one key at a time and instructs Windows to respond as if the keys had been pressed simultaneously.
When StickyKeys is on, pressing any modifier key (CTRL, ALT, or SHIFT) "latches" that key down until you release the mouse button or press a key that is not a modifier key. Pressing a modifier key twice in a row locks the key down until it is tapped a third time.
 To adjust StickyKeys settings
The Keyboard tab appears.

The Settings for StickyKeys dialog box appears.
 To turn StickyKeys on or off by using an emergency hot key
If you have the sound features of StickyKeys enabled, you hear a rising siren tone when StickyKeys is turned on or off using the hot key.
StickyKeys operates in two modes: Latched mode and Locked mode:
For shared computers, there is an optional feature to keep non-disabled people from being confused when StickyKeys is left on. Whenever other people use the keyboard, they can hold the modifier key down and strike another key simultaneously. If the option Turn StickyKeys Off When Pressing Two Keys At Once is enabled, StickyKeys detects that two keys are held down simultaneously and automatically turns the StickyKeys feature off.
Some people do not like to have keyboard sounds, while others find them useful. You can turn feedback sounds on or off in the StickyKeys properties by using the option Make Sounds When Modifier Key Is Pressed.
Also, it is possible to disable the Locked mode of StickyKeys by making sure the Press Modifier Key Twice To Lock check box is not selected.
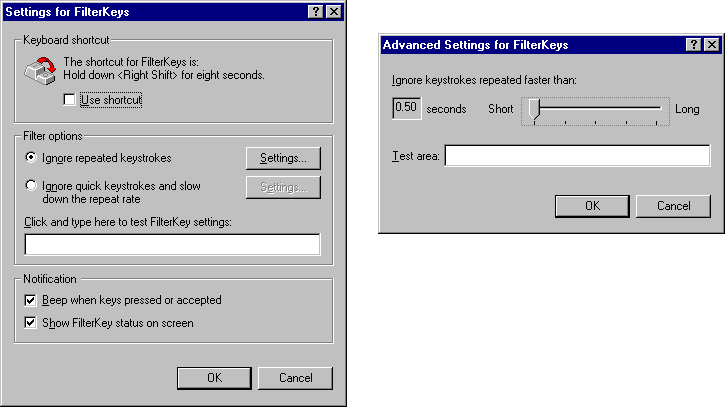
Windows 98 includes features designed to work either separately or in combination to address problems related to keyboard sensitivity. These features are grouped as FilterKeys and are known separately as SlowKeys, BounceKeys, and RepeatKeys. These options include the following:
You can adjust FilterKeys settings by using the Accessibility Options icon in Control Panel, or you can turn a specific FilterKeys feature on or off by using an emergency hot key.
To activate FilterKeys with your default settings, hold down the right SHIFT key for at least eight seconds.
The following sequence of events happens:
When you disable FilterKeys (using the same keyboard action), you hear a falling siren.
You can adjust the FilterKeys settings so that unwanted functions have no effect.
 To adjust FilterKeys settings
The Keyboard tab appears.

– Or –
Select Ignore Quick KeyStrokes, and then select the related Settings button. You can then configure settings for RepeatKeys and SlowKeys.
For RepeatKeys, which overrides the settings made using the Keyboard properties in Control Panel:
Another very useful FilterKeys feature is the option Beep When A Key Is Pressed. If this option is on and any FilterKeys functions are active, you hear a beep when you press the key or when the key repeats. For example, if SlowKeys is active, you hear a sound when the key is pressed and when the computer accepts the key. This can be useful when the keyboard is set to respond differently than usual.
People with visual impairments may not be able to see the lights on the keyboard that indicate CAPS LOCK, NUM LOCK, and SCROLL LOCK status. ToggleKeys provides audio cues—high and low beeps—to tell you whether these keys are active or inactive. If ToggleKeys is enabled, when you press one of these keys and it turns on, you hear a high beep. When you press one of these keys and it turns off, you hear a low beep.
 To adjust ToggleKeys settings
The Keyboard tab appears.
The Settings for ToggleKeys dialog box appears.

Remember the following points when using ToggleKeys:
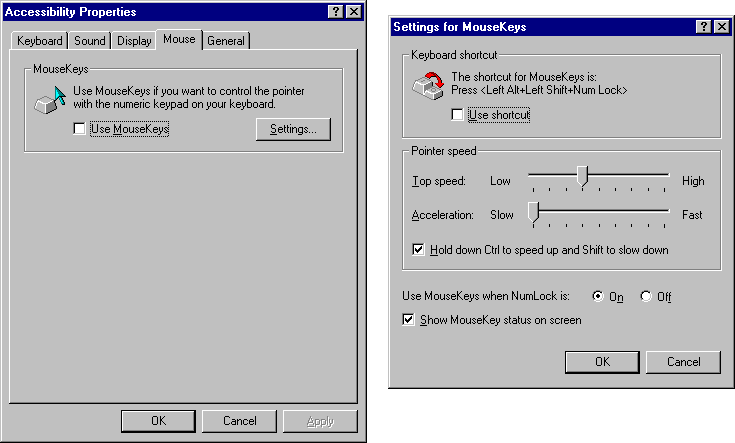
MouseKeys lets you control the mouse pointer by using the keyboard. Although Windows 98 is designed to allow you to perform all actions without a mouse, some programs might still require one, and a mouse might be more convenient for some tasks. MouseKeys is also useful for graphic artists and others who need to position the pointer with great accuracy. You do not need to have a mouse to use this feature.
 To adjust MouseKeys settings
The Mouse tab appears.

The Settings for MouseKeys dialog box appears.
 To turn on MouseKeys from the keyboard
When MouseKeys turns on, you hear a rising siren if sounds are turned on.
If you are using only one finger, a mouthstick, or a head-pointer to operate the computer, the easiest way to activate MouseKeys is to first activate StickyKeys by tapping either SHIFT key five times. You can then press the three keys in sequence rather than simultaneously.
Note
If SlowKeys is active, all the MouseKeys control keys respond according to the acceptance delay set for SlowKeys.
When MouseKeys is on, use the following keys to move the pointer on the screen:
You can use NUM LOCK to toggle the MouseKeys control pad back to the numeric keypad and vice versa. This is especially useful with a laptop or notebook computer that does not have a separate numeric keypad. On these computer keyboards, the numeric keypad is usually overlaid on top of the standard QWERTY keyboard.
Note
If the MouseKeys feature is on but NUM LOCK is toggled to the opposite setting, the MouseKeys icon in the taskbar shows that MouseKeys is disabled.
For example, if you are using the numeric keypad for number entry before starting MouseKeys, when you toggle out of MouseKeys by using NUM LOCK, you can enter numbers with the numeric keypad. If you are using the numeric keypad as a cursor keypad before starting MouseKeys, when you toggle out of MouseKeys by using NUM LOCK, you have a cursor keypad.
It can be useful to combine use of MouseKeys and use of a physical mouse. For example, you can use the standard mouse to move quickly around the screen and then use MouseKeys to move more precisely (unit by unit) to your final destination. Some people cannot use the standard mouse while simultaneously holding down the mouse button, so you can use MouseKeys to lock down the currently active mouse button, move the mouse cursor by using MouseKeys or the real mouse, and then release the mouse button by using MouseKeys.
ShowSounds is a feature that instructs programs to provide visible feedback, in effect, asking the programs to be "closed-captioned."
SoundSentry tells Windows to send a visual cue, such as a blinking title bar or a screen flash, whenever the computer generates a sound. This enables you to see when the computer is generating sounds, although it cannot help you distinguish between different sounds.
ShowSounds and SoundSentry can be enabled through both the Accessibility Wizard and the Sounds tab within Accessibility Options in Control Panel.
You can also assign your own WAV files as custom sounds to any event through Sounds in Control Panel.
For information on using NetMeeting within corporate intranets to communicate real time in text-based chat, see "Conferencing with NetMeeting" in Chapter 20, "Internet Access and Tools."
 To adjust Sound settings
The Sound tab appears.

The Settings for SoundSentry dialog box appears.