 To view or edit default system policies
This section describes procedures for creating system policies.
To take advantage of automatic downloading, discussed earlier, create a policy file that contains user, computer, and group entries to reside in the Netlogon share of a Windows NT server or the Public directory of a NetWare server. Based on the client selected, Windows 98 automatically looks in one of these locations to download your newly created system policy.
 To view or edit default system policies
Ė Or Ė
Double-click Default Computer to define the settings for computer-specific policies.
This section describes how to create a system policy for a user or computer.
Tip
To reduce the management load, minimize the number of user and computer entries in system policy files. Consider first creating one standard system policy for all users by editing default settings, and then creating settings for individuals on an exception basis.
 To create system policies for a new user or computer
Tip
You can easily copy policy values to the new user or computer from an existing user or computer by copying and pasting them. Highlight an existing user or computer, and on the Edit menu, click Copy. Then highlight the new user or computer, and on the Edit menu, click Paste.
 To edit existing system policies
Group policies are supported for both Windows NT and NetWare networks. Creating policies for groups is similar to creating policies for users or computers.
You must first make sure that Grouppol.dll, which supports group policies, has been successfully installed on each client computer. For more information, see "Installing System Policy Editor" earlier in this chapter.
You cannot create new groups by using System Policy Editor; you can use only existing groups on the NetWare or Windows NT network. To create a new group, use the tools provided with your network administrative software.
 To create system policies for groups
Ė Or Ė
If user-level security is enabled, click Browse, click the name of the group you want, and then click OK.
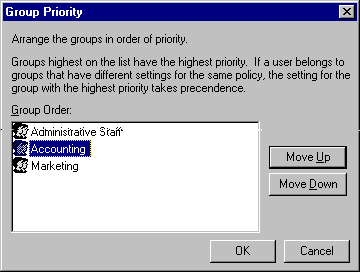
Group policies are downloaded starting with the lowest-priority group and ending with the highest-priority group. All groups are processed. The group with the highest priority is processed last so that any of the settings in that groupís policy file supersede those in lower-priority groups. You can use one policy file for each group, even if some of the client computers in the group do not have support installed for group policies. Client computers that are not configured for using group policies will ignore group policy files.
Important
If a policy exists for a specific named user, group policies are not applied to that user.
 To set priority levels for groups

Microsoft Service for NetWare Directory Services supports system policies on a Novell Directory Services (NDS) network. When your users log on, Windows looks for the policy file in the location you specify.
Note
The first time system policies are implemented on an NDS tree, the treeís schema database, which defines the objects in the tree, is modified. This happens because the schema provides templates for each NDS object type, and adding system policies is a modification of some templates. To modify the schema, you must have Supervisor rights to the [Root] on the NDS tree. Subsequent implementations of system policies, however, can be done by administrators who do not have Supervisor rights to the [Root] on the NDS tree.
If you plan to implement user or group system policies, you must enable user profiles on your network. Also, for group policies, at least one NetWare version 4.1 server on the network must have bindery emulation enabled. Make sure the group and all the users in the group are in the bindery context for the server.
 To set the system policies in a new or existing policy file
Ė Or Ė
If you have not implemented system policies on your network, on the File menu, click New.
 To specify the location of the policy file
Note
To gain access to the NDS Administration Settings tab, you must be a trustee for the volume object. You must also have the Supervisor object and Supervisor property correct for the volume.
Any container (Organization or Organizational Unit) can have its own policy file. When a user logs on to NDS, the Service for NetWare Directory Services looks in the parent container of the logon container, and so on up to the root.
The advantage of this is that you can put a policy file in the root and have it apply to every object in the tree, or you can have individual system policy files in any container below the root.
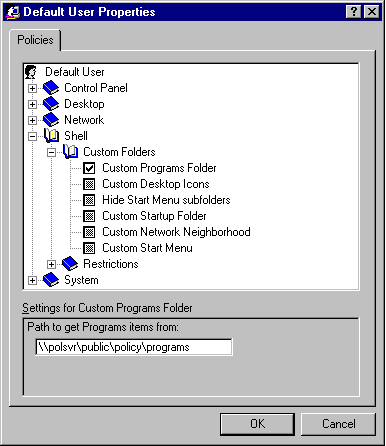
You can define five system policies to create a custom desktop. These policies use custom folders, created by the administrator, that contain the specific settings for the customized desktop. Table 8.4 summarizes the policies used to create a custom desktop.
Table 8.4 System policies used to create a custom desktop
| Policy | Description |
|---|---|
| Custom Programs Folder | Shortcuts that appear in the Programs group on the Start menu. |
| Custom Network Neighborhood | Shortcuts to resources that appear in Network Neighborhood, including shortcuts to shared printers and files and to Dial-Up Networking connections. |
| Custom Desktop Icons | Shortcuts that appear on the desktop. |
| Custom Start Menu | Shortcuts and other options that appear on the Start menu, as defined by using the Taskbar Properties dialog box. |
| Custom Startup Folder | Programs or batch files that appear in the Startup group on the Start menu. |
Before you create a custom desktop by using system policies, you must define custom folders.
 To define custom folders for use with policy files
Note
To prevent accidental removal or unauthorized changes, place custom folders in directories where users are restricted to read-only access.
Caution
Do not place folders in the custom Network Neighborhood. Windows 98 does not support this feature, and unpredictable results can occur.
 To create a custom desktop using system policies

If the custom folders will not be stored in the directories where Windows 98 automatically looks for them, you must specify another location when you specify the Custom Folders policies. For example, you might want to create these folders where the system policy files are located on the server.
The following list shows the default locations for custom folders.
c:\windows\profiles\username\start menu\programs
c:\windows\profiles\username\desktop
c:\windows\profiles\username\start menu\programs\startup
c:\windows\profiles\username\nethood
c:\windows\profiles\username\start menu
Table 8.5 summarizes the new system policies provided by Microsoft Service for NetWare Directory Services.
Table 8.5 New system policies provided by Microsoft Service for NetWare Directory Services
| Option | Description |
|---|---|
| Default Name Context | Sets the default context. |
| Preferred Tree | Sets the default NDS tree. |
| Disable automatic tree logon | Causes you to be prompted to log on to the NDS tree when starting Windows 98, even if your NDS password is the same as your Windows password. |
| Enable logon confirmation | Causes a confirmation dialog box to appear after you log on. |
| Default type of NetWare logon | Specifies whether you log on as a bindery user (for example, by using logon /b) or an NDS user by default. |
| Donít show Advanced logon button | Hides the Advanced button on the logon dialog box. The Advanced button enables you to choose a different tree or context when you log on. |
| Donít allow browsing outside the default context | Hides Directory Services containers outside the default context. |
| Donít show volume objects | Hides NDS volume objects from the directory tree in Network Neighborhood. |
| Donít show server objects | Hides NDS server objects from the directory tree in Network Neighborhood. |
| Donít show servers that arenít NDS objects | Hides all servers that are not objects in the Directory Tree (for example, bindery servers and peer servers). |
| Donít show printer objects | Hides NDS printer objects in Network Neighborhood. |
| Donít show print queue objects | Hides NDS queue objects in Network Neighborhood. |
| Donít show container objects | Hides NDS organizations and organizational units in Network Neighborhood. |
| Donít show peer workgroups | Hides Windows 98 workgroups within Network Neighborhood. |
| Load NetWare DLLs at startup | Automatically loads Novell-supplied NetWare dynamic-link libraries (DLLs) required by some NDS applications. |