 To add Client for NetWare Networks after installing Windows 98
The redirector provided by Client for NetWare Networks (Nwredir.vxd) is a file system driver that supports the NCP file sharing protocol for NetWare 3.x and NetWare 4.x. Client for NetWare Networks also supports Microsoft File and Printer Sharing for NetWare Networks (Nwserver.vxd, the NCP peer server provided with Windows 98).
In addition to installing Client for NetWare Networks, you can install the optional Microsoft Service for NetWare Directory Services. Microsoft Service for NetWare Directory Services adds several features, such as support for NDS and for logon scripts. If you install Microsoft Service for NetWare Directory Services, Client for NetWare Networks will be automatically installed.
This section describes how to install and configure Client for NetWare Networks and Microsoft Service for NetWare Directory Services, and provides some technical notes on supporting files.
For information about how to configure logon for Client for NetWare Networks and Microsoft Service for NetWare Directory Services, see Chapter 18, "Logon, Browsing, and Resource Sharing."
When using Client for NetWare Networks, you generally do not need to load any Novell-supplied drivers or components. This client runs with the Microsoft IPX/SPX-compatible protocol and NDIS-compliant, protected-mode drivers, which Windows 98 Setup installs automatically when you select this client.
However, you may need to load Novell-supplied files if you are running NetWare-aware utilities and they do not function correctly with Microsoft Client for NetWare Networks, or if you have installed Microsoft Service for NetWare Directory Services and you need to run NDS-based utilities. For a list of these files, see "NetWare API Support in Client for NetWare Networks" later in this chapter.
When Windows 98 is installed with Client for NetWare Networks, Windows 98 Setup automatically moves any relevant Net.cfg settings to the Windows 98 registry. You can configure the related settings using the Network option in Control Panel. You can also configure the network adapter driver and the IPX/SPX-compatible protocol, as described in Chapter 15, "Network Adapters and Protocols."
If you did not install Client for NetWare Networks before Windows 98 Setup, you can switch to this client any time after Windows 98 is installed. If you need to connect to the NDS tree, follow the procedures outlined in "Setting Up Microsoft Service for NetWare Directory Services" later in this chapter. However, if you do not need to connect to the NDS tree, follow the procedure "To add Client for NetWare Networks after Windows 98 has been installed" in this section.
You can also install Client for NetWare Networks and configure related options when installing Windows 98 using custom setup scripts, as described in Chapter 3, "Custom Installations."
Tip
To display the Network option without opening Control Panel, right-click the Network Neighborhood icon on the desktop. Then click Properties on the context menu.
Note
Windows 98 Setup copies files from your original Windows 98 installation media, so make sure your original Windows 98 installation media are ready before you perform this procedure.
To add Client for NetWare Networks after installing Windows 98
You must shut down and restart the computer for the changes to take effect.
Caution
Do not click Cancel during the installation. If you decide that you do not want to install Client for NetWare Networks, you must complete the installation process and then remove Client for NetWare Networks.
Setup automatically installs and configures all related components. Windows 98 Setup also adds the value lastdrive=32 to the parameters for the network client in the registry. This value makes room for entries in a table to store drive information. For Microsoft networking, the last drive would be set to Z (or 26), but NetWare allows six additional entries in its drive table.
If you install Microsoft Service for NetWare Directory Services, Client for NetWare Networks will also be automatically installed. You do not need to install Microsoft Client for NetWare Networks if you install Microsoft Service for NetWare Directory Services.
You can add Microsoft Service for NetWare Directory Services whether or not you have already installed Client for NetWare Networks.
Note
Windows 98 Setup copies files from your original Windows 98 installation media, so make sure your original Windows 98 installation media are ready before you perform this procedure.
To add Microsoft Service for NetWare Directory Services after installing Windows 98
You must shut down and restart the computer for the changes to take effect.
After your computer restarts, you will be prompted to log on to the NDS tree. Make sure the dialog box identifies the correct context and tree.
Caution
Do not click Cancel during the installation. If you decide that you do not want to install Microsoft Service for NetWare Directory Services, you must complete the installation process, and then remove Microsoft Service for NetWare Directory Services.
You can include Microsoft Service for NetWare Directory Services in automated installations that work with Msbatch.inf. For more information about automated installations, see Chapter 4, "Automated Installations."
To include the Service for NetWare Directory Services in an automated installation
Clients=NWREDIR
Services=NWREDIR4
Note
You can also include entries for other networking clients and services on the above lines. Each entry should be separated by a comma. For example:
Clients=VREDIR,NWREDIR
[NWRedir4]
PreferredTree = <Tree>
NameContext = <MyNameContext>
setup <drive letter>:<path>\msbatch.inf
– Or –
Place Msbatch.inf in the same directory as Setup.exe and then run Setup.
If you are doing an automated installation of Microsoft Service for NetWare Directory Services on computers that are running the NETX or VLM client, you should be aware of the following issues:
This section presents information for configuring and using Microsoft Client for NetWare Networks, including the following topics:
For information about configuring logon options for Client for NetWare Networks, see Chapter 18, "Logon, Browsing, and Resource Sharing."
When you install Client for NetWare Networks, a 32-bit, protected-mode, NDIS 3.1 and later compliant network adapter driver is installed automatically, unless the computer is running software cited in Table 17.1.
Although it is possible to run Client for NetWare Networks over ODI drivers, Microsoft recommends that you install a 32-bit, protected-mode network adapter driver to take advantage of the performance improvements offered by these drivers, as described in Chapter 15, "Network Adapters and Protocols." If you do configure Client for NetWare Networks to use ODI drivers instead, you can switch to the protected-mode drivers at any time.
Depending on when you install Client for NetWare Networks, you might have to install the 32-bit, protected-mode network adapter driver before you can install the network client. Setup prompts you to do this if it is necessary.
To switch to a 32-bit, protected-mode network adapter driver
For more information about using NDIS, see Chapter 15, "Network Adapters and Protocols."
This section describes how to configure Client for NetWare Networks with ODI network adapter drivers. For more information about ODI, see "Configuring Network Adapter Drivers for Real-Mode Novell Clients" later in this chapter.
Figure 17.1 shows the architecture for Client for NetWare Networks with ODI network adapter drivers. Novell-supplied components appear in bold.
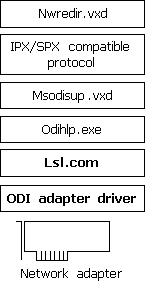
Figure 17.1 Architecture for protected-mode client with ODI drivers
Using an ODI driver instead of an NDIS 3.1 or later driver with Client for NetWare Networks has the following drawbacks:
If you want to use the current ODI driver instead of a Windows 98 NDIS network adapter driver, you can select that driver using the Network option in Control Panel. For more information about using ODI drivers, see "Configuring Windows 98 with ODI Drivers" later in this chapter. For information about the related files, see "Obtaining Current Novell-Supplied Files" later in this chapter.
To use ODI drivers with Client for NetWare Networks
With Client for NetWare Networks, you can use the 32-bit, protected-mode graphical tools built into Windows 98 as well as the 16-bit command-line utilities provided with NetWare for managing and sharing resources. You can run all NetWare 3.x utilities that reside on the NetWare server, such as SYSCON. You can also run most bindery-based NetWare 4.x utilities. However, you cannot use the VLM NWUSER utility, and you cannot use utilities that require NDS.
If you are running Microsoft Client for NetWare Networks along with Microsoft Service for NetWare Directory Services, you can use all the tools listed above, as well as graphical tools and utilities that require NDS, including NWAdmin, CX, and NETADMIN.
Tip
SYSCON, a tool for NetWare 3.x servers, and NETADMIN, a tool for NetWare 4.x servers, are located in the SYS:PUBLIC directory. To access them using NetWare 3.x, map a drive to them either in a logon script or while you are running Windows 98. If you are using NetWare 4.x, you can also access NETADMIN from Network Neighborhood. Both SYSCON and NETADMIN are MS-DOS utilities, so whichever way you access them, you must run them from a command prompt (either a virtual machine or the Run prompt).
To run NetWare utilities from an MS-DOS prompt
When you use Map Network Drive, you can make this a persistent connection by clicking the Reconnect at logon box.
If you are running Microsoft Service for NetWare Directory Services and you are logged on to an NDS tree, you can also run NetWare utilities by clicking on their icons in Network Neighborhood.
To run NetWare utilities from Network Neighborhood
Note
To run NetWare 4.x NDS utilities, you must install Microsoft Service for NetWare Directory Services. You also need access to, and the appropriate license to use, the NetWare dynamic link libraries (DLLs) listed in "NetWare API Support in Client for NetWare Networks" later in this chapter.