 To install Novell Client for Windows 95/98 from the Network option in Control Panel
Windows 98 can run with the following Novell-supplied clients:
It is strongly recommended that you use Novell Client for Windows 95/98 instead of a real-mode client. Novell Client for Windows 95/98 provides more efficient memory use than the real-mode clients. It also provides such capabilities as support for NDS, support for optional components, such as IP Gateway, and integrated Windows logon.
Note
If you are running Windows 98 Setup from a Windows for Workgroups computer that has Novell Client for DOS/Windows 3.x, Setup will fail. You should delete Novell Client for DOS/Windows 3.x Client before running Windows 98 Setup.
The following section describes how to set up and configure Windows 98 with Novell-supplied clients. For more information, contact Novell.
Note
Before installing Windows 98, make sure that you have the necessary Novell-supplied files for Windows support, which can be obtained from Novell.
If you are upgrading to Windows 98 from another version of Windows, and you had Novell-supplied NetWare client software on your previous version of Windows, make sure that the Novell-supplied NetWare client software is working properly before you start Windows 98 Setup. To verify that the Novell-supplied software is working, make sure you can successfully connect to and use resources on a NetWare server.
This section describes how to install Novell Client for Windows 95/98 after Windows 98 Setup. First, it describes how to prepare the installation, then it describes how to perform the installation, and finally, it describes how to remove Novell Client for Windows 95/98.
Before you install Novell Client for Windows 95/98, make sure that none of the following software is installed on your Windows 98 computer:
These network components conflict with Novell Client for Windows 95/98. If any of these components are installed, the Client installation program detects the conflict and removes the conflicting network components.
You must also prepare your servers for the installation. For NetWare 3.x and 4.x servers (except NetWare 4.11 servers), make sure the patches shipped with Novell Client for Windows 95/98 are installed.
Also, to support long file names, load Long.nam on each NetWare 4.11 server and on each volume. (See the Novell Client online help for more information.) For versions of NetWare earlier than NetWare 4.11, use the OS/2 name space instead of Long.nam.
Each name space uses up to 252 kilobytes (KB) of disk space. Each name space added to a volume requires additional server memory. If you add name space support to a volume, but do not have enough memory, the server cannot mount that volume. Once you add a name space to a volume, you cannot remove that name space unless you delete the volume and re-create it or use VREPAIR.
For information about how to calculate the memory required for name space support and for how to remove a name space, contact Novell.
If you have installed Microsoft Client for NetWare Networks or an old version of a Novell protected-mode NetWare client, Setup for Novell Client for Windows 95/98 replaces it with the Novell Client.
You can run Setup in one of four ways:
This section discusses the first two methods.
Regardless of which method you choose, you should have your original Windows 98 installation media ready before running Setup.
Take the following steps to install Novell Client for Windows 95/98 from the Network option in Control Panel.
To install Novell Client for Windows 95/98 from the Network option in Control Panel
Take the following steps to install the Novell Client for Windows 95/98 from the Novell-provided Novell Client for Windows 95/98 CD-ROM.
To install Novell Client for Windows 95/98 from the CD-ROM
For NetWare 3.x, set a Preferred Server. For NetWare 4.x, set a Preferred Server, Preferred Tree, Name Context, and First Network Drive.
This option takes you to the Network option in Control Panel and allows you to install optional components or configure your workstation.
You can remove Novell Client for Windows 95/98 in one of two ways:
To use the Control Panel
Examples of other networking components are Novell ODINSUP and the IPX 32-bit Protocol for Novell Client for Windows 95/98.
To use Novell’s Uninstall utility
The file is on the Novell Client for Windows 95/98 CD-ROM in the Products\Win98 \IBM_ENU\Admin folder.
This check box appears only if a 32-bit ODI adapter has been installed on the workstation.
The uninstall process begins.
Caution
Do not try to cancel the uninstall process by turning off your computer. If you do so, your registry might become corrupt. If you do turn off your computer during the uninstall process, run the Uninstall utility again to finish uninstalling the client and to clean up the registry.
Novell Client for Windows 95/98 works with Microsoft-provided, 32-bit NDIS network drivers and with Novell’s 32-bit ODI drivers. If you want to use Novell Client for Windows 95/98 with Novell’s 32-bit ODI drivers, you must install them by running Novell’s Setup.exe instead of by using the Network option in Control Panel.
Novell Client for Windows 95/98 might also work with NDIS 2 or 16-bit ODI drivers; however, this configuration is not recommended.
Windows 98 works with the real-mode NETX and VLM clients; however, it is strongly recommended that you upgrade to the protected-mode Client for NetWare Networks or Novell Client for Windows 95/98.
By default, Windows 98 Setup automatically replaces NETX with Microsoft Client for NetWare Networks. To install Windows 98 with NETX, you must use a custom setup script.
However, Microsoft supports upgrading from NETX to Client for NetWare Networks only if you are logged on to a NetWare server at the time of the upgrade. For more information, see the troubleshooting step "Upgrade from NETX to Client for NetWare Networks fails," later in this chapter.
If you are running VLM and you do not call Login.exe either in Autoexec.bat or a batch file referenced by it (such as Startnet.bat) when you install Windows 98, Windows 98 Setup might replace VLM with Client for NetWare Networks.
However, Windows 98 Setup does not replace VLM with Microsoft Client for NetWare Networks if you are logged on to NDS when you start Windows 98 Setup. If you are running VLM and you are logged on to NDS using the Login.exe command either in Autoexec.bat or a batch file referenced by it (such as Startnet.bat), Windows 98 uses the existing networking configuration specified in Net.cfg for protocols, adapter drivers, and other values.
If you currently use Ipx.com, Microsoft recommends that you upgrade to the latest versions of NetWare client software that use ODI drivers before you install Windows 98. Windows 98 does not support Ipx.com.
Caution
NETX and VLM require that you log on to the appropriate NetWare server before starting Windows 98. Thus, if you are using these clients, you should not log on to a NetWare server from within Windows 98.
Instead, log on to the server from Autoexec.bat or from a batch file that is called from Autoexec.bat. You should also continue to load the necessary MS-DOS-based TSR programs using Autoexec.bat or Startnet.bat.
For information about where a logon command should be placed in system startup files, see Chapter 18, "Logon, Browsing, and Resource Sharing."
This section describes how to install Windows 98 with ODI drivers, how to verify that you are using the correct drivers, how to retain VLM and NETX when you are upgrading to Windows 98, and how to install them after Windows 98 Setup. For architectural information about ODI drivers and for information about Net.cfg settings, see "Configuring Network Adapter Drivers for Real-Mode Novell NetWare Clients" later in this chapter.
Before you install Windows 98 on a computer, the real-mode IPXODI network should be configured and working properly using your Novell-supplied installation program. Test to confirm that there are no errors when loading the Novell-supplied files Lsl.com, Ipxodi.com, the ODI driver, and Netx.exe or Vlm.exe, or when accessing resources on NetWare servers.
If Windows 98 Setup cannot identify the ODI driver being used, you might have to configure the network adapter driver manually.
To configure the network adapter driver manually
Before installing a real-mode client, make sure the correct adapter driver is installed. Real-mode clients require 16-bit ODI drivers, and some cards do not work with those drivers. If you cannot install the correct adapter driver, you will not be able to install the real-mode client.
To determine whether the correct adapter driver is installed after Windows 98 Setup
This section describes how to upgrade Windows 98 and retain the VLM client if VLM support was previously installed under Windows 3.x or Windows 95 and you are upgrading from the \Windows directory, or if VLM was previously installed under DOS.
If you run Windows 98 Setup without the proper preparation, Setup replaces VLM with Client for NetWare Networks. You can prevent VLM from being replaced in one of two ways:
To retain VLM during Windows 98 upgrade
Note
If you are upgrading from a version of Windows, those files should be located in you /Windows/System and network client directories.
Otherwise, use the NetWare Nwunpack command to expand the following files from your VLM installation media: Netware.hl_, Nwpopup.ex_, Vipx.38_, Vnetware.38_, Ipxodi.co_, Lsl.co_, Netware.dr_, and the driver for your network adapter.
Note
Setup might place the entry device=*vnetbios in System.ini, which causes a blue screen error to appear when you restart the computer. You can safely ignore this screen.
You must reboot your computer for the changes to take effect.
In the Network option in Control Panel, you will see that Setup has added Novell NetWare (Workstation Shell 4.0 And Above [VLM]) as a network client. You might also need to modify configuration files, such as Net.cfg and Autoexec.bat. Consult your NetWare documentation for more information.
This section describes how to install the VLM client after Windows 98 Setup if it has not been previously installed. For information about how to upgrade VLM from Windows 95, see the sections "Upgrading Windows 98 With VLM in Typical Installations" and "Upgrading Windows 98 With VLM in Special Cases," earlier in this chapter.
Note
Before attempting to install VLM, you should follow the procedure in "Verifying Drivers for Real-Mode Clients After Windows 98 Setup," earlier in this chapter.
To install VLM after Windows 98 Setup
Note
You will see an error message stating that you have a bad or missing VnetBIOS. Continue past this error message.
You must reboot your computer for the changes to take effect. You might also need to modify configuration files, such as Net.cfg and Autoexec.bat. Consult your NetWare documentation for more information.
By default, if Windows 98 Setup detects the NETX client, it replaces NETX with Microsoft Client for NetWare Networks. If you want to retain NETX when you upgrade to Windows 98, follow these steps.
To select Novell-supplied NETX client support during Windows 98 Setup
– Or –
Place Msbatch.inf in the same directory as Setup.exe and then run Setup.
For information about creating and using Msbatch.inf files, see Chapter 3, "Custom Installations." For information about Msbatch.inf parameters, see Appendix D, "Msbatch.inf Parameters for Setup Scripts."
Alternatively, you can install the Novell-supplied NETX client software after you have run Windows 98.
Note
Before attempting to install NETX, you should follow the procedure in "Verifying Drivers for Real-Mode Clients After Windows 98 Setup," earlier in this chapter.
To reinstall NETX after Windows 98 Setup
Important
Make sure you remove Client for NetWare Networks before installing NETX.
Windows 98 automatically installs IPXODI support.
Usually, you will have to reinstall Novell-supplied files at this stage, because Windows 98 Setup previously replaced these files with versions required by Client for NetWare Networks. You must also make sure that Net.cfg is present and contains correct settings, and that the required settings are present in Config.sys and Autoexec.bat. See your Novell documentation for information about these required settings.
Before attempting to install a real-mode client, you should make sure your network adapter card and drivers work with your real-mode client. In some cases, you must obtain a driver that works with ODI. After you install a real-mode client, you might need to make changes to Net.cfg, the Novell NetWare configuration file that specifies settings for the adapter, protocol, and client.
This section presents some technical information related to the network adapter drivers used when configuring Windows 98 to run with Novell-supplied network clients. The topics include configuring Windows 98 with ODI drivers and setting options in Net.cfg.
For information about how to ensure your network adapter card and drivers work with your real-mode client, see "Verifying Drivers for Real-Mode Clients After Windows 98 Setup" earlier in this chapter. For information about installing ODI drivers, see "Installing Windows 98 with ODI drivers" earlier in this chapter. For information about the format and contents of Net.cfg, consult your Novell documentation.
Note
Windows 98 does not support the monolithic IPX configuration. You should use ODI drivers with real-mode clients. Also, Windows 98 does not support ArcNet network adapters. For information about ArcNet network adapters, see the Microsoft Windows 95 Resource Kit.
The Open Datalink Interface (ODI) specification was defined by Novell and Apple Computer to provide a protocol and a consistent API for communicating with a network adapter driver and to support the use of multiple protocols by a network adapter driver.
Figure 17.2 shows the architecture for ODI drivers.
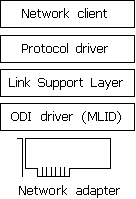
Figure 17.2 Architecture for ODI drivers
ODI consists of the following components:
An ODI-compliant version of the IPX/SPX protocol.
This component provides the network protocol for communicating between NetWare clients and servers. With NETX or VLM clients, this must be the Novell-supplied Ipxodi.com. With Novell Client for Windows 95/98, it must be the 32-bit IPX protocol that ships with it.
For Client for NetWare Networks, you can also use the Microsoft IPX/SPX-compatible protocol.
The Link Support Layer (LSL).
This component, provided in the Novell-supplied Lsl.com file, sets the foundation for the network adapter and multiple protocol drivers to communicate.
The ODI driver.
Also called the Multiple Link Interface Driver (MLID), the ODI-compliant network adapter driver is created by the adapter manufacturer. This component usually identifies the name of the supported adapter in the file name, such as Ne2000.com for the Novell NE-2000 adapter, 3c5x9.com for the 3Com EtherLink III adapter, and Exp16odi.com for the Intel EtherExpress 16 adapter. Windows 98 supports using these drivers, but they are not included with Windows 98.
For information about required files, see "Obtaining Current Novell-Supplied Files" later in this chapter.
Because a computer using ODI drivers can have multiple ODI drivers and multiple protocols loaded and bound, the networking software uses Net.cfg to identify the network adapters, protocol configuration, and binding information. Net.cfg is responsible for configuring the network environment for a Novell-supplied client, and is used to configure custom parameters for VLM, NETX, IPX, NetBIOS, or the general NetWare environment. To configure any options, edit Net.cfg as described in your Novell documentation.
NetWare uses Net.cfg as the configuration file name for ODI. You should not use Shell.cfg. If neither file exists, default settings are used.
If you are using ODI drivers, the Novell-supplied Lsl.com file uses information from Net.cfg to configure the ODI driver before the NETX workstation shell does. For the LSL driver to load and initialize information from Net.cfg, the proper Net.cfg file should reside in the same directory as Lsl.com and the Novell-supplied Netx.exe network client, or Lsl.com should take the path to the proper Net.cfg file as a parameter. To verify that there is not more than one Net.cfg file present on a computer, type dir /s net.cfg at the command prompt (or from Start, click Find and search for Net.cfg).
Network adapter configuration information is contained in a "Link Driver" section in Net.cfg, where you can specify the network adapter’s interrupt, I/O address, memory address, frame types, and protocols. The following example shows Net.cfg entries for an SMC Ethercard Plus Elite 16 adapter:
show dots=on
file handles=60
preferred server=nw_311
link driver smc8000
    int 5
    port 240
    mem d000
    frame ethernet_802.3
Table 17.2 describes selected information commonly found in Net.cfg under the "Link Driver" section. For information not found in Net.cfg, default settings for the network adapter are assumed. For more information, consult your Novell documentation.
Table 17.2 Network adapter driver settings in Net.cfg
| Net.cfg setting | Description |
|---|---|
| DMA | DMA channel number. Can assign up to two DMA channels by designating them DMA #1 x and DMA #2 y. |
| FRAME | Alternate media access control layer frame encapsulations for the network adapter. Frame types are:
ETHERNET_802.3ETHERNET_SNAP You must add the ETHERNET_II frame type for Microsoft TCP/IP to work over ODI drivers. |
| INT | Interrupt Request (IRQ) number. Can assign up to two IRQs by designating them IRQ #1 x and IRQ #2 y. |
| MEM | Memory address in upper memory area (UMA). Can assign up to two UMA addresses by designating them MEM #1 x and MEM #2 y. |
| NODE ADDRESS | 12-digit media access control address assigned to the network adapter. |
| PORT | I/O port address. Can assign up to two I/O port addresses by designating them PORT #1 x and PORT #2 y. |
| PROTOCOL | Protocols to be used with ODI drivers. You do not need to specify this in Net.cfg if NETX is running only the IPX protocol. If other protocols are running, you must specify the protocol, protocol ID, and frame type. |
| SLOT | Network adapter slot number (MCA, EISA). |