With Dial-Up Networking, you can configure a computer running Windows 98 to be a remote access server for dial-up clients running Windows 98, Windows 95, Windows for Workgroups, or Windows 3.1, or any other client running PPP. The Windows 98 dial-up server can act as a server to the client, sharing its file and printer resources with one dial-up client at a time. Both the dial-up server and the dial-up client must be running the same protocol (IP, IPX, or NetBEUI). The Windows 98 dial-up server can also act as a gateway to an IPX/SPX or NetBEUI network, as long as both the client and the server are using the same protocol that is used on the network.
The Windows 98 dial-up server supports software compression. It also works with ISDN; however it can use only one B channel.
A Windows 98 dial-up server differs from the Windows NT 3.5 and later dial up servers in the following ways:
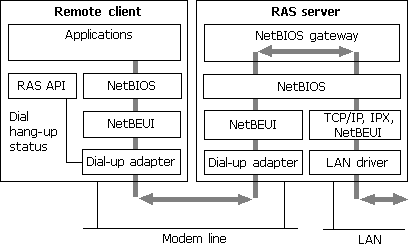
A Windows 98 dial-up server with the appropriate network protocols installed can act as a NetBIOS gateway, as shown in Figure 19.4.

Figure 19.4 Dial-up server as NetBIOS gateway
Configuring a computer running Windows 98 to be a dial-up server consists of the following steps:
After you perform the steps previously listed, your Dial-Up Server will be ready to answer incoming calls.
 To disconnect any users who are currently connected to this computer through Dial-Up Networking
Note
The Dial-Up Server for Windows 98 can use only one modem at a time. You can enable caller access on multiple modems at any one time, but only one modem can be connected.
In Windows 98, the Dial-Up Server is not automatically installed. To install it, follow this procedure.
 To install the Dial-Up Server
Dial-Up Networking gives you the option of requiring a password to connect to the remote access server, depending on whether the Windows 98 dial-up server is protected with share-level or user-level security.
With user-level security, when the user accesses shared resources on the dial-up server, Windows 98 controls a userís rights to the shared resources, such as whether the user has read-only access or full access to files. Access rights are specified in the sharing properties for each resource protected by user-level security. For more information, see Chapter 9, "Security," and Chapter 18, "Logon, Browsing, and Resource Sharing."
The following procedure assumes that you have completed the installation procedure described in the previous section, "Installing a Windows 98 Dial-Up Server."
 To configure the dial-up server for user-level security
Clicking the Require encrypted password option requires the client to send an encrypted as opposed to a text password. Some clients support only text passwords; however, encrypted passwords are preferred. Clearing this option does not disable password protection.
 To configure the dial-up server for share-level security
Note
Share-level security is not available on NetWare networks.
This section explains how to configure the server type for the dial-up server. It assumes that you have already followed the procedures in the sections "Installing a Windows 98 Dial-Up Server" and "Configuring Security Options for a Windows 98 Dial-Up Server," earlier in this chapter.
 To configure a computer as a dial-up server
Make sure that the server type is the same for both the dial-up server and the dial-up client. If the dial-up client uses PPP, you can also select the Default server type. If you select the Default server type, the dial-up server will automatically start in PPP mode for incoming calls and switch to Windows for Workgroups and Windows NT 3.1 if the PPP negotiation fails.
Notice that changes to the server type do not apply to a currently open connection. Changes will apply to any future connections made to this computer.
You can disable dial-up server support in several different ways. You can disable it from within Dial-Up Networking, as the following procedure explains.
 To disable the dial-up server on a single computer
You can also completely remove Dial-Up Server capabilities from a userís computer by using the Add/Remove Programs option in Control Panel.
Finally, you can disable dial-up support on each computer or on a system-wide basis by using System Policy Editor to change a single computerís registry or to define policies that can be shared by multiple computers.
To disable dial-up support by using System Policy Editor, click Disable Dial-in. The Dial-Up Server menu option still appears on the Connections menu after dial-up support has been disabled, but no dialog box for setting up the dial-up server will appear. For more information, see Chapter 8, "System Policies."