 To edit the registry on a remote computer by using System Policy Editor
The tools and agents that network administrators can use for system management are available from various installation sources. Tools come with Windows 98 that help you manage your system, and several other system and remote management tools are available from Microsoft. This section describes how to access the management tools in Windows 98 and where to find tools available from other sources.
Setup installs Registry Editor, the utility used to modify the registry, and Registry Checker, a utility that backs up and, if necessary, fixes the registry. The following tools are also installed during Windows 98 Setup: Disk Defragmenter, DriveSpace 3, and ScanDisk, as described in Chapter 10, "Disks and File Systems."
Microsoft Backup can be installed optionally from the Windows 98 installation compact disc. For more information about Microsoft Backup, see Chapter 27, "General Troubleshooting."
Some agents and tools are provided on the Windows 98 compact disc. Users can install these agents and tools directly from the compact disc, or the administrator can copy the software to the shared network directory that contains the Windows 98 source files. This software can be installed from custom setup scripts during Windows 98 installation or by using Control Panel after Windows 98 has been installed.
The following tools are available only in the Tools\Reskit\Netadmin directory on the Windows 98 compact disc. You can run these tools directly from the compact disc or install them locally by using the Add/Remove Programs option in Control Panel:
The following agents and services are available only in the Tools\Reskit \Netadmin directory on the Windows 98 compact disc. You can install them on a local computer by using the Network option in Control Panel.
Note
Both System Policy Editor and Registry Editor allow you to gain access to a remote computer’s registry. However, System Policy Editor allows you to gain access to only a subset of keys, whereas Registry Editor allows you to gain access to the entire registry. This means that to use Registry Editor, users may require significantly more training. Also, remember that some changes made to the registry on a remote computer require the user to shut down and restart the computer, whereas other changes take effect immediately. As a rule, if you must restart the computer when changing a setting by using Control Panel or other tools, you must restart it when directly changing that setting in the registry.
This section discusses how to control remote registries; view a remote computer; and use Net Watcher, Network Neighborhood, and various agents. It also describes other system management tools and technologies. In addition to the tools discussed in this section, you can use other system management tools provided by Microsoft or by other vendors to remotely administer computers running Windows 98. Such tools include the following:
When you run System Policy Editor in registry mode, you have direct, real-time access to the registry for a local or remote computer. This section discusses how to gain access to the registry on a remote computer by using System Policy Editor. You can also use System Policy Editor to create, edit, and manage system policies to control system settings for multiple computers on the network. For information about installing and using System Policy Editor, see Chapter 8, "System Policies."
As with Registry Editor, most of the changes you make with System Policy Editor in registry mode modify the remote registry as soon as you save the changes. These registry changes apply to the user or to the computer. Some of them require the user to log off and then log back on to take effect.
To edit the registry on a remote computer by using System Policy Editor
The title bar of System Policy Editor shows whether you are viewing a local or a remote registry.
After you have made a connection to the remote computer, you can use System Policy Editor to modify user and computer properties just as you would on a local computer.
You can use Registry Editor to read and write values directly in the registry. You can read settings, create new keys and entries, or delete existing keys. Registry Editor should be used only by those who have appropriate access rights to identify and correct problems. You can also use Registry Editor to solve a problem on a remote computer running Windows 98. To solve a problem on a remote computer running Windows 98, you might need to gain access to the entire registry for the computer. In this case, you should use Registry Editor, because System Policy Editor allows access to only a subset of registry settings.
Note
To use Registry Editor to edit the registry on a remote computer, the Microsoft Remote Registry service must be installed on the remote computer, as described in "Setting Up Remote Administration" earlier in this chapter.
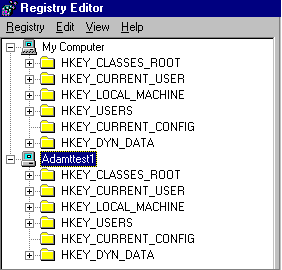
To edit the registry on a remote computer by using Registry Editor
Windows 98 adds the contents of the remote registry below the contents of the local registry.
System Monitor is a tracking tool that monitors the real-time performance of various computer components, functions, and behaviors and displays the results in graphs or charts. You can use System Monitor to troubleshoot performance problems by monitoring virtual device drivers across the network. System Monitor can provide you with performance information from many system components, including the file system and network clients. This information is useful in locating bottlenecks and solving other performance problems.
With the appropriate administrative privileges, you can use System Monitor over the network to track the performance of remote computers. To monitor more than one computer simultaneously, you can start multiple instances of System Monitor and connect to the appropriate computers.
For more information about installing and using System Monitor, see Chapter 26, "Performance Tuning."
Note
To use System Monitor to connect to a remote computer, the Microsoft Remote Registry service must be installed on the remote computer.
To view performance data on a remote computer by using System Monitor
If you use file and printer sharing services, you can use Net Watcher to create, add, and delete shared resources on remote computers, and to monitor and manage connections to shared resources. This is especially useful when you need to know who is connected to a computer and which files are open.
Note
If you are not using file and printer sharing services, you can skip this section.
Net Watcher includes a set of icons that make it easy to do the following:
To install Net Watcher
To connect to a remote computer by using Net Watcher
The password depends on the type of security used on the remote computer, as follows:
When using Net Watcher to view a remote computer, consider the following constraints:
Tip
You can prevent a user from sharing files, although the user must have file and printer sharing services running to allow remote administration. To do this, set the system policies named Disable File Sharing Controls and Disable Print Sharing Controls. Disabling these options by using system policies does not remove the file and printer sharing services, whereas using the Network option in Control Panel does disable the service.
To share a resource on a remote computer by using Net Watcher
Another way to use System Policy Editor, Registry Editor, System Monitor, or Net Watcher remotely is to right-click the remote computer from within Network Neighborhood.
To manage remote computers in the local workgroup by using Network Neighborhood
| Option | Description |
|---|---|
| Net Watcher | Runs the Net Watcher tool and automatically connects to the specified computer. |
| System Monitor | Runs the System Monitor tool and automatically connects to the specified computer. |
| Administer | Opens a folder on the desktop for the specified remote computer and allows you to gain access to the remote computer’s hard disk drive. |
The Scheduled Task Wizard lets you run useful utilities and routine tasks at regular intervals. You can set the tasks to run at times that are most convenient for you.
Once you have a task scheduled, an icon appears in the Windows taskbar.

Note
If you are upgrading a Windows 95 computer on which System Agent is installed, the System Agent tasks are inherited by the Scheduled Task.
The Scheduled Task Wizard is automatically installed when you install Windows 98. The executable file, Mstask.exe, is located in your \Windows \System folder.
To schedule tasks
Each task in Scheduled Tasks can be reconfigured once it has been set up in the Scheduled Task Wizard.
To change the configuration for a scheduled task
The following information describes the three tabs that you can use to reconfigure each task:
Consider the following issues when you are using Scheduled Tasks:
The Windows Scripting Host (WSH) is a language-independent scripting host that enables scripts to be executed directly on the Windows desktop or command console, without the need to embed the scripts in an HTML document. You can run scripts directly from the desktop simply by clicking on a script file, or from the command console. WSH provides a low-memory scripting host that is ideal for noninteractive scripting needs, such as logon scripting or administrative scripting.
For more information about the WSH, see the following Web site:
Microsoft Management Console (MMC) is a general-purpose management display framework for hosting administration tools built by Microsoft and third parties. It is provided in the Windows 98 implementation for compatibility with Windows NT. MMC is task-focused. It is implemented with an object architecture, which gives MMC the foundation for its modularity and customizability and provides administrators with the flexibility to build and distribute task-oriented tools from modular components called snap-ins.
MMC can be used from within an existing enterprise console or can launch enterprise consoles. Unlike enterprise consoles, MMC imposes no protocol dependencies or object repositories; these remain the responsibility of each snap-in. Working within the MMC, the administrator can use a series of snap-ins to create task-oriented administrative displays customized to provide the appropriate management functions. Snap-ins can work independently or act to extend functionality of other snap-ins. Allowing administrators to create their own views and removing technology discipline boundaries, makes it possible to create a display of network, system, and user information — providing a single point of management that is integrated, comprehensive, and easy to use.
For more information about the Microsoft Management Console, see the following Web sites:
Microsoft has launched an initiative called the Zero Administration Initiative for Windows. Zero Administration Initiative for Windows (ZAIW) encapsulates many technologies, some of them already available and some under development. It equates to establishing a management infrastructure in Microsoft Windows, exposing the infrastructure, and building the tools to use it.
Zero Administration Initiative for Windows includes infrastructure components, such as Windows Management Instrumentation (WMI), Web-based Enterprise Management (WBEM), and management tools, such as Systems Management Server and Microsoft Management Console (MMC). This section describes technologies that combine to provide the Zero Administration Initiative for Windows. It also describes the Internet Explorer Administration Kit Profile Manager, which ships as a Resource Kit tool.
After you create a custom Windows 98 Active Desktop and Active Channel configurations on your computer, you can use the Internet Explorer Administration Kit (IEAK) Profile Manager to import the custom configurations and deploy them to users or workgroups.
You can also use IEAK Profile Manager to:
For more information about setting up the Active Desktop, see Chapter 6, "Configuring the Active Desktop and Active Channels."
The Internet Explorer Administration Kit provides extensive details, procedures, and technical discussions about planning, creating, and deploying custom configurations, creating software distribution channels, and using the Profile Manager.
The IEAK ships as a tool on the Windows 98 Resource Kit compact disc.
For more information about the IEAK, see the Windows 98 Resource Kit compact disc. See also the following Web sites:
Systems Management Server is a systems management application for medium and large organizations that require a highly scalable and extensible management infrastructure for the management of distributed Windows-based systems. Providing automated software and hardware inventory, software distribution, and remote diagnostics, Systems Management Server integrates with leading enterprise management platforms while also providing an integration point for a range of third-party management applications.
For more information about Microsoft Systems Management Server, see the following Web site:
Web-based Enterprise Management (WBEM) is a collection of technologies designed to facilitate management of the enterprise. These technologies were developed by a group of companies and are intended to work independently of their vendors, protocols, and management standards. Typically, enterprise management has been tied to different protocols for different disciplines; for example, SNMP for network management. WBEM assumes that management problems are task-oriented and require tools that work together to provide a single management methodology. The WBEM technologies are strongly influenced by advancing Internet technology, which has opened up a new perspective on system management.
For more information about WBEM, see the following Web sites:
Windows Management Instrumentation (WMI) provides the basis for instrumentation in future Windows environments. Close coupling of WMI with services developed to conform to the Web-based Enterprise Management initiative will allow Microsoft to simplify instrumentation and provide consistent, open access to management data. WMI is a set of extensions to the Win32 Driver Model (WDM) and provides an operating system interface through which instrumented components can provide information and notification.
For more information about WMI, see the following Web site: