 To launch Microsoft System Information
This section provides an overview of tools that are available in Windows 98. The tools can help you maintain your system in the following ways:
Table 27.1 lists system tools installed during Windows 98 Setup. The table includes a brief overview of the tool, and some details about the files that make up the tool. The tools are described in more detail later in the section.
Note
This chapter assumes that your Windows 98 files are in the \Windows folder, which is the default folder in which Setup copies the system files.
Table 27.1 Troubleshooting tools
| Tool | Overview | File details |
|---|---|---|
| Microsoft System Information (MSInfo) | Displays system information, such as hardware resources, devices installed, and the corresponding device drivers. Use MSInfo to diagnose and solve computer problems. MSInfo can be used to view reports generated by WinRep or DOSRep on a remote system. | Name: Msinfo32.exe Location: \program files\common files\microsoft shared\msinfo |
| Dr. Watson | A program error debugger that traps application faults (running in ring 3 of the processor), generating a snapshot of the system to aid in the diagnosis of the fault. This tool interprets program errors in Windows-based applications and attempts a diagnosis. When you are running Dr. Watson, it automatically creates a log file when an application fault occurs. The log files are stored in the \Windows\Drwatson directory with a .wlg extension. The log file indicates the program that faulted, the program the fault occurred in, and the memory address where the fault occurred. Dr. Watson cannot create a snapshot in the event of a system hang. | Name: Drwatson.exe Location: \windows |
| System File Checker | Verifies the integrity of system files. This tool scans the system for changed, deleted, or corrupt files. If necessary, System File Checker can extract the original Windows 98 file. | Name: Sfc.exe Location: \windows\system |
| Digital Signature Check | Feature that network administrators can enable to identify drivers that have been digitally signed by Microsoft. This feature can be turned on using Policy Editor (Poledit) or by setting a key in the registry. | Enabled in registry key: HKEY_LOCAL_MACHINE \Software\Microsoft\Driver Signing |
| Signature Verification Tool | Tool that determines whether a file has been granted a digital signature and whether that file has been modified after being granted a digital signature. | Name: Sigverif.exe Location: \windows |
| Automatic Skip Driver Agent | Detects devices that prevent Windows from starting. | Name: Asd.exe Location: \windows |
| Windows Update | Windows Update is the Web-extension of Windows 98 designed to help your computer continue to work better and run better. Windows Update contains a central catalog of new product enhancements, including service packs and new Windows features. In addition, Windows Update lets you update new system files and device drivers, specific to your computer. | Name: Iexplore.exe Location: http://www.microsoft.com /windowsupdate |
| System Configuration Utility | Automates routine Windows troubleshooting steps. System Configuration Utility allows you to modify the system configuration with check boxes. This tool allows you to troubleshoot problems through a process of elimination using check boxes. | Name: Msconfig.exe Location: \windows\system |
| Registry Checker | Windows 98 includes both Windows-based and MS-DOS-based programs for scanning, fixing, backing up, and restoring the registry and system configuration files. Registry Checker runs each time Windows starts. | Names: Scanreg.exe and Scanregw.exe Locations: \windows\command \scanreg.exe and \windows \scanregw.exe |
| Microsoft Backup | A built-in application that you run to back up the data in your entire system to prevent the loss of data in the event of hardware failure | Name: Msbackup.exe Location: \program files\accessories \backup\msbackup.exe |
| Microsoft System Recovery | Operating system recovery tool that operates completely in protect mode. Installs a minimal Windows 98 environment with full access to Win32 APIs, drivers, and other resources, and then steps you through the process of recovering files through Microsoft Backup. | Name: Pcrestor.bat Location: \tools\sysrec on Windows 98 compact disc |
| Scheduling Tasks | The Scheduled Task Wizard enables you to run important utilities such as ScanDisk, Disk Defragmenter, and Backup at regular intervals. | Name: Mstask.exe Location: \windows\system |
| Maintenance Wizard | The Windows Maintenance Wizard is used to schedule the operation of ScanDisk, Disk Cleanup, Disk Defragmenter, and other tools. | Name: Tuneup.exe Location: \windows |
| Version Conflict Manager | Windows 98 Setup automatically installs Windows 98 files over a newer file that may be on the hard drive. | Name: Vcmui.exe Location: \windows |
| Windows Report Tool | Web-based reporting tool that gathers system information and uploads it using HTTP to a support provider. The report includes a snapshot of the system in Microsoft System Information’s format. | Name: Winrep.exe Location: \windows |
| MS-DOS Report Tool | Web-based reporting tool used to gather system files and upload them to an FTP server when Windows is inaccessible. | Name: Dosrep.exe Location: \windows |
Microsoft System Information (MSInfo) collects system information, such as devices installed or device drivers loaded, and provides a menu for displaying the associated system topics. Use MSInfo to diagnose computer problems. For example, if you are having display problems, use MSInfo to determine the display adapter installed on the computer and the status of its drivers.
Use MSInfo to track down an error and to learn the appropriate support tool to resolve the problem. For example, if a device is not functioning, MSInfo reports the following when viewing problem devices:
This device has a problem: Code=##MSInfo also provides links in the Tools menu to other tools used for troubleshooting.
To launch Microsoft System Information
Note
You can also launch Microsoft System Information by typing msinfo32.exe filename at the command prompt. The command prompt option filename enables you to specify a CAB file that was generated by the Windows Report Tool. For information about the Windows Report Tool, see "Windows Report Tool" later in this chapter.
The information displayed in MSInfo is divided into three categories: Hardware Resources, Components, and Software Environment. The following sections describe the categories and sub-categories displayed in MSInfo, and explain how this information can be used when troubleshooting.
System Information provides a general profile of the system. This includes the version of Windows, the version of the Internet Explorer browsing software, CPU, memory, system resources, total and available disk space, and the file system for each partition. Use this information at the beginning of the troubleshooting process to develop a basic picture of the environment in which the problem occurs.
The Hardware Resources view displays hardware-specific settings, such as assigned or used interrupt requests (IRQs), I/O addresses, and memory addresses.
Conflicts/Sharing
Lists identified resource conflicts between Industry Standard Architecture (ISA) devices, and identifies resources shared by peripheral component interconnect (PCI) devices. Use this information to help you identify some hardware conflicts.
DMA
Reports the DMA channels in use, the devices using them, and those free for use.
Forced Hardware
Lists hardware devices that have user-specified resources as opposed to system-specified resources. This information is useful when troubleshooting Plug and Play resource conflicts.
I/O
Lists all I/O port ranges in use and the devices using each range.
IRQs
Summarizes IRQ usage, identifying the devices using the IRQs and showing free IRQs.
Memory
Lists memory address ranges in use by devices.
Components displays information about your Windows 98 system configuration. The Components view includes the status of your device drivers, networking, and multimedia software. There is also a comprehensive driver history and a summary of problem devices.
Multimedia
Lists sound card and game controller information.
Multimedia — Audio
Lists audio CODECs loaded.
Multimedia — Video
Lists video CODECs loaded.
Multimedia — CD-ROM
Lists the drive letter and model of the CD-ROM drive. With a data CD-ROM in the drive, MSInfo also performs a data transfer test.
Display
Lists video card and monitor information.
Infrared
Lists Infrared device information.
Input
Lists keyboard and mouse information.
Miscellaneous
Lists information about any miscellaneous components.
Modems
Lists modem information.
Network
Lists network adapter, client, and protocol information.
Network — Winsock
Lists Winsock version, description, and status information.
Ports
Lists serial and parallel port information.
Storage
Lists information on hard drives, floppy drives, removable storage, and controllers.
Printing
Lists installed printers and printer drivers.
Problem Devices
Lists devices with problems. Lists each device flagged in Device Manager, with the corresponding status information.
USB
Lists controllers and drivers installed.
History
Lists complete driver history or history for the past seven days. Useful for tracking changes to the system’s configuration.
System
Lists information on BIOS, motherboard, and other system devices.
Note
The options to view Basic Information, Advanced Information, or History appear if the component has a device driver.
The Software Environment view displays a snapshot of the software loaded in computer memory.
Drivers — Kernel Drivers
Lists kernel-mode (ring 0) device drivers loaded.
Drivers — MS-DOS Drivers
Lists real-mode device drivers loaded.
Drivers — User-Mode Drivers
Lists user-mode (ring 3) device drivers loaded.
16-bit Modules Loaded
Lists loaded 16-bit system-level dynamic-link libraries (DLLs) and programs. Useful for debugging software problems, such as application faults.
32-bit Modules Loaded
Lists loaded 32-bit system-level DLLs and programs. Useful for debugging software problems, such as application faults.
Running Tasks
Lists currently running executable files. This provides a comprehensive view of the processes running on the system.
Startup Programs
Lists programs started automatically either from the registry, the Startup group, or the Win.ini file.
System Hooks
Lists programs that are resident in memory and hook system calls.
OLE Registration — INI File
Lists OLE file associations controlled by various INI files.
OLE Registration — Registry
Lists OLE file associations controlled by the registry.
Caution
Hardware information is not available in Safe Mode. While MSInfo can run in Safe Mode, it will be limited to displaying system components and the software environment.
With Windows 98, Microsoft System Information should be the first place to go when troubleshooting. To reduce the time spent navigating through the Start menu, you can launch the following utilities from the Tools menu of Microsoft System Information:
These troubleshooting tools are covered later in this chapter.
To view files created by other programs
You can view the following file formats:
| File | Description |
|---|---|
| *.cab | Report created by the Windows Report Tool (Winrep.exe) or MS-DOS Report Tool. This is the same CAB format used by Windows 95. |
| *.txt | File created by a text editor such as Notepad. You can paste specific information from MSInfo into Notepad, and send it to Technical Support so that they can view only that specific information. |
| *.dat | File created by Hwinfo.exe. |
| *.wlg | Dr. Watson log files. Dr. Watson is used to assist in determining the cause of failures in Windows-based applications. |
| *.nfo | File created by MSInfo. You can view NFO files created on another computer to see its system configuration. |
To save system information
You can save system information in the following file formats:
| File | Description |
|---|---|
| *.nfo | This is the MSInfo file format. These files are saved to the \Windows folder by default. |
| *.txt | Files created by a text editor such as Notepad. You can paste specific information from MSInfo into Notepad, and then send it to Technical Support. |
To export system information
MSInfo exports information in text file (TXT) format. The files are saved to the \Windows folder by default.
To print system information
Note
A typical MSInfo report can total more than 80 pages depending on the hardware and software installed.
To print specific information
Dr. Watson (Drwatson.exe) collects detailed information about the state of your system at the time of and slightly before an application fault. Dr. Watson intercepts the software faults, identifying the software that faulted and offering a detailed description of the cause. When enabled, this tool automatically logs this information to the disk (\Windows\Drwatson\*.wlg), and can display it on screen. Dr. Watson indicates the program that caused the application fault, the program the fault occurred in, and the memory address at which the fault occurred. This information can be used to assist product support personnel in determining the cause of the fault.
You can configure Dr. Watson to load automatically when Windows starts by creating a shortcut to Drwatson.exe in the Startup folder. This is important when an issue is not easily reproducible. Once Dr. Watson traps the application fault and creates the log, you can contact support for further assistance.
Tip
Dr. Watson is best used with reproducible faults. Determining the cause of intermittent faults may prove difficult.
To start Dr. Watson
– Or –
Click Start, point to Programs, Accessories, and System Tools, and then click System Information. Select the Tools menu and click Dr. Watson.
Dr. Watson runs minimized, and the icon appears in the Taskbar. Dr. Watson monitors the system for application faults. If an application fault occurs, Dr. Watson generates a snapshot of the software environment. Click the Details button in the error message box to view the information gathered by Dr. Watson.
To generate a log file
When Dr. Watson is loaded, you move out of the text box by clicking any tab. The Dr. Watson window closes if you press the ENTER key.
To view the Advanced tabs in Dr. Watson
The following tabs, which provide detailed information about your system for a support technician, are added to the dialog box:
If you get an application fault, use these general guidelines to isolate the problem.
If the problem is intermittent or not easy to reproduce, put Dr. Watson in your Startup folder so that it is always running. The Dr. Watson dialog box provides a text box to provide information about what you were doing when the problem occurred. You should provide which applications were running, and the steps that resulted in the application fault in this box.
Caution
After typing the information in the text box, choose File Save or Save As to save the file. If you click OK, the text entered in the text box is not saved.
You customize Dr. Watson by clicking Options from the View menu. Table 27.2 describes these options.
Table 27.2 Dr. Watson options in View menu
| Option | Description |
|---|---|
| Log Files | Configures the number of log files to store on the computer and the folder that log files are saved in. |
| Disassembly | Configures the number of CPU instructions and stack frames that are reported in the log file. You need to configure these options only when requested to do so by technical support. |
| View | Configures Dr. Watson to display in Standard View or Advanced View the next time it runs. |
When an application fault occurs, the Dr. Watson log file is automatically named Watsonxx.wlg (where xx is an incremented number). By default, Dr. Watson log files are saved to the \Windows\Drwatson folder.
To save the information generated by Dr. Watson
Caution
After typing the information in the text box, choose File Save or Save As to save the file. If you click OK, the text entered in the text box is not saved.
You can view a Dr. Watson log file in the Dr. Watson program or from Microsoft System Information (MSInfo).
To view Dr. Watson log files from MSInfo
Print Dr. Watson log files by selecting Print from the File menu. To print only specific information, use Microsoft System Information to view the log file, and then copy the specific information to a text editor, such as Notepad.
Note
A typical Dr. Watson log can be over 15 pages, depending on the software running.
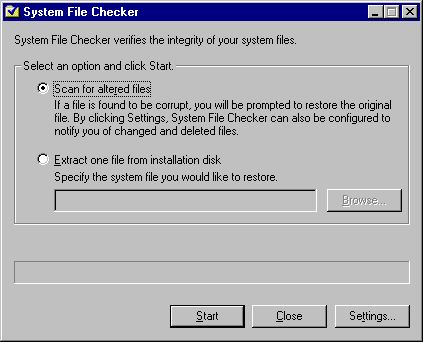
System File Checker verifies the integrity of your system files. After scanning for altered files, it offers to restore corrupted files. If a file is found to be corrupt, you will be prompted to restore the original file. By clicking Settings, System File Checker can also be configured to notify you of changed and deleted files. If you choose to restore the file, System File Checker attempts to extract the file from your original Windows 98 installation source.
System File Checker (Sfc.exe) helps you do two things:
To start System File Checker
To scan for corrupt files
System File Checker scans the system using a default baseline contained in a file named Default.sfc. Default.sfc is copied from the Windows 98 installation source and contains the information shown in Table 27.3 about each system file:
Table 27.3 System File Checker Default.sfc contents
| Information | Description |
|---|---|
| Cyclical Redundancy Check (CRC) | A checksum added to a file entry whenever a file is written to disk. This data is used to see if the file has changed. For example, the sum of all ones and zeros in a file equals a specific number. If a CRC is performed on the file and the sum does not equal the checksum associated with the file, then System File Checker assumes the file has changed. When a difference is detected between the information in the Default.sfc and the file on the disk, a message box appears. If all the verification data matches except for the CRC, the message indicates that there is possible file corruption and recommends you restore the file. |
| Date, time, size, and version information | If System File Checker determines a change in date, time, size, or version, it considers the file to be changed. |
When System File Checker identifies a changed file, the user is given several choices to approach the situation. Table 27.4 describes these options.
Table 27.4 System File Checker options
| Option | Used to |
|---|---|
| Update the verification information | Update the file data in Default.sfc. Choose this option when you have updated a system file without running System File Checker, and are certain that you want to update Default.sfc to use the updated information about the file the next time System File Checker is run. |
| Restore file | Specify the source location of the file to restore and where to save the new copy of the file. You are also prompted to back up the existing file to the \Windows\Helpdesk\SFC folder. Choose to back up the file in case there are problems using the new file. |
| Ignore | Skip the file. The next time System File Checker is run, this file will cause the File Changed dialog box to appear because it was not added to Default.sfc and it was not restored. |
To verify the integrity of your system files
When you uninstall a program, System File Checker reports that files necessary for that program (for example, files with .exe, .dll, and .ocx extensions) have been deleted. Select Update verification information to bring the baseline for System File Checker up to date.
If you know a specific system file is corrupt or missing, you can extract it from your original installation media using the following procedure.
To extract a specific system file
You can customize the criteria that System File Checker uses to check files. Table 27.5 shows the items that you can customize in the System File Checker Settings dialog box:
Table 27.5 System File Checker custom settings
| Option | Description |
|---|---|
| Settings | Used to configure how to back up files, log file options, and whether to check for changed or deleted files. |
| Search Criteria | Used to modify the files and folders to scan. |
| Advanced | Used to create a new verification data file, choose a different verification data file to use, or restore the original Default.sfc. |
To customize System File Checker
| Option | Description |
|---|---|
| Always back up before restoring | Before restoring the original file, System File Checker will always create a copy of the current file. |
| Prompt for back up | Before restoring the original file, System File Checker will ask you if you want to save a copy of the current file. |
| Never back up before restoring | System File Checker will not create copies of the current files before restoring. |
The default backup location is C:\Windows\Helpdesk\sfc.
| Option | Description |
|---|---|
| Append to existing log | Keeps one log file, and System File Checker adds to that file with every system check. |
| Overwrite existing log | Overwrites existing log file with every system check. |
| No log | Does not create a log file. |
To change the search criteria
System File Checker shows the list of folders to be checked according to the verification data file.
Files that are renamed during Windows 98 Setup are not automatically extracted and renamed by System File Checker. For example, Winoa386.new in a CAB file cannot be extracted and renamed to Winoa386.mod.
There are files created during Windows 98 Setup that cannot be found by System File Checker Extract. System File Checker Extract looks for files in the cabinets to extract. If they do not exist in the CAB files, it cannot extract them. For example, files such as Control.ini, Exchange32.ini, and Msbatch.inf are not found.
If you save any changes for the search criteria in Default.sfc, those changes will overwrite the original file.
Points to remember about System File Checker:
All drivers shipped with Windows 98 will be digitally signed by Microsoft. You can verify that the drivers you install on your Windows 98 system have met the Windows Hardware Quality Labs (WHQL) standards, and that they have not been modified since they were tested by WHQL. To ensure that the device drivers you are installing are compatible with Windows 98, look for vendors offering drivers signed by Microsoft.
Windows 98 includes the Signature Verification Tool and Signature Checking to identify files that have been signed. This section describes them.
The Signature Verification Tool (Sigverif.exe) determines whether or not a file is signed. With Sigverif.exe, you can do the following:
To start the Microsoft Signature Verification Tool
– Or –
Click Start, point to Programs, Accessories, and System Tools, and then click System Information. Select the Tools menu and click Signature Verification Tool.
Signature Checking can be enabled by system administrators to ensure that Windows 98 inspects files for digital signatures whenever drivers are installed.
Signature Checking has three levels:
You can start the Signature Checking feature using Policy Editor (Poledit).
To start Signature Checking using Policy Editor
Note
For information about setting up, starting, and using Policy Editor, see Chapter 8, "System Policies."
The system administrator can set the Security level using the list box.
Caution
Making a mistake in editing the registry can cause your system to become unstable and/or unusable.
Wherever possible, use the administrative tools, such as Control Panel or System Policy Editor, to make configuration changes, rather than editing the registry. This is to ensure values are stored properly in the registry when changing the configuration.
If you use Registry Editor to change values, you will not be warned if any entry is incorrect. Editing the registry directly by using Registry Editor can cause errors in loading hardware and software, and can prevent users from being able to start the computer.
You can also start the Signature Checking feature by setting the following registry value:
HKEY_LOCAL_MACHINE\Software\Microsoft\Driver Signing
If the Policy Value is set to "00 00 00 00", the signature checking is set to level 0.
If the Policy Value is set to "01 00 00 00", the signature checking is set to level 1.
If the Policy Value is set to "02 00 00 00", the signature checking is set to level 2.
Automatic Skip Driver (ASD) Agent is used to detect and automatically disable device drivers or operations that fail during startup. Disabled items can be viewed and re-enabled by running the Automatic Skip Driver Agent (Asd.exe). If you run Asd.exe with no errors in the registry, you will receive a message stating that no critical operation failures occurred.
When Windows 98 starts, it attempts to load all device drivers required for the installed hardware. If a hardware device or its driver is defective, the device driver can fail to load and prevent Windows from starting. Automatic Skip Driver tracks the device load failure using the following steps:
If a device is disabled by ASD, it may be identified with a yellow exclamation point (!) in Device Manager. Device Manager identifies devices disabled by ASD with a Code 11.
Along with device drivers, certain problems during startup and during normal operating system operation can be detected by ASD. The following items are examples of operations that ASD monitors:
To launch Automatic Skip Driver Agent
– Or –
Click Start, point to Programs, Accessories, and System Tools, and then click System Information. Select the Tools menu and click Automatic Skip Driver Agent.
Every problem that ASD has ever detected on that computer is recorded in the Asd.log file.
Automatic Skip Driver Agent tracks device load failures by identifying specific device(s) that failed to enumerate when Windows 98 started.
If a device driver fails to load during startup, run Asd.exe. In the Automatic Skip Driver dialog box, click the operation that failed, and then click Details. The device’s Details dialog box appears and provides a recommendation for solving the problem. This may include updating the driver.
Points to remember about Automatic Skip Driver Agent:
Windows Update (lexplore.exe) is an online extension of Windows 98. It helps your computer operate better by providing a central location to find customized files and product enhancements. Product enhancements include service packs, system files, device drivers, and new Windows 98 features.
When Windows 98 is installed, an Internet shortcut to the Windows Update page on www.microsoft.com is created on the Start menu. Windows Update uses Active Setup and ActiveX controls to provide product enhancements. The ActiveX controls are downloaded and installed on your system when you connect to the Windows Update Web page.
Note
Windows Update requires browser software that supports ActiveX controls.
Once the controls are installed, they automatically compare device drivers installed on your computer with a database of updated drivers on the server. If any drivers are found to be newer than your current set, they are offered to you to install.
Note
Device drivers, system patches, or hot fixes can be uninstalled using the Restore page from the Web site. If you are unable to connect to the Windows Update Web site, you can uninstall the latest updates by using Update Wizard Uninstall (Upwizun.exe) found on the Tools menu of Microsoft System Information. Existing files and drivers are automatically backed up before the new ones are installed.
To use Windows Update
– Or –
Click Start, point to Settings, and then click Windows Update.
Follow the instructions on the screen to install the latest updates.
Windows Update scans your system, generates a list of items that can be updated, and then installs the files for the items you choose to update.
You can use Policy Editor to restrict access to Windows Update. System administrators can control access to system updates to ensure the Windows 98 configuration remains consistent across all desktops. Use the following check boxes in System Policy Editor to restrict access:
To restrict access to Windows Update using Policy Editor
Note
For information about setting up, starting, and using Policy Editor, see Chapter 8, "System Policies."
Caution
Making a mistake in editing the registry can cause your system to become unstable and/or unusable.
Wherever possible, use the administrative tools, such as Control Panel or System Policy Editor, to make configuration changes, rather than editing the registry. This is to ensure values are stored properly in the registry when changing the configuration.
If you use Registry Editor to change values, you will not be warned if any entry is incorrect. Editing the registry directly by using Registry Editor can cause errors in loading hardware and software, and can prevent users from being able to start the computer.
You can also restrict access to Windows Update by setting the following registry values:
HKEY_LOCAL_MACHINE\Software\Microsoft\Windows\CurrentVersion\Policies\Explorer\NoWindowsUpdate
If the value is set to "1", access to Windows Update is disabled.
If the value for NoWindowsUpdate is deleted, access is permitted.
HKEY_LOCAL_MACHINE\Software\Microsoft\Windows\CurrentVersion\RunOnce\WUCheckShortcut
If the value is set to "WUpdMgr.exe -shortcut", the shortcut to Windows Update is deleted on the subsequent system startup.
If a value is specified for a local URL, the first time Windows Update runs, it redirects the user to this location.
If a value is specified for a remote URL, the link to Windows Update redirects the user to this location.
Points to remember about Windows Update:
The System Configuration Utility (Msconfig.exe) provides a graphical interface for configuring the Windows 98 startup environment. The System Configuration Utility (MSConfig) lets you troubleshoot by creating a clean environment to test against. If a problem is not reproducible after performing a Diagnostic startup, a process of elimination can be used to identify the source of the issue.
The System Configuration Utility lets you edit lines of Windows 98 configuration files, like Config.sys or System.ini, and provides the ability to "remark" individual lines in the files, preventing the lines from executing or processing on subsequent boots of the computer.
The System Configuration Utility also lets you enable/disable items in your Startup group, and the RUN/RUN SERVICES keys of the registry. You can also use it to create a backup of system files.
To use the System Configuration Utility
Table 27.6 describes the tabs in System Configuration Utility.
If the symptoms are alleviated, a process of elimination can be employed to identify the source of the problem using MSConfig. Continue with step 6 of this procedure to isolate the source of the issue using the Selective Startup Options.
– Or –
If the symptoms still manifest after a Diagnostic startup, investigate the following possibilities:
Using a process of elimination, enable options until the symptoms are reproducible. Once the problem reappears, isolate the issue by narrowing the suspect options down to one source.
The Config.sys and Autoexec.bat tabs use the following conventions to identify settings and minimize the risks inherent in editing configuration files:
The System.ini and Win.ini tabs also follow these conventions and identify sections with a yellow folder. Entire sections can by commented out by disabling the check box for the section.
The Startup tab lists items loading automatically at startup from the Windows 98 Startup group, Win.ini load= and run=, and the registry.
Table 27.6 System Configuration Utility dialog box tabs
| Tab | Description |
|---|---|
| General | Enable or prevent the loading of all or specific device drivers and software. Prevent the loading of Config.sys, Autoexec.bat, System.ini, Win.ini, and Startup options. Back up or restore Config.sys, Autoexec.bat, System.ini, and Winstart.bat. The Advanced button contains the settings that are described in Table 27.7. |
| Config.sys | Enable or prevent the loading of specific lines in the Config.sys file. Checking a line item edits the Config.sys file and adds REM TSHOOT: to remark out the line. |
| Autoexec.bat | Enable or prevent the loading of specific lines in the Autoexec.bat file. Checking a line item edits the Autoexec.bat file and adds REM TSHOOT: to remark out the line. |
| System.ini | Enable or prevent the loading of specific lines in the System.ini file. Checking a line item edits the System.ini and adds ;REM TSHOOT: to remark out the line. |
| Win.ini | Enable or prevent the loading of specific lines in the Win.ini file. Checking a line item edits the Win.ini and adds ;REM TSHOOT: to remark out the line. |
| Startup | Enable or prevent specific items loaded by the operating system on startup. The information in the Startup tab comes from the registry, Win.ini items on the Startup menu under Programs. |
Table 27.7 The Advanced button settings of System Configuration Utility
| Setting | Description |
|---|---|
| Disable System ROM Breakpoint | Specifies whether Windows 98 should use ROM address space between F000:0000 and 1 MB for a breakpoint. |
| Disable Virtual HD IRQ | Allows Windows to terminate interrupts from the hard disk controller, bypassing the ROM routines that handle these interrupts. Some legacy hard drives might require that this setting be disabled in order for interrupts to be processed correctly. If this setting is disabled, the ROM routine handles the interrupts, which slows the system’s performance. |
| EMM Exclude A000-FFFF | EMM Exclude specifies a range of memory that Windows will not use as an API buffer area. Using or attempting to use certain areas of the upper memory area can interfere with some ISA adapters that use the same memory area. |
| Force Compatibility mode disk access | Forces Windows to use real-mode methods to access the hard drive. No 32-bit disk drivers are loaded in the system (except the floppy driver). Used as a troubleshooting tool to test for problems with protected-mode hard disk drivers. Note that this drastically affects performance. |
| VGA 640 x 480 x 16 | Forces the display to use the industry-standard VGA mode. If the machine is not booting, and this setting allows the machine to boot successfully, then this could indicate a video-related problem. |
| Use SCSI Double-buffering | Grayed out if Windows detected that SCSI double-buffering is required. Enables SCSI double-buffering. Windows 98 detects whether this double-buffering is needed or not, so this should be enabled only if there is a disk access problem. |
| Enable Startup menu | Enables or disables a setting in the Msdos.sys file that controls whether the Start menu appears or not by default. |
| Disable ScanDisk after bad shutdown | Modifies a setting in the Msdos.sys file that controls whether ScanDisk runs automatically following an improper shutdown of Windows 98. |
| Limit memory to | Adds a setting to System.ini that artificially limits the amount of physical memory available to Windows 98. Note that a 16 MB or lower setting may prevent Windows from starting in normal mode. |
| Disable fast shutdown | Instructs Windows 98 to revert to the previous methods of shutting down Windows 98. Some software may not allow this feature, and could manifest problems if fast shutdown is enabled. |
| Disable UDF file system | Disables the Universal Disk Format (UDF) file system for all removable media. Use this to troubleshoot problems encountered with proprietary DVD movie players that are incompatible with UDF. |
| Enable Pentium F0 (Lock CmpXchg) workaround | If an illegal instruction sequence is issued, certain Pentium processors will hang. If this box is checked, Windows will enable the protection routine to avoid hanging under the illegal instruction sequence. Checking this box will write a SWORD registry key "FixP5Lock" with value 1 at HKEY_LOCAL_MACHINE\System\CurrentControlSet\Services\VxD\VMM. Note that this routine makes part of the interrupt description table to be not present, so it is recommended that this feature remain disabled while debugging programs. |
In the System Configuration Utility dialog box, the View menu lets you open other controls in Windows 98, which include the following:
When you disable an entry in System.ini or Win.ini from the System Configuration Utility, the following entry is added to the front of the specified line:
;REM TSHOOT:
When you disable an entry in Config.sys or Autoexec.bat from the System Configuration Utility, the following entry is added above and before the specified line:
REM TSHOOT:
Backups of Win.ini, System,ini, Autoexec.bat, and Config.sys can be created with the System Configuration Utility by clicking Create Backup from the General tab. These files have a .pss extension and can later be restored to their original name and configuration by clicking Restore Backup.
Important
It is strongly recommended that you create a backup of these four system files before making any changes to an installation with System Configuration Utility.
To create backups of your files
The Startup tab lists information about items loading from the registry’s run and runservices keys, the Win.ini run= load=, and the Startup group. It does not list Static Virtual Device Drivers (VxDs) and Shell Extensions. Identify items loading automatically at startup as a Static VxD or Shell Extension by using information gathered by Dr. Watson and the software environment category in Microsoft System Information; refer to the product’s documentation for instructions on disabling or uninstalling the software.
Points to remember about the System Configuration Utility:
Registry Checker is a system maintenance program that finds and resolves some registry problems, and regularly backs up the registry. Windows 98 provides an MS-DOS-based version for scanning the registry, backing up, and restoring the registry and system configuration files, and a Windows-based version for scanning and backing up the registry.
Registry Checker backs up the registry each day following a successful Windows 98 system startup, maintaining one backup for each day. If a serious problem is found in the registry, Registry Checker will restore the most recent registry from a backup copy.
Note
If you want to restore an earlier version of the registry, you must use the MS-DOS-based utility outside of Windows.
Registry Checker maintains compressed backups of the registry and configuration files that have successfully started the computer. Registry Checker will attempt to fix the registry only if a valid backup cannot be found.
ScanRegW is the Windows-based version. This program scans the registry for corruption and determines if it requires optimization, and then backs up the following system configuration files: registry (User.dat and System.dat), Win.ini, and System.ini. This scan occurs automatically when the system is started. You can run Scanregw.exe to force a scan and backup of these files. ScanRegW backs up the registry and configuration files using a compressed CAB file in the \Windows\Sysbckup directory.
ScanReg is the MS-DOS-based version. If ScanRegW detects a problem with the registry, it prompts you to restart the computer to fix the problem, and ScanReg will run automatically. It either restores a known good backup or, if no backups are available, attempts to repair the current registry by removing the corruption. If ScanRegW detects that optimization is required, ScanReg will optimize the registry on the subsequent startup.
For more information about the registry, see Chapter 31, "Windows 98 Registry." For information about restoring a registry, see "Restoring the Registry" later in this chapter.
Table 27.8 identifies the differences between ScanRegW and ScanReg.
Table 27.8 Differences between ScanRegW and ScanReg
| Function | ScanRegW | ScanReg |
|---|---|---|
| Environment | Windows | MS-DOS |
| Real-mode or Protected- mode? | Protected-mode | Real-mode |
| Scan registry? | Yes | Yes |
| Fix registry? | No | Yes |
| Backup registry? | Yes | Yes |
| Runs in Safe Mode? | Yes | No |
| Compresses backup | Yes | No |
| Runs automatically? | Yes, every time computer is started. | Yes, if a registry problem is detected. |
| Restores the registry? | No | Yes |
Table 27.9 describes command line options for the ScanRegW and ScanReg utilities of Registry Checker.
Table 27.9 Command line options for Registry Checker
| Command line option |
Description |
Available for |
|---|---|---|
| /backup | Backs up the registry with no prompts to the user. | ScanReg and ScanRegW |
| /restore | Displays a list of backup files available, sorted by date and time of the backup. | ScanReg |
| "/comment" | Specifies that a comment be associated with the backup. The comment is displayed with the /restore command. For example: "/comment=this is a backup comment." | ScanReg and ScanRegW |
| /fix | Repairs the registry files. | ScanReg |
| /autoscan | Scans the registry files every time it is run, but backs up the registry only once per day. | ScanRegW |
| /scanonly | Scans the registry files and returns an error, if appropriate; it does not back up the files. | ScanRegW |
Both ScanRegW and ScanReg use settings from the Scanreg.ini file. Table 27.10 lists the settings.
Table 27.10 Scanreg.ini settings
| Keyname and default value |
Function | Other values |
|---|---|---|
| Backup=1 | Run ScanReg at startup and make a backup automatically. | 0: ScanReg is not run at startup |
| Optimize=1 | Run ScanReg to optimize the registry, reducing its size to improve performance. | 0: Automatic optimization is skipped |
| MaxBackupCopies=5 | Number of backups to store in the backup folder. | 0 to 99 |
| BackupDirectory= | Backup directory where CAB files are stored. Must be a full path, for example c:\tmp\backup. | Defaults to Windows\sysbckup |
| Files=[dir code,] file1,file2,file3 | Additional system files to backup into the CAB file. File names are separated by a comma (,). The dir code can be: 10: windir (ex. c:\windows) 11: system dir (ex. c:\windows\system) 30: boot dir (ex. c:\) 31: boot host dir (ex. c:\) |
None |
Note
If ScanReg cannot create a backup in the location specified by the Backup folder in the Scanreg.ini file, it defaults to placing the CAB file in the \Windows folder.
Registry Checker automatically makes a backup of your registry once per day as the computer starts, but you can also manually make periodic backups of the registry using ScanRegW. There are several reasons to back up the registry, for example, before editing the registry using Registry Editor, or before installing an application.
ScanRegW stores the backup as a RB0##.cab file in \Windows\Sysbckup, which is a hidden folder. The symbols ## represent backups using digits from 01 to 99 (05 is the default for the number of backups). The files are compressed CAB files (like the files on the Windows 98 compact disc). If you run ScanRegW and your system already has the maximum RB0##.cab files as indicated in Scanreg.ini, the oldest one is deleted.
The RB0##.cab file contains the following files:
To back up your registry
After scanning the system registry, ScanRegW displays a dialog box asking if you would like to back up the registry. Click Yes.
– Or –
Type ScanRegW /autoscan to automatically back up the registry without a dialog box. Use this command line switch to have ScanRegW scan and back up the registry as a scheduled task.
ScanRegW informs you when the backup is complete. The backup is stored as the file RB0##.cab in the hidden \Windows\Sysbckup folder.
Registry Checker runs automatically with each startup to determine if the system registry has errors, and to back up the registry. Some more points to remember about Registry Checker:
You should perform a full backup of your system regularly to have a current backup of your entire system available to restore in case of hard disk failures. Windows 98 includes a new backup utility called Microsoft Backup (Msbackup.exe), which supports a wider range of backup devices than the Windows 95 backup utility. Support has been added for parallel, IDE/ATAPI, and SCSI backup devices.
Several devices are supported, including the following:
Note
QIC-40 backup devices are no longer supported by the Windows 98 backup utility.
Microsoft Backup is not a default selection for the Windows 98 installation process. If the utility is installed on Windows 95 before Windows 98 Setup is run, Microsoft Backup will be installed during Setup.
The tool can be added using Add/Remove Programs in Control Panel. It is located in the Disk Tools component. Microsoft Backup requires the same minimum configuration for Windows 98 as well as a hard drive with at least 5.2 MB free disk space. When the backup utility is installed, the program is added to the System Tools menu under Start\Programs\Accessories.
To install Microsoft Backup
Copying the files for the selected components runs automatically.
To configure a backup device
To start Microsoft Backup
If Windows 98 does not detect a backup device, it asks you if you want the Add New Hardware applet. Click Yes, and add the device, or click No to continue.
Backup Wizard leads you through the steps required to create a new backup job. The backup utility uses backup jobs to save and reuse file or option selections and to perform backups.
Note
Backup Wizard is used only to create new backup jobs. It cannot be used to modify an existing job.
| Backup Wizard Configuration When naming a Backup, you cannot use these characters: \ / : ? * " < > | To change a setting or review the backup job’s summary while progressing through the wizard, use the Back and Next buttons. If the medium being used to back up the files does not have a unique name, a prompt will be displayed for naming it. Removable media devices are supported when specifying the option in Microsoft Backup to back up to a file rather than a removable drive. Restore Wizard Configuration You can select your files from the catalog stored on your hard disk or from the tape in your drive. Files are restored in their original folder structure unless you choose to restore all files to an alternate location. |
Restore Wizard presents a series of dialog boxes that lead you through the steps required to restore a backup job. Restore Wizard can be launched from the Microsoft Backup Tools menu or from the Microsoft Backup toolbar.
Note
You can restore backups made with the Windows 95 backup. You cannot restore backups made with MS-DOS version 6.x or earlier.
To use Restore Wizard
Both Backup and Restore create a report for the operation. If unsuccessful, the report can give an indication as to why.
A sample report is shown below.
Start Job Report
    Job Name: Restore
    Restore Job Started - 8/13/97 1:47:47PM
    Processed File Count: 1
    Total Bytes Before Compression: 180,736
    Operation Completed - Yes
    Restore Job Ended - 8/13/97 1:47:49PM
End Job Report
To set options for the report
To view or print a report
Note
A history of the backup and restore operations for the machine can be found in \Program Files\Accessories\Backup\Reports\Report.txt. You can open the file in Notepad.
You can back up files without using Backup Wizard.
To back up without using Backup Wizard
To back up an entire drive, click the box next to the drive.
– Or –
To back up individual folders or files, click the + next to the drive and select the folders, or click the + next to a folder and select files.
Note
Back up removable media as a File.
The Backup Options dialog box has the following tabs: General, Password, Type, Exclude, Report, and Advanced. Click ? for a description of the features on these tabs. Click OK to return to the Backup Options dialog box.
You can restore files without using Restore Wizard.
To restore without using Restore Wizard
The Restore Options dialog box has the following tabs: General, Report, and Advanced. Click OK to return to the Restore Options dialog box. The restore general options are displayed in How to Restore.
Points to remember about Microsoft Backup:
Microsoft System Recovery (Pcrestor.bat) is a quick and easy method to restore your system from a backup. The recovery tool operates completely from protect mode (within the Windows operating system environment).
Microsoft System Recovery takes advantage of the scripting extendibility of the Windows 98 Setup program to install Windows 98, while maintaining access to the Win32 APIs and other critical system resources (such as networks, removable media, and tape devices) needed to access your data.
Microsoft System Recovery uses Msbatch (Msbatch.inf), an automated setup process, to install a minimal Windows 98 environment. Microsoft System Recovery copies Msbatch to a directory called \Restore on the hard drive, and then starts the install process. There are no prompts during the setup process since Msbatch automates the entire setup program. Msbatch is described in detail in Appendix D, "Msbatch.inf Parameters for Setup Scripts."
Finally, Microsoft System Recovery uses a wizard to walk you through the process of recovering system files through Microsoft Backup.
Important
You should perform a full backup of your system regularly to have a current backup of your system available to restore in case of hard disk failures. Microsoft System Recovery requires a backup to restore your system files.
It is recommended that you back up your system files at least once a week. For more information about backing up your files, see "Using Microsoft Backup" earlier in this chapter.
To start a system recovery using Microsoft System Recovery
After Windows 98 is set up, Microsoft Recovery Wizard walks you through the process of restoring system and application files from Microsoft Backup. In addition to Microsoft Backup, the System Recovery Wizard installs Microsoft Notepad and Wordpad.
Tip
Click the Details button in the wizard for help in recovering your files.
Microsoft System Recovery operates completely in protect mode, and uses an automated batch program to install a minimal Windows 98 environment. It then uses a wizard to step you through a recovery process that lets you recover all or part of your system.
The following is a list of the benefits of Microsoft System Recovery:
Scheduled Task Wizard lets you run useful utilities and routine tasks at regular intervals. You can set the tasks to run at times that are most convenient for you.
Once you have a task scheduled, an icon appears in the Windows taskbar.
Note
If you are upgrading a Windows 95 installation in which System Agent is installed, the System Agent tasks are inherited by the Scheduled Task.
To schedule tasks
For more information about Scheduled Task Wizard, see Chapter 23, "System and Remote Administration Tools."
Maintenance Wizard is used to schedule several performance-improving tasks, such as Disk Defragmenter, ScanDisk, Disk Cleanup, and Compression Agent (on DriveSpace 3 drives).
Note
Microsoft Plus! for Windows 98 includes two additional features: you can clean up your Start menu, and you can clean up orphan links in Add/Remove Programs. To obtain Microsoft Plus! for Windows 98, contact your Microsoft reseller.
You can choose time of day or night, or customize the schedule to run the performance improving tasks.
The following list shows a typical schedule for these tasks:
For more information about Disk Defragmenter, ScanDisk, and Disk Cleanup, see Chapter 10, "Disks and File Systems."
To start Maintenance Wizard
To view scheduled tasks
Note
You can also launch Maintenance Wizard from the Welcome to Windows 98 screen, which appears after you set up the Windows 98 software.
You can start and run all the tasks in succession anytime with the Tune-Up/autorun switch.
To run the tasks in succession
The tasks will run automatically in succession. This does not change the schedule for the tasks that you set in Maintenance Wizard.
Sometimes, when installing software, you may have a newer version of a file on your system than the one being installed. Windows 98 Setup automatically installs the Windows 98 file over the newer file and stores the newer version of the file in the \Windows\VCM folder. Those files can be viewed with Version Conflict Manager (VCM).
Note
The determining factor in identifying an older file is the file version, not the file date.
You can use Version Conflict Manager (Vcmui.exe) to restore an application’s version of a file. Reinstalling the entire application is no longer necessary.
To launch Version Conflict Manager
Version Conflict Manager displays the file name, the backup date, and the backed- up version of every newer file that was replaced. It also lists the current version being used of that file.
When Version Conflict Manager restores an older file, the older file is moved in the \Windows\VCM folder with the extension changed to .000. You can then use Version Conflict Manager to determine the original configuration.
Points to remember:
The Windows Report Tool (Winrep.exe), is an Internet-based information gathering tool that is installed with Windows 98. This tool provides a means for uploading system information to a support provider for diagnosis.
With the Windows Report Tool, you can submit problem reports over the Internet to a technical support center, or across an intranet to a corporate help desk. The problem report includes system data and can include configuration files. To use Windows Report Tool, you connect to a Web page, and then, using ActiveX control and scripting, the Windows Report Tool is invoked on the local computer.
If you cannot connect to a Web page, you can launch the Windows Report Tool (Winrep) from the Tools menu in the Microsoft System Information utility and save the report as a CAB file. The report can then be transferred to support personnel another way, such as by using FTP or by copying the file to a computer that is connected to the Internet and using Winrep on that system to open and submit the report.
Support personnel using MSInfo to open the CAB file can view the report. For information about MSInfo, see "Using Microsoft System Information" earlier in this chapter. Winrep can write information to a SQL database to track the service requests.
This section describes how to generate a report using Windows Report Tool, and then submit it to a Web server. For information about how to design the Web server to accept Windows Report Tool reports and to update a database, see the paper "OEM and Corporate WinRep Integration" on the Microsoft Windows 98 Resource Kit compact disc.
Note
For best results, establish a connection to the Internet before launching Windows Report Tool. If you need to create a new Internet connection, run the Internet Connection Wizard.
To use Windows Report Tool to submit a report
Note
Enabling the Use alternate data format proxy server feature will slow down the upload process.
Tip
The first line of the problem description will become the report’s title, so use this to summarize the contents of the report.
You can also use Windows Report Tool to generate a report, without first connecting to a Web page.
To use Windows Report Tool without first connecting to a Web page
The MS-DOS Report Tool (Dosrep.exe) is an Internet-based reporting tool that can be run outside of Windows (in real-mode). This tool was created to upload system information to a Support Engineer when Windows is not accessible.
To use MS-DOS Report Tool
Note
The list of files uploaded by MS-DOS Report Tool is configurable. Edit the Dosrep.ini to add or remove files to be uploaded by the tool.
To receive reports generated by the MS-DOS Report Tool, you must use a File Transfer Protocol (FTP) server on the Internet. Provide users with either the Internet Protocol (IP) address or the friendly name (DNS or HOST) of the FTP server. Also, provide them with the name of the directory on your FTP server in which they will submit reports. The MS-DOS Report Tool then creates the specified directory on the FTP server share and uploads a cabinet (CAB) file to it. To view the uploaded report, use MSInfo to open the report in the directory you specified, and then access its contents.
Points to remember:
ECHO ATDT > COMx [enter]
Where x is the COM port your modem is using.
If you do not hear a dial tone, your modem is not accessible at that COM port in real-mode. You can still use the MS-DOS Report Tool to gather system information by typing:
DOSREP [enter]
and then clicking the option named Create and save report.
This will generate a CAB file comprised of the system files that could be uploaded using another machine connected to the Internet. The Windows Report Tool can be used to upload reports created using the MS-DOS Report Tool.