An evolution in computer power management is taking place because of the advent of the Simply Interactive PC (SIPC), a Microsoft initiative to create a computer that never needs to be serviced by the user and is as simple to use as any household appliance. This new computer is instantly available to the user because it uses power management to keep the machine in a low power state when it is not being used rather than turning all the way off (thus avoiding lengthy boot times).
For more information about SIPC, see http://www.microsoft.com/hwdev/.
Windows 98 directs power management through the OnNow system. Unlike previous approaches to power management, OnNow manages power for the entire system including all system devices and peripherals. To make this possible, the operating system must direct power to the computer.
With legacy power management architectures, the BIOS controls the power state of system devices. However, OnNow makes it possible for the operating system to coordinate power management activities at all levels and define the power-state transitions for the system.
Computer power management means there is control over how the computer consumes energy and integrates its components. For example, a running application, or mouse, keyboard, or joystick activity, prompts the power management system that the computer is in use. The power management system then allows the computer full power, Otherwise, the power management system drops the computer to a sleep state. Another example is a fax modem, which does not need to use full power all the time. The fax modem can operate in a "standby" state, consuming less energy until it has to receive an incoming fax, at which time it is given full power. This section describes how Windows 98 supports power management.
With OnNow power management, the computer functions as follows:
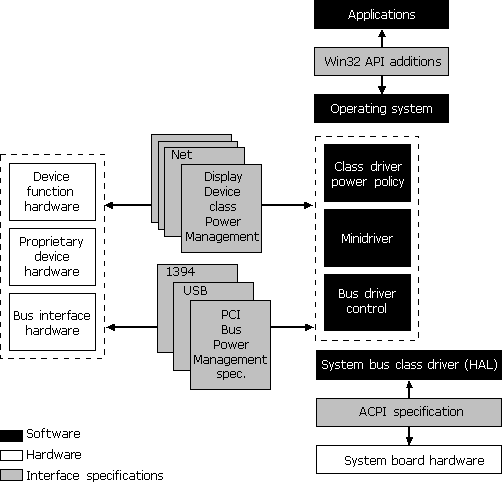
Figure 30.11 shows the components of the OnNow system.
Figure 30.11 OnNow system components
Note
Applications developed before the advent of OnNow were designed to assume that the computer is always fully powered while the application is running. Such applications can inadvertently keep the system from entering a lower power state. In addition, these applications can crash when the computer wakes up, either after time has passed or after devices have been removed.
Though Windows 98 performs most of the work for OnNow, applications have to be designed for OnNow power management and Plug and Play to make the entire process seamless.
The goal of the operating system is to conserve energy while the computer is working and to put the computer to sleep when it is not working. The decisions that determine how to save energy and when to go to sleep are referred to as the power policy. In OnNow, power policy is based on the end user’s preferences, the application requirements, and the system hardware capabilities. The implementation of power policy is distributed throughout the system, with different system components acting as policy owners for different aspects. For example, the operating system itself is the policy owner responsible for when the computer should go to sleep, how deep a sleep the computer should go into, and how to operate the processor to obtain energy conservation, and to meet thermal and audible noise goals.
There is also a policy owner for each device class in the computer. The policy owner for a particular device class is the component that knows how the device is used by the end user and the applications. This is generally a high-level component and in most cases a WDM class driver. Each policy owner has to make appropriate power management decisions for its class and work consistently with the operating system's policy for putting the computer to sleep.
Carrying out power policy — actually controlling devices so power consumption or capabilities change — is not the concern of the policy owner. Responsibility for this power control is given to the device drivers for the affected device and is shared among the drivers in the stack. Device-specific drivers or minidrivers are responsible for saving and restoring the device’s settings (context) across low-power state transitions. Bus drivers are responsible for giving the actual hardware command to the device to change state. When the policy owner makes the decision to enter a low-power state and communicates it to the device driver through the system, the device driver saves context and then sends the request to the bus driver. This gives the hardware command to the device to enter the low-power state. When the device is to be powered-up, the same sequence occurs in reverse; the bus driver turns on the device, and the device-specific driver restores the saved context.
For the OnNow system to be successful, Windows 98 must be aware of how power management features integrate throughout the computer. This is done through the OnNow feature known as the Advanced Configuration and Power Interface (ACPI), a system interface that provides a standard way to control power management and Plug and Play functions of the computer hardware. ACPI allows the motherboard to describe its device configuration and power control hardware interface to Windows 98; this allows the operating system to automatically turn on and off standard devices, such as CD-ROMs, network cards, hard disk drives, and printers, as well as consumer devices connected to the computer, such as VCRs, TVs, phones, and stereos.
For a complete OnNow system, the system BIOS must support ACPI. The BIOS plays an important role in the ACPI by working with Windows 98 in performing the necessary initialization processing and handoff during boot and when resuming the working (full power) state.
Figure 30.12 is an overview of the ACPI.
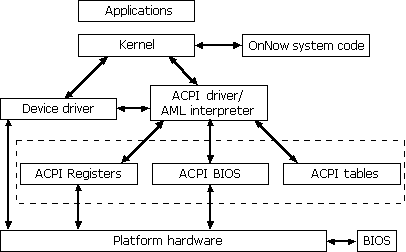
Figure 30.12 Overview of the ACPI
Note
With legacy BIOS, the power management features in Windows 98 function, but the legacy BIOS must control power management.
The ACPI specification, currently in version 1.0, has two parts: configuration (Plug and Play), and power management. ACPI gives Windows 98 and the device drivers all power management decision making. The BIOS simply provides Windows 98 with access to the hardware controls for controlling power in the system. Windows 98 and the device drivers, which already know when the system is active, decide when to turn off devices that are not in use and when to put the entire system to sleep.
Since power management is controlled by the operating system, there is a single user interface for managing power that works on all ACPI computers and simplifies the experience for the end user. ACPI provides more detailed knowledge to the operating system about what the system can do and what are the sources of events.
For example, the ACPI computer and operating system can do the following:
During Windows 98 Setup, ACPI is installed only on systems that are listed on the retail compact disc as good ACPI systems. However, if you have had the system BIOS updated to a fully functioning ACPI BIOS, you can have ACPI installed by using the following procedure.
 To install ACPI
Under HKEY_LOCAL_MACHINE\Software\Microsoft\Windows\CurrentVersion\Detect, add a String value called ACPIOption, and set it to 1.
To remove ACPI support, perform steps 1 through 3, but set ACPIOption to 2. The settings for ACPIOption are as follows:
0 (or not present) – Detect only ACPI BIOSs on good list.
1 – Detect any ACPI BIOS.
2 – Do not detect ACPI BIOSs (remove support if installed).
Alternatively, you can enable ACPI support at setup time using the following command line:
setup /p J
In contrast to ACPI, there is the Advanced Power Management (APM) BIOS specification, which is currently in version 1.2. Under APM, the BIOS controls system power management. The BIOS has timers that monitor most interrupts, and I/O port reads and writes. When the timer for a device exceeds some value set in the BIOS setup, the BIOS turns off the device. When the system-wide timer exceeds some value set in the BIOS, the BIOS sends a message to Windows 98 to put the computer to sleep. Windows 98 then prepares to suspend the computer and tells the BIOS to do so.
The APM BIOS is also responsible for monitoring the battery status and requesting a suspend if the battery is getting low.
However, the following limitations exist with APM.
Different user interfaces.
Each BIOS has its own user interface and its own power management behavior. This means every computer operates differently—users have to be retrained on each computer.
Reasons for suspend are not known.
Because of the architecture of the APM BIOS interface, the APM BIOS cannot inform Windows 98 that the request is due to the user pushing a sleep button, the BIOS assuming the system is idle, or the battery running out of power. So Windows 98 must always honor this suspend request and attempt to put the computer to sleep—even if the computer is not idle. It is recommended that users turn off all their BIOS timeout settings.
Devices might be turned off at inappropriate times.
By monitoring I/O ports and interrupts, the BIOS is essentially trying to second-guess what the user and the applications are doing. Although this often works, there are many scenarios in which the BIOS can guess incorrectly. For example, the BIOS turns off or slows down a computer in use (such as a screen saver turning on in the middle of a presentation), or the BIOS does not turn off a truly idle computer.
No system capabilities information on APM 1.0 or 1.1 BIOS.
With these older versions of the APM BIOS specification, the only way to determine if the computer-supported standby was for the operating system is to try putting it in standby. Not only did some BIOSs not implement standby, but they crashed when the operating system called the BIOS. APM 1.2 provides a way to determine if standby is supported, and the operating system uses standby only if the computer supports it.
The BIOS detects activity only on devices residing on the motherboard. The BIOS cannot detect devices, such as add-in cards, USB devices, and IEEE 1394 devices. As a result, the BIOS might think that the system is not in use even if one or more of these off-motherboard devices is in use.
For more information about how your computer’s BIOS supports ACPI and APM, see the MSInfo utility that ships with Windows 98.
In addition to providing a common set of I/O services and device drivers for Windows 98 and future versions of Windows NT, WDM includes support of OnNow power management.
WDM drivers can implement power policy and control. Device Driver Interfaces (DDIs) are defined to synchronize power-state changes with other power management activities in the system, and to detect idle devices. I/O request packets (IRPs) set the power state, enable wakeup, and query power status. Power policy decisions generally result in the kernel sending an IRP to a specific system component (often the policy owner itself) to affect a particular power management control.
For more information about WDM, see "Understanding WDM," earlier in this chapter.
Windows 98 allows you to monitor OnNow features and set power management options called Power Schemes using the Power Management icon in Control Panel.
OnNow includes the following features for Power Management:
The ability to start using the system in just a few seconds by using Standby instead of Off. While on standby, your monitor and hard disks turn off, and your computer uses less power. When you want to use the computer again, it comes out of standby quickly. Standby is particularly useful for conserving battery power in portable computers. ACPI machines have a power/sleep feature that you can access from the front of the computer or from the operating system.
The ability for the system to put itself in standby automatically when not in use.
The ability for the system to automatically wake to handle events, such as running backups, downloading e-mail, and defragmenting your hard disk. This is done through the Task Scheduler. For more information, see Chapter 23, "System and Remote Administration Tools."
A simplified, single-user interface for power management.
This includes a new battery meter, low battery alarms, power control panel, Hibernate, and Standby on the shutdown menu.
Enhanced application messaging to allow applications to adjust their behavior appropriately for changes in battery state.
Note
To use Power Management, you must have a computer that is set up by the manufacturer to support these features. For more information, see your computer documentation.
Windows 98 provides power schemes that configure the system to go on standby, and the monitor to shut off after predetermined periods of system inactivity.
The following set of power schemes is built into Windows 98:
Home/Office Desk.
For desktop machines. This scheme is installed with Typical/Compact/Custom Setup options.
Portable/Laptop.
Optimized for portable computers. This scheme includes aggressive settings for running on batteries (the AC settings are the same as desktop), and is installed with Typical/Compact/Custom/Portable Setup options.
Always On.
For use with personal servers. This scheme is similar to Home/Office, but has the standby timer disabled and hard disk timer increased. It is installed when you install a server and is the default for APM desktop computers.
If none of the built-in schemes is appropriate, you can change the properties of a built-in scheme or create an entirely new scheme through the Power Management Properties dialog box.
Note
If you want to set up a power scheme that configures automatically on power-up, you need to write a script within Msbatch.inf. See Appendix D, "Msbatch.inf Parameters for Setup Scripts," and Chapter 2, "Setting Up Windows 98."
Using the Power Management features for the desktop, you can create a power scheme and display the power meter on the taskbar. The power scheme will turn off your monitor after a specified length of time of inactivity. You can choose from three preset Power Management configurations: Home/Office Desk, Portable/Laptop, and Always On.
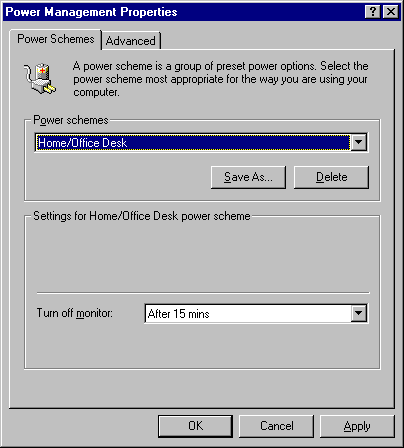
To change the properties of an existing power scheme
To create a new power scheme
The Advanced tab lets you control the System Tray icon. Right-click the taskbar icon to see the status of the power meter, and click the icon to change the power scheme on the fly.
To add the power meter to the system tray
If your computer supports these options, you can use the Advanced tab to make your computer go into Standby or Shutdown mode by pressing the power button or closing the lid.
To use the Power Management power buttons
Some ACPI computers support a feature called Hibernate, which saves everything in your computer memory to your hard disk. You would put your computer into Hibernate when you are away from your computer for an extended time or overnight. When you turn your computer back on, all programs and documents that were open when you turned the computer off are quickly restored to the desktop.
Note
To use Hibernate, you must have a computer that is set up by the manufacturer to support this option. If the Hibernate tab is not displayed in Power Management, your computer does not support this feature.
To use the Hibernate feature
In addition to the tabs provided for the desktop, Power Management for portable computers includes the Alarms and Battery Meter tabs. A major difference between power management for desktop and portable computers is that you can change settings based on battery use for a portable computer.
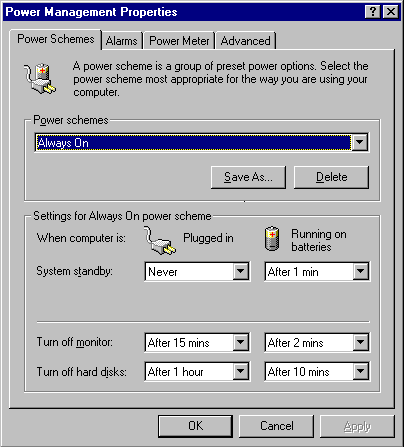
System Standby can reduce the power consumption of your computer. Depending on whether your computer is plugged in or running on batteries, you can choose a different length of time for the computer to go into standby. The time specifies the length of time that your computer is inactive before it going into standby mode.
You can change the properties of an existing power scheme or create a new power scheme using Power Schemes. Select a power scheme that works best with the way you use your computer. You can choose from three preset Power Management configurations: Home/Office Desk, Portable/Laptop, and Always On. You can also set suspend time for Energy Start–compliant monitors and the IDE hard drive spin down time.
To change the properties of an existing power scheme
To create a new power scheme
To change the elapsed time before your hard disk automatically turns off
To change the elapsed time before your monitor automatically turns off
The Alarms tab lets you set a low battery alarm and a critical battery alarm. You can set the type of notification — an audible alarm or a displayed message — when your battery drops to the levels you specify. You can also specify whether the computer goes on standby or shuts down when the alarm sounds or a message is displayed.
Note
The critical batter alarm level must be less than the low battery alarm.
To set the battery alarms
The Power Meter tab shows the current source of power and displays the percentage of power level remaining for all the batteries in your computer.
To check the power level of the batteries
You can display the power meter icon on the taskbar using the Advanced tab. Right-click the power meter icon on the taskbar to get the status and other details of each battery, and click the icon to change Power Schemes on-the-fly.
To show the battery meter on the system taskbar
You can choose to be prompted for a password when the computer goes out of standby using the Advanced tab.
To be prompted for a password when the computer goes out of standby
If your computer supports these options, you can use the Advanced tab to make your computer go into Standby or Shutdown mode by pressing the power button or closing the lid.
To use the Power Management power buttons
Some ACPI computers support a feature called Hibernate, which saves everything in your computer memory to your hard disk. You would put your computer into Hibernate when you are away from your computer for an extended time or overnight. When you turn your computer back on, all programs and documents that were open when you turned the computer off are quickly restored to the desktop.
Note
To use Hibernate, you must have a computer that is set up by the manufacturer to support this option. If the Hibernate tab is not displayed in Power Management, your computer does not support this feature.
To use the Hibernate feature
– Or –
Click When I close the lid of my computer, and then click Hibernate.