Compaq Computer Corporation
Phoenix Technologies Ltd.
Intel Corporation
October 6, 1994
(Editor's note: Text that was changed or added in the original Plug and Play BIOS Specification is indicated by italics. Text that was deleted in the original Plug and Play BIOS Specification is indicated by a line through the text.)
This specification has been made available to the public. You are hereby granted the right to use, implement, reproduce, and distribute this specification with the foregoing rights at no charge. This specification is, and shall remain, the property of Compaq Computer Corporation ("Compaq") Phoenix Technologies LTD ("Phoenix") and Intel corporation ("Intel").
NEITHER COMPAQ, PHOENIX NOR INTEL MAKE ANY REPRESENTATION OR WARRANTY REGARDING THIS SPECIFICATION OR ANY PRODUCT OR ITEM DEVELOPED BASED ON THIS SPECIFICATION. USE OF THIS SPECIFICATION FOR ANY PURPOSE IS AT THE RISK OF THE PERSON OR ENTITY USING IT. COMPAQ, PHOENIX AND INTEL DISCLAIM ALL EXPRESS AND IMPLIED WARRANTIES, INCLUDING BUT NOT LIMITED TO THE IMPLIED WARRANTIES OF MERCHANTABILITY, FITNESS FOR A PARTICULAR PURPOSE AND FREEDOM FROM INFRINGEMENT. WITHOUT LIMITING THE GENERALITY OF THE FOREGOING, NEITHER COMPAQ, PHOENIX NOR INTEL MAKE ANY WARRANTY OF ANY KIND THAT ANY ITEM DEVELOPED BASED ON THIS SPECIFICATION, OR ANY PORTION OF IT, WILL NOT INFRINGE ANY COPYRIGHT, PATENT, TRADE SECRET OR OTHER INTELLECTUAL PROPERTY RIGHT OF ANY PERSON OR ENTITY IN ANY COUNTRY.
This paper is intended to clarify certain technical points of interest and implementation philosophies. Functional changes have been avoided so that backwards compatibility does not become an issue at this time.
Complete sections of the Plug and Play BIOS Specification 1.0A were copied and modified in this paper. These sections can be considered to be replacement sections. It was intended that this paper would provide the engineer with replacement pages but the word processor of choice does not provide consistent pagination for all available printers.
The following section numbers refer to actual sections in the Plug and Play BIOS Specification 1.0A. Revision marks along the margins indicate modified text. Underlined text (with revision marks on the side) indicate text additions and strikethrough text indicates text that has been deleted.
One of the new features of the Plug and Play BIOS architecture is the enhancements to the ISA Option ROM architecture. This new interface will help couple the system BIOS closely with the Plug and Play option ROM to assist the system BIOS in completing the POST configuration process. For details about the Plug and Play option ROM enhancements, refer to the section on the Plug and Play Option ROM. This section describes how the system BIOS will initialize both standard ISA and Plug and Play Option ROMs.
All ISA option ROMs that are not Plug and Play compatible will be initialized by the Plug and Play BIOS POST using the exact procedure used in existing PC compatible systems. This procedure is performed by scanning the C0000h to EFFFFh address space on 2K boundaries searching for a 55AAh header. Once located, the module is checksummed to determine if the structure is valid and, if valid, the option ROM is initialized by making a far call to offset 03h within the segment.
There are two different environments that Plug and Play compliant option ROMs could be installed in. The first is a standard PC compatible system that does not have a Plug and Play compatible system BIOS. The second environment is a system that has a Plug and Play system BIOS. The option ROM can determine which environment it is installed in by examining the register information passed to the option ROM's initialization routine. It is able to perform this check because the Plug and Play BIOS will provide the following information:
Entry: ES:DI Pointer to System BIOS Plug and Play Installation Check Structure (See Section 4.4)
The following registers will only be initialized for Plug and Play ISA devices:
BX Card Select Number for this card, FFFFh if this device is not ISA Plug and Play.
DX Read Data Port address, FFFFh if there are no ISA Plug and Play devices in the system.
For other bus architectures, refer to the appropriate specification. For example, the PCI Local Bus Specification R2.1 published by the PCI SIG specifies AH=Bus number and AL=Device Function number as parameters for Option ROM initialization.
On a system that does not have a Plug and Play compatible system BIOS, ES:DI would not point to a valid Plug and Play Installation Check Structure . Therefore, by validating the contents of the data pointed to in ES:DI, the option ROM can determine whether it is being initialized from a Plug and Play or non-Plug and Play system BIOS. Some Plug and Play system BIOSs do not pass ES:DI as a valid pointer to the Plug and Play Installation Check Structure. In this case, the $PnP option ROM can determine if the BIOS supports the $PnP header structure by following the procedure outlined in Section 4.4. In any case, the OPROM decision to do a legacy initialization, or a Plug and Play initialization, should be made solely on the contents of ES:DI being valid or not. Once the option ROM has determined the environment it is installed in, it can perform the proper steps for initialization.
In the first environment, which is a standard PC compatible system that does not have a Plug and Play compatible system BIOS, the ISA option ROM scan will be performed and the Plug and Play option ROM should initialize exactly as if it was a standard ISA option ROM.
In the second environment, where the system has a Plug and Play system BIOS, the option ROM will recognize the Plug and Play installation check structure and perform the initialization as specified in section 3, which describes the option ROM support. Option ROM initialization routines can not depend on any of the Plug and Play runtime functions to be available until after INT19 has been invoked at the end of the POST process.
2.4 Interrupt 19H Execution
Interrupt 19h, commonly referred to as the system bootstrap loader, is responsible for loading and executing the first sector of the operating system. This bootstrap sequence is the final component of the system BIOS POST before control is passed onto the operating system. In a PC system, the Initial Program Load (IPL) device can easily be any device supported by an option ROM if it intercepts Interrupt 13h and provides these services. However, some option ROMs have gone even further and captured Interrupt 19h to control the bootstrap process.
An Option ROM which takes control of Interrupt 19h presents a major problem to a Plug and Play system BIOS. The system BIOS can no longer control which device will be the Initial Program Load (IPL) device since it no longer controls the bootstrap sequence. Given this dilemma, the system BIOS POST will recapture Interrupt 19h away from an option ROM if the primary Initial Program Load (IPL) device is either a Plug and Play ISA device or a device that is known to the system BIOS (e.g., ATA compatible IDE fixed disk).
One particularly interesting situation occurs when the system BIOS has recaptured Interrupt 19h and then determines that it cannot load the operating system due to invalid media or other problems. In this case, the Plug and Play system BIOS will restore the last captured Interrupt 19h vector and reinitiate the Interrupt 19h boot sequence.
In the current boot model for standard PC compatible systems, once the system BIOS turns control over to the Initial Program Load (IPL) device's boot sector, there is no way for the boot sector to return control to the system BIOS in the event that an OS loader is not present on the disk, or the IPL fails for some other reason. In the Plug and Play Boot model, an attempt is made to correct this.
When $PnP option ROM cards are called through the initialization vector at ROM scan they should not take any vectors or modify system RAM in any way. When the $PnP BIOS selects a device to be the IPL device, the BIOS calls that device through the BOOT_CONNECTION_VECTOR or BOOTSTRAP ENTRY VECTOR. During these calls the device can take appropriate vectors and modify memory. If the device determines that it is incapable of IPL it should restore the resources it modified then return to the $PnP BIOS using INT18 or INT19.
When a legacy card captures INT13 or INT19 the $PnP BIOS should give it boot preference over all of the other $PnP boot devices that are found. It is suggested that the BIOS does not re-capture the INT19 vector. Legacy cards are given priority because the OPROM scan gives them control and it is very difficult to control how these cards affect the system by taking vectors and modifying the BIOS Data Area.
As an alternative, the system BIOS could preserve the interrupt table and stack, plus re-capture INT19 prior to passing control to the IPL device. Critical data could be stored in the POST stack area (3000h-3fffh), the Extended BIOS Data Area or shadow RAM. If the selected IPL device executes INT18 or INT19 to report an error the $PnP BIOS could replace the environment that was saved and go on to the next boot device.
The $PnP option ROM must execute INT18 or INT19 error path in real mode.
If at any time after control has been turned over to the IPL device's boot sector either the boot sector or some other portion of the OS loader determines that the IPL device is incapable of supporting the boot process, control may be returned to the system BIOS (so that the system BIOS can attempt to boot off of a different IPL device) by issuing either an INT 19h or an INT 18h. The BIOS will intercept this INT vector and attempt to continue the bootstrap process.
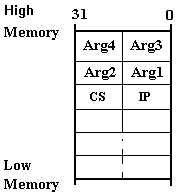
Note This figure was modified to show where the CS register properly resides in the stack frame.
Figure 4.4.1 - 16-bit Stack Frame on 32-bit Stack
Synopsis:
int FAR (*entryPoint)(Function, NumNodes, NodeSize, BiosSelector);
int Function /* PnP BIOS Function 0 */
unsigned char FAR *NumNodes; /* Number of nodes the BIOS will return */
unsigned int FAR *NodeSize; /* Size of the largest device node */
unsigned int BiosSelector; /* PnP BIOS readable/writable selector */
Description:
Required. This function will return the number of nodes that the system BIOS will return information for in NumNodes. These nodes represent only the systemboard devices. In addition to the number of nodes, the system BIOS will return the size, in bytes, of the largest System Device Node in NodeSize. This information can be utilized by the system software to determine the amount of memory required to get all of the System Device Nodes.
After an ISA warm/hot dock, the BIOS should be able to revise the mother board device node list to include any new devices that are discovered in the new docked environment. Conversely, at undock, device nodes that describe non-existent devices should be removed from the list. The Plug and Play operating system will re-enumerate all system devices, including mother board devices, each time it receives the “DOCK_CHANGED” message or “SYSTEM_DEVICE_CHANGED” message. The PnP OS may also re-enumerate each time the system resumes from sleep mode. The node number for each device should remain constant as there is no requirement for node numbers to be sequential. Plug and Play operating systems should be designed to handle devices that appear and disappear on the fly. The device node number sequence is not important, however, the BIOS should never change the node number of any existing device node. For example, an undocked system may report device nodes 0-11. When the system detects the hot-insertion of a modem it then reports device nodes 0-12. Later, when the system docks it can report more devices 0-12 and 20-22. If the modem is extracted the system reports device nodes 0-11 and 20-22.
The Number of Nodes variable was originally implemented as a WORD, then later it was changed to a CHAR. All new BIOSes should be implemented a CHAR according to the specification. All operating systems and utilities should expect a WORD then clear the upper byte because it is indeterminable. This will allow OS and utility vendors to be backwards compatible with earlier versions of plug and play BIOS.
The BiosSelector parameter enables the system BIOS, if necessary, to update system variables that are contained in the system BIOS memory space. If this function is called from protected mode, the caller must create a data segment descriptor using the 16-bit Protected Mode data segment base address specified in the Plug and Play Installation Check data structure, a limit of 64 kilobytes (KB), and the descriptor must be read/write capable. If this function is called from real mode, BiosSelector should be set to the Real Mode 16-bit data segment address as specified in the Plug and Play Installation Check structure. Refer to section 4.4 above for more information on the Plug and Play Installation Check Structure and the elements that make up the structure.
The function is available in real mode and 16-bit protected mode.
Returns:
0 if successful - SUCCESS
!0 if an error (Bit 7 set) or a warning occurred - error code (The function return codes are described in Appendix C)
The FLAGS and registers will be preserved, except for AX which contains the return code.
Example:
The following example illustrates how the 'C' style call interface could be made from an assembly language module:
      .
      .
      .
   push   Bios Selector
   push   segment/selector of NodeSize      ; pointer to NodeSize
   push   offset of NodeSize
   push   segment/selector of NumNodes      ; pointer to NumNodes
   push   offset of NumNodes
   push   GET_NUM_NODES         ; Function 0
   call   FAR PTR entryPoint
   add   sp,12               ; Clean up stack
   cmp   ax,SUCCESS            ; Function completed successfully?
   jne   error               ; No-handle error condition
      .
Synopsis:
int FAR (*entryPoint)(Function, Node, devNodeBuffer, Control, BiosSelector);
int Function; /* PnP BIOS Function 2 */
unsigned char Node; /* Node number/handle to set */
struct DEV_NODE FAR *devNodeBuffer; /* Buffer containing device node data */
unsigned int Control; /* Control Flag */
unsigned int BiosSelector; /* PnP BIOS readable/writable selector */
Description:
Required. This function will allow system software to set the system resource configuration for the specified System Device Node. The Node argument will contain the unique node number (handle) for the device that is to be set, and devNodeBuffer contains the pointer to the node data structure that specifies the new resource allocation request. The node data structure must completely describe the resource settings for the device. A node data structure that contains partial settings will result in the improper set up of the device. It cannot be assumed that any previous resource allocations will remain when this call is made. It is important to note that the resource descriptors that define the resource allocation must be specified in the same order as listed in the allocated resource configuration block for the system device node to be set. The allocated resource configuration block should be used as a template for setting the new resources for the device to ensure that the descriptors are specified in the correct format. In fact, the devNodeBuffer can be a copy of the fetched System Device Node with its allocated resource configuration block modified to reflect the desired new device configuration. Therefore, this function must be implemented to extract and use only the relevant new resource configuration information while ignoring all other extraneous node information. This function will not validate the resource settings or the checksum passed by the caller, and may not return an error code.
To disable a device, all resource descriptors in the allocated resource configuration block of the System Device Node must be set to zero. The resource attribute information field and the tag fields are "Don't Care" and may be zeroed. A device with a single configuration option that can be enabled/disabled must include that single configuration option in the possible resource configuration options.
The Control flag provides a mechanism for allowing the system software to indicate whether the systemboard device configuration specified by this call is to take affect immediately or at the next boot. Control is defined as:
Bits 15:2: Reserved (0)
Bit 1: 0=Do not set the device configuration for the next boot.
1=Set the device configuration for the next boot (static configuration).
Bit 0: 0=Do not set the device configuration dynamically.
1=Set the device configuration right now (dynamic configuration).
If Control flag is 0, neither bit 0 nor bit 1 is set and this function should return BAD_PARAMETER. If both bits are set, then the system BIOS will attempt to set the configuration of the device right now (dynamic configuration), as well as set the device configuration for the next boot (static configuration). When both bits are set, it is possible that the NOT_SET_STATICALLY warning could be generated. This indicates that the device was configured dynamically, but could not be configured statically (See Appendix C, Error Codes).
The BiosSelector parameter enables the system BIOS, if necessary, to update system variables that are contained in the system BIOS memory space. If this function is called from protected mode the caller must create a data segment descriptor using the 16-bit Protected Mode data segment base address specified in the Plug and Play Installation Check data structure, a limit of 64k, and the descriptor must be read/write capable. If this function is called from real mode, BiosSelector should be set to the Real Mode 16-bit data segment address as specified in the Plug and Play Installation Check structure. Refer to section 4.4 above for more information on the Plug and Play Installation Check Structure and the elements that make up the structure.
The function is available in real mode and 16-bit protected mode.
Returns:
0 if successful - SUCCESS
!0 if an error (Bit 7 set) or a warning occurred - error code (The function return codes are described in Appendix C)
The FLAGS and registers will be preserved, except for AX which contains the return code.
Example:
The following example illustrates how the 'C' style call interface could be made from an assembly language module:
      .
      .
      .
   push   Bios Selector
   push   Control               ; Control flag
   push   segment/selector of devNodeBuffer      ; pointer to devNodeBuffer
   push   offset of devNodeBuffer
   push   Node               ; node number - only low 8-bits used
   push   SET_DEVICE_NODE         ; Function 2
   call   FAR PTR entryPoint
   add   sp,12               ; Clean up stack
   cmp   ax,SUCCESS            ; Function completed successfully?
   jne   error               ; No-handle error condition
      .
      .
.Synopsis:
int FAR (*entryPoint)(Function, ESCDBuffer, ESCDSelector, BiosSelector)
int Function; /* PnP BIOS Function 042h */
char FAR *ESCDBuffer; /* Addr of caller's buffer for storing ESCD */
unsigned int ESCDSelector; /* ESCD readable/writable selector */
unsigned int BiosSelector; /* PnP BIOS readable/writable selector */
Description:
Optional. This function is used to read the ESCD data from nonvolatile storage on the system into the buffer specified by ESCDBuffer. The entire ESCD will be placed into the buffer. It is the responsibility of the caller to ensure that the buffer is large enough to store the entire ESCD. The caller should use the output from Function 41 (the ESCDSize field) when calculating the size of the ESCDBuffer. The system BIOS will return the entire ESCD, including information about system board devices. The system board device configuration information will be contained in the slot 0 portion of the ESCD. The caller can determine the size of the data in the ESCD from the ESCD Configuration Header Structure. In protected mode, the ESCDSelector has base = NVStorageBase and limit of at least NVStorageSize. In real mode, the ESCDSelector is a segment that points to NVStorageBase.
Refer to the ESCD Specification for a complete description of the interfaces to support the ESCD as well as the format of the ESCD.
Implementation Note: Functions Get/Set Statically Allocated Resource Information, and Read/Write Extended System Configuration Data are not required to be implemented on EISA systems. These four plug and play BIOS functions mentioned above may be implemented so that operating systems and utilities can use a single, consistent interface. At a minimum, a plug and play EISA system is required to support the standard plug and play BIOS functions and include access to NVS through the EISA specific INT15 mechanism.
The following table represents the return codes for the BIOS functions.
Bit 7 set indicates an error has occurred.
Additionally, when a PnP BIOS supports the Extended Configuration Services ESCD access Functions 41, 42 and 43, it may return one of the values that are defined in the ESCD Specification, Appendix D. In this case the returned error values are in the 05xH range.
Note that some of the Plug and Play BIOS error codes may conflict with ESCD error codes as defined in the current ESCD specification. Error codes must be qualified using the context of the call.
Success Codes 00h:
| Return Code | Value | Description |
| SUCCESS | 00h | Function completed successfully |
Warning Codes 01h through 7Fh:
| Return Code | Value | Description |
| Reserved | 01h | |
| NOT_SET_STATICALLY | 7Fh | Warning that indicates a device could not be configured statically, but was successfully configured dynamically. This return code is used only when function 02h is requested to set a device both statically and dynamically. |
Error Codes 81h through FFh:
| Return Code | Value | Description |
| UNKNOWN_FUNCTION | 81h | Unknown, or invalid, function number passed |
| FUNCTION_NOT_SUPPORTED | 82h | The function is not supported on this system. |
| INVALID_HANDLE | 83h | Device node number/handle passed is invalid or out of range. |
| BAD_PARAMETER | 84h | Function detected invalid resource descriptors or resource descriptors were specified out of order. |
| SET_FAILED | 85h | Set Device Node function failed. |
| EVENTS_NOT_PENDING | 86h | There are no events pending. |
| SYSTEM_NOT_DOCKED | 87h | The system is currently not docked. |
| NO_ISA_PNP_CARDS | 88h | Indicates that no ISA Plug and Play cards are installed in the system. |
| UNABLE_TO_DETERMINE_DOCK_ CAPABILITIES | 89h | Indicates that the system was not able to determine the capabilities of the docking station. |
| CONFIG_CHANGE_FAILED_NO_ BATTERY | 8Ah | The system failed the undocking sequence because it detected that the system unit did not have a battery. |
| CONFIG_CHANGE_FAILED_ RESOURCE_CONFLICT | 8Bh | The system failed to successfully dock because it detected a resource conflict with one of the primary boot devices; such as Input, Output, or the IPL device. |
| BUFFER_TOO_SMALL | 8Ch | The memory buffer passed in by the caller was not large enough to hold the data to be returned by the system BIOS. |
| USE_ESCD_SUPPORT | 8Dh | This return code is used by functions 09h and 0Ah to instruct the caller that reporting resources explicitly assigned to devices in the system to the system BIOS must be handled through the interfaces defined by the ESCD Specification. |
| MESSAGE_NOT_SUPPORTED | 8Eh | This return code indicates the message passed to the system BIOS through function 04h, Send Message, is not supported on the system. |
| HARDWARE_ERROR | 8Fh | This return code indicates that the system BIOS detected a hardware failure. |
- End of Clarification Paper -