![]()
Welcome to the InetMonitor Operations Guide. You can use InetMonitor for capacity planning, monitoring your site, and to simulate load on your site. InetMonitor can be used to track hardware resource utilization, provide workload profiles by average user or service, make configuration recommendations, and help in capacity planning. InetMonitor can also be used to simulate thousands of Internet users. InetMonitor supports most Internet protocols and authentication methods.
With the introduction of InetMonitor, optimizing hardware configuration, monitoring your services, and simulating Internet or intranet users has become less complicated. Whether you have one server or a bank of servers, InetMonitor will help you make decisions about capacity requirements and configuration optimization.
This Operations Guide assists Web administrators and capacity planners in installing and operating InetMonitor.
This guide is written for a wide audience, from individuals running one Internet service to systems managers in charge of data center operations running many Internet services on multiple servers. It is assumed that you are familiar with Microsoft® Windows NT® version 4.0 and have an in-depth knowledge of the services being used and of Internet protocols.
The following topics are covered:
Following are the minimum requirements for each server running InetMonitor:
Following are the minimum requirements for each server being monitored:
Following are the minimum requirements for each client running simulations:
The connectivity hardware and software should meet the following requirements:
This section applies only to those who are familiar with InetLoad version 2.0 or 2.5. InetLoad has been incorporated into InetMonitor as the live simulation piece for capacity planning.
A number of enhancements, as well as new features, have been included for the simulator in this version of InetMonitor. This section will give you a quick overview of the additional functionality included in this version. Complete details of new features are included in the rest of the documentation.
The simulator has been enhanced to support new protocols, new versions of existing protocols and has enhancements to the scripting language. In addition, the InetMonitor scripting commands have been standardized across all supported protocols. Following is a list of enhancements.
IMAP4 has been added to the existing suite of protocols now supported by InetMonitor.
Support for HTTP 1.1 has been added to InetMonitor.
Support for Lightweight Directory Access Protocol (LDAP) version 3 has been added to InetMonitor. The most commonly-used LDAP commands have been included in this version of InetMonitor.
For information about the added LDAP commands, see Appendix B.
Following is a brief description of what has been added or standardized across all the protocols.
| Macro name | Description |
| RANDLIST(filename) | Randomly choose an entry from the file specified by filename. |
| SEQULIST(filename) | Sequentially choose an entry from the file specified by filename. |
| SEQUNUMBER(x, y, ID) | Sequentially choose a number between x and y. ID allows for multiple sequnumber commands in the script, and tells InetMonitor which sequence to choose from for the next sequential number. |
| SAMERANDLIST | Does not take any arguments. It tells InetMonitor to use the same value generated by a previous RANDLIST macro. This is done on a per-command basis. Hence use of the SAMERANDLIST macro is valid only when it is preceded by a RANDLIST macro on the same command. |
| SAMESEQULIST | Similar to SAMERANDLIST, but applicable to the SEQULIST macro. |
| SAMERANDNUMBER | Similar to SAMERANDLIST, but applicable to the RANDNUMBER macro. |
| SAMESEQUNUMBER | Similar to SAMERANDLIST, but applicable to the SEQUNUMBER macro. |
| SAMERANDALPHA | Similar to SAMERANDLIST, but applicable to the RANDALPHA macro. |
| SAMERANDNUMERIC | Similar to SAMERANDLIST, but applicable to the RANDNUMERIC macro. |
All these macros can be embedded anywhere on the command line and case is irrelevant.
| Command name | Description |
| %XX | Number that instructs InetMonitor what percent of the time a command should be executed. |
| SKIP # | Instructs InetMonitor to skip the next number (#) of commands. Used in conjunction with %XX, the skip command can be effective in either running a set of commands or not running any commands in a given set. |
| LOOP # OR RANDNUMBER(x, y) | LOOP command indicates the start of a loop. The number sign (#) represents the number of times the loop should execute. The number sign (#) can also be replaced by the randnumber macro to generate a random number between x and y. |
| ENDLOOP | ENDLOOP command indicates the end of the loop. |
| STARTTIMER - ENDTIMER | Set of commands that allow you to measure latency between a collection of commands. You can specify start timer at any point in the script, followed by an end timer. In the log you will get the time interval between the two commands. |
| Exit | Causes the client to exit the script and stop. |
For consistency, the following commands have been removed from the HTTP protocol:
Cookie support has been expanded to include the following six types:
Secure Sockets Layer (SSL) security has been added to the LDAP protocol.
Automatic Cookie and HTML Forms Authentication have been added for Membership Directory security.
Please refer to specific Internet Request For Comments (RFC) papers on the various protocols supported by InetMonitor. RFC papers about the protocols can be found at http://www.cis.ohio-state.edu/hypertext/information/rfc.html.
The following text formats are used throughout this document.
| Convention | Meaning |
| Bold | Indicates the actual commands, words, or characters that you select in a dialog box or at the command prompt. |
| Italic | Indicates a placeholder for information or parameters that you must provide. For example, if the procedure asks you to type filename, you must type the actual name of a file. Italic is also used to present a new term or concept. |
Monospace |
Represents examples of screen text or entries that you might type at the command line or in initialization files. |
This chapter provides a brief introduction to InetMonitor. It explains the need for InetMonitor and its uses. By reading this overview, you can gain a sense of how you can use InetMonitor.
Many Internet service providers (ISPs) and Information Services (IS) departments are now deploying various Internet services to meet customers' demands. The ISPs and IS departments currently face the following major issues when operating an intranet or internet site:
The lack of protocol support and customization makes it difficult to profile a site supporting multiple Internet protocols and users that do not represent the profile of the tool. Most tools are designed for the expert capacity and performance planner. These tools generally use a command-line interface and are difficult to use.
In summary, existing tools are limited in usefulness and scope. Some tools can address a couple of these areas, but cannot recommend courses of action. These tools generally monitor raw hardware utilization. This is similar to what Performance Monitor (PerfMon) provides, that is, a set of counters that show the utilization of a specific resource. In many cases, this type of monitoring does not help in figuring out where the problem is and what needs to be done to fix the problem.
Very few tools make it possible to simulate real users. Using InetMonitor, you can simulate users for many standard Internet protocols. These simulations can help you determine whether your configuration can handle the load that will be generated by your users.
InetMonitor has been designed to address these issues in a concise and integrated manner. InetMonitor consists of two major components, Monitor and Simulator, which together provide you with a technically-advanced capacity planning tool for Internet-based services.
The Monitor component of InetMonitor addresses the following business needs:
The Simulator component of InetMonitor provides the load generation engine in InetMonitor. The Simulator was previously released as InetLoad. The Simulator addresses the following business need:
InetMonitor runs on Microsoft® Windows NT® version 4.0 and Service Pack 3 (SP3). Microsoft® Internet Information Server (IIS) is not required, but if you want to use IIS, you must install version 4.0. InetMonitor is designed to address multiple Internet protocols, varying user profiles, and an easy-to-use interface. InetMonitor supports multiple authentication schemes. Because InetMonitor is written to lower-level interfaces, it has high-performance characteristics. Depending on the protocol and the user profile, the Simulator component of InetMonitor can simulate hundreds to thousands of active clients per computer.
InetMonitor provides features that take monitoring and capacity planning to new heights. Following are some of the highlights of the Monitor component of InetMonitor:
The Monitor component performs the following major functions:
The Simulator component is the load generator for InetMonitor and has the following three basic components:
The Simulator reads commands from a script file as input, and writes detailed logs as output.
The following sample illustrates how InetMonitor can be used to first measure the capacity of a server and then to get a better understanding of the user workload and resource consumption.
INetSrv, an Internet service provider (ISP), is planning to roll out several Microsoft servers. One of the services INetSrv is interested in rolling out is the Membership Directory. INetSrv wants to roll out both static directory and Dynamic Directory services. INetSrv has defined user behavior, or profiles, for each of these services. In addition, INetSrv has determined that the total membership will be around 100,000, with 1 percent of members connected on the average and 2 percent connected during peak. The static directory will mostly be used to look up e-mail addresses. The Dynamic Directory is used for Microsoft® NetMeeting™. The connect time to the static directory is very short for lookups. The connect time to the Dynamic Directory is about 30 minutes.
INetSrv summarizes the workload of a typical user in the following tables.
| Projected workload by average user | |
| Total members | 100,000 |
| 2 percent online during peak | 2,000 |
| At any time only 1 percent of users online perform a static directory lookup | 20 |
| 25 percent of online users use the Dynamic Directory | 500 |
| Static Directory workload | |
| Session duration | 1 second, for each lookup, 2 seconds total |
| Connect and quit | 1 each per session |
| Search | 2 base level searches on the average per lookup |
| Dynamic Directory workload | |
| Session duration | 30 minutes |
| Connect and quit | 1 per session |
| Refresh entry | 1 per session, (timeout period is set to 20 minutes) |
| Search | 15 searches per session |
INetSrv has bought one server on which to deploy the Membership Directory. However, there is concern about whether one server is enough. The president of the company is interested in learning whether one server can meet the peak load or whether the company should deploy two servers.
INetSrv decides to use InetMonitor to simulate both Dynamic and static directory users. The company writes the necessary scripts to depict a typical directory user, then runs InetMonitor to see the effect these users will have on one server. Using one client computer, INetSrv is able to run two instances of InetMonitor, one instance simulating static directory users, and the other instance simulating Dynamic Directory users.
INetSrv starts the simulation using the simulation view, and then switches to the monitoring view to monitor the effect on the server. It is noted that the server is running at less than 50 percent processor utilization and the disk drives are busy only about 25 percent of the time. However, available memory has dropped to less than 10 MB. The company decides that one server is enough for their initial rollout, but they decide to add 32 MB of memory to the server to be safe.
After rollout, INetSrv continues to use InetMonitor to monitor the services and get a better handle on the user behavior. After a week of monitoring, they observe that the user behavior is quite different than predicted.
INetSrv thought the users would not be doing any modifies. However, after reviewing the results, they found out that many users were modifying the entries in the directory. The search rate is higher on the static directory, indicating that the users are actually doing three searches per request instead of two. However, concurrent users of the static directory total less than 20, indicating the requests are being serviced in less than 2 seconds.
After a few weeks and after analyzing the logs, INetSrv discovers that the rate of concurrent users is growing rapidly. Based on the initial user workload, this means the server will run out of capacity in six months instead of a year, as previously predicted. To complicate the matter, the user behavior is different than originally predicted, with more lookups and modifies than expected.
INetSrv decides to run a simulation to see how many more users this server can handle. Equipped with the new user behavior numbers, they generate the appropriate scripts. The first simulation is run with the number of users projected at the end of four months. InetMonitor shows that the server can sustain this load, and does not generate any alerts. Encouraged, INetSrv now runs a test projecting the number of users six months from now. InetMonitor generates many alerts, and all indications are that the server is overloaded.
When the five months’ numbers are used, the server is running at capacity. Some alerts are generated as spikes are experienced. INetSrv now knows that, given the current growth rate and the current user behavior, the one server will be enough for the next five months. However, to be safe, they plan to add a server after four months
This chapter introduces the platform and software architecture of InetMonitor.
This section describes the InetMonitor platform architecture, including the computers, operating systems, and network components.
As mentioned earlier, InetMonitor architecturally consists of two major components: Monitor and Simulator. In the following sections, each of these components is described separately.
InetMonitor runs as an application on a server running Microsoft® Windows NT®. Although multiple instances of InetMonitor can be run on a single computer, it is not recommended that you run more than one instance at a time for monitoring. Running multiple instances for monitoring will slow down all instances. You may run multiple instances for simulations.
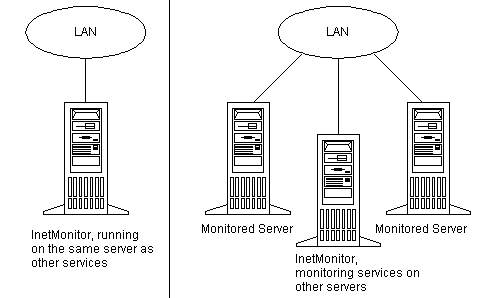
The Monitor component can monitor the server it is running on, or other servers connected by way of a local area network (LAN). Multiple servers can run InetMonitor to monitor groups of servers.
The Simulator component can be run on multiple computers to generate load against one or more servers.
This section describes the platform architecture of the Monitor component of InetMonitor.
The following describes the components of a typical configuration using InetMonitor for monitoring.
| Computer | Location | Description |
| Monitoring Server | Data center | Computer running Windows NT Server version 4.0, Service Pack 3, and InetMonitor version 3.1. Microsoft Internet Information Server (IIS) is not required, but if you want to use IIS, you must install version 4.0. |
| Monitored Server | Data center | Computer running Windows NT Server version 4.0. |
InetMonitor can be set up to monitor the server on which it is installed, or to monitor additional servers connected by way of a LAN. The following illustration shows these two configurations.
This section describes the platform architecture of the Simulator component of InetMonitor.
The following table describes the various components of a typical configuration using InetMonitor for simulation.
| Computer | Location | Description |
| Simulator computer | Data center | Computer running Windows NT Server version 4.0, SP 3, and InetMonitor version 3.1. Microsoft Internet Information Server (IIS) is not required, but if you want to use IIS, you must install version 4.0. |
| Server | Data center | A computer running Windows NT Server version 4.0 and the service against which load is being generated, such as the LDAP Service. |
In most cases, a number of clients running the Simulator will be set up to run against one or more servers. In addition, one computer may be set up to actually monitor the effects of the load on the servers. This computer will run the Monitor from InetMonitor.
This section describes InetMonitor server architecture, including the major components of InetMonitor, their design and interaction. This section also covers product design goals and highlights some of the major building blocks in the product. Again, the information is presented in two sections, first for the Monitor, followed by the Simulator.
From a non-technical perspective, the Monitor can be broken down into three parts: input, process, and output. Input for the Monitor is mainly in the form of Performance Monitor (PerfMon) counters. The process is a set of rules that are applied to the counters. Based on these rules, the Monitor determines whether the server is in a normal state or reaching capacity. If a server is degrading, then an alert is generated. This is the output for Monitor. A number of alerts in a short period of time will generate a recommendation.
The next section discusses the key components of the Monitor’s architecture.
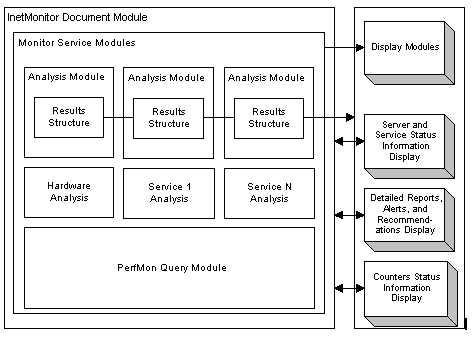
Key components can be grouped into six major categories: hardware analysis, software analysis, PerfMon query module, display module, server module, and document module. The following table describes these components.
| Component | Description |
| Hardware Analysis module | Deals with complexities of hardware. In this module, the rules governing hardware are implemented. This module also contains all the hardware PerfMon counters that need to be gathered for appropriate hardware analysis. |
| Software Analysis module | Services that are correctly instrumented and have rules governing their behavior have a software analysis module in Monitor. The rules calculate server and user workload profiles and detect service level bottlenecks. |
| PerfMon Query module | Queries all the servers being monitored for the appropriate PerfMon counters. It handles all counter manipulations such as adding, deleting, and collecting of PerfMon counters. A data structure keeps all counters added on a per server basis. |
| Display module | Takes care of producing output. It includes graphics and text output to the screen, based on the data passed to it by the document module. It also includes text output in the format of alerts, recommendations, and logs to the disk. |
| Server module | Encompasses the analysis and query modules. It is needed because each server has its own copy of the analysis and query modules. This server module delivers results on a per computer basis to the display module. |
| Document module | Encompasses a group of Server modules. The document module coordinates the data flow between the display module and the server module. |
The various components of Monitor have been designed to run together on a single server and in a seamless fashion. The following diagram illustrates the relationship between each of the major components.
Like the Monitor, the Simulator can be broken down into three parts: input, process, and output. The input to the Simulator comes from two sources. The first is through the dialog boxes on the screen. This information specifies the protocol, the server, the number of users, and so on. The second is the actual script that defines the workload expected by each simulated user. The process consists of reading the script, processing any script-specific commands, sending service level commands to the server, and processing responses. The output is in the form of logs and onscreen statistics.
Major components of the Simulator include: a transport engine, protocol or component DLLs, work queues, and a client engine. The following table discusses the various components of the Simulator.
| Component | Description |
| Client Engine | Engine that performs the send and receive operations on behalf of the clients. |
| Timeout manager | Manager that times out clients and puts them in send state after a time out period is reached. |
| Work Queue | Queue where the work is stored for each client. The work units are send or receive. |
| State information | Area to keep track of the client state. |
| Worker thread pool | Pool of threads used to process sends and receives. |
| Sleep manager | Manager that puts a client to sleep, and wakes up clients after sleep time has expired. |
| API Layer | Abstraction layer that sits on top of the transport layer. |
| Transport Layer | Layer that handles the sends and receives on the net. |
The following diagram shows how the various components of the Simulator interact with each other.
InetMonitor Document Module
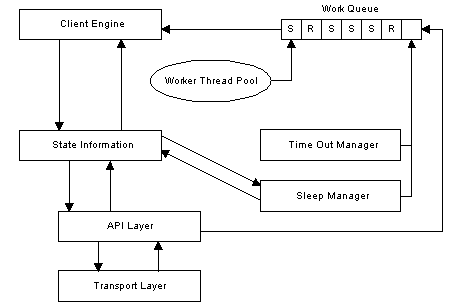
A worker thread chooses up a work item from the work queue (either a send or receive), and the work item is then processed by the client engine. The protocol DLLs that work in conjunction with the client engine format send request and process responses.
The state information component keeps track of the state of the client. The time out manager times out a client after a set amount of time. The sleep manager puts clients to sleep and awakens clients when a sleep expires.
Send and receive commands go through an abstraction API layer before going to or coming from the transport layer.
This chapter walks you through setting up InetMonitor, testing your installation, and setting up simulations.
This section provides procedures for preparing the platform on which InetMonitor will run, as well the platforms that InetMonitor will monitor and the Simulator clients. You must prepare the appropriate platform components before you run Setup to ensure that all components interact correctly. If you plan to do monitoring only, you do not need to prepare the Simulator clients.
As with any product, InetMonitor has its complexities. These complexities can be learned best through experience and by using the product. The following diagram shows an appropriate first platform configuration. The instructions will first walk you through the setup of a single-server configuration, and then, after testing, will explain how to scale up to multiple servers so you can monitor a large data center. A single-server configuration does not support the Simulator component of InetMonitor. Later in this chapter, you will learn about setting up and using the Simulator component of InetMonitor.
To prepare the platform for monitoring, perform the following steps:
This section describes the hardware and software you must install before setting up InetMonitor. The following are platform requirements for the single-server configuration described in the preceding section. This configuration does not support simulation; it only supports monitoring of the local server.
This section lists the hardware and software you will need to install and run InetMonitor on a single server.
Note This is a minimum memory requirement. It is highly recommended that the InetMonitor computer be equipped with enough RAM for optimal performance and for heavy-load situations.
This section describes the procedures necessary for setting up InetMonitor. These procedures include installing Microsoft® Windows NT® Server, calibrating the disk and memory, and then installing InetMonitor.
Each computer running InetMonitor must have Windows NT Server 4.0 installed. Install Windows NT Server, and Service Pack 3 on each computer, as instructed in the Windows NT Server documentation. Internet Information Server (IIS) is not required, but if you want to use IIS, you must install version 4.0.
If you have prepared the platform for InetMonitor as instructed in “Preparing the Platform” earlier in this chapter, you are ready to begin setting up the InetMonitor server.
To set up InetMonitor, you run the InetMonitor Setup program. During the installation process, Setup performs the following actions:
After the setup is complete, you must calibrate the disks you want to monitor.
The disk calibration process performs a large number of non-cached reads and writes to the disk to determine the maximum number of reads and writes the disk can handle. These numbers are later used in calculations to determine whether the disk is reaching capacity. Each separate logical disk needs to be calibrated. So if you have drives C, D, and E on your server, and you want to monitor drives D and E, then you will need to run the calibration process on these drives. Each drive must have 1 GB of free disk space to run the calibration process successfully.
Note Only run the calibration process on the disk that you want to monitor.
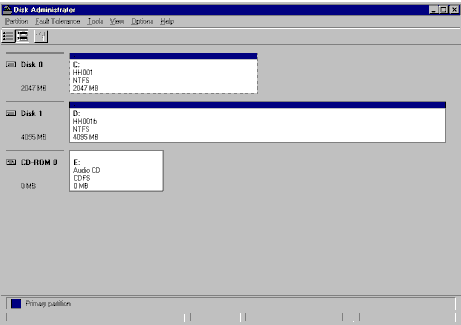
You will see a screen similar to the following one, listing the letters of the disk and their associated internal disk numbers. In the screen below, drive C is disk 0, and drive D is disk 1. Note the disk numbers of the disks you want to monitor and the associated drive letter.
This is the default directory. If you installed InetMonitor in a different directory, type the correct directory name instead of InetMonitor.
If you do not have the disk performance monitoring turned on you will get a warning message.
This is the disk number found in step 1.
If you do not have disk counters turned on, you will receive a warning message informing you that you need to turn them on. Step 2 explains how to turn on disk counters. If you have the disk counters on, disk calibration will start. This process will take some time. When the calibration finishes, the Clean Up box opens.
This section describes procedures for testing InetMonitor. It details the testing scenarios that you should create to be sure that the pre-production configuration works. When you complete this step, you will have resolved setup and configuration problems and InetMonitor will be running.
If you have installed InetMonitor and run the calibration for the disks that you would like to monitor, you are ready to start testing.
Use the following instructions and procedures to test the server.
This will add the server to the Tree view on the left and you will see hardware summary on the top right.
The plus sign will only appear if you have instrumented services that InetMonitor can monitor; otherwise, only hardware can be monitored. For a list of instrumented services, refer to the “Monitoring Menu” and “Monitor Server” sections in Chapter 4, Operating the Monitor Component.
If InetMonitor is working correctly, you will see the name of the server, and the services being monitored under the server name. You will also see a graph of the counters.
There can be several reasons why InetMonitor does not come up correctly.
This section provides procedures for expanding the monitoring function to other servers. You can monitor up to 16 servers with each InetMonitor console.
Before you can add more servers you need to make sure that you have met the following conditions:
If these conditions are met, you can add servers to be monitored.
This will add the server to the Tree view on the left and you will see hardware summary on the top right.
Only instrumented services will appear. For a list of instrumented services, refer to the “Monitoring Menu” and “Monitor Server” sections in Chapter 4, Operating the Monitor Component.
This section provides procedures for setting up and running simulation.
Before you can run a simulation, you need to make sure that you have completed the following tasks:
You test the Simulator by running the Simulator on the client.
The Simulation view will appear in the bottom right-hand side of the InetMonitor screen, with several input boxes
This server must have Windows NT Server 4.0 and Service Pack 3. Internet Information Server (IIS) is not required, but if you want to use IIS, you must install version 4.0.
A number of counters should appear on the bottom half of the screen. The following counters should be increasing: Connections, Page Gets, Sleeps, and Successful Returns. The Error Returns counters should not increase and should stay at zero. If this is not the case, the test did not run successfully.
If the test did not run successfully, make sure you can access the default.htm page on the server, and then try again. If you can access the default.htm page successfully, open the Log folder under the InetMonitor folder. Look at the log generated by InetMonitor to determine the cause of the problem.
To add additional clients, install InetMonitor on the clients.
This chapter provides instructions for operating InetMonitor. It first presents the big picture, discussing all the various tasks that InetMonitor can perform. It then discusses monitoring specifics, followed by simulation specifics.
The following diagram shows how InetMonitor can be used to monitor production services, simulate additional users in a production environment, and simulate load against test servers.
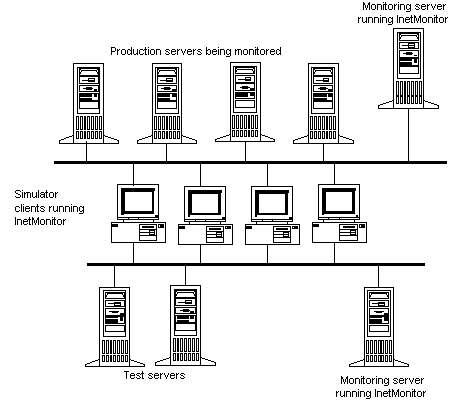
This diagram shows simulation clients, test servers, production servers and monitoring servers all together. It is also possible to set up the components separately. If you do not want to run simulation, then only the monitoring server is needed. You can also choose not to run simulation against production servers and only run simulation against test servers.
The following discussions are based on a sample configuration with production servers, test servers, simulation clients, and monitoring servers. If your configuration differs from this sample configuration, skip any sections that do not apply to your configuration.
This sections discusses what needs to be done for each of the computers in the sample configuration. All computers running InetMonitor need to have Microsoft® Windows NT® Server 4.0 with Service Pack 3. Microsoft® Internet Information Server (IIS) is not required, but if you want to use IIS, you must install version 4.0.
The production servers are Windows NT servers running various services. You will need to calibrate the disks on these servers if you want InetMonitor to monitor the disks and memory. Please follow the instructions in Chapter 3 to calibrate the disks.
Note Only instrumented services can be monitored. For a list of instrumented services, refer to the “Monitoring Menu” and “Add Server” sections in Chapter 4, Operating the Monitor Component.
The test servers are also Windows NT servers running the services for which you want to generate load. If you are planning to monitor the disks on these servers as well as run simulations, you will need to calibrate the disks.
To prepare the servers that you want to test, you must install the appropriate services on the server.
Refer to the server documentation for setting up and configuring the servers that you want to test.
You will need to install InetMonitor on all the simulation clients.
In the sample configuration, two monitoring servers are set up: one monitoring server for the production environment and one for the simulation environment. You need to install InetMonitor on both of these servers.
The Monitor has been designed to monitor your hardware and software and report, by way of alerts and recommendations, any performance and capacity problems. For this release, only some of the rules for some of the services have been implemented. Therefore, the Monitor does require the user to do some analysis. The following sections explain how to operate the Monitor, what the Monitor can provide, and how to use the information to arrive at conclusions.
Before operating the Monitor component, verify that the following conditions have been met:
To monitor your servers you must first add the servers you want to monitor. Once the servers have been added, the services that InetMonitor can monitor will be automatically detected and added under each of the servers. After you have added the servers, you are set for monitoring.
This section lists each menu option in the user interface, and describes what you can do with that menu option.
This is the standard File menu. The File menu includes the following items:
The Monitoring menu includes the following items:
User profiles will be logged once every minute for every service being monitored. Alerts and recommendations will be logged when an alert or a recommendation is generated.
The Simulation menu allows you start and stop your simulations. You must first set up your simulation correctly, choosing the simulation view and filling the required information before you can start a simulation. Refer to the “Operating the Simulator Component” section for more details.
The View menu allows you to toggle between the Monitor and the Simulator view. The Monitor view screen is divided into three sections:
The Summary view also shows if any recommendations or alerts have been recorded. Alerts and recommendations can be viewed in the Details view or in the logs.
The following detail views are available:
By turning on logging you can capture the service and average user workload. You can then use the logs to do trends analysis over long periods of time.
For the Monitor, logging can be turned on by choosing Monitoring from the Main InetMonitor menu and then choosing Log Active. When you activate the logs, you will be asked if you would like to activate counter logging. Generally, you will not want to activate counter logging. Refer to the Log Active menu item for details. The log is comma- delimited with the following format for each type of entry:
This section discusses the details of how to operate the Simulator component of InetMonitor.
The following list summarizes the steps you must take to run a meaningful simulation:
Before you can test certain services, you may have to add user names to a database. For example, to get a mail system up and running, you will need to load the names of the users into the database. Similarly, to use the security system, you need to populate the security database with the names of the users and their access rights. For certain databases, you can use batch utilities, described in Appendix E. You can also load databases by using the new commands provided in release 3.1 of InetMonitor, such as SEQULIST, and SEQUNUMBER. SEQULIST can read sequentially from a file and SEQUNUMBER can generate sequential numbers.
If you choose to use the commands provided in release 3.1 of InetMonitor, you have the option of populating the databases with alphabetic names or digits. Alphabetic name loading is only supported in version 3.1 of InetMonitor. There are advantages and disadvantages to each approach, as described in the following sections.
In order to load a database with alphabetic names, you must generate a file with a list of names. Then you can instruct InetMonitor to read the file sequentially and add the names to the database using the Add command for the protocol you plan to test. For example, when loading a directory, you would use the LDAP Add command to read from a file and add the names. Adding the file that includes the list of names will populate the database.
When you test the search function of the protocol, you will need to issue a search command and give it a name to search. In order to simulate an accurate scenario, you will need to supply a random name for every search you issue. In order to get a random name, you will need to make the entire file of names available to InetMonitor, instruct InetMonitor to randomly choose a name from the file, and then search for that name.
If the file has a million names in it, it will take a long time to load into memory, it will take up a large amount of memory, and it will take a long time to choose a random name from the file. All these operations will slow down the simulations and consume large amounts of resources. Using digits as names can eliminate this problem.
When you use digits instead of alphabetic names, you do not need a file. You can instruct InetMonitor to add digits sequentially to the database as user names. You will still use the Add command for the appropriate protocol to add the digits as names to the database.
When you have populated the database you can instruct InetMonitor to search for a name. Suppose you populated the database with numbers starting at 1 and ending with 1,000,000. In this case, rather than supplying a file of names to choose from, you simply tell InetMonitor to generate a random number between 1 and 1 million. This number is then used as the user name to search for. This avoids loading and storing large files.
It is critical that you accurately define the workload profile of an average user for each of the services that you will be running. The first step in defining the workload profile is to estimate the number of members you expect to support. Then you must figure out what percentage of members is on the system during the peak period. You will also need to determine what percentage of the users on the system are using each of the services. For example, you might have 1,000 users on the system, but only 30 percent, or 300, are using the static directory, with another 20 percent, or 200, using the Dynamic Directory. Once you have determined the number of concurrent users by service, you can start working on the specific workload profiles for each service.
Defining a user workload profile for a specific service means figuring out what the user, or the user’s client software, does. For example, a directory lookup could be initiated by a mail program looking up the mailbox address of a specific user, or it could be a search by a user trying to find the address or an 800 number for a business. These two lookups represent different behaviors. In the first case, the search will usually be for an exact match on a user e-mail name. In the second case, there may be multiple searches with wild cards as the user tries to narrow down a company name and location. Your script must be able to simulate any and all of these user profiles.
Defining a user profile that simulates the type of users that you intend to support is critical. The next section, “Writing InetMonitor Scripts,” provides an example of a script. Appendix A contains sample user profiles that you can use to create your own.
After you have defined a user profile, it is fairly simple to write the script. The following example shows a script written to simulate a mail system doing a directory lookup:
Connect
BINDSIMPLE c=US, cn=someone@Microsoft.com, o=DefaultOrg, ObjectClass=Person;
QUIT
This script is a simple translation of the profile into commands. A complete list of commands and syntax for use in InetMonitor scripts is supplied in Appendix B, InetMonitor Scripting Commands.
There are two results that you must review when you run the simulation: server behavior and response time to the client. For services being monitored by InetMonitor, you can simply use InetMonitor to see how the server is behaving. For services not being monitored by InetMonitor, you will need to monitor critical PerfMon counters to locate any resource bottlenecks. A list of critical PerfMon counters to Monitor appears in Appendix D. On the client side, you review the logs to determine latencies, and any errors that might have happened during the simulation.
InetMonitor can generate very detailed logs. The logs allow you to look at the latency of every command, as well as the entire interaction, from connect to quit. All errors are shown in the log for easy debugging. The first line of response returned by the server is also included in the log. The log format is shown in Appendix C, Simulator Log Format.
This section walks you through the simulation process.
Before you set up a simulation, you must switch to Simulation View. To switch to Simulation View in InetMonitor, on the View menu, click Simulation View. Then, click the protocol you would like to simulate.
Depending on the protocol, you will need to supply the appropriate information to run the specific simulation. The information in the following table must be supplied for all protocols. Specific information for each protocol is listed later in this section.
| Information to Supply | Description |
| Target Server: Port | Specify the name or the IP address of the server against which you are running the simulation. In the case of LDAP and HTTP, you can override the default port that InetMonitor automatically uses by specifying a port number on the server line separated by a semicolon. |
| Number of Users | Specify the number of active users you want to simulate. The limit is 3,000 per InetMonitor session. You can support more than a thousand on one computer by running multiple InetMonitor sessions. However, make sure that the client does not become the bottleneck. In general, you can only support a large number of clients if you are simulating users that sleep between commands. NNTP users demonstrate a good example of this behavior, where a user can take minutes to read an article, equivalent to a sleep in InetMonitor, before downloading the next one. |
| User Start Delay (ms) | Specify the number of milliseconds you want InetMonitor to wait before starting the next user. This is only relevant when starting users and is not a pacing parameter between users that are already running. This parameter is used to prevent a storm of new users at the beginning of a new run. |
| Test Duration (mins) | Specify the length of time in minutes that you want to run the test. An entry of zero (0) represents forever and will run the test until the End Simulation button is clicked. |
| Logging | If you select this box, the client will write a log to the log file. If you do not select this box, the client will not write a log. |
| Worker Threads | Specify the number of threads that will process requests. The limit is 50. In general, you can specify the same number of threads as you do users, for numbers of users that are less than 50. |
| Command Script | Specify the name of the script file that you want to run. |
This section explains the parameters required by each protocol. When you choose the protocol you want to simulate, you will be presented with input fields. The input fields will differ depending on the protocol you choose. Following is an explanation of each of the input fields by protocol.
HTTP Input Fields
| Field | Description |
| Authentication | Specify the authentication method. The authentication methods are available from the drop-down box.
HTML Forms Authentication is specific to Membership Authentication mode. Automatic Cookie Authentication for Membership Authentication mode is done by specifying the Runtime option in the cookies file field. |
| Cookies File | Specify how you want HTTP to handle cookie processing. Six options are available from a drop-down box:
No entry Random (n) File filename FixedFile filename Runtime RuntimeFile filename |
| Client Timeout (s) | Specify in seconds how long a client should wait for an answer from the server before timing out, abandoning the call, and continuing with the next command. |
| HTTP 1.0 or HTTP 1.1 | Specify the version of the HTTP protocol you want to run. |
| Load Images | Selecting this box will instruct InetMonitor to get any images embedded in a page. |
LDAP Input Fields
| Field | Description |
| Authentication | Specify the authentication method. The authentication methods are available in the drop-down box. |
| Max Search Time | Maximum time the LDAP protocol should wait for results. This is different from time out. If the server is returning many results, it will not time out, but may take a long time. You can specify for how long to keep accepting results before abandoning the connection. |
| Client Timeout(s) | Specify in seconds how long a client should wait for an answer from the server before timing out, abandoning the call, and continuing with the next command. |
| Use Client side SSL | You have the option of enabling client side Secure Sockets Layer (SSL) in LDAP. |
After you have entered the appropriate information in the top part of the window and for the specific protocol you plan to run, you can click Run Simulation to start the simulation. As the test runs, the status counters in the lower-right part of the window will show you how the test is doing in terms of errors as well as successful operations. See “Using the Test Status Panel” for a list of some of the counters that will provide you feedback on your simulation in the test status panel.
The simulator provides you with information about the current test and counters for the different protocols. Information about the current test consists of the following fields.
| Field Name | Description |
| Simulation Duration | Field located at the bottom left side of the screen and shows how long the test has been running. |
| Protocol-specific counters | Each protocol maintains a set of counters. The values of these counters typically include totals of connections established, selected commands executed, successful and error returns from the server, and so on. |
This section presents answers to frequently asked questions (FAQs):
Make sure the client is not overloaded. You can do this by running PerfMon on the client and looking at CPU utilization, paging, and available memory. Generally, keep CPU utilization below 90 percent and avoid paging all together. Adding more memory will reduce paging.
You may be overloading the server. Reduce the number of clients and threads you specified in InetMonitor and see whether the error rate drops. Check the InetMonitor log and the server logs.
There are two places where you can find sample files. Specific service sample files for some of the services have been included in Appendix A. You can also find sample files in the Samples directory under the InetMonitor directory or the directory you chose at installation time. You can use these files by opening the tst.inm file located in the samples directory. Before you can run these scripts, you must type your server name in the Target Server input box.
This appendix lists sample profiles for the servers supported by InetMonitor. These profiles were used for one specific test and do not represent a general profile. Your profile will differ from these example profiles.
Most of these samples include a column representing transactions per second. Although this column is not necessary when setting up user profiles or scripts, it does represent a convenient mapping between PerfMon statistics, represented in transactions per second, and user load. For example, PerfMon will report that at 50 percent CPU utilization, the server is performing 42 searches per second. If a typical user performs 0.042 searches per second, then the server can support 1,000 concurrent users doing searches at 50 percent CPU utilization.
| Transaction | Transactions per session | Session duration | Transactions per second |
| Add record | 0.1 | 20 sec | 0.0050 |
| Delete record | 0.03 | 20 sec | 0.0015 |
| Modify record | 0.03 | 20 sec | 0.0015 |
| Search | 0.84 | 20 sec | 0.0420 |
The Membership Directory sample user profile presented here shows that 10 percent of the transactions are adds, 3 percent are deletes, 3 percent are modifies, and 84 percent are searches. Each action requires 20 seconds, and therefore the session duration in the third column is set to 20 seconds for each action.
The last column shows how many of each transaction a user performs per second. This is simply the number of transactions per session divided by session duration.
Using the Percent (%) protocol we can easily simulate a single user doing the operation for a subset of the time. The script ends with a 20,000 millisecond sleep to simulate the average connection time.
CONNECT
BINDSIMPLE dn=cn=administrator,ou=members,o=microsoft;password=pw;

%10 ADD dn=cn=tstSEQUNUMBER(1,1000,xxx),ou=members,o=microsoft;objectClass=member;guid=RANDNUMERIC(32);telephoneNumber=RANDNUMERIC(10);password=pw;

%3 MODIFY billable=RANDALPHA(32): A;dn=cn=tstRANDNUMBER(1,1000), ou=members, o=microsoft;

%3 DELETE cn=tstRANDNUMBER(1,1000),ou=dynamic, o=microsoft;

%84 SEARCH BASE RETURN ALL dn=cn=tstRANDNUMBER(1,1000),ou=members,o=microsoft; filter=(objectclass=*);
SLEEP 20000

QUIT
The Dynamic Directory was formerly known as Internet Locator Service (ILS).
| Profile specifics | |
| Average length of session | 20 minutes |
| Transaction | Transactions per session | Transactions per second |
| User Registration | 1 | 0.00083/sec |
| User Unregistration | 0.395 | 0.00033/sec |
| User Resolve | 20.25 (with 80 percent success and 20 percent failure) | 0.01688/sec |
| User Directory | 2.24 | 0.00187/sec |
| User Refresh | 1.84 | 0.00153/sec |
The first column lists the relevant commands for a typical user. The second column represents the transactions per user per session, and the third column represents the transactions per second.
This profile shows a Dynamic Directory user who logs on for 20 minutes. After 20 minutes, the user disconnects 39.5 percent of the time, resulting in one user registration and one user unregistration in the course of 20 minutes. The user also does a search on other specific users. This profile shows that the user does 20.25 such searches and gets matching results 80 percent of the time. The user also issues 2.24 directory request to see everyone who is currently online.
CONNECT

rem Register the user by adding them to the list
rem
ADD dn=cn=dynuserRANDNUMBER(1,500),ou=dynamic, o=microsoft; objectclass=member\dynamicObject;guid=RANDNUMERIC(32);telephoneNumber=RANDNUMERIC(10);street=RANDALPHA(60);homepage=RANDALPHA(8);userPassword=password;

loop 81
rem resolve
rem
%25 SEARCH BASE RETURN ALL dn=cn=dynuserRANDNUMBER(1,500),ou=Dynamic,o=microsoft;filter=(objectclass=*);
sleep RANDNUMBER(300,1100)

rem directory
rem
%9 SEARCH ONELEVEL RETURN ALL dn=ou=Dynamic,o=microsoft;filter=(cn=*);
sleep (400,1200)


ENDLOOP

rem delete
rem
%39 DELETE cn=dynuserRANDNUMBER(1,500),ou=dynamic,o=microsoft;
QUIT
| Profile specifics | |
| Connection duration | 6 minutes |
| Number of users | 5000 |
| Amount of content | 5000 items |
| Transaction | Transactions per session |
| Gets to each rule page-enabled ASP script | 1.5 |
The first column lists the relevant commands for a typical user. The second column represents the transactions per client per session. The scripts in the following example were generated the Site Server 3.0 Rule Builder tool. This script for InetMonitor is purely an example of what you can do. The script works with a site that is protected with Distributed Password Authentication (DPA). The script starts by logging in to the site with the USER command. Then the script retrieves the three different Web pages a fixed percentage of the time. It sleeps in between GETs for approximately one-half second to one full second. The RPSF1.asp and rl.prf files are code that should be installed on your remote Web server along with Site Server 3.0.
USER tstRANDNUMBER(1,1000) password
%33 GET url:/rpsf1.asp
 SLEEP RANDNUMBER(500,1000)
 %33 GET url:/rpsf2.asp
 SLEEP RANDNUMBER(500,1000)
 %33 GET url:/rpsf3.asp
 SLEEP RANDNUMBER(500,1000)
DISCONNECT
Content script <RPSF1.asp>
<%@ LANGUAGE="VBSCRIPT" %>

<HTML>
<HEAD>
<META NAME="GENERATOR" Content="Microsoft Visual InterDev 1.0">
<META HTTP-EQUIV="Content-Type" content="text/html; charset=iso-8859-1">
<TITLE>Select First</TITLE>
</HEAD>
<BODY>

<!-- Insert HTML here -->
<H2>This page selects the first item in the result set.</H2><br>


<!--METADATA TYPE="DesignerControl" startspan
  <OBJECT ID="FormatRuleset1" WIDTH=487 HEIGHT=241
   CLASSID="CLSID:F78EAED2-F867-11D0-9F89-0000F8040D4E">
    <PARAM NAME="_ExtentX" VALUE="12885">
    <PARAM NAME="_ExtentY" VALUE="6376">
    <PARAM NAME="RecordSetURL" VALUE="http://u2-perf3/U2Performance/r1.prf">
    <PARAM NAME="FormattingText" VALUE="<% = MemRecordSet("Content") %> <br>">
  </OBJECT>
-->
<!-- #INCLUDE FILE="r1.prf" -->
<%
MemRecordSetEmpty = True
If (IsObject(MemRecordSet) = True) Then
   If (MemRecordSet.EOF = False) Then
      MemRecordSetEmpty = False
%>
<% = MemRecordSet("Content") %> <p>
<%
   End If
   MemRecordSet.Close
End If
%>
<!--METADATA TYPE="DesignerControl" endspan-->

</BODY>
</HTML>

RULE <R1.prf>
<%
REM Do not edit this file generated by Membership Rule Editor


REM Query Formatting CR

REM (Membership.QueryFormatting 0 0 0 "u2perf" "sa" "pw" "" "" 1 "" )
REM Rule CR

REM (Membership.RuleSet "" "" "cn=u2perftestodbc" 0 0 "U2-PERF3" (Membership.Priority 1 (Membership.Rule 1 0.000000 "" "rule1" (Membership.AndCond (Membership.StringContainsCond (Membership.UserProp 2 "" "TextTag" )(Membership.String 1 "red" )))(Membership.Action (Membership.ShowContent (Membership.EqualsStringAct (Membership.ContentProp 1 "TextTag" )(Membership.String 1 "red" )))))))
REM Rule VBScript

If VarType(User) <> 9 Then Set User = Server.CreateObject("Membership.UserObjects")

Do
   bstrSSPMQuery = ""
   bstrMemLog = "+"

   fSSPMRunVBScript = FALSE

   If ( 0 <> InStr(1, User.TextTag , "red",1) ) Then
      bstrMemLog = bstrMemLog & "rule1+"
      If Len(bstrSSPMQuery) > 0 Then bstrSSPMQuery = bstrSSPMQuery & " OR "
      bstrSSPMQuery = bstrSSPMQuery & "TextTag LIKE 'red' "
   End If

   If ( (Len(bstrSSPMQuery) > 0) OR (fSSPMRunVBScript = TRUE) )Then
      Exit Do
   End If
Loop While (False)
If (Len(bstrSSPMQuery) > 0) Then
   Set MemRecordSet = Server.CreateObject("ADODB.Recordset")
   bstrSSPMQuery = "Select * from perftable Where (" & bstrSSPMQuery & ")"

   MemRecordSet.Open bstrSSPMQuery, "DSN=u2perf;UID=sa;PWD=pw",1,1.1
End If

Function MemMultValCont(obj,value)
   MemMultValCont = FALSE
   if IsArray(obj) Then
      For SSPMi = LBound(obj) To UBound(obj)
      If obj(SSPMi) = value Then
         MemMultValCont = TRUE
         Exit For
      End If
      Next
   else
      If obj = value Then
         MemMultValCont = TRUE
      End If
   End If
End Function
bstrMemLog = Left(bstrMemLog,Len(bstrMemLog)-1)
bstrMemDSN = "u2perf"
%>
| Profile specifics | |
| Session duration | 15 minutes |
| Transaction | Transactions per session |
| Add item to basket | 2.0 |
| Browse product | 6.0 |
| Check out of store | 1.5 |
| Lookup shopper | 1.0 |
| Main directory listing of departments | 3.0 |
| Remove item from shopping basket | 1.0 |
| Search for item in store | 2.0 |
The first column lists the relevant commands for a typical user (also referred to as a shopper). The second column represents the transactions per client per session.
Commerce Server scripting can be fairly complex. Commerce stores can have a variety of different types of transactions. The shopper may be new to the store or may be a returning customer. Once in the store, the shopper may get a complete directory listing of all departments in the store, or possibly a complete product listing. The shopper can then browse departments (and sub-departments if available) and individual products in the department. If the shopper likes a product he or she may choose to add the product to the shopping basket. He or she may also choose (at a later time) to remove any or all product items previously added to the basket.
The shopper may also be able to do product searches. Using a key word, the shopper can get a list of all products that match the qualifications of the search. Ultimately, the shopper will either check out of the store and purchase products in the shopping basket or skip checkout completely.
InetMonitor has many features to accommodate the various scenarios required to simulate a Commerce Server user. The following script shows a new user walking into a store, then browsing, and then searching for products. The user then adds an item to the basket, removes it, adds another item, and then checks out of the store. An explanation of the script commands follows the script.
REM +++ Shopper Lookup +++
 POST url:/vc/xt_shopper_lookup.asp?PROPERTIES:shopper_email=jsmith&
    shopper_password=pass
 SLEEP RANDNUMBER(30000,90000)

REM +++ Go to Main Directory Area +++
LOOP 3
 GET url:/vc/main.asp
 SLEEP RANDNUMBER(30000,90000)
ENDLOOP

REM +++ Browse Product +++
LOOP RANDNUMBER(3,9)
  GET RANDLIST(vc_product.txt)
  SLEEP RANDNUMBER(30000,90000)
ENDLOOP

REM +++ Search for Product +++
LOOP RANDLIST(1,3)
 POST url:/vc/srchresult.asp?PROPERTIES:str=chocolate
 SLEEP RANDNUMBER(30000,90000)
ENDLOOP

REM +++ Add Item to Basket +++
LOOP 2
 POST url:/vc/xt_orderform_additem.asp?PROPERTIES:pfid=1&
    name=Ethiopian+Supremo&quantity=1
 SLEEP RANDNUMBER(10000,50000)
ENDLOOP

REM +++ Remove Item from Basket +++
 GET url:/vc/xt_orderform_delitem.asp
 SLEEP RANDNUMBER(10000,50000)

REM +++ Checkout (Purchase product items) +++
50% SKIP 6
 GET url:/vc/checkout-ship.asp
 SLEEP RANDNUMBER(30000, 90000)

 POST url:/vc/xt_orderform_prepare.asp?PROPERTIES:goto=checkout-pay.asp&use_form=1&

    ship_to_country=USA&ship_to_name=1&ship_to_street=5+5th+St&ship_to_city=Seattle&
    ship_to_state=WA&ship_to_zip=98195&ship_to_phone=2065431000
 SLEEP RANDNUMBER(30000,90000)

 POST url:/vc/xt_orderform_purchase.asp?PROPERTIES:goto=confirmed.asp&error=error.asp&
    bill_to_name=Jane+Smith&bill_to_street=5+5th+St&bill_to_city=Seattle&
    bill_to_state=WA&bill_to_zip=98195&bill_to_country=USA&

    bill_to_phone=2065431000&bill_to_email=jsmith&cc_name=1&cc_type=Visa&
_cc_number=4111111111111111&_cc_expmonth=12&_cc_expyear=1998
SLEEP RANDNUMBER(30000,90000)
POST command indicates that data (e-mail ID and password) entered by the user is posted to the server. SLEEP command directs the script to pause somewhere between 30 and 90 seconds (numbers are in milliseconds).SLEEP commands). GET command directs the server to display directory information in the user’s Web browser.LOOP command simulates a user browsing anywhere between 3 and 9 products in the store. GET RANDLIST command opens a file which contains a list of products found in the store which can be randomly selected to be used in the InetMonitor script.SKIP 6 command directs InetMonitor to skip the next 6 commands 50 percent of the time. In effect, this means that a user will check out of the store half of the time and purchase products half of the time.The InetMonitor script listed above may be broken down in the following way. A returning shopper enters the store and browses the main directory area three times. Then the shopper browses (on average) six different products in the store and searches (on average) for two more. Next, the shopper adds two products to the shopping basket and removes one. And finally, half of the time, the shopper will check out of the store and purchase the products in the shopping basket.
This script is a fairly simple simulation of shopper behavior. It can be refined in a number of ways. For example, it can include all transactions available to shoppers (instead of a partial listing as shown above), creating more variability in SLEEP time, and creating more variability in the number of times each transaction is executed (using LOOP RANDNUMBER and percent SKIP).
| Profile Specifics | |
| Length of session | 5 minutes |
| Transaction | Transactions per session per client | Transactions per second per client |
| Authenticated simple query returning 40 hits | 4 | 0.013 / sec |
| Authenticated complex query returning 10 hits | 1 | 0.003 / sec |
In this example, the Search Server client performs authenticated searches of varying complexity with varying numbers of hits returned. More specifically, over the course of five minutes, the client performs four authenticated simple queries with each query returning up to 40 hits and one authenticated complex query returning up to 10 hits. This equates to 0.013 simple queries per second per client, and 0.003 complex queries per second per client.
The query parameters are captured by the InetMonitor script and the ASP script it calls. In particular, the first transaction listed above is characterized in the following way:
USER login password
GET url:/siteserver/samples/knowledge/search/basic/search.asp?qu=qu1&ct=cat1

SLEEP 100
The ASP script identified above (called search.asp) specifies the search fields, the order in which these fields are searched, and so on, and is included with the Site Server installation. This script is also modified by the addition of logic that limits the number of hits returned to 40 for the first transaction. More precisely, Q.MaxRecords is set to 40.
The InetMonitor client is connected to the Search server under the HTTP 1.1 protocol, and specifies either BASIC or NTLM authentication methods. Of course, the appropriate directory and file permissions within Microsoft® Internet Information Server (IIS) must correspond to the InetMonitor security specification.
This appendix explains all the scripting commands available with InetMonitor. The appendix starts with general commands that are available across all scripts, and then lists the commands specific to each protocol.
The following macros and commands are available for all protocols.
These macros can be embedded anywhere in the commands. InetMonitor, on encountering any of these macros in a command, replaces them with the corresponding string, and then processes the command.
| Macro name | Description |
| RANDALPHA(n) | Generates an alphabetic string of length n. |
| RANDNUMERIC(n) | Generates a numeric string of length n. |
| RANDNUMBER(x, y) | Generates a random number between the limits x and y where x is lower than y. |
| RANDLIST(filename) | Randomly choose an entry from the file specified by filename. |
| SEQULIST(filename) | Sequentially choose an entry from the file specified by filename. |
| SEQUNUMBER(x, y, ID) | Sequentially choose a number between x and y. ID allows for multiple sequnumber commands in the script, and tells InetMonitor which sequence to choose from for the next sequential number. |
| SAMERANDALPHA | This macro does not take any arguments. It tells InetMonitor to use the same value generated by a previous RANDALPHA macro. This is done on a per- command basis. Hence, the use of the SAMERANDALPHA macro is valid only when it is preceded by the use of the RANDALPHA macro in the same command. This macro can occur multiple times on the same command. |
| SAMERANDNUMERIC | Similar to SAMERANDALPHA, but applicable to the RANDNUMERIC macro. |
| SAMERANDNUMBER | Similar to SAMERANDALPHA. |
| SAMERANDLIST | Similar to SAMERANDALPHA. |
| SAMESEQULIST | Similar to SAMERANDALPHA. |
| SAMESEQUNUMBER | Similar to SAMERANDALPHA. |
The case is irrelevant for these three macros.
All protocols support the following commands.
| Command name | Description |
| SLEEP milliseconds | Simulates a client sleep for milliseconds. |
| SLEEP RANDNUMBER(lower,upper) | Generates the sleep time randomly between the limits lower and upper. |
| REM | Any line starting with the REM command is treated as a comment. |
| %XX | XX is a number that instructs InetMonitor what percentage of the time a command should be executed. |
| SKIP # | The skip command instructs InetMonitor to skip the next number (#) of commands. Used in conjunction with %XX, the skip command can be effective in either running a set of commands or not running any commands in a given set. |
| LOOP # OR RANDNUMBER(x, y)
Commands ENDLOOP |
LOOP command indicates the start of a loop. The number sign (#) represents the number of times the loop should execute. The number sign (#) can also be replaced by the randnumber macro to generate a random number between x, and y.
ENDLOOP command indicates the end of the loop. |
| START TIMER
Commands END TIMER |
|
| EXIT |
The following commands are specific to the HTTP protocol in general.
| Command name | Description |
| DISCONNECT | Closes the server connection. Can be used to stop keep-alive behavior. |
| GET url:/address | Specify the URL to Get. |
| GET RANDLIST | SEQULIST (filename) | RANDLIST | SEQULIST indicates that the URL should be randomly chosen from a file of URLs specified by filename. |
| POST url:/address?properties:name=value | Specify the URL to Post. Properties indicates that InetMonitor will send properties to the ASP file. |
| POST RANDLIST | SEQULIST (filename) | RANDLIST | SEQULIST indicates that the URL should be randomly or sequentially chosen from a file of URLs specified by filename. |
| USER (username) (password) | When using authentication, specify the user name, and password. RANDNUMBER, RANDLIST, SEQULIST can be used to generate random numbers or to read from a file. |
The following commands are specific to the LDAP protocol.
| Command name | Description |
| ADD parameter_string | The parameter_string in an ADD command is similar to the one specified in the modify command file, except that no modify operators are specified and a distinguished name has to be specified. The entry is added to the DN specified in the command. This DN should be a subtree in the database. For example,
|
| BINDSIMPLE ANONYMOUS | Anonymous bind. |
| BINDSIMPLE DN=distinguished_name; username=username;password=password;domain=domain; | For SIMPLE binds, only a DN and user name is required. All other binds require DN, user name and password. Domain is optional. |
| COMPARE parameter_string | The parameter_string contains a distinguished name (which is a leaf node) and an attribute/value pair. For example,
|
| CONNECT | Required to establish a connection to the server. Required following any QUIT commands used in the middle of the script. |
| DELETE | DELETE requires binding with a DN. The delete operation is executed on the DN that is used in the BIND. This form of DELETE is the one used for LDAP. |
| DELETE distinguished_name | The delete operation is executed on the DN specified in the command. This is the form of DELETE used in Dynamic Directory (ILS). |
| MODIFY parameter_string | The parameter_string consists of a sequence of modify operations separated by a semicolon. Each modify operation specifies an attr = value pair and a modify operator. The modify operators are A (for ADD), R (for REPLACE), and D (for DELETE). The modify operations are executed on the DN that is used in the BIND. Multiple values for an attribute are separated by a \. If a DN is specified in the MODIFY, it is used. Otherwise, the DN specified in a previous BIND is used. For example,
The following modify adds the values FirstName and OldName to the givenName attributes and replaces the surname attribute with the value LastName. |
| QUIT | Required. Closes the connection and frees memory. |
| (SEARCH|SEARCHPAGED) (BASE | ONELEVEL |SUBTREE) RETURN (ALL | SUBSET) Search String | Retrieves all or a subset of the attributes in the database for each record matching the search criteria. For examples and details, refer to Appendix F. The Search String is a series of attr=value pairs separated by a semicolon. All searches are constructed as AND filters. For example,
|
| (SEARCH|SEARCHPAGED) (BASE | ONELEVEL |SUBTREE) RETURN (ALL | SUBSET) filter | If filters that are more complex than a simple AND filter need to be constructed, the user can specify a special attribute called filter = filter string. When the filter attribute is specified, all other attributes (except the DN) are ignored and the exact filter specified by the user is used to construct the search. Please refer to RFC 1960 for details about how to use filters. You can follow the URL in “Additional Documentation” to locate this RFC. For example,
|
The log files generated by the Simulator component of InetMonitor take the following format: name, header, and then log body.
Log file names are created by concatenating, in the order specified, the following elements:
The above log file would be named InetLoad19970219ATHENA3153610268.log.
The year, month, day, hour, minute, second, and millisecond are determined at the time the log is created by the test framework. The application name, date, and computer name are mainly informational in nature, although the computer name may help distinguish between multiple tests run on different computers at the same time. The time, reported up to the millisecond, will make sure that no two logs generated have the same name.
All logs contain header information consisting of the following:
The main body of the log contains records describing client transactions. Each record is on a separate line. The contents of a record are not standard across the protocols, but usually contain a subset of the following information:
This appendix describes the Microsoft® Windows NT® Performance Monitor (PerfMon) counters that are helpful in monitoring capacity and performance for the services supported by InetMonitor. The appendix is divided into two parts: General PerfMon Counters and Service-Specific Counters. The first section, General PerfMon Counters, describes counters that are common to all services, most of which are hardware-level counters. These counters can be used to determine whether the hardware is reaching capacity. The second section, Service-Specific Counters, describes counters that help relate service-level performance and capacity to hardware counters. These counters can also be used to determine service usage levels, as well as typical user profiles.
For a detailed discussion of system-level counters and the use of PerfMon, refer to the Windows NT documentation.
These counters are a part of Windows NT in general and can be used to monitor any service running under Windows NT. A detailed description of these counters can be found in the Windows NT documentation.
On multiple-disk RAID arrays, when the average disk queue length is never smaller than the number of active disks in the array, the array has reached capacity.
On multiple-disk RAID arrays, this is the only counter that will indicate that throughput is nearing the maximum. At the point at which the Current Disk Queue is never smaller than the number of active disks in the array, the array has reached capacity. This point is normally reached at an average Current Disk Queue (over 100 data points) of between one and two times the number of active disks in the array.
In general, it is best to run the profiler from InetMonitor. This will give you the maximum number of disk reads and writes your disk can perform. Then you can monitor the disk reads and writes and see whether you are reaching capacity on the disk.
Should be less than 70 percent (for each processor). Generally, you want to leave enough capacity to allow for peaks.
Available bytes should be greater than 4 MB. It is best to have enough memory to avoid paging. In high-utilization services, paging can have a spiraling effect. As the system runs out of memory, it pages areas of memory to disk, increasing the overhead on the system. The increased overhead can cause system throughput to go down, which causes work to back up. As this cycle is repeated, the system gets further and further behind on real work.
Adding Cache Bytes and Available Bytes will give the amount of RAM potentially used for NTFS caching.
Should not exceed the maximum recommended for the type of configuration. There are different limits and various rules of thumb for each type of network. For example, a general rule of thumb recommends not running an Ethernet network beyond 30 percent utilization. This means a 10-MB Ethernet network will start having bottlenecks when it reaches throughput of 3 MB/sec. You need to determine the bottleneck point of your network and ensure that percent network utilization does not exceed this limit.
Service-specific counters can be used to determine service usage as well as a typical user profile. These counters can also be used to detect service-level capacity in relation to hardware capacity.
To determine a user profile, you need to capture the commands a typical user would issue during a session. These commands have been exposed as counters. By observing the number of commands issued per second and the number of users currently logged on, you can determine how many commands each user is issuing per second. By looking at all the commands, you can derive how a typical user uses the service.
By taking the total of the commands, you can determine how the service is used during a given period. The counters give a view of the service during a second. However, the per- second view can be averaged over a longer period to get the desired view of the service usage.
To see the capacity from a service perspective, you need to map the service usage with hardware usage. For example, in the mail system, you can choose to view capacity as the number of messages delivered per second. By observing the right counters, you determine that the service is delivering ten messages per second. At the same time, you observe that the CPU utilization is 40 percent, disk utilization is 20 percent, and you have used up 10 percent of memory beyond the base required to run the service and Windows NT. From this observation, you can determine that at twenty messages per second you will be reaching the capacity of your system, and the limiting factor will be CPU utilization.
In most cases, increasing the load linearly will increase resource usage linearly. However, it is best to observe this behavior at various points to ensure that a linear increase in load results in a linear increase in resource utilization.
The following counters are meant to help you determine user profiles and service-level usage, and help you translate hardware capacity to service capacity.
The following counters help in profiling a Content Deployment project for both the sending and receiving servers. They can also help in setting service-level capacity thresholds by mapping them to resource utilization.
This appendix is included to preserve functionality of release 2.0 of InetMonitor. The enhancements to Release 3 have eliminated the need for the utilities required in release 2.0, except for the Creatusr.exe utility.
InetMonitor 2.0 did not support the commands SEQULSIT(FILENAME), and SEQUNUMBER(X, ,Y, ID). Therefore, it was necessary to load the databases using a utility. InetMonitor 2.0 was only designed to work with digits as account names for performance and scalability reasons.
Four utilities are included with InetMonitor 2.0 and higher. These utilities are used to populate databases used by Site Server 3.0 services. These utilities load default values in the databases. In most cases, you will need to update the default values to match your configuration. Following are details for each of the four utilities.
This utility is used to create Windows NT user accounts. The users’ names and passwords are numeric, with the name matching the password. After running this utility, you will need to go into Windows NT User Manager for Domains and select all the users you added. Then you will need to clear the User Must Change Password at Net Logon check box, and select the boxes User Cannot Change Password and Password Never Expires. The format of creatusr.exe is as follows, where from is the starting number and to is the ending number:
Creatusr from to
Example: Creatusr 100 200 will create Windows NT users from 100 to 200 with corresponding passwords. User 100 will have a password of 100.
(SEARCH|SEARCHPAGED) (BASE | ONELEVEL | SUBTREE) RETURN (ALL | SUBSET) (SEARCH STRING | FILTER) DN=Country, O=Organization;
SEARCH. Mandatory to indicate that a search is requested.
SEARCHPAGED. Same syntax as search, but it uses the LDAP 3 paged search functionality. The page size is fixed at 64.
(BASE | ONELEVEL | SUBTREE) You need to specify what level of the tree to search, base, onelevel, or subtree.
RETURN. This is mandatory.
(ALL | SUBSET). Specifying ALL will return all the fields in the record. Specifying SUBSET will return a subset of the fields in the record currently set to the following fields: field1, field2, field3.
(SEARCH STRING | FILTER). You can specify a string to search for, or you can provide a filter. The filter is passed to the LDAP server as is. Therefore, it is critical that the filter follow the exact syntax specified in RFC 1960, included in Appendix F. Errors in filter construction may cause undesirable results.
DN=C=Country, O=Organization. Mandatory and indicates the DN. Replace Country, and organization with the appropriate values.
SEARCH BASE RETURN ALL DN=C=US, O=MICROSOFT;FILTER=(!(CN=SOMEONE));
In this example, a search is performed for common name (CN), where the common name is not equal to SOMEONE. The search is done at the base level of the directory where the distinguished name (DN) is given with country=US and organization=Microsoft.
The phrase RETURN ALL specifies that all of the fields in the matching record should be returned.
The word FILTER indicates that a filter will be used to specify the search criteria. RFC 1960 is a complete description of the filters that are available for the LDAP V3 protocol.
SEARCH SUBTREE RETURN ALL DN=C=US, O=MICROOSFT; SN=SOMEONE;
In this example a search is performed for surname (SN), where the surname equals SOMEONE. The search is done at the sub-tree level of the directory where the distinguished name (DN) is given with country=US and organization=Microsoft.
No FILTER is specified in this search.
MODIFY ATTRIBUTE NAME1 = VALUE1\VALUE2 ….VALUEN: (A | D | R), ATTRIBUTE NAME2 = VALUE1\VALUE2 ….VALUEN: (A | D | R); DN=Distinguished Name;
MODIFY. Mandatory to indicate the operation is a modify.
ATTRIBUTE NAME = VALUE1\VALUE2 ….VALUEN: (A | D | R). The attribute name indicates the attribute you want to modify. Values for the attribute are separated by \, if you want to modify a multivalued attribute. The value list must end in a colon. The colon is followed by the letter A, if you want to add the value to the attribute, D if you want to delete the value, and R if you want to replace the value. Separate multiple attributes to be changed at one time with commas.
DN=Distinguished Name; Replace with a correct distinguished name for the record to be modified.
MODIFY billable=1 A;dn=cn=tstRANDNUMBER(1,100000), ou=members, o=microsoft;
In this example the Member is receiving a new field billable with a value 1. The member is some random user.
ADD DN=Distinguished Name; objectClass=member;GUID=RANDNUMBER(1,100); (ATTRIBUTES=VALUE1\VALUE2…VALUEN);
ADD. Mandatory to identify the operation as an ADD operation.
DN=Distinguished Name; Replace with a correct distinguished name for the record to be modified. For the Dynamic Directory, the ou must equal dynamic.
OBJECTCLASS=member. Mandatory to indicate that the person needs to be added to the static directory. For the Dynamic Directory, the objectclass must equal member\dynamicObject.
(ATTRIBUTES = VALUE1\ VALUE2 …VALUEN). List of attributes that you want to add. At a minimum, this list must contain all of the mandatory fields necessary to successfully add an object to the directory. The GUID attribute is mandatory for Site Server 3.0.
ADD dn=cn=rndRANDNUMBER(1,100000),ou=members,o=microsoft;objectClass=member;guid=RANDNUMERIC(32);telephoneNumber=RANDNUMERIC(10);
In this example, a user is added with a random GUID and telephone number.
Information in this document, including URL and other Internet web site references, is subject to change without notice. The entire risk of the use or the results of the use of this resource kit remains with the user. This resource kit is not supported and is provided as is without warranty of any kind, either express or implied. The example companies, organizations, products, people and events depicted herein are fictitious. No association with any real company, organization, product, person or event is intended or should be inferred. Complying with all applicable copyright laws is the responsibility of the user. Without limiting the rights under copyright, no part of this document may be reproduced, stored in or introduced into a retrieval system, or transmitted in any form or by any means (electronic, mechanical, photocopying, recording, or otherwise), or for any purpose, without the express written permission of Microsoft Corporation.
Microsoft may have patents, patent applications, trademarks, copyrights, or other intellectual property rights covering subject matter in this document. Except as expressly provided in any written license agreement from Microsoft, the furnishing of this document does not give you any license to these patents, trademarks, copyrights, or other intellectual property.
© 1998-2000 Microsoft Corporation. All rights reserved.
Microsoft, MSN, Visual Basic, Windows and Windows NT are either registered trademarks or trademarks of Microsoft Corporation in the U.S.A. and/or other countries/regions.
The names of actual companies and products mentioned herein may be the trademarks of their respective owners.