Using Microsoft Access 97 to Share Static Data on the Web
Mark Gillis
Microsoft Corporation
Applies To: Microsoft® Access 97
Created: April 1997
Revised: August 1999
Summary: This article describes how to use the Publish to the Web Wizard in Microsoft® Access 97 to publish static reports and datasheets to the Web. It also covers how to periodically refresh the data you have published to the Web. (13 printed pages)
Introduction
You've got valuable data stored in Microsoft Access and you've been creating all sorts of useful reports and datasheets (tables, queries, and forms). Meanwhile, your company's intranet is growing by leaps and bounds. Microsoft Access is a great desktop database, and it's fun to surf the World Wide Web. Can't you somehow combine these to create the best of both worlds?
You sure can! Using the Northwind Traders sample database of Microsoft Access, I'll show you how easy it is to publish and update a report or datasheet on the Web. You can even create your own "data warehouse," a collection of reports and datasheets, by using the Publish to the Web Wizard. Once you learn how to do this with the Northwind Traders sample database, you'll be able to do it for any Microsoft Access database.
Why Publish Your Microsoft Access Data to the Web?
Putting your data on the Web has many advantages. Reports and datasheets are much easier and more convenient to find if they're on the Web. You can quickly, even automatically, update the Web site that contains your data. Furthermore, you overcome the traditional problems of printed information: it's cumbersome to manage, time-consuming to locate, bulky to store, and wasteful to use, especially when your users only need to see selected data.
Using Static HTML Format
Hypertext Markup Language (HTML) is a system of marking up, or tagging, a document so that it can be published on the Web. Documents prepared in HTML include reference graphics and formatting tags. You use a Web browser (such as Microsoft Internet Explorer) to view these documents.
With Microsoft Access, you can output two types of HTML files: static or dynamic. In this article, I'll talk about static HTML. The static HTML files you output are a "snapshot" of the data at the time you publish your files. In general, you use static HTML files for reports and datasheets that you update and disseminate as part of your regular business cycles, such as weekly stock-level reminders or monthly sales reports. Microsoft Access creates one Web page for each report page and one Web page for each datasheet that you output. When your data changes, you need to publish your files again, so that your users can view the new data on the Web.
Another article describes how to set up a simple Web application by using dynamic HTML format, which you use when your data changes frequently and your users need to store and retrieve live data using a form.
Saving a Single Report to Static HTML Format with an HTML Template File
The Northwind report called Alphabetical List of Products lists each product, the category it belongs to, the quantity per unit, and the current stock level. This report is a good candidate for a trial run. The HTML pages you output will simulate the report's page orientation, margin settings, and other attributes such as color, font, and alignment. You can output most controls and features of a Microsoft Access report to HTML.
Note If the Northwind sample database is not installed on your computer, search the Microsoft Access Help index for "Setup, adding/removing Microsoft Access components."
- First, set up a working folder called WebReport on your hard disk, to keep all related files together.
- Even before you output your report, you'll want to use a Microsoft Access HTML template file to enhance the appearance of the report and provide navigation hyperlinks to each page of the report. An HTML template file includes standard HTML tags along with special HTML tokens unique to Microsoft Access that indicate where to insert additional information. These tokens are in HTML comment format and contain the string "AccessTemplate" so they won't be confused with standard HTML tags.
Create the following HTML template file, called NWTemplate.html, in your working folder. You can just copy and paste the following information into Notepad.
HTML Template File: NWTemplate.html
<HTML>
<HEAD>
<!—A Microsoft Access HTML token that places the report name in the title bar of the Web browser -->
<TITLE><!--AccessTemplate_Title--></TITLE>
</HEAD>
<!--A standard HTML tag that inserts a background color -->
<BODY BGCOLOR=WHITE>
<!--A standard HTML tag that inserts the Northwind logo at the top of each page of the report -->
<IMG SRC="NWlogo.GIF">
<!—A Microsoft Access HTML token that specifies placement of the report on the Web page -->
<!--AccessTemplate_Body-->
<BR>
<!—Microsoft Access HTML tokens that provide navigation hyperlinks at the bottom of each page of the report -->
<A HREF="<!--AccessTemplate_FirstPage-->">First</A>
<A HREF="<!--AccessTemplate_PreviousPage-->">Previous</A>
<A HREF="<!--AccessTemplate_NextPage-->">Next</A>
<A HREF="<!--AccessTemplate_LastPage-->">Last</A>
</BODY>
</HTML
For additional examples of HTML template files, look in the C:\Program Files\Microsoft Office\Templates\Access folder for files with the .htm extension.
- Copy the Northwind logo graphic file, Nwlogo.gif (located by default in C:\Program Files\Microsoft Office\Office\Samples), to your working folder. This file needs to be in the working folder so that Microsoft Access can locate it during the output process.
- Open the Northwind sample database, Northwind.mdb (located by default in C:\Program Files\Microsoft Office\Office\Samples). In the Database window, on the Reports tab, click Alphabetical List of Products, and then on the File menu, click Save As/Export. (Don't click Save As HTML—'ll talk about that command later on.) In the Save As dialog box, click To An External File Or Database, and then click OK.
- In the Save Report reportname In dialog box: in the Save In box, locate the WebReport folder; in the Save As Type box, click HTML Documents (*.html;*.htm); select the Autostart check box; and then click Export.
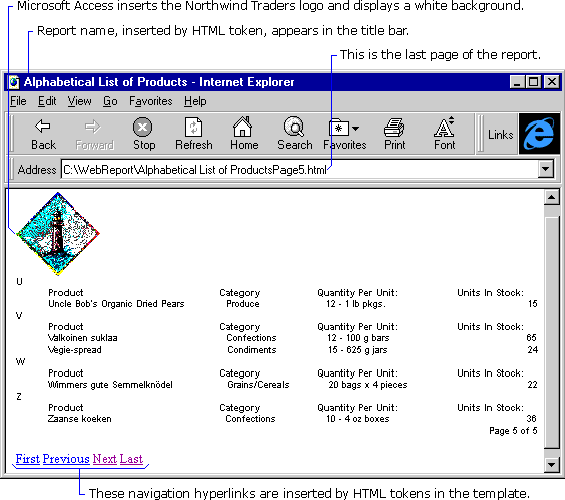
- In the HTML Output Options dialog box, click Browse, or type the name of the HTML template file created in step 2 (NWTemplate.html), and then click OK. Microsoft Access replaces the special HTML tokens and merges the HTML template file with the HTML output files.
- Because you selected the Autostart check box in the Save As dialog box, Microsoft Access displays your output in your default Web browser, such as Microsoft Internet Explorer.

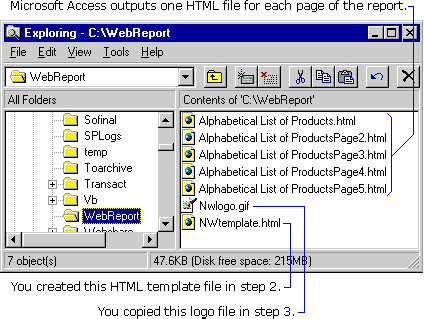
Here's what your working folder looks like at this point.

Publishing Your Microsoft Access Report on the Web
Now that you have your HTML files created and formatted the way you want, how do you make them available on your company's intranet?
You may already have a Web site in your company. If so, simply post (or copy) all the files in your working folder to a production folder designated by the person in charge of your Web site, often called a webmaster or site administrator.
Using Microsoft Personal Web Server
Another option is to install Microsoft Personal Web Server, which is a simple way to make a personal computer or any computer on your intranet a Web server. You can download Microsoft Personal Web Server from its home page for free.
Microsoft Personal Web Server is a great solution for low-volume Web traffic, providing a site for conveniently testing out access to your files through the Web or quickly distributing your information. You can install it on your own personal computer, or dedicate an extra PC as your personal Web server machine if your reports make for popular reading. Building Applications with Microsoft Access 97, the book that ships with Microsoft Access, has more information about Microsoft Personal Web Server in Chapter 21.
Once you install Microsoft Personal Web Server and have it running on your PC, locate the default root folder, called C:\Webshare\Wwwroot. In Windows® Explorer, copy your working folder, C:\WebReport, to this default root folder to create your production folder, C:\Webshare\Wwwroot\WebReport.
Publicizing Your Work
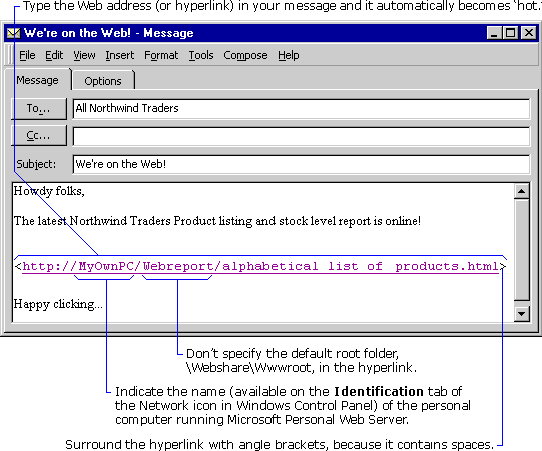
Once you have the files set up on your own Personal Web Server site, you'll want to publicize your stellar achievements. You can use Microsoft Outlook® to send mail to your users and notify them about the Web address. One click on the Web address in your mail, and your users are reading your reports. (And now they have no excuse not to!)

Regularly Refreshing Your Report
Congratulations! You've got your report out on the Web. But what about next week, or next month? Well, because you used static HTML, you'll need to repeat most of the preceding steps each time you want to publish a new report.
Creating a Macro and Batch File to Refresh Your Report
You could just republish the report manually, but here's a better way: Automate the procedure with a macro! So create the following macro, called Web Report, in your Northwind Traders sample database. (If you're not familiar with macros, search the Microsoft Access Help index for "macros, overview.")
Macro: Web Report
| Action |
Argument |
Value |
Comments |
| OutputTo |
Object Type |
Report |
|
| |
Object Name |
Alphabetical List of Products |
|
| |
Output Format |
HTML |
|
| |
Output File |
C:\WebReport\Alphabetical List of Products.html |
This macro assumes that old output files have been deleted by a batch file. |
| |
Auto Start |
No |
Set the Auto Start argument to No this time because you don't need to verify output in the Browser. |
| |
Template File |
C:\WebReport\NWTemplate.html |
|
| Quit |
Options |
Exit |
Immediately exit Microsoft Access because, in this case, you are running the macro in a batch file. |
Then, create the following batch file and put it in the C:\WebReport folder. (Again, you can just copy and paste the following information into Notepad.)
Batch File: WebRpt.bat
REM   Defines a path for the Microsoft Access executable
REM   (assumes default installation)and Start command.
PATH = "C:\Program Files\Microsoft Office\Office\;C:\Windows\Command"
REM   Moves to your working folder.
CD C:\WebReport
REM   Deletes previously created HTML files.
DEL ALPHAB*
REM   Starts Microsoft Access and runs the macro.
REM   The next 2 lines must be 1 line in the .bat file to execute.
START /WAIT Msaccess.exe "C:\Program Files\Microsoft Office\Office\Samples\Northwind.mdb" /x "Web Report"
REM   Copies the HTML output files to the production folder.
REM   (Assumes you have the HTML template and Nwlogo.gif files in the
REM   production folder already.)
COPY ALPHAB* C:\Webshare\Wwwroot\WebReport
EXIT
Each time you want to republish the report, just execute the batch file and Voila! instant Web publishing.
Scheduling and Automating the Batch File
You could use the Calendar in Microsoft Outlook to schedule a recurring event to run the batch file each time the report needs updating. Just drag the batch file from Windows Explorer over to the Calendar icon in the Microsoft Outlook Bar. This will create a recurring event. Specify the day of the week and the time you want to be reminded. When Outlook reminds you, open the event and double-click the icon to execute the batch file.
Or completely automate the process and use System Agent in Microsoft Plus! for Windows 95 or the Task Scheduler in Windows 98 to run the batch file for you on a regular schedule.
Your colleagues will think you have your own programming staff. I won't tell anyone if you decide to take the rest of the afternoon off.
Building Your Data Warehouse with the Publish to the Web Wizard
Now that you've learned how to output one report or datasheet, you'll want to distribute several reports and datasheets. This sounds like a job for the mighty Publish to the Web Wizard. Using this wizard, you can select several reports and datasheets, specify one or more HTML template files, create a home page, store all files to your working folder as a Web publication, and save a Web publication profile to use later.
You've examined the Northwind database, tested individual reports and datasheets to verify the HTML output files, created the necessary HTML template files, and decided to add the following reports and query, table, and form datasheets to your data warehouse.
| Name |
Object Type |
| Alphabetical List of Products |
Report |
| Sales Totals by Amount |
Report |
| Category Sales for 1995 |
Query |
| Products Above Average Price |
Query |
| Shippers |
Table |
| Customers |
Form |
- On your hard disk, create a new working folder, called WebWarehouse, and copy the file Nwlogo.gif from C:\Program Files\Microsoft Office\Office\Samples and the file NWTemplate.html from C:\WebReport to C:\WebWarehouse.
- Open the Northwind sample database, Northwind.mdb, located by default in C:\Program Files\Microsoft Office\Office\Samples.
- To start the Publish to the Web Wizard, click Save As HTML on the File menu. (Skip the first page of the Wizard for now; I'll discuss it later.)
- On the different tabs, select the items that you decided to publish (listed in the preceding table), and then click Next.
- When asked what HTML document you want to use as the default template, select the check box to indicate you want to select different HTML template files for the selected objects, clear the text box if it contains a template file, and then click Next.
- On the next page of the wizard, you can group-select some objects to apply one HTML template file to them, and avoid using a template file for other objects; then click Next.
- Select Static HTML as your output format, and then click Next.
- Indicate that you want to put your Web publication in your new working folder, C:\WebWarehouse. Make sure the option to only publish objects locally is selected, and then click Next.
- On the next page, tell the Publish to the Web Wizard to create a home page for you, called HomePage, and then click Next.
- On the next page, save all your wizard answers in a Web publication profile, with the name Web Warehouse Profile, so that when you run the wizard again to republish your data, you can select the profile by name and not have to retype all your choices.
- Click Finish. Now that you've made all your choices, the Publish to the Web Wizard outputs all HTML files to your working folder.
- In Windows Explorer, copy your working folder, C:\WebWarehouse, under the default root folder to create your production folder, C:\Webshare\Wwwroot\WebWarehouse.
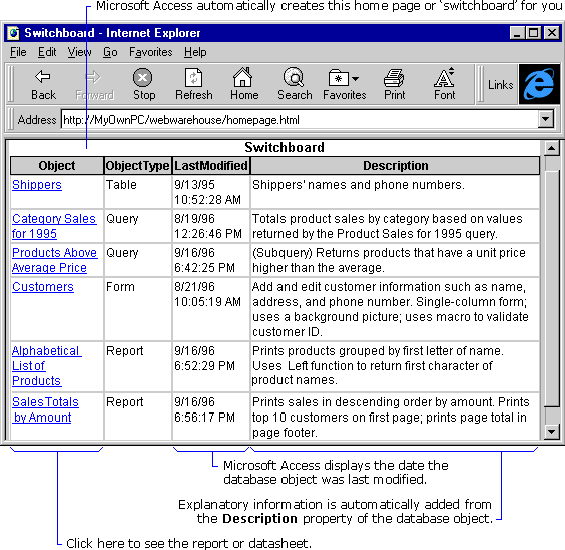
After you copy all your files from your working folder to your production folder, send a message again through Microsoft Outlook with the hyperlink http://MyOwnPC/WebWarehouse/HomePage.html, and your Web data warehouse is online and ready to roll. When your users click the hyperlink, they will see the following home page.

Regularly Updating Your Data Warehouse
As before, each time you want to republish your updated data to the Web, you need to either manually repeat your steps or create and run a macro. In this case, the macro is a lot simpler because you thought ahead and created a profile in the Publish to the Web Wizard.
Creating a Macro and Batch File to Refresh Your Data Warehouse
If you ran the Publish to the Web Wizard again, the first page of the Publish to the Web Wizard would let you choose a profile to run (the Web Warehouse Profile you created in the previous procedure).
Instead, you can use the following macro to automatically select and run the profile.
Macro: Web Warehouse
| Action |
Argument |
Value |
Comments |
| SendKeys |
Keystrokes |
" "{DOWN}{DOWN}%F |
You need to put one space between the quotation marks. See next table for additional information. |
| |
Wait |
No |
Ensures the macro does not pause. |
| RunCommand |
Command |
Publish |
Runs the Web Publishing Wizard. |
| Quit |
Options |
Exit |
Immediately exits Microsoft Access because, in this case, you are running the macro in a batch file. |
The Send Keys Action essentially does your typing for you. The Keystrokes argument simulates what you would type.
| Keystroke |
Action |
| " " |
Pressing the space bar selects the first check box. |
| {DOWN} |
Pressing the DOWN key positions the insertion point in the Web publication profile list box. |
| {DOWN} |
Pressing the DOWN key again selects the first profile in the list. Because Publish to the Web Wizard Profiles are always listed in the order in which they are created and cannot be deleted, you can be sure that the sequence of the list will be the same. If your profile is not first in the list, just add the necessary number of DOWN keys. |
| %F |
Pressing ALT+F finishes the Wizard. |
Then, create the following batch file, WebWarhs.bat, in your working folder, C:\WebWarehouse. Schedule and run the batch file as before. Note that unlike a single export operation, the Publish to the Web Wizard will overwrite files of the same name, so the batch file doesn't need to delete previous versions of files to clean up the working folder.
Batch File: WebWarhs.bat
REM   Defines a path for the Microsoft Access executable
REM   (assumes default installation)and Start command.
PATH = "C:\Program Files\Microsoft Office\Office\;C:\Windows\Command"
REM   Moves to your working folder.
CD C:\WebWarehouse
REM   Starts Microsoft Access and runs the macro.
REM   The next 2 lines must be 1 line in the .bat file to execute.
START /WAIT Msaccess.exe "C:\Program Files\Microsoft Office\Office\Samples\Northwind.mdb" /x "Web Warehouse"
REM   Copies all files to the production folder.
COPY * C:\Webshare\Wwwroot\WebWarehouse
EXIT
Wrapping Up
I hope I've whetted your Web appetite. If you'd like to know more, I've written an article about using dynamic HTML that shows you how to interact in real time with your Microsoft Access database on the Web.
Happy clicking!


