Steve Strauch, Gavin Smith, and Acey J. Bunch
Microsoft Corporation
Updated September 1999
Summary: This article presents a step-by-step process for customizing the Microsoft® Small Business Customer Manager (SBCM) and the tools and resources that can make these tasks easier. The SBCM customizability adds value for the end user because core functionality can be enhanced beyond customer and sales data-tracking, to include anything the customer requires—through one standard interface. (44 printed pages)
Click here to access the SBCM End User License Agreement for the SBCM Customization SDK. After agreeing to the provisions of the license, you can download the self-extracting executable file (809K), which contains all the tools you'll need to start customizing, plus this document in Word 97 format. For more information on installing the tools, see Setting Up for Customization below.
Introduction
Application Overview
Step One: Adding Custom Tables
Step Two: Adding Custom Forms
Step Three: Adding Custom Menu Items
Step Four: Adding Custom Business Rules
Step Five: Adding Custom Automation Actions
Step Six: Adding Custom Templates
Step Seven: Adding Custom Reports
SBCM Tools
SBCM in the Future
Additional Resources
The Small Business Customer Manager (SBCM) is a customizable application developed by Microsoft that enables small businesses to leverage their existing sales and contact information in many useful ways. It is designed to help small businesses achieve more effective customer tracking, analysis, and communication by making use of the data they already have. However, some small businesses may need to expand the capabilities of the SBCM to fit a specific business task. For this reason, the SBCM is fully customizable so that Independent Software Vendors (ISVs) and Solution Providers can modify it to fit their customers' small business needs. This article presents, in a step-by-step process, ways to customize the SBCM and the tools and resources that can make these tasks easier to accomplish.
To fully understand how to customize the SBCM, we must examine the different components of the application and how they are used. For end users, the SBCM is a simple interface for accessing their business data. But from a developer perspective, the SBCM is a fully functional and professionally developed application that can be modified to fit other important customer needs. The SBCM is easily customizable because of its table-driven design. To make new forms, actions, or other features available through the SBCM interface, you need only make a few minor modifications. It is the SBCM customizability that provides the added value for the end user, because you can enhance core functionality beyond customer and sales data tracking to include anything the customer requires—but do so through one standard interface.
The SBCM includes essentially four main types of components: preinstalled software, databases, libraries, and executables. The following sections will detail those components and how they are used to build the SBCM application.
Before installing the SBCM Customization SDK provided for the SBCM, you must have already installed the full version of Microsoft® Access 2000, the Small Business Tools, and any other Microsoft Office applications that you may use for automation.
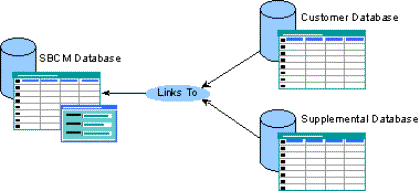
The SBCM application uses two core Access databases. Additionally, you can add one or more supplemental databases as described in the section, Adding Custom Tables. See the illustration in Figure 1.

Figure 1. Database components of the SBCM
Each database performs an important role in building a custom SBCM application.
The main database of the SBCM is Sbcm.mdb, which contains the tables used to build the user interface, and it is the modifiable component of the SBCM. By making entries into the Sbcm.mdb tables and by adding your own code modules, you can change the user interface and expose any new functionality your customers require. For more information about the Sbcm.mdb database, see the section SBCM Database Objects.
This database contains the customer's sales and contact information. The database must be created with the Small Business Tools New Database Wizard to ensure the appropriate table design is generated. The customer's sales and contact information is imported into this database, and the tables are linked into the SBCM.mdb database. The tables of the customer database are divided into two classes, each identified by the table's prefix:
| Information Type | Prefix |
| Accounting Information | AA_ (Used by the Small Business Financial Manager) |
| Organizational/Contact Information | CMA_ (Used by the Small Business Customer Manager) |
| General Tables | tbl_ |
| Temporary Tables | tbl_somename_Temp |
For more information about creating the customer's database, see the section Creating the Customer's Database.
This database contains the customized data storage that is used to contain any new data the customer requires. This database does not have to be created with the New Database Wizard, it is simply a database that contains some custom tables. No supplemental databases ship with the SBCM, they represent additional data sources that can be added by solution providers. The database can be created in any data format that Access supports. However, the custom tables should contain the appropriate fields that can relate their data to data in the customer's database. The tables in the supplemental database are then linked into the Sbcm.mdb database, and relationships are established with the tables that are linked in from the customer's database. For more information about creating the supplemental database, see the section Creating the Supplemental Database.
Note Although entries can be made to the Sbcm.mdb database tables, it is recommended that developers not change the design of these tables, nor the design of the tables in the customer's database. If new fields or records need to be added to the SBCM, developers should add them to the Supplemental Database.
The library used with the SBCM is Sbcmlib.mdb. It is a compiled, non-modifiable Access database that contains functions and procedures used to help generate the SBCM user interface. In addition, a few dynamic link libraries (DLLs) are used by the SBCM for various utility functions, but these DLLs are also compiled and non-modifiable.
The executable used to launch the SBCM user interface is Sbcmstrt.exe. It is also compiled and non-modifiable.
Because the Sbcm.mdb database is the database where most of the customization will take place, it is important to understand the different objects it uses and how they fit in to the customization effort.
As depicted previously in Figure 1, the full SBCM application makes use of two core Access data_bases, and any supplemental databases. The tables from two of the databases are linked into Sbcm.mdb, the master database. The master database also contains its own tables that are used to drive the user interface, and some of the tables can have records added to them to control various aspects of the user interface. It is recommended that you not alter the design of the native Sbcm.mdb tables, because this may cause unpredictable results in the user interface. The native tables are used to track business rules, filters, menu items, and messages, as well as other information used within the application. Making entries into these tables will be discussed throughout this article.
Many queries in the SBCM.mdb database are used to populate combo boxes, build menu selections, and execute business rules. It is recommended that you do not modify any of the queries that ship with the SBCM, but you can build your own custom queries and add them to the SBCM.mdb database. For more information about adding custom queries, see the section Creating the Custom Business Rule.
Many forms in the SBCM.mdb database are used for displaying data and prompting for user action. Although it is possible to modify the forms, you should use caution in doing so. Changing existing form objects may cause unpredictable behavior in the SBCM. You can also add your own custom forms to the SBCM.mdb database. For more information about adding custom forms, see the section Step Two: Adding Custom Forms.
In addition to queries and forms, the SBCM also ships with some macros. Most of the macros are used to run SBCM programming code, and they should not be changed. There are two macros that you may need to use when designing custom menus and toolbars:
The other database objects that ship with the SBCM are modules. Modules are used for various functions within the SBCM, and it is recommended that they not be changed. However, you can add your own modules to contain your custom functions and procedures. For more information about adding custom modules, see the section Step Three: Adding Custom Menu Items.
In order to customize the SBCM, you must first install the modifiable version of the Sbcm.mdb file, and make sure that it is in the right location. You need the modifiable version because the shipping version of SBCM that comes with Microsoft Office 2000 Small Business Edition has its code modules password-protected, whereas the modifiable version has the password protection removed.
To start the setup process, download the modifiable SBCM database from the End User License Agreement associated with this article. Once you have the file downloaded, you need to determine the appropriate directory to copy it to. The current location of the Sbcm.mdb file can be found by examining the HKLM\SOFTWARE\Microsoft\Office\9.0\CMA\FrontEndPath registry subkey. This is normally a path ending with "\All Users\Application Data\SBT\SBCM". Depending on your operating system, the path may be found at:
| Operating System | Path Location |
| Microsoft Windows® 9x | C:\Windows |
| Windows NT® 4.0 | C:\WINNT |
| Windows 2000 | C:\Documents and Settings |
Once the modifiable database has been copied into its proper location, use the following command line to open the SBCM.mdb database in debug mode.
"C:\Program Files\Microsoft Office\Office\MSACCESS.EXE" "C:\winnt\All Users\Application Data\SBT\SBCM\Sbcm.mdb" /wrkgrp "C:\winnt\All Users\Application Data\SBT\Databases\SomeFileName.mdw" /cmd Start /user username /decompile
Note It is always a good idea to make backups of the Sbcm.mdb file before making modifications to it. It is recommended that you make copies of both the modifiable and nonmodifiable versions of Sbcm.mdb before you begin customization.
You will need to change the path locations and name of the work group information file, based on how you have your system set up. You may find it easier to create a new shortcut on your desktop using the command line above in the target field of the shortcut's Properties dialog box. You can also use the SBCM Debug Wizard, which is a graphical tool that will open the SBCM.mdb database in debug mode. This tool can save developers time because multiple shortcuts are no longer necessary. For more information on the SBCM Debug Wizard, see the section Using the SBCM Debug Wizard.
To open the database in debug mode, simply double-click on the desktop shortcut you created that uses the debug command line. Once the database is open, press the F11 key to close the business rule form and open the database window.
If you want to have the standard Access menus and toolbars available in debug mode, hold down the SHIFT key when first opening the database. This will bypass the AutoExec macro and keep the SBCM from removing the standard Access menus and toolbars. If you are opening the Northwind sample database, the user name to enter is 'username,' and the password is blank.
The first time you open the SBCM in debug mode, you may notice that there are no linked tables. Don't panic! We will be discussing the linking process in the next section.
For demonstration purposes, this article will describe how to customize the SBCM application by using the example of sales call information. Many sales people record information about sales calls made to existing clients and prospects, and they want to store the date and time of each call and what was discussed. In order to show how to customize the SBCM for this requested feature, this article will demonstrate how to add the tables, forms, menu items, business rules, automation actions, templates, and reports to accomplish this task.
The first step in customizing the SBCM is to create and then link the tables from the customer's and supplemental databases into the master database.
You create the customer's database through the New Database Wizard that is part of the Small Business Tools. Using the Wizard, you can import the customer's contacts from Microsoft® Outlook® and their accounting data from a variety of accounting programs. The Wizard generates the necessary schema for the imported data that will allow the customer's database to integrate with the SBCM database.
If you want to create your own filter to import data into the Small Business Customer Manager or Small Business Financial Manager, follow the Filter SDK links off any Small Business Tools Web site.
To start the New Database Wizard, open the Microsoft Customer Manager dialog box, point to Small Business Customer Manager in the Microsoft Office Small Business Tools program group, and then click New Database Wizard. See Figure 2.
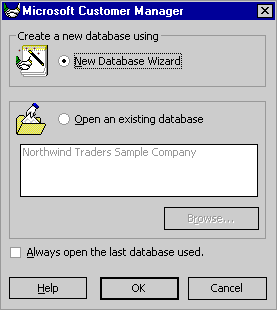
Figure 2. The Microsoft Customer Manager (New Database Wizard)
Follow the prompts as the Wizard walks you through creating the customer's database. When you are asked to set the database name and location, accept the default location, but rename the database Customer.mdb.
Note It is recommended that you do not alter the design of the customer's database, as doing so could cause unpredictable results in the behavior of the SBCM. For more information about different accounting programs that are compatible with the SBCM, search the SBCM online help for "accounting programs."
You should add supplemental data to the SBCM via a supplemental database. First, this will reduce the likelihood of fatally altering the design of the SBCM tables. Also, a supplemental database may only be associated with specific customer databases.
You create the supplemental database by simply creating a new Access database and then creating a custom table. Following the customization example, create a new Access database, and name it SalesInfo.mdb. Then create a new table called CMA_SalesCalls, which follows the naming convention that identifies this table as part of the organizational and contact data. Use the following schema for the new table:
| Field Name | Data Type | Description |
| SalesCallID | AutoNumber | The primary key. |
| ContactIndex | Long Integer | An indexed field used to link with other tables. |
| CallTime | Date/Time | Time of the call. |
| Notes | Memo | For extra information. |
Save the supplemental database in the same directory as the default location of the customer's database. The default location of the customer's database can be found by examining the HKLM\SOFTWARE\Microsoft\Office\9.0\CMA\DatabasePath registry subkey. This is normally a path ending with "\All Users\Application Data\SBT\Databases". While still in design mode for the new table, create an ascending index on the ContactIndex field.
In the customer's database that you created with the New Database Wizard, there are many related tables that are used for organizational and contact data. For example, the table CMA_Party contains one row for every organization and contact in the database. Table CMA_Organization has one row per organization, and table CMA_Contact has one row per contact. The key field, ContactIndex, establishes a one-to-one relationship between table CMA_Organization and table CMA_Contact to the master table, CMA_Party. The relationships between these tables are enforced by the SBCM programming code.
Additional information for each organization and contact is contained in related detail tables that are linked by the key field ContactIndex. For example, phone numbers for each organization and contact are stored in table CMA_PhoneNumber, and street addresses are stored in table CMA_StreetAddresses.
By creating the ContactIndex field in the custom table CMA_SalesCalls, you are able to create a one-to-many relationship between the custom table and the customer's primary organizational and contact tables.
Once you have created both the customer's and the supplemental database, you need to link them to the SBCM database.
The Sbcm.mdb database contains code that attaches the customer's database tables when you use the Open an existing database option of the Microsoft Customer Manager dialog box. The tables that get attached are listed in the table tblLinkedTables, and the links are checked each time the SBCM application is opened.
To attach the customer's database tables to the SBCM database, open the Microsoft Customer Manager dialog box, point to Small Business Customer Manager in the Microsoft Office Small Business Tools program group, and then click Open an existing database. See Figure 3.
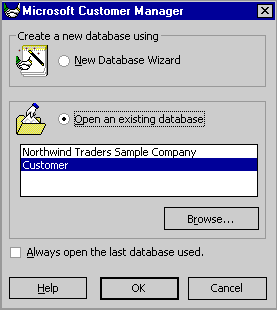
Figure 3. The Microsoft Customer Manager (Open an existing database)
There are two approaches to attach tables in the supplemental database to the SBCM database. The first is to link the tables manually using the regular Access method of getting external data—point to Get External Data on the File menu, and then click Link Tables. This is the best method for custom solutions that are only installed once.
The second approach is to write your own programming code that will automate the linking process. The SBCM database uses this approach, and its code can be used as an example (CheckLinks() in the module modStartupRoutines). The benefit of automating the linking process is that once it is set up, it can be deployed multiple times, without the need for manually linking the tables every time.
Note The SBCM maintains the links for the most recently opened customer and supplemental databases. If deploying a solution that makes use of different customer and supplemental databases, the current attachments will be lost each time the users switch to the other solution. Make sure that your code rechecks the links each time the SBCM is opened.
The second step in customizing the SBCM is to create or modify forms in the SBCM database that interact with the new data you created in the supplemental database.
When adding custom forms to the SBCM database, two methods can be used. The first is to create an all-new form that interacts with the supplemental database. The second is to modify one of the SBCM's existing forms so that it can interact with the supplemental database. The forms and other objects in the SBCM.mdb file are standard Microsoft Access objects. Though the form objects can be modified, avoid changing or removing existing elements within the form because this could interfere with normal SBCM processing. In general, the only changes you should make to existing forms are to add to the elements already present.
Note If you change SBCM objects, you may not be able to upgrade to newer versions of the SBCM without having to recreate all of your changes.
You can create a new form within the SBCM.mdb database just like you would within any other Access database. The new form would interface with the custom table you develop and attach from the supplemental database.
You can modify existing forms within the SBCM.mdb database by opening the forms in design mode and adding the new elements that are needed to interface with the supplemental database. As noted above, you should avoid making changes to elements already present in the existing SBCM forms because it may cause unpredictable results in SBCM processing.
Following our sales information example, we will modify an existing SBCM form so that it will interact with the CMA_SalesCalls table we created in our supplemental database. Before modifying the form, make sure that the CMA_SalesCalls table is already attached to the SBCM.mdb database.
The step-by-step sections that follow detail how to modify an existing form and add a new tab control page that will enable customers to track sales calls. Once completed, the new tab page should be similar to the one in Figure 4 below.
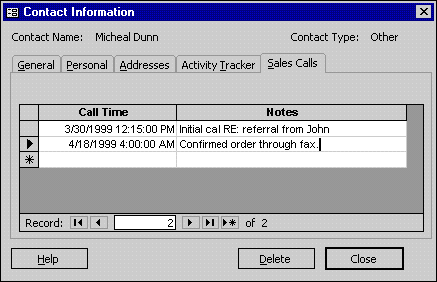
Figure 4. The Sales Call tab page
The third step in customizing the SBCM is to add menu items to the SBCM user interface. To add menu items to the SBCM, you need to add new rows to table tblMenuItems, which drives the creation of the menus, and then write procedures in new code modules that will perform specific tasks when the new menu items are selected.
Note By default, the SBCM menus are built from tblMenuItems the first time the SBCM is opened, and they are never rebuilt after that. After you have added a new menu item row to tblMenuItems, you must rerun macro CreateCommandBars to force the menus to be removed and rebuilt from the table.
To understand how the menus are built from table tblMenuItems, we must examine how the menu layouts are determined using the concepts of menu item sequencing and levels.
The menu item sequence is determined by the MenuItemID, which is the primary key for each record in tblMenuItems. This means that the order of the MenuItemIDs determines the order within a particular menu when it is selected by a user. For example, on the edit menu, the order of the first three menu items is as follows:
| Menu Items | MenuItemID (sequence) |
| Cut | 210 |
| Copy | 220 |
| Paste | 230 |
The MenuLevel field in table tblMenuItems determines he menu item level. The level of a menu item determines where it is placed in the hierarchy of menu and submenus. For example, on the Tools menu, the levels associated with reaching the compact and repair menu item are as follows:
| Menu Items | MenuLevel (level) |
| Tools | 1 |
| Database Utilities | 2 |
| Compact and Repair | 3 |
Table tblMenuItems contains the information that is used to build all of the SBCM menus. By making entries within certain fields of table tblMenuItems, you can control where and how your custom menu item is implemented. To add a row to table tblMenuItems, simply open the table and manually add a new row.
You can configure your custom menu items in a variety of ways, and the following table summarizes the usage of each field in table tblMenuItems and how you can use it.
| Field Name | Data Type | Description |
| MenuItemID | Long Integer | The primary key, used for establishing sequencing. |
| MenuLevel | Long Integer | Used for establishing the menu level. |
| DisplayOrder | Long Integer | Number relative to the other entries in the table. Used for sequencing items in the menus. Make sure that the values are unique. |
| MenuItemLabel | Text | Used for the text of the menu item, the "&" is used to establish hotkeys. |
| Accelerator | Text | Used to establish shortcut keys combinations (e.g., "CTRL+N"), tied to entries made in the AutoKeys macro. |
| FunctionCall | Text | Used to name the function that is called when a user selects this menu item. The functions must be public and return a long value. For toolbar functions, there can be no parameters. |
| BeginAGroup | Yes/No | TRUE if there should be a separator before this menu item. |
| PopupMenu | Yes/No | TRUE if this menu item contains submenus. |
| FaceID | Double | The bitmap ID number for a menu icon. |
| BuiltIn | Yes/No | TRUE if this menu item calls a built-in Access function. |
| RequiresForm | Yes/No | TRUE if a view must be active for this menu item to be enabled. |
| RequiresContact | Yes/No | TRUE if a contact record must be active for this menu item to be enabled. |
| RequiresOutlook | Yes/No | TRUE if Microsoft Outlook must be installed for this menu item to be enabled. |
| RequiresFull | Yes/No | TRUE if full user security status is required for this menu item to be enabled. |
Following the sales information example, we will make entries into table tblMenuItems to establish a new menu item that will open the Sales Calls dialog box, based on the currently selected contact. We will also write a function in a new code module that will execute when the user selects the custom menu item.
The following sections detail, step-by-step, how to create the new menu item and the code that it will execute when it is selected. Once completed, the new menu item should be similar to the one in Figure 5 below.
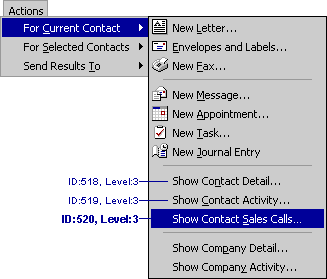
Figure 5. Show Contact Sales Calls menu item
Note the sequencing, level, and label that will be used to create the new menu item.
'//////////////////////////////////////////////////////////////
'// CmdContactSalesInfo
'//
'// This function opens the form frmContactInformation and sets
'// the tab page pgSales based on the current contact index.
'//////////////////////////////////////////////////////////////
Public Function CmdContactSalesInfo() As Long

Dim dbsSBCM As DAO.Database
Dim rstContact As DAO.Recordset
Dim lContact As Long

On Error GoTo ErrorHandler

    'Global variable used to set the page index for the tab control.
    pstrContactPage = "pgSales"

    'Get the current contact index from the active form.
    lContact = CurrentContactIndex

    'If contact index is valid, open the form.
    Set dbsSBCM = CurrentDb
    Set rstContact = dbsSBCM.OpenRecordset("SELECT ContactIndex " & _
    "FROM CMA_Contact WHERE ContactIndex = " & lContact)

    If 0 <> lContact And rstContact.RecordCount <> 0 Then
    DoCmd.OpenForm "frmContactInformation", acNormal, , _
    "ContactIndex = " & lContact, , acDialog, ActiveFormBR
    End If

    'Close out gracefully.
    rstContact.Close
    dbsSBCM.Close
    Set rstContact = Nothing
    Set dbsSBCM = Nothing

Exit Function

ErrorHandler:
    MsgBox "Error:  " & Err.Description, vbInformation
End Function
One of the most powerful customizations that you can make to the SBCM is to add custom business rules or views of user data (the term "views" is used interchangeably with "business rules"). Business rules are simply queries that are formatted and displayed for users when selected from the SBCM user interface. By adding a new business rule, you can enable the user to work with new views of existing data, and with views based on custom data that you have added.
In order to add a business rule to the SBCM, you must create new records in one or more core SBCM database business rule table. You can use the business rules maintenance form instead of directly accessing the tables. For more information, see the section Using the Business Rules Maintenance Form. The following sections discuss each of the core business rule tables and how you can use each of them to build a custom business rule.
The main table used in the creation of SBCM business rules is table tblBusinessRules. This table contains most of the information necessary to establish a custom business rule, and each row of the table is equivalent to one business rule. By adding a record to this table, you can establish the query and menu items used to enable the custom business rule. The following table schema lists each field in table tblBusinessRules and describes how each field is used.
| Field Name | Data Type | Description |
| BusinessRuleID | Long Integer | The primary key is used to uniquely identify each business rule. |
| Title | Text | The title string of the business rule. |
| ShortDescription | Text | Used to describe the purpose of the business rule. Is not currently used in the user interface. |
| LongDescription | Memo | Used as the tool tip that is displayed when the mouse pointer is centered over the business rule's title in the business rule form. |
| BRCategoryID | Long Integer | Title of the category menu that will contain this business rule. A lookup field based on records in tblBusinessRulesCategories. For more information about business rule categories, see the section Using Table tblBusinessRulesCategories. |
| BRPass1SQLString | Memo | The first query run to create the result set. This string is the SQL statement that will be executed first, and it creates table tblBR1_1temp if the field CreatePass1TmpTbl is set to TRUE.
Warning This query should not use a 'GROUP BY' clause because of the manner in which the front end modifies this query for implementing filters. |
| BRPass2SQLString | Memo | The second query that will be executed on the results of the first query. Results are displayed in the SBCM user interface. There are no limitations on the SQL syntax used in this query. |
| KeyField | Text | This is the field that will be used for drill-downs. The SBCM will insert the value of the field supplied in the SQL that is generated from the DrillDownSQL field. For more information about business rule drill-downs, see the section Creating the Custom Business Rule Drill-Down. |
| MenuTitle | Text | Should be the same as the Title field because it will be displayed in the menu. Use the "&" to mark a hotkey, and make sure that the hotkey is unique for the particular business rule category. |
| Accelerator | Text | Accelerator key for this business rule in the menu.
Note This is only the text displayed in the menu for the accelerator. You must modify the AutoKeys macro for the accelerator to work. |
| DisplayOrder | Long Integer | Number relative to the other entries in this table. Determines the order in which the business rules are displayed in the menus and drop-down list boxes. Every business rule should have a unique value. |
| ContactUsed | Yes/No | True, if this business rule contains either ContactIndex or SelectedContactIndex in the KeyField field. |
| DrillDownSQL | Memo | If the business rule displays a column for which the DoubleClickAction in tblFieldLevelManipulation equals "Drill-Down," and the column title equals DrillDownDisplayField, then, on double-click, a form will be displayed with a data grid attached to the results of this SQL query. For more information about business rule drill-downs, see the section Creating the Custom Business Rule Drill-Down. For more information on table tblFieldLevelManipulation, see the section Using Table tblFieldLevelManipulation. |
| DrillDownDisplayField | Text | Name to be displayed on the drill-down form as described above. For more information about business rule drill-downs, see the section Creating the Custom Business Rule Drill-Down. |
| CreatePass1TmpTbl | Yes/No | If the business rule seems to take a particularly long time to run, set this field to true, and the SBCM will create a temporary table for the first pass, instead of just using the first-pass query. |
| BROrderBy | Text | This will be the default sort order that will be applied to the business rule results set. |
| Assumptions | Yes/No | TRUE if this business rule warrants displaying the assumption dialog. When set to TRUE, the business rule form will then show the "About Calculations" hyperlink that display the assumptions dialog box. Modifying the Msg field in table tblMsg where the locID is equal to 3600 will alter the assumption dialog's message text. |
Obviously, the key fields in table tblBusinessRules are BRPass1SQLString and BRPass2SQLString, because these fields contain the SQL statements used to create the business rules. These SQL statements are executed consecutively, and the results are then formatted and displayed in the SBCM user interface.
The SQL statements can be executed in two ways, and the field CreatePass1TmpTbl determines which method is used. If CreatePass1TmpTbl is set to TRUE, then BRPass1SQLString is executed, and a temporary table is built from the results. BRPass2SQLString is then executed against the temporary table. If CreatePass1TmpTbl is set to FALSE, then no temporary table is created, BRPass2SQLString is executed, and it uses BRPass1SQLString as a data source.
The reason for the temporary table feature is performance-based. By default, you should leave the value in CreatePass1TmpTbl set to FALSE, because the majority of business rules will run faster that way. But if you have an extremely large recordset to deal with, then you should set the value of CreatePass1TmpTbl to true, so that the temporary table is used. Note that BRPass2SQLString should not be changed between the two methods; the SBCM handles running it from the temp table or from the other SQL statement.
After the BRPass2SQLString is executed, a temporary table is always built with the results, and it is the table that is used as the data source for the user interface.
The value in the BusinessRuleID field is used to create qryRunBR##FirstPass. This field is auto-numbered so it is unique within the table and can be referenced/linked by other tables. Code in the BR maintenance form creates a new business rule, and shows how to get this value and change the SQL for the second pass. Use this code to programmatically add business rules to the Small Business Customer Manager.
On the SBCM business rules menu, the business rules are separated into categories. The default categories are hot views, customers, products, sales, and profitability. If you want to create a new business rule category, you should add a new record to table tblBusinessRulesCategories. Adding a new record will make the new category available in field BRCategoryID of table tblBusinessRules, and you can then associate new business rules with the new category. The following table schema lists each field in table tblBusinessRulesCategories and describes how each field is used.
| Field Name | Data Type | Description |
| RBCategoryID | Long Integer | The primary key, used to uniquely identify each business rule category. |
| Title | Text | Text that will appear in the menus for this category. Business rules for which BRCategoryID equals this value will be displayed under this category. Make sure hotkeys are unique. |
| Description | Memo | Used to describe the purpose of the category. Is not currently used in the user interface. |
| DisplayOrder | Long Integer | Number relative to the other entries in the table. Used for sequencing categories on the menu. Make sure that the values are unique. |
For each business rule, there is a set of appropriate automation tasks that a user can perform. These tasks are displayed in the Actions menu and in the Action drop-down list boxes. Enter a record in this table for each automation task that should be available for a specific business rule. Each automation task associated with a business rule is equivalent to one row in this table. The following table schema lists each field in table tblBusinessRulesWithAutomationTasks and describes how each field is used.
| Field Name | Data Type | Description |
| BusinessRuleID | Long Integer | The related BusinessRuleID from tblBusinessRules. A lookup field based on records in tblBusinessRules. |
| AutomationTaskID | Long Integer | The related AutomationTaskID from tblAutomationTasks. A lookup field based on records in tblAutomationTasks. |
For more information about automation tasks, see the section Step Five: Adding Custom Automation Actions.
For each business rule there can also be a set of business rule filters. These filters allow users to narrow their view of information in the business view results. These filters are displayed in the Narrow Your Choice drop-down list box. Add a new record in table tblBusinessRulesWithFilters for each filter that should be available for a particular business rule. The following table schema lists each field in table tblBusinessRulesWithFilters and describes how each field is used.
| Field Name | Data Type | Description |
| BRFilterID | Long Integer | The primary key, used to uniquely identify each business rule filter. |
| BusinessRuleID | Long Integer | The related BusinessRuleID from tblBusinessRules. A lookup field based on records in tblBusinessRules. |
| FilterID | Long Integer | The related FilterID from tblFilters. A lookup field based on records in tblFilters. |
| DisplayOrder | Long Integer | Number relative to the other entries in the table. Used for sequencing filters in the drop-down list box. Make sure that the values are unique. |
For more information about business rule filters, see the section Creating the Custom Business Rule Filter.
Associated with business rule filters is table tblFilters. This table is used to specify the behavior of the filters that are set in table tblBusinessRulesWithFilters. Add a new record in table tblFilters for each new filter that should be available for a particular business rule. The following table schema lists each field in table tblFilters and describes how each field is used.
| Field Name | Data Type | Description |
| FilterID | Long Integer | The primary key, used to uniquely identify each business rule filter. |
| Title | Text | The name that is displayed in the Filter drop-down list box. |
| FilterType | Text | Can be either TOP or WHERE. |
| QueryPassToApplyTo | Integer | 1 to apply to the first query, 2 to apply to the second. |
| ComboRowSourceType | Text | Usually set to Table/Query. |
| ComboRowSource | Text | The name of the table or query used in the filter. |
| ComboBoundColumn | Text | The column of the combo box that is bound. |
| ComboColumnWidths | Text | The width of the fields in the combo box, enter 0 for fields that should not be displayed. |
| ComboColumnCount | Integer | The number of columns returned by the query. |
| ComboBoundDataType | Text | The data type of the bound column. The SBCM uses this data type to determine how to format the value. |
| UseSortOrder | Yes/No | If there is an ORDER BY clause in your query, set this field to true. The SBCM uses this field when creating the final filter SQL statement. |
For more information about business rule filters, see the section Creating the Custom Business Rule Filter.
This table lists all fields displayed by all business rules. The settings maintained in this table determine the formatting, appearance, localization, drill-down characteristics, and merge availability of each field. Add a new record in this table for each field displayed by your custom business rules. The following table schema lists each field in table tblFieldLevelManipulation and describes how each field is used.
| Field Name | Data Type | Description |
| NameIDForLoc | Text | The primary key, used to uniquely identify each business rule field. |
| EnglishName | Text | Not used by application. Software localizers can use the English name as a common basis for creating the localized version. Must match name used in templates if MergeField is checked. |
| LocalizedVersion | Text | Localized name of the field. This is the name that will actually get displayed on the business rule form. |
| DoubleClickAction | Integer | The action that should occur when the user double-clicks on an entry from this field. There are three hard-coded options:
|
| ViewPercentage | Double | If non-zero, then this is the initial percentage width of this column. Setting this to 50 percent for "ContactName" column will take up half the window of the "All Customers" business rule view. For columns with this set to 0, the remaining space is evenly distributed. |
| FormatMask | Text | The format property applied to the fields displayed in the datasheets. |
| AlignmentMasks | Integer | Hard-coded list: 0="General";1="Left";2="Center";3="Right". |
| NoDecimals | Text | Number of decimals to display if the field is numeric. |
| MergeField | Yes/No | TRUE if the field is to be used as a primary merge field. For more information about merge fields and how they are used, see the section Step Six: Adding Custom Templates. |
Following our sales information example, we will go through the steps to create a custom business rule to view the sales call information contained in the custom sales information table that we created in a previous section. The following sections detail how to construct the custom business rule and integrate it into the SBCM user interface.
SELECT CMA_Contact.FullName AS ContactName,
CMA_Party.ParentContactIndex AS OrganizationContactIndex, CMA_Contact.CompanyName AS Company,
CMA_Contact.ContactIndex AS SelectedContactIndex, CMA_SalesCalls.CallTime, CMA_SalesCalls.Notes
FROM (CMA_Contact INNER JOIN CMA_Party ON CMA_Contact.ContactIndex =
    CMA_Party.ContactIndex) INNER JOIN CMA_SalesCalls ON
    CMA_Party.ContactIndex = CMA_SalesCalls.ContactIndex
In the SQL statement above, notice that some fields are aliased with the AS keyword. This is because the SBCM looks for certain field names in order to perform necessary actions. An example of this is the use of SelectedContactIndex as the alias for ContactIndex in qryBR_SalesCalls. The SelectedContactIndex is used for implementing the drill-down Contact Information form, but it is not displayed in the datasheet view for the sales call business rule. Some of the fields were named with a specific alias because that is how they are entered in the table tblFieldLevelManipulation, which was described in a previous section.
For qryBR_SalesCalls, the following table provides field names and the reasons for their aliases:
| Field Name | Description |
| ContactName | Name that is used throughout the SBCM, found in table tblFieldLevelManipulation. |
| OrganizationContactIndex | Used by the SBCM to reference the organization for a particular contact. |
| Company | Used for display only. |
| SelectedContactIndex | Known in the SBCM as belonging to a contact if there is an OrganizationContactIndex in the query, otherwise refers to an organization's ContactIndex. |
| CallTime | Used for display only. |
| Notes | Used for display only. |
Rather than create a business rule from scratch and having to remember all the fields to set, it is often more useful to create one from an existing business rule, and then modify it as needed. For the purposes of this example, business rule #4, "All Contacts" is very similar to what we need.
The step-by-step sections that follow detail how to create the new business rule. Once completed, the new business rule view should be similar to the one in Figure 6 below.
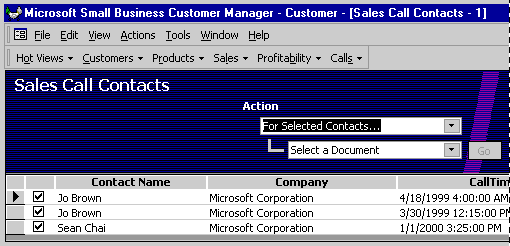
Figure 6. The Sales Call Contacts business rule
SELECT qryBR_SalesCalls.* FROM qryBR_SalesCallsSELECT qryRunBR##FirstPass.* FROM qryRunBR##FirstPassNotice in the BRPass1SQLString field that the SQL statement makes reference to query qryBR_SalesCalls. Although we could have entered the SQL syntax from the SQL View of the query in the BRPass1SQLString field, using the query instead of the long SQL statement makes things much simpler when creating the business rule in table tblBusinessRules. Also note that in the BRPass2SQLString there are two numeric symbols (##) in the SQL statement. You should replace these symbols with the BusinessRuleID number generated when you add the new business rule. This will enable the SBCM to build the temporary table that is based on BRPass1SQLString.
The new business rule we just created will display columns of sales call information in the SBCM user interface. These columns can be set so that when users drill-down (or double-click) on specific entries in columns, additional information can be displayed. Three type of additional information can be displayed:
To determine the type of drill-down you should use, consider if any of the fields should display the contact or organization information forms. You should then check table tblFieldLeveManipulation to see if one of the fields in your business rule has already been set to a drill-down type in its DoubleClickAction field.
Keep in mind that when you set a drill-down type for a particular field in table tblFieldLevelManipulation, that field will always have its drill-down type associated with it, no matter how many different business rules you use it in. Each business rule can display one custom drill-down, with any of the fields in the business rule displaying that drill-down.
As mentioned previously, the SBCM has three types of drill-downs that you can associate with a field in table tblFieldLevelManipulation. Two of the drill-downs will result in the launching of SBCM forms objects. One is the Organizational Details form, and the other is the Contact Details form. Both types can be set in table tblFieldLevelManipulation by using the drop-down list box associated with the DoubleClickAction field.
In our custom business rule example for sales call information, the ContactName field in our query was already set to the Contact Details type of drill-down. If you have the SBCM open and are viewing the sales call contacts business rule, double-clicking on the contact name will drill-down or launch into the Contact Details form.
You can also specify the third kind of drill-down type, which is simply Drill Down in the DoubleClickAction field list box. This type will allow you to specify your own SQL statements that will run once the user has double-clicked on the column you defined in table tblFieldLevelManipulation. The following steps detail how to create your own user-defined drill-down.
Note It is very important that you get the part of the drill-down SQL statement dealing with the KeyField in the WHERE clause in the correct syntax that will work with the system. Also, for KeyFields that are of the Text data type, quotes should surround the whole expression rather than being located in the middle of it.
The SBCM allows users to filter down within existing views of information by using filters. Business rule filters are located in table tblFilters, and these filters are assigned to business rules in tblBusinessRulesWithFilters. In order to create the custom filter, you must first determine a distinct list of values to filter with, then you must build a special query that the SBCM can use to do the filtering, and finally you must make entries into the two filtering-related tables.
Using our sales call information example, we will build a filter that that displays sales information by company. The step-by-step sections that follow detail how to create the new business rule filter. Once completed, the new business rule filter should be similar to the one in Figure 7 below.
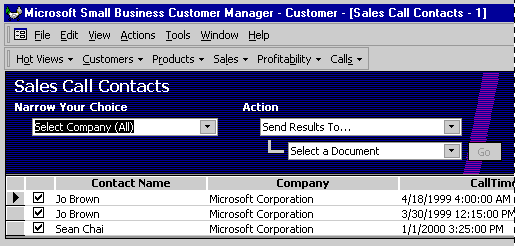
Figure 7. The Sales Call Contacts business rule filter
SELECT DISTINCT Company AS CompanyID, Company,
"Company='{GetComboChoice}'" AS SQLString
FROM qryBR_SalesCalls
In order for the SBCM to use a filter query, the filter query must contain three fields. The first field is the ID field. This type of field will uniquely identify each row returned by the query. In our example, the ID field is the distinct company name.
The second field the filter query must contain is the bound field. This is the field that will be used by the SBCM to populate the filter combo box that is in the user interface.
The third and final field needed by the SBCM is a partial SQL string aliased as SQLString. This string is basically the SQL WHERE clause that the SBCM will use to implement the custom filter. The string must reference bound column field of the query (the second field) and the SBCM function GetComboChoice, which is a function that simply returns the value selected by the user in the filter combo box.
In the SQL string from the example above, notice that we are building the query from our qryBR_SalesCalls query. This is because we only want to filter on those companies that have sales calls associated with them. Although we could have used the SQL statement from query qryBR_SalesCalls to build our filter query, it is much simpler to reference it in the FROM clause.
Notice in the business rule filter combo box that there is a selection titled Select Company (All). This business rule filter is automatically generated for you by the SBCM.
Automation actions are custom operations that can be performed on information in a particular business rule view. For example, you may want to enable the user to send a view to Excel so that it will be formatted in spreadsheet format. Section Using Table tblBusinessRulesWithAutomationTasks discussed how you can make entries into table tblBusinessRulesWithAutomationTasks to enable the Actions menu and Action drop-down list selections. These selections are in turn associated with automation actions that are defined by table tblAutomationTasks. Anytime you want to create a new automation action for a particular business rule view, you must create an entry in table tblBusinessRulesWithAutomationTasks, and associate that task with your custom function that carries out the task in table tblAutomationTasks. In addition, you must also select which automation category you want the task to fall under, as defined by table tblAutomationCategories.
To associate an automation action to a custom function, you must create an entry in table tblAutomationTasks and specify the automation category under which the action will fall. The automation category is the first-level drop-down list under the Action section of a business rule view. The shipping version of the SBCM has three default automation categories: For Selected Contacts, For Current Contact, Send Results To. Before making an entry into table tblAutomationTasks, be sure to check table tblAutomationCategories and get the appropriate AutomationCategoryID to associate with the new automation action. The following table schema lists each field in table tblAutomationTasks and describes how each field is used.
| Field Name | Data Type | Description |
| AutomationTaskID | Long Integer | The primary key, used to uniquely identify each automation task. |
| Title | Text | The task title that is displayed in the Action drop-down list box. |
| Description | Memo | The task description. |
| AutomationCategoryID | Long Integer | The automation category under which this action falls. |
| FunctionToCall | Text | The name of the function that should be executed when this action is selected from the Action drop-down list box. |
| DisplayOrder | Long Integer | This value should be a unique value for all records in this table under the automation category of your new task. Determines the display order of the automation action in the drop-down list. |
You may write a custom automation action function that mirrors the behavior of the built-in automation functions or that does something entirely different. If your automation function does merging, you can use some of the standard routines built in to the SBCM to simplify your coding task. Otherwise, you can write a function to perform any task that can be executed in code.
To add new data for merging, you need only create a new business rule that returns fields. This will become available as one of the business rules that can be the basis for a merge. You can then create a new document template that expects your custom fields as well as the core merge fields.
For custom automation actions that perform tasks other than merges, you can write any kind of programming code necessary to perform the desired task.
Following our sales calls example, we will create an custom automation action that will generate an Excel spreadsheet for all selected calls. Once completed, the new automation action should create a spreadsheet similar to the one in Figure 8 below.

Figure 8. The Sales Calls Excel spreadsheet
'//////////////////////////////////////////////////////////////
'// Constant values from the Excel type library that are not
'// needed if you include a reference to the Excel type library.
'//////////////////////////////////////////////////////////////
Enum ExcelConstantsEnum
    xlColumnClustered = 51
    xlColumns = 2
    xlCategory = 1
    xlPrimary = 1
    xlValue = 2
    xlLocationAsObject = 2
End Enum

'//////////////////////////////////////////////////////////////
'// CmdBuildSalesCallSpreadsheet
'//
'// This function builds an Excel spreadsheet of sales call
'// contacts grouped by user.
'//////////////////////////////////////////////////////////////
Public Function CmdBuildSalesCallSpreadsheet _
        (strCurrBR As String, lngTaskID As Long) As Long

Dim strBRTableName As String
Dim strSQL As String
Dim appExcel As Object                '/Excel.Application
Dim wkbReport As Object                '/Excel.Workbook
Dim wksReportsheet As Object        '/Excel.Worksheet
Dim chtChart As Object                '/Excel.Chart
Dim snpResult As DAO.Recordset
Dim blnResult As Boolean
Dim intRecordCount As Integer

On Error GoTo CleanUp

    'Set default return value.
    CmdBuildSalesCallSpreadsheet = 0

    'Get the name of the temporary table with the business rule
    'data.
    strBRTableName = GetBusinessRuleTempTableName(strCurrBR)

    'Test to make sure the user has checked at least one customer
    'for the report.
    If BusinessRuleSelectedCount(strCurrBR) = 0 Then
        MsgBox "Select customers for report.", _
                 vbOKOnly + vbInformation, _
                 "Customer Manager Custom Automation"
        Exit Function
    End If

    'Build the SQL statement.
    strSQL = "SELECT qryBR_SalesCalls.ContactName, " & _
                "Count(qryBR_SalesCalls.CallTime) AS CountOfCallTime " & _
            "FROM " & strBRTableName & " INNER JOIN qryBR_SalesCalls " & _
                "ON " & strBRTableName & _
        ".SelectedContactIndex=qryBR_SalesCalls.SelectedContactIndex " & _
                "GROUP BY qryBR_SalesCalls.ContactName, " & _
                strBRTableName & ".Selected " & _
                "HAVING " & strBRTableName & ".Selected=True"

    'Query the database.
    Set snpResult = CurrentDb.OpenRecordset(strSQL, dbOpenSnapshot)

    'Set default value.
    intRecordCount = 0

    'Find out how many records in recordset.
    If Not RecordsetIsEmpty(snpResult) Then
    snpResult.MoveLast
    intRecordCount = snpResult.RecordCount
    snpResult.MoveFirst
    End If

    'Tell the user and exit if there are no records returned.
    If intRecordCount = 0 Then
        MsgBox "No sales calls to report.", _
             vbOKOnly + vbInformation, _
             "Customer Manager Custom Automation"
        Exit Function
    End If

    'Launch Excel.
    blnResult = SafeCreateObject(appExcel, "Excel.Application", _
        "Couldn't instantiate Microsoft Excel.")
    If Not blnResult Then Exit Function

    'Create a new workbook.
    Screen.MousePointer = 11
    Set wkbReport = appExcel.workbooks.Add

    'Add a worksheet to that workbook.
    Set wksReportsheet = wkbReport.Worksheets.Add

    'Add and format data on the worksheet.
    With wksReportsheet

        'Add titles.
        With .Range("A1")
            .FormulaR1C1 = "Sales Call Analysis"
            With .Font
                .Bold = True
                .Size = 14
            End With
        End With

        .Range("A2").FormulaR1C1 = Format(Now(), "mmmm d, yyyy")
        .Range("A4").Value = "User"
        .Range("B4").Value = "# of Calls"
        'Copy data from recordset to the worksheet.
        .Range("A5").CopyFromRecordset snpResult
        'Set the range name of the returned data area.
        .Range("A5").CurrentRegion.Name = "'" & .Name & "'!ChartData"

        'Add the chart to the workbook.
        Set chtChart = wkbReport.Charts.Add

        With chtChart
            'Set chart type, data, and formatting information.
            .ChartType = xlColumnClustered
            .SetSourceData _
        Source:=wkbReport.sheets(wksReportsheet.Name).Range("ChartData"), _
                PlotBy:=xlColumns
            .HasTitle = True
            .ChartTitle.Characters.Text = "Users with Sales Calls"
            .Axes(xlCategory, xlPrimary).HasTitle = False
            .Axes(xlValue, xlPrimary).HasTitle = True
            .Axes(xlValue, xlPrimary).AxisTitle.Characters.Text = _
                "# of Calls"
            .HasLegend = False
            'Change the chart to an embedded object on the worksheet.
            .Location Where:=xlLocationAsObject, Name:=wksReportsheet.Name

            With wksReportsheet
                .Shapes(1).Top = .Range("A1").Offset(6 + intRecordCount).Top
                .Shapes(1).Left = 0
            End With
        End With
    End With

    'Change the selected cell.
    wksReportsheet.Range("g1").Select

    'Make Excel instance visible.
    appExcel.Visible = True

CleanUp:
    Screen.MousePointer = 0

    'Return the error number -- non-zero values will display a
    'generic error message.
    CmdBuildSalesCallSpreadsheet = Err.Number

    'If an error occurs after instantiating Excel, quit Excel.
    If (Err.Number <> 0) And Not (appExcel Is Nothing) Then
        If Not wkbReport Is Nothing Then
            'Set the workbook to saved, so no "Do you want to
            'save?" message appears.
            wkbReport.Saved = True
        End If

        'Turn error-reporting UI off.
        appExcel.DisplayAlerts = False
        'Quit Excel instance.
        appExcel.Quit
    End If

    'De-reference objects.
    snpResult.Close
    Set snpResult = Nothing
    Set appExcel = Nothing
    Set wkbReport = Nothing
    Set wksReportsheet = Nothing
    Set chtChart = Nothing

End Function

'//////////////////////////////////////////////////////////////
'// RecordsetIsEmpty
'//
'// This function checks to see if a recordset contains any
'// records. Returns TRUE if it does, FALSE if it doesn't.
'//////////////////////////////////////////////////////////////
Function RecordsetIsEmpty(rsTest As DAO.Recordset) As Boolean
    RecordsetIsEmpty = True
    RecordsetIsEmpty = rsTest.BOF And rsTest.EOF
End Function
Another type of customization that you can make to the SBCM is to add custom templates that can be used to create Microsoft Word or Publisher merge documents. The SBCM allows users to share their accounting and contact data with Microsoft Office applications by creating and attaching a data source with contact and accounting information to Microsoft Word and Publisher merge documents. Twenty-three sample merge templates are provided with the SBCM, and these templates contain sample data that include merge fields generated by the SBCM.
Although it is possible to modify the templates that are shipped with the SBCM, you can also create your own custom templates to work with your custom SBCM application. The following sections detail how you can create the custom templates and make them available from the SBCM user interface.
When a user initiates a merge, the SBCM creates a text file data source that includes all core merge fields, and the additional fields that are specific to the chosen business rule that is currently displayed in the user interface. Core merge fields like My_, MyCompany_ and Recipient_ are fields that are specified as merge fields in table tblFieldLevelManipulation. Additional business rule fields are the fields specific to the chosen business rule that is currently displayed in the user interface. This text file data source is a temporary file that is set as the merge data source for the new document. It is created from the template specified by the user, and it is automatically deleted once the merge is complete.
The SBCM templates are documents that have attached merge data sources. When they are created from within SBCM, these documents are attached to the temporary data source created by the SBCM that is eventually removed. If the templates are opened outside of the SBCM and the expected data source is absent, the application's "resolve data source discrepancies" dialog may appear.
In order to create the custom templates, you must first understand how the SBCM stores and accesses templates.
If you installed the SBCM in the default directories, the path for the template files will be C:\Program Files\Microsoft Office\Office\SBT\SBCM\Templates. There are three subdirectories under the templates directory, and these subdirectories contain the Word and Publisher template files. The three subdirectories are General, Promotions, and Sales Followup, and each subdirectory is related to a custom SBCM tab that is displayed in the standard Microsoft Office File/Open dialog box when it is launched from the SBCM.
There are also three desktop folder shortcuts that are named General, Promotions, and Sales Followup. Each of the shortcuts point to its related SBCM template folder subdirectory discussed in the previous paragraph. The three desktop folder shortcuts are installed in the current user's profile directory located at C:\Windows (or WINNT)\Profiles\username.000\ApplicationData\Microsoft\Templates. The presence of each link in this directory causes the File/Open dialog box to display folder tabs with the captions set to each link name. You can create your own desktop folder shortcuts to display a new custom tab in the File/Open dialog box.
In a typical user scenario, certain sequential steps are followed when creating a merge document from one of the SBCM templates.
When creating or modifying a template for the SBCM, the steps you follow are essentially the same as those outlined above, except that when you have completed your modifications to the document, you need to save it as a template in one of the template subdirectories.
Using our sales call information example, we will create a sales call tab in the New Documents to Contact dialog box that displays when a user selects one of the For Selected Contacts items from the Actions menu. The step-by-step sections that follow detail how to create the new documents tab. Once completed, the new documents tab should be similar to the one in Figure 9 below.

Figure 9. The Sales Calls New Documents tab
Based on the information covered in the section Template Locations, we will create the needed subdirectories and shortcuts to enable the new Sales Calls tab.
Note The new Sales Calls tab will not appear in the New Documents to Contacts dialog box until there are files in its associated directory.
Now that we have directories and shortcuts created, we can create our custom template. It is often easier to create a custom template by basing it on a template that already exists.
In the following step-by-step example, we will create our template based on a template that ships with the SBCM. Once completed, the new custom template should be similar to the one in Figure 10 below.
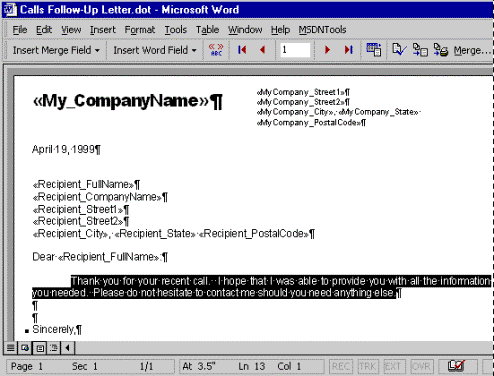
Figure 10. The Sales Call Follow-up template
In the SBCM.mdb database, you can create custom reports just as you would in any other Access application. After creating your report, you can create new menu items to preview or print the report. For more information about creating new menu items, see the section Step Three: Adding Custom Menu Items.
Using our sales call information example, we will build a report that lists sales call information grouped by company. The step-by-step sections that follow detail how to create the new report using the Access report wizard. Once completed, the new report design should be similar to the one in Figure 11 below.
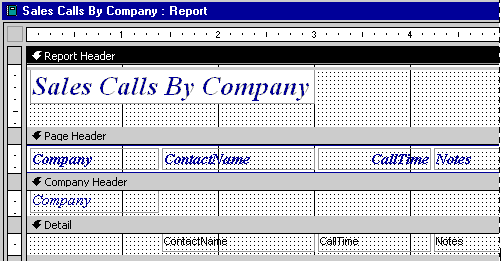
Figure 11. The Sales Calls By Company report
In addition to the customizable version of the SBCM.mdb database, there are other tools that you can use to help develop your custom application.
The business rules maintenance form is a tool that you can use to maintain or add new business rules to the SBCM. It allows you to use a graphical interface instead of accessing the tables directly as discussed in the section Step Four: Adding Custom Business Rules. To get the business rules maintenance form, you must run the install.mdb database. The install.mdb database is an Access database that will automatically add the business rules maintenance forms to your custom SBCM.mdb database file. See Figure 12.
Note When you use the copy feature to duplicate an existing business rule, you will need to create the filters and tasks that you wish to have associated with that business rule, the filters and tasks are not copied from the original business rule.
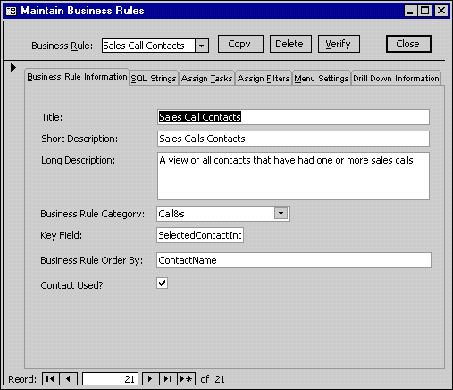
Figure 12. The Maintain Business Rules form
The SBCM Debug Wizard is a graphical tool that you can use to open the SBCM.mdb database in debug mode. The tool will build the debug command line for you as you enter in information about the locations and security information for the SBCM database that you want to open. See Figure 13.
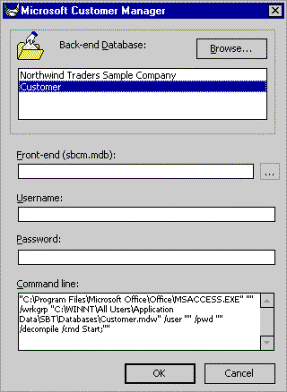
Figure 13. The SBCM Debug Wizard
The following table describes the fields in the SBCM Debug Wizard and how you can use them.
| Field Name | Description |
| Back-end Databases | This is the database created by the New Database Wizard. Use the Browse button to find the database if it is not listed. |
| Front-end (sbcm.mdb) | This is the SBCM.mdb database. Use the ellipsis (browse) button to find the database if it is not listed. |
| Username | A valid user name. |
| Password | A valid password. |
| Command Line | The debug command line that will be used to open the SBCM database in debug mode. |
In the future, more Small Business tools may be available to assist in developing customized versions of the SBCM. Be sure to periodically check the Small Business Tools Web site for new information.
Continue to check the SBCM Customization SDK Web site for more tools and documentation.
Microsoft Access 2000 Online Help—This is an irreplaceable source for Access 2000 programming topics. Note that Microsoft Jet SQL Reference, the definitive source for the SQL language as it applies to Access 2000, can be found in the contents section of Access 2000 online help.
Microsoft Office 2000/Visual Basic Programmer's Guide—This comprehensive book covers Office programming with the Visual Basic for Applications programming language.
http://msdn.microsoft.com/library/officedev/odeopg/deovroffice2000visualbasicprogrammersguide.htm.
Microsoft Jet Database Engine Programmer's Guide—This book is everything you wanted to know about programming with the Microsoft Jet Database Engine.
http://mspress.microsoft.com/prod/books/459.htm.
Microsoft Developer Network—This Web site always has the latest information for developing solutions with Microsoft platforms and languages.
http://msdn.microsoft.com/.
Microsoft Office Developer's Forum—Look here for the latest information on developing applications with Microsoft Office.
http://msdn.microsoft.com/officedev/.
Building Applications with Forms and Reports—Here you can find solid development techniques for developing an Access 2000 application.
http://msdn.microsoft.com/library/officedev/off2000/
defbuildingapplications.htm.
Microsoft Mastering Series Courseware—MSDN Training now includes Mastering Series Courseware, designed to help software developers and to provide the soundest techniques for developing Access 2000 applications.
http://msdn.microsoft.comhttp://msdn.microsoft.com/training/.