
Guy Eddon
Henry Eddon
March 1998
Adapted from Inside Distributed COM by Guy Eddon and Henry Eddon, available from Fatbrain.com.
Summary: Describes distributed COM (DCOM) features of type libraries (ICreateTypeLib, ICreateTypeInfo, ITypeLib, and ITypeInfo). Details how to make previously built in-process C++ components that implement ISum interfaces and matching C++ clients more accessible using type libraries and language integration. Also discusses the use of ATL (Active Template Library) to assist in building COM components in C++ and other COM issues from the perspective of Visual Basic, Visual J++, Java, and JavaBeans. (45 printed pages)
Introduction: What's the Next Step After Building In-Process Components in C++?
Eureka! Type Libraries
An Easy C++ Client That Utilizes the Type Library
Active Template Library
COM Programming in Visual Basic
COM Programming in Java
After you have built an in-process component in C++ that implements the ISum interface and a matching C++ client, what's the next step?
Let's find some way of making built components more accessible to a wider variety of developers. Consider this: Who might your customers be if you decided to market this component? Even discounting the fact that a component that can only add two numbers is of limited value, right now only developers with a good grasp of C++ and COM would be interested in spending any money on our component. Perhaps we could broaden our market a bit if we made the component accessible to developers using Microsoft® Visual Basic® or Java, and maybe we could even make the component easier to use from C++.
Remember that COM is a binary standard for component implementation and integration, and therefore the language used to build or call COM objects is irrelevant. Since our component is already built on COM, you might wonder why anything special is required to make it accessible to developers using other languages. Well, to make a component more accessible to developers working in other languages, you need to create a type library. For example, Visual Basic and Microsoft Visual J++®, by and large, depend on type libraries for their COM integration features.
NOTE Some of the sample code presented in this article is based on sample code presented in Chapter 2 "IUnknown and IClassFactory" of Inside Distributed COM by Guy Eddon and Henry Eddon. Consult that chapter if you want to review that code or if this is your first time building COM-based components in C++ that implement the ISum interface.
In this article, we first discuss type libraries. Then we examine how using type libraries can make client-side COM programming in C++ easier. We also introduce the Active Template Library (ATL), which assists in building COM components in C++. Last we cover COM issues from the perspective of Visual Basic and Visual J++.
A type library is best thought of as a binary version of an Interface Definition Language (IDL) file. It contains a binary description of the interfaces exposed by a component, defining the methods along with their parameters and return types. Many environments support type libraries: Visual Basic, Visual J++, and Microsoft Visual C++® all understand type libraries; so do Delphi, Microsoft Visual FoxPro®, and Microsoft Transaction Server. Rumor has it that the next version of Microsoft (Visual) Macro Assembler will support COM via type libraries.
Microsoft has defined the COM interfaces needed to build (ICreateTypeLib and ICreateTypeInfo) and read (ITypeLib and ITypeInfo) type libraries. Few programs other than the Microsoft IDL (MIDL) compiler have any need of the interfaces used to build type libraries, but Visual C++, Visual J++, and Visual Basic are all capable of reading type libraries. What is the advantage of describing your interfaces in a type library? Since a type library provides complete information about your interfaces to anyone who is interested, sophisticated modern programming tools can read this information and present it to programmers in an accessible format, making COM programming a breeze.
Visual Basic, for example, has a feature named Auto List Members that displays a drop-down list while you are writing code, as shown in Figure 1. The statement builder drop-down list makes code suggestions. To insert an item into your code, simply double-click on it or press the Tab key while the option is selected. With a feature like this, it's no wonder that Visual Basic has become so popular! Visual Basic retrieves all the information it needs to develop the selections presented in the statement builder from the type libraries of available components. Future versions of Visual C++ and Visual J++ might offer a similar feature.
Figure 1. The statement builder feature in Visual Basic
With a few simple additions, an ISum interface definition can be compiled into a binary type library file (component.idl) by using the MIDL compiler. The improved IDL file that will instruct the MIDL compiler to generate a type library for our component is shown (the additions are shown in boldface).
import "unknwn.idl";
[ object, uuid(10000001-0000-0000-0000-000000000001),
oleautomation ]
interface ISum : Iunknown
{
HRESULT Sum(int x, int y, [out, retval] int* retval);
}
[ uuid(10000003-0000-0000-0000-000000000001),
helpstring("Inside DCOM Component Type Library"),
version(1.0) ]
library Component
{
importlib("stdole32.tlb");
interface ISum;
[ uuid(10000002-0000-0000-0000-000000000001) ]
coclass InsideDCOM
{
interface ISum;
}
};
NOTE The oleautomation attribute in the code listed above has been added to the ISum definition to indicate that this interface uses only Automation-compatible types. Note that the ISum interface is not an Automation interface. The ISum interface does not inherit from IDispatch (the Automation interface). For more detailed instructions on building ISum interface definitions, see Chapter 2 "IUnknown and IClassFactory" of Inside Distributed COM by Guy Eddon and Henry Eddon.
To instruct MIDL to generate a type library you must add the library keyword to the IDL file. Anything defined in the library section of the IDL file is added to the type library. The library has a universally unique identifier (UUID) defined for it and contains a coclass (COM class) statement that provides a listing of the interfaces supported by a COM class. In this case, the InsideDCOM class supports only one interface: ISum. The version attribute specifies the version number of the type library only; it is not used to specify the COM interface version or the class version. The helpstring attribute can be used to describe a type library, coclass, interface, method, or any other element in a type library. This information is often used by applications to provide a user-friendly name for a component. For example, Visual Basic uses these strings in the References dialog box, shown in Figure 2, to present the user with a selection of available components. The References dialog box is really used to set a reference to a type library stored inside a component. The type library gives Visual Basic sufficient information to access the component.
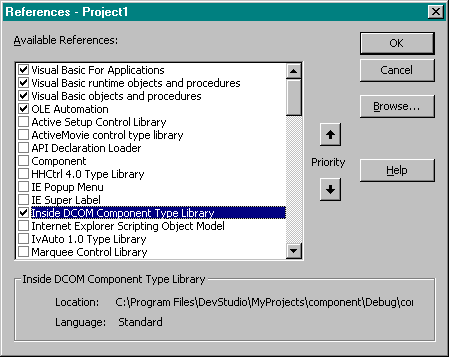
Figure 2. The Visual Basic References dialog box
Before you can make full use of a type library, its existence must be noted in the registry. Languages such as Visual Basic and Visual J++ scour the registry in search of components containing type libraries. Registering a type library consists basically of inserting the necessary entries under the HKEY_CLASSES_ROOT\TypeLib and HKEY_CLASSES_ROOT\Interface keys in the registry. The HKEY_CLASSES_ROOT\TypeLib key declares each type library installed on the system. A library identifier (LIBID) consists of a globally unique identifier (GUID) that identifies each registered type library. Every LIBID key in the registry contains several subkeys that specify the version number of the type library, the path to that library, several flags, and an optional path to a directory containing help files with information about the contents of the type library.
A registration (.reg) file can be used to create these registry entries. It is preferable to integrate the type library registration step with the component self-registration step, however. Programmatically registering a type library is as easy as calling the LoadTypeLibEx function. This call can be used to create all the necessary entries automatically. In addition to filling in a complete registry entry under the TypeLib key, the function adds entries for each of the Automation-compatible interfaces (including dual interfaces) defined in the type library. This information is required to create instances of these interfaces. It is important to note that COM objects are not registered by LoadTypeLibEx (that is, the type library registration functions do not write any values into the CLSID key of the object).
NOTE For more information on registration (.reg) files and their use with type libraries, consult Chapter 2 "IUnknown and IClassFactory" of Inside Distributed COM by Guy Eddon and Henry Eddon.
The HKEY_CLASSES_ROOT\Interface key contains information about each COM interface available on the system that has an interface identifier (IID). This section begins with {00000000-0000-0000-C000-000000000046}, the IID of the IUnknown interface, and then proceeds with some very standard COM interfaces, such as IClassFactory, IMalloc, and IMarshal, before heading off into some of the more esoteric COM interfaces, such as IExternalConnection, and finally delving into the world of custom interfaces. One IID subkey is required for each new interface your application defines. The Interface key can contain the subkeys listed in Table 1 below:
Table 1. Descriptions of HKEY_CLASSES_ROOT\Interface\{YourIID} subkeys
| Subkeys of HKEY_CLASSES_ROOT\ Interface\{YourIID} |
Description |
| BaseInterface | Identifies the interface from which the current interface is derived |
| NumMethods | Specifies the number of methods in the associated interface |
| ProxyStubClsid32 | Identifies the CLSID of the 32-bit proxy/stub DLL that knows how to marshal this interface |
| TypeLib | The LIBID associated with the type library in which the interface is described |
The following code shows an improved version of the self-registration code that calls LoadTypeLibEx to register the component's type library. Notice that the LoadTypeLibEx function is called to load the type library from the component.dll file, as shown in boldface. This call assumes that the type library has been embedded in the DLL file, as will be discussed shortly.
HRESULT __stdcall DllRegisterServer()
{
    char DllPath[256];
    OLECHAR wDllPath[256];
    GetModuleFileName(g_hInstance, DllPath, 256);
    mbstowcs(wDllPath, DllPath, 256);
    ITypeLib* pTypeLib;
    HRESULT hr = LoadTypeLibEx(wDllPath, REGKIND_REGISTER,
        &pTypeLib);
    if(FAILED(hr))
        return hr;
    pTypeLib->Release();
    return RegisterServer("component.dll", CLSID_InsideDCOM,
        "Inside DCOM Sample", "Component.InsideDCOM",
        "Component.InsideDCOM.1", NULL);
}
HRESULT __stdcall DllUnregisterServer()
{
    HRESULT hr = UnRegisterTypeLib(LIBID_Component, 1, 0, LANG_NEUTRAL,
        SYS_WIN32);
    if(FAILED(hr))
        return hr;
    return UnregisterServer(CLSID_InsideDCOM, "Component.InsideDCOM",
       "Component.InsideDCOM.1");
}
Now recompile the updated component.idl file using the MIDL compiler to produce the type library file (component.tlb). Be sure to remove or comment out the CLSID_InsideDCOM definition from the client.cpp and component.cpp source files, as shown in the following code. This CLSID is now generated by MIDL, in the component_i.c file linked with those projects.
// Remove this stuff.
/*
{10000002-0000-0000-0000-000000000001}
const CLSID CLSID_InsideDCOM =
{0x10000002,0x0000,0x0000,{0x00,0x00,0x00,0x00,0x00,0x00,0x00,0x01}};
*/
An alternative to leaving a component's type library as a separate .tlb file is to embed the type library in the component as a resource. This technique has the advantage of making your component neater, since the one file includes both the component and the type information that describes how to use that component. To include a type library as a resource in a component, you must first create a resource script (.rc) file. The following shows a component.rc resource script file that includes a type library in a component:
1 TYPELIB "component.tlb"
Calling LoadTypeLibEx is programmatically quite easy to do, but it is nonetheless a chore during the development process. To make this task easier, we have created a simple utility named RegTlb that can be used to register any stand-alone type library file. Here's the code for the RegTlb .cpp file:
#include <windows.h>
#include <iostream.h>

void main(int argc, char** argv)
{
if(argc < 2)
{
cout << "Usage: regtlb tlbfile.tlb" << endl;
return;
}

CoInitialize(NULL);

OLECHAR psz[255];
MultiByteToWideChar(CP_ACP, 0, argv[1], strlen(argv[1]),
psz, 255);
Now simply add the resource script file to the project and rebuild; the resource compiler (rc.exe) will automatically embed the type library into the finished component. Last, register the component by choosing Register Control from the Tools menu in Visual C++. The component should self-register successfully, and you will be able to see several new entries in the aforementioned areas of the registry.
The OLE/COM Object Viewer (oleview.exe) utility that comes with Visual C++ is a good tool to use when you are exploring the registry and type libraries, either as .tlb files or embedded within components. The OLE/COM Object Viewer is a nifty utility that can function as an alternative to the registry editor, since it is designed specifically for viewing the registry information that pertains to COM objects. It can also be used to reverse-engineer type libraries into their original IDL source code.
ITypeLib* pTypeLib;
HRESULT hr = LoadTypeLibEx(psz, REGKIND_REGISTER, &pTypeLib);
if(FAILED(hr))
{
cout << "LoadTypeLibEx failed." << endl;
return;
}
else
cout << "Type library registered." << endl;

pTypeLib->Release();

CoUninitialize();
}
Once the program has been compiled, simply execute a command-line statement such as RegTlb mytlb.tlb and all the necessary registry entries will be created automatically. This technique is similar to the way the RegSvr32 utility works, except that RegSvr32 refuses to register stand-alone type libraries. Improving RegTlb so that it also allows you to unregister type libraries using the UnRegisterTypeLib function is left as an exercise for you.
Let's see how a client application could be simplified using a type library. The easyclient.cpp application shown here uses the type library embedded in the component.dll file:
#import "C:\Program Files\DevStudio\MyProjects\component\\
Debug\component.dll" no_namespace
#include <iostream.h>

void main()
{
CoInitialize(NULL);
ISumPtr myRef(__uuidof(InsideDCOM));
int result = myRef->Sum(5, 13);
cout << "5 + 13 = " << result << endl;
myRef = NULL;
CoUninitialize();
}
NOTE For more information on building client applications in C++ that can be later enhanced using type libraries, see Chapter 2 "IUnknown and IClassFactory" of Inside Distributed COM by Guy Eddon and Henry Eddon.
The first immediately apparent simplification appears in the layout of the program. From over 30 lines of code (without a type library), we now need only 12 lines of code (with a type library). More important, the type library has lowered the knowledge barrier required to use this component; the user no longer has to be a C++ or COM expert. How did the type library perform this magic? If you look at the very first line of code in the program, you will see the answer: the #import directive. This Microsoft language extension is used to incorporate information from a type library. The #import directive instructs the compiler to process the designated type library, converting the contents to C++ code that describes the COM interfaces contained within the type library.
When it encounters the #import directive, the C++ compiler generates two header files that reconstruct the type library's contents in C++ source code. The primary header file has the same name as the type library with the .tlh (type library header) extension. This file is similar to the header file produced by the MIDL compiler, as it contains the abstract base class definitions for the interfaces. The secondary header file, also with the same name as the type library but with the .tli (type library implementation) extension, contains the implementations of compiler-generated member functions and is included by using the #include directive in the primary (.tlh) header file. Both header files are placed in the compiler's output directory. They are then read and compiled as if the .tlh file were named by using a #include directive in the source code.
The most interesting aspect of the contents of these header files is their use of Microsoft's smart pointer template classes. But before we become more deeply engrossed in smart pointers, it is important to have a solid grounding in C++ template classes. If, like us, you struggle to keep up with the latest features of C++, Java, and Visual Basic, you might find the following section useful. If you are already a template guru, just skip to the section of this article on smart pointers.
Templates (sometimes called parameterized types) in the C++ language are mechanisms for generating code based on a parameter's type. Using templates, you can design a single class that operates on data of many types instead of having to create a separate class for each type. The standard example of a template involves creating a function that compares two values and returns the greater one. In C, you could accomplish this task with a macro, as shown here:
#define max(a, b) ((a > b) ? a : b)
Although they are valid in C++, macros of this sort are frowned on due to their lack of type checking. For example, the compiler has no objection to code such as this:
max(60, ‘b'); // Compiler says no problem!
Macros can also lead to more insidious bugs like this:
int x = 6;
cout << max(++x, 6) << endl; // Displays 8
The fact that this code prints the value 8 might seem odd at first, until you mentally expand the macro as the compiler does:
cout << ((++x, 6) ? ++x : 6) << endl;
Since the preprocessor expands macros by substitution, the variable x is incremented twice.
Templates were added to the C++ language to address some of these issues. The template version of the preceding macro is shown here:
template <class T>
T max(T a, T b)
{

    return (a > b) ? a : b;
}
There are two basic types of templates: function templates and class templates. A function template defines a function that can accept arguments of any type, as shown in the preceding example. A class template defines an entire class that can be generalized to work with any type. The template keyword begins the definition of the template, followed by the type argument enclosed in angle brackets (< and >). The class keyword is used to indicate a type argument to a template, even though the actual type argument can be any type and need not be a class. This keyword is followed by the actual function template definition, with the argument T used to represent the type. Think of the argument T as a variable representing the type of the actual parameter. This function template can now be used for any of the following types:
max(10, 12);            // int
max(10.8, 12.5);        // float
max(‘a', ‘b');          // char
max(true, false);       // bool
Because no macro substitution is used, the following code works fine:
int x = 6
cout << max(++x, 6) << endl; // Displays 7
Type checking is also enforced, making this code illegal:
max(60, ‘b'); // Compiler says big problem!
When a function template is first called for each type, the compiler creates an instantiation, or version, of the template function specialized for that type. This instantiation will be called every time the function is used for the type. If you have several identical instantiations, even in different modules, only one copy of the instantiation will end up in the executable file. For example, max(10, 12) causes the compiler to generate the following code:
int max(int a, int b)
{
    return (a > b) ? a : b;
}
And max('a', 'b') generates this code:
char max(char a, char b)
{
    return (a > b) ? a : b;
}
Whereas macros have no overhead because the preprocessor expands them, the overhead of templates can be minimized using the inline keyword. The inline keyword suggests that the compiler insert a copy of the function body into each place the function is called. Using inline functions can make a program faster because they eliminate the overhead associated with function calls. Inline functions are also subjected to code optimizations not available to normal functions.
Another useful feature of templates is the ability to override a template function in order to define special behavior for a specific type. Say you wanted to compare the lengths of two strings using the max function template. The standard version generated by the compiler would compare only the pointer addresses. The following code shows a function that overrides the compiler's default instantiation of the template in order to compare string lengths:
template<> char* max(char* a, char* b)
{
    return (strlen(a) > strlen(b)) ? a : b;
}
Now you can write code such as this:
cout << max("hello", "good-bye") << endl; // Displays good-bye
A class template enables you to generalize an entire class so that it can work with any type. For example, a string class might need to work with single-byte characters as well as double-byte Unicode characters. Here is the definition of a rudimentary string template class:
template <class T> class String
{
    struct sRep;
    sRep* rep;
public:
    String();
    String(const T*);
    String(const String&);

    §
};
This template class could be instantiated for the regular character and a Unicode character, as shown here:
String<char> cs;
String<wchar_t> ws;
This review of C++ templates should give you enough information to get started with smart pointers. We'll revisit C++ templates later in the Active Template Library section of this article.
A smart pointer is an object that looks, acts, and feels like a normal pointer but offers greater functionality. The designers of smart pointers usually have two goals in mind: to make programming safer and to make programming easier. In C++, smart pointers are implemented as template classes that encapsulate a pointer and override standard pointer operators. What do smart pointers have to do with COM? Since COM programming in raw C++ is quite difficult and error prone, smart pointers can be used to improve the programmer's odds of success. Let's look at three aspects of standard smart pointers, with an eye toward how they could improve client-side COM programming:
Construction of a smart interface pointer can be as simple as initializing the pointer to null or as complex as calling CoCreateInstance to retrieve a pointer to the requested interface. Normally, a smart pointer class's constructor is overloaded to support all of these various capabilities. The destructor of a smart interface pointer can automatically call Release. A smart pointer can overload the assignment operator (=) so that any attempt to copy the pointer results in an automatic AddRef call, relieving the programmer of the burden of reference counting. Last the indirection operator (*) can be overridden by the smart pointer class to perform some basic error checking, ensuring that the internal "dumb" pointer is not null or invalid in some other way.
For the most part, smart pointer classes are implemented as template classes because otherwise they would be useful only with a specific pointer type. For example, you could build a well-designed smart pointer class for IUnknown interface pointers, but this class would be of limited value to someone who wanted to access the ISum custom interface. Since template classes allow you to create generic wrappers to encapsulate pointers of almost any type and since interface pointers share similar semantics, a template version of the smart pointer class could be built, allowing the smart pointer to be used with any interface pointer type.
Microsoft has defined a set of smart pointer template classes in the header files comdef.h, comutil.h, and comip.h. These template classes are used in the code generated by the compiler in response to the type library specified by the #import statement. The fundamental template class defined by Microsoft is _com_ptr_t. The _com_ptr_t template class is a smart pointer implementation that encapsulates interface pointers and eliminates the need to call the AddRef, Release, and QueryInterface methods of the IUnknown interface. In addition, it wraps the call to CoCreateInstance when instantiating a new COM object. The _COM_SMARTPTR_TYPEDEF macro is used to establish typedefs of COM interfaces to be template specializations of the _com_ptr_t template class. For example, the following code:
_COM_SMARTPTR_TYPEDEF(ISum, __uuidof(ISum));
is expanded by the compiler into:
typedef _com_ptr_t<_com_IIID<ISum, __uuidof(ISum)> > ISumPtr;
The ISumPtr type can then be used in place of the raw interface pointer ISum*. To instantiate an object, declare a variable of type ISumPtr and pass the COM class' CLSID to the constructor, as shown here:
ISumPtr myRef(__uuidof(InsideDCOM));
The smart pointer's constructor calls CoCreateInstance, followed by QueryInterface for the ISum interface. Now myRef can be used to call methods of the ISum interface with code nearly identical to that used with dumb pointers:
int result = myRef->Sum(5, 13);
Notice that the value returned by the function is not an HRESULT but the actual sum previously returned via a pointer in the third parameter. The compiler notices that the parameter is marked as [out, retval] in the type library, and as shown in the following code, it generates a wrapper function in the .tli file that provides the real return value:
int __inline ISum::Sum ( int x, int y ) {
    int _result;
    HRESULT _hr = raw_Sum(x, y, &_result);
    if (FAILED(_hr)) _com_issue_errorex(_hr, this, __uuidof(this));
    return _result;
}
This code ends without calls to AddRef or Release since the smart pointer fully automates reference counting. Before calling CoUninitialize, however, it is important to set the smart pointer to NULL, as shown in the following code fragment, in order to force a call to Release. After CoUninitialize, any attempts by the smart pointer to call Release in the destructor will crash.
myRef = NULL;
CoUninitialize();
If you decide that you like Microsoft's smart pointer template classes but are not keen to have the C++ compiler generate code based on a type library, you can use the smart pointer classes directly simply by including the comdef.h header file. The client application, shown in below, uses these header files to call previously created components. Be sure to compile and link this file with the component_i.c file generated by the MIDL compiler.
NOTE For more detailed information on creating components that can be called with the comdef.h header files, see Chapter 2 "IUnknown and IClassFactory" of Inside Distributed COM by Guy Eddon and Henry Eddon.
smartpointerclient.cpp
#include <comdef.h>
#include <iostream.h>
#include "component.h" // Generated by MIDL

void main()
{
CoInitialize(NULL);
_COM_SMARTPTR_TYPEDEF(ISum, IID_ISum);
ISumPtr myRef(CLSID_InsideDCOM);
int result;
myRef->Sum(5, 13, &result);
cout << "Client: 5 + 13 = " << result << endl;
myRef = NULL;
CoUninitialize();
}
By default, the .tlh file generated by the compiler in response to the #import directive is enclosed in a namespace with its name lifted from the library statement in the original IDL file. A namespace is a declarative region that attaches an additional identifier to any names declared inside it. The additional identifier makes it less likely that a name will conflict with names declared elsewhere in the program. The C++ language provides a single global namespace by default, which can cause problems when global names clash. For example, you might want to import two different type libraries, both of which contain identically named items, into the same C++ source file. Normally, this is not a problem for COM since everything works based on GUIDs. The #import directive, however, enables COM objects to appear almost as standard C++ objects, with the GUIDs hidden in the compiler-generated code.
These two C++ header files illustrate the problem:
// one.h
class Math { ... };

// two.h
class Math { ... };
With these definitions, it is impossible to use both header files in a single program; if you did, the Math classes would clash. Namespaces have been introduced into the C++ language to address this problem. It is possible to use the identical names in separate namespaces without conflict even if the names appear in the same translation unit. As long as the names are used in separate namespaces, each name will be unique because of the addition of the name- space identifier.
The C++ namespace keyword is used to declare a namespace, as in these examples:
// one.h
namespace one
{
    class Math { ... };
}

// two.h
namespace two
{
    class Math { ... };
}
Now the Math class names will not clash because they have become one::Math and two::Math.
Declarations made outside all namespaces are still members of the global namespace. You can use the names from a namespace either by an explicit qualification with the namespace name (one::Math) or by selecting a namespace using the using keyword, as shown here:
using namespace two;
Math x();    // Refers to two::Math
When the #import directive is used, the generated namespace can be suppressed by specifying the no_namespace attribute, as shown here:
#import "component.dll" no_namespace
Be aware that suppressing the namespace may lead to name collisions if you import multiple type libraries from different components. In this example, only one component is used, so specifying the no_namespace attribute to avoid dealing with namespaces does not create a problem.
The #import directive and the smart pointer template classes make client-side COM programming significantly easier and more enjoyable. These extensions do not aid in the building of COM components themselves, however. To assist developers building COM components in C++, Microsoft has introduced the Active Template Library (ATL). ATL is a small library composed of C++ template classes that provide support for the most common of COM programming chores, such as implementing the IUnknown, IClassFactory, and IDispatch interfaces, as well as dealing with component registration issues.
The design of ATL is loosely based on that of the Standard Template Library (STL), originally developed by Hewlett-Packard and now part of the ANSI/ISO standards for C++. As their names imply, both libraries heavily leverage the template functionality found in C++. Template libraries differ from traditional C++ class libraries in several important ways. First, the functionality of a template library is generally accessed by instantiating a class from a template rather than deriving from a base class. Due to this design difference, a class hierarchy does not necessarily define the relationships among the classes in a template library. Second, template libraries are typically supplied in source code form, often contained in header files, with little or no run-time DLL.
The differences between traditional C++ class libraries and template libraries can be illustrated by comparing the Microsoft Foundation Class (MFC) library to ATL. MFC is a heavy-duty library containing over 100,000 lines of code that does everything from supporting database functionality to creating ActiveX® controls (with the kitchen sink thrown in for good measure). This versatility makes MFC a great choice for developers working on standard double-clickable Windows-based applications who want as much prefabricated functionality as possible. Nevertheless, the 918-kilobyte (KB) overhead of the mfc42.dll run-time file might prove unacceptable for those working on small and (hopefully) lightweight COM components that may be downloaded over a low bandwidth Internet connection. ATL, on the other hand, has a 20-KB DLL (atl.dll), and even that is optional. Of course, ATL has a much more limited scope than MFC: ATL allows you to easily create COM objects, ActiveX controls, and Automation servers.
To make it easier for you to work with ATL, Microsoft has provided the ATL COM AppWizard in Visual C++, shown in Figure 3. This simple wizard asks you to choose one of three types of components: DLL, EXE, or Win32 service. The wizard even allows you to specify that the proxy/stub interface marshaling code should be merged with the main project rather than built as a separate DLL. Based on these few decisions, the wizard generates the source code for a component. For example, if you choose an in-process component, the wizard will generate code for the standard DLL entry points, including DllMain, DllGetClassObject, DllCanUnloadNow, DllRegisterServer, and DllUnregisterServer.
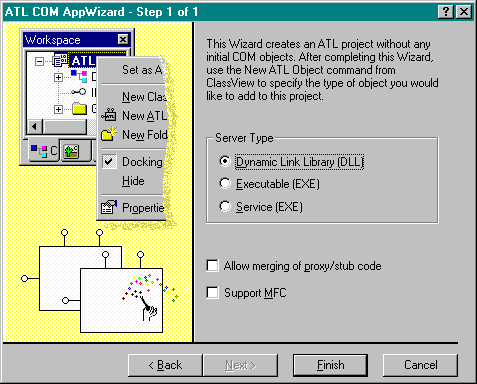
Figure 3. The ATL COM AppWizard, which generates some of the framework code to create a COM component
Although the main housing for a component is quickly generated by the ATL COM AppWizard, no COM objects are implemented as of yet. For this task, Microsoft provides the ATL Object Wizard, shown in Figure 4. The ATL Object Wizard enables you to add several different types of COM objects to a component, from rudimentary COM objects to objects that can operate within Microsoft Transaction Server. The ATL Object Wizard also supports the creation of several types of ActiveX controls, such as basic controls that work with Microsoft Internet Explorer and full controls that work with almost any container, including Visual Basic.
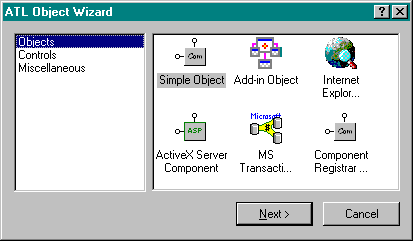
Figure 4. The ATL Object Wizard, which assists in creating a COM object based on ATL
The simplest type of object, aptly named simple object, does not provide automatic support of any standard COM interfaces besides IUnknown and IClassFactory and thus often makes the best choice when you are implementing custom interfaces. The interfaces implemented automatically for some of the other available object types are listed in Table 2 below:
Table 2. Object types and implemented interfaces
| Object Type | Implemented Interfaces |
| Internet Explorer object | IObjectWithSite |
| Microsoft Transaction Server object | IObjectControl |
| Internet Explorer control | IViewObject
IViewObject2 IViewObjectEx IOleWindow IOleInPlaceObject IOleInPlaceObjectWindowless IOleInPlaceActiveObject IOleControl IoleObject IPersistStreamInit |
| Full control | All interfaces implemented for the Internet Explorer control, plus the following:
IQuickActivate IPersistStorage ISpecifyPropertyPages IDataObject IprovideClassInfo IProvideClassInfo2 |
| Property page | IPropertyPage |
Depending on the object type you choose, the ATL Object Wizard presents a set of options, which enable you to select the threading model supported by the object, decide whether a custom interface should include support for IDispatch, and specify whether the object supports aggregation. Figure 5 shows the most common options presented for a simple object.
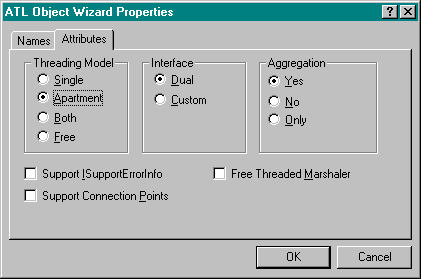
Figure 5. Available options for the simple object in the ATL Object Wizard
The next step after adding a COM object to an ATL project is to add the desired methods and properties to the interface. The simplest way to add methods and properties to an interface is to use the wizardlike dialog boxes provided by Visual C++. Figure 6 shows the Add Method To Interface dialog box, which lets you do just that.
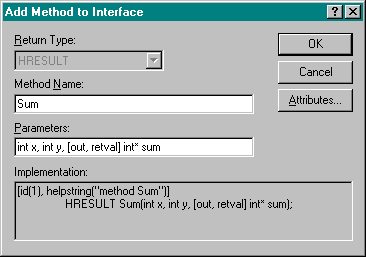
Figure 6. The dialog box used to add a method to an interface
Once the desired interfaces and methods have been added to an ATL-based component, the implementation work is complete. There is no need to mess with IUnknown, IClassFactory, or even registration functions, as all of this default functionality is automatically provided by ATL. The module definition (.def) file containing the DLL exports and the resource script (.rc) file referencing the type library are provided. Even the IDL file is generated and then compiled by MIDL as an automated part of the build process.
Figure 7 shows the fundamental ATL classes used to implement a COM object.
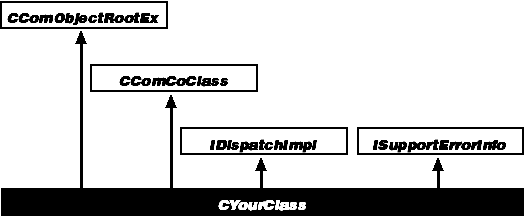
Figure 7. The ATL object model
CComObjectRootEx is the essential ATL class. It provides the default table-driven QueryInterface mechanism and is a required part of every ATL object. The CComCoClass class defines the default class factory and aggregation model for an object. For objects supporting a dual interface, IDispatchImpl can be used to provide a default implementation of the IDispatch interface. The ISupportErrorInfo interface must be supported if the IErrorInfo interface is used to report errors back to the client. This interface can be easily implemented using the ISupportErrorInfoImpl template class.
The following exercise takes you through the steps needed to build a simple COM object using ATL:

Figure 8. The Java Type Library Wizard, which displays the COM class with type libraries that are listed in the registry
STDMETHODIMP CInsideDCOM::Sum(int x, int y, int * sum)
{
    // TODO: Add your implementation code here
    *sum = x + y;
    return S_OK;
}
You can test this ATL-based component using any language that supports COM. To create a test program in Visual Basic, simply create a Standard EXE project and set a reference to the TestATL 1.0 Type Library in the References dialog box, which can be opened by choosing References from the Project menu. Then type the following code, shown here in boldface, in the Form_Load procedure:
Private Sub Form_Load()
    Dim x As New InsideDCOM
    MsgBox x.Sum(6, 3)
End Sub
Contrary to popular belief, COM programming can be done quite successfully in Visual Basic. Visual Basic is perhaps best at creating the more complex varieties of COM objects (namely, ActiveX controls and ActiveX documents). Developing such components in raw C++ could become quite an undertaking. Visual Basic is also surprisingly flexible and easy to use when it comes to providing the fundamental aspects of COM programming.
CoInitialize and CoUninitialize are called automatically by Visual Basic with no interventions necessary on the part of the programmer. The New keyword in Visual Basic replaces CoCreateInstance as the object instantiator. Visual Basic's automatic garbage collection algorithm is used to call IUnknown::Release for you on object references that go out of scope. It is also possible to explicitly call Release by setting an object reference to Nothing, as shown here:
Set myRef = Nothing
Although a COM class can support multiple interfaces, Visual Basic tries to simplify things by assuming that the programmer wants access to the default interface and therefore automatically calls QueryInterface to request that interface. This simplification makes sense, since the majority of classes have a primary interface through which most operations are performed. Unfortunately, in addition to assuming that a programmer wants to access the default interface, Visual Basic also hides the name of the default interface! If you want to access a default interface named IMyDefault implemented by a COM class named MyClass, the name MyClass will be used as an alias for the IMyDefault interface. This technique seems to work acceptably when you are accessing a COM object from Visual Basic, but it fails miserably when you are attempting to implement a COM interface in Visual Basic.
Using the Implements keyword, a Visual Basic class module can implement any COM interface described in a type library. When the desired interface happens to be the default, writing code that implements the COM class instead of the desired interface can look mighty strange. Perhaps this oddity will be corrected in a future version of Visual Basic. Should a developer need access to the other (nondefault) interfaces supported by an object, a QueryInterface call can be executed using the Set statement. If needed, the Set statement will call the IUnknown::QueryInterface method to cast the rvalue interface pointer to the type of the lvalue reference. For example, the following code snippet shows two references: MyRef1 and MyRef2. MyRef1 is declared as an IUnknown interface pointer; MyRef2 is a pointer to the IMyInterface interface. When MyRef2 is set to MyRef1, a QueryInterface call that requests the IMyInterface interface pointer from the object pointed to by MyRef1 takes place.
Dim MyRef1 As IUnknown
Set MyRef1 = New MyObject

Dim MyRef2 As IMyInterface
Set MyRef2 = MyRef1 ‘ QueryInterface executed!
In the preceding code, MyRef1 is declared As IUnknown. This declaration might look odd to a Visual Basic programmer, but it is actually much more efficient than declaring references As Object. As Object actually uses the IDispatch (Automation) interface, which is much less efficient than a normal v-table-based interface.
In an IDL file, the default interface is indicated using the [default] attribute, shown here in boldface. If no interface in a coclass statement is declared as the default, the first interface listed is treated as the default. Here is an IDL file containing multiple interfaces that can be compiled into a type library and used in Visual Basic:
import "unknwn.idl";

[ object, uuid(00000000-0000-0000-0000-000000000001) ]
interface IDefaultInterface : IUnknown
{
    HRESULT ThingOne();
}

[ object, uuid(00000000-0000-0000-0000-000000000002) ]
interface ISecondaryInterface : IUnknown
{
    HRESULT ThingTwo();
}

[ uuid(00000000-0000-0000-0000-000000000003) ]
library Component
{
    interface IDefaultInterface;
    interface ISecondaryInterface;

    [ uuid(00000000-0000-0000-0000-000000000004) ]
    coclass TheClass
    {
        [default] interface IDefaultInterface;
        interface ISecondaryInterface;
    }
};
The following Visual Basic code uses the previously defined type library, accompanied by C++-style pseudo-code comments that explain what the code is doing in COM terms. Note that the IDefaultInterface interface is hidden from the Visual Basic programmer and is instead referred to as TheClass.
Private Sub Command1_Click()
‘ IDefaultInterface* myRef1;
‘ CoCreateInstance(CLSID_TheClass, NULL, CLSCTX_INPROC_SERVER,
‘     IID_IDefaultInterface, (void**)&myRef1);
Dim myRef1 As New Component.TheClass

‘ ISecondayInterface* myRef2;
Dim myRef2 As Component.ISecondaryInterface

‘ myRef1->ThingOne();
myRef1.ThingOne

‘ myRef1->QueryInterface(IID_ISecondaryInterface, (void**)&myRef2);
Set myRef2 = myRef1

‘ myRef2->ThingTwo();
myRef2.ThingTwo

‘ myRef1->Release();
Set myRef1 = Nothing

‘ Garbage collector calls myRef2->Release();
End Sub
One solution to the hidden default interface problem in Visual Basic is to make IUnknown the default interface of a COM class in the IDL file, as shown in boldface in the following code. This technique tricks Visual Basic into showing all interfaces of a coclass; when Visual Basic thinks it is hiding the default interface from you, it is really hiding only IUnknown!
[ uuid(00000000-0000-0000-0000-000000000003) ]
library Component
{
    importlib("stdole32.tlb");
    interface IDefaultInterface;
    interface ISecondaryInterface;

    [ uuid(00000000-0000-0000-0000-000000000004) ]
    coclass TheClass
    {
        [default] IUnknown;    // IUnknown will be hidden
        interface IDefaultInterface;
        interface ISecondaryInterface;
    }
};
It is certainly true that Visual Basic offers developers a mere subset of the total underlying COM functionality. Since Visual Basic programmers don't call CoCreateInstance, IUnknown::QueryInterface, and the like, they can exercise only a limited degree of control. Perhaps the greatest weakness in its support of COM is Visual Basic's reliance on the registry. When calling CoCreateInstance, a C++ programmer may specify an in-process, a local, or a remote component at run time. Visual Basic programs must accept the registry configuration in all such matters. For example, if you want to use DCOM from within a Visual Basic application to call an object on another machine, you need to indicate that desire in the registry using the RemoteMachineName value. If the application later wants to connect to another machine, someone must first update the registry.
In order to overcome this limitation of Visual Basic, the CoCreateInstanceEx function used by C++ programmers to instantiate an object on a remote machine must somehow be called from Visual Basic. This task is not as difficult as it might sound, since Visual Basic can call nearly all Win32 API functions. The code listed below (createobjectex.bas) shows the CreateObjectEx function, implemented in Visual Basic, which enables an object to be instantiated on a remote machine using DCOM. This function has been modeled after Visual Basic's own CreateObject function, which is used to create objects on a local machine. In the next version of Visual Basic, the CreateObject function has been extended to support an optional second parameter that specifies the machine name on which the object should be instantiated.
Option Explicit

Private Type GUID
Data1 As Long
Data2 As Integer
Data3 As Integer
Data4(7) As Byte
End Type

Private Type COSERVERINFO
dwReserved1 As Long ‘ DWORD
pwszName As Long ‘ LPWSTR
pAuthInfo As Long ‘ COAUTHINFO*
dwReserved2 As Long ‘ DWORD
End Type

Private Type MULTI_QI
piid As Long ‘ const IID*
pItf As Object ‘ IUnknown*
hr As Long ‘ HRESULT
End Type

Enum CLSCTX
CLSCTX_INPROC_SERVER = 1
CLSCTX_INPROC_HANDLER = 2
CLSCTX_LOCAL_SERVER = 4
CLSCTX_REMOTE_SERVER = 16
CLSCTX_SERVER = CLSCTX_INPROC_SERVER + CLSCTX_LOCAL_SERVER + Œ
CLSCTX_REMOTE_SERVER
CLSCTX_ALL = CLSCTX_INPROC_SERVER + CLSCTX_INPROC_HANDLER + Œ
CLSCTX_LOCAL_SERVER + CLSCTX_REMOTE_SERVER
End Enum

Private Const GMEM_FIXED = &H0
Private Const IID_IDispatch As String = _
"{00020400-0000-0000-C000-000000000046}"
Private Declare Function GlobalAlloc Lib "kernel32" _
(ByVal wFlags As Long, ByVal dwBytes As Long) As Long
Private Declare Function GlobalFree Lib "kernel32" _
(ByVal hMem As Long) As Long
Private Declare Function IIDFromString Lib "OLE32" _
(ByVal lpszIID As String, ByVal piid As Long) As Long
Private Declare Function CLSIDFromString Lib "OLE32" _
(ByVal lpszCLSID As String, pclsid As GUID) As Long
Private Declare Function CLSIDFromProgID Lib "OLE32" _
(ByVal lpszProgID As String, pclsid As GUID) As Long
Private Declare Function CoCreateInstanceEx Lib "OLE32" _
(rclsid As GUID, ByVal pUnkOuter As Long, ByVal dwClsContext As Long, _
pServerInfo As COSERVERINFO, ByVal cmq As Long, _
rgmqResults As MULTI_QI) As Long
Private Declare Function lstrcpyW Lib "kernel32" _
(ByVal lpString1 As String, ByVal lpString2 As String) As Long

Public Function CreateObjectEx(ByVal Class As String, _
Optional ByVal RemoteServerName As String = "") As Object
Dim rclsid As GUID
Dim hr As Long
Dim ServerInfo As COSERVERINFO
Dim Context As Long
Dim mqi As MULTI_QI

mqi.piid = GlobalAlloc(GMEM_FIXED, 16)

‘ Convert the string version of IID_IDispatch to a binary IID.
hr = IIDFromString(StrConv(IID_IDispatch, vbUnicode), mqi.piid)
If hr <> 0 Then Err.Raise hr

‘ Convert the CLSID or ProgID string to a binary CLSID.
If ((Left(Class, 1) = "{") And (Right(Class, 1) = "}") And _
(Len(Class) = 38)) Then
‘ Create a binary CLSID from string representation.
hr = CLSIDFromString(StrConv(Class, vbUnicode), rclsid)
If hr <> 0 Then Err.Raise hr
Else
‘ Create a binary CLSID from a ProgID string.
hr = CLSIDFromProgID(StrConv(Class, vbUnicode), rclsid)
If hr <> 0 Then Err.Raise hr
End If

‘ Set up the class context.
If RemoteServerName = "" Then
Context = CLSCTX_SERVER
Else
Context = CLSCTX_REMOTE_SERVER
Dim MachineArray() As Byte
ReDim MachineArray(Len(StrConv(RemoteServerName, _
vbUnicode)) + 1)
ServerInfo.pwszName = lstrcpyW(MachineArray, _
StrConv(RemoteServerName, vbUnicode))
End If

‘ Create the object.
hr = CoCreateInstanceEx(rclsid, 0, Context, ServerInfo, 1, mqi)
If hr <> 0 Then Err.Raise hr
GlobalFree mqi.piid
Set CreateObjectEx = mqi.pItf
End Function
To use the CreateObjectEx function, simply put the code into any Visual Basic module and then call it. The class can take the form of a programmatic identifier(ProgID) such as Word.Application or the equivalent CLSID (in this case, {000209FE-0000-0000-C000-000000000046}). Note that if a ProgID is supplied, the local registry is searched for the corresponding CLSID. This function could be enhanced to read the remote computer's registry instead.
The optional RemoteServerName parameter references the computer on which the object is to be run. If a remote server name is not provided, the function creates the object on the local machine, analogous to the behavior of the standard CreateObject function. The RemoteServerName parameter can be set to the computer name of the remote machine, as in \\server (or just server), or the Domain Name System (DNS) name, such as server.com, www.microsoft.com, or 199.34.57.30.
The following code shows some sample invocations of the CreateObjectEx function:
Private Sub Form_Click()
    Dim x As Object

    ‘ Create object based on ProgID.
    Set x = CreateObjectEx("Application.Object", "\\Machine")

    ‘ Create object based on CLSID.
    Set x = CreateObjectEx("{????????-????-????-????-????????????}", _
        "Machine")

    ‘ Create object on local machine.
    Set x = CreateObjectEx("Application.Object")
End Sub
In addition to creating clients of COM objects in Visual Basic, you can also use Visual Basic to build COM-based components. Visual Basic can produce in-process or local components, as well as components that run remotely using DCOM. No interface definition is required for Visual Basic components, as Visual Basic will deduce the interface automatically. If you want, you can implement a specific interface described in a type library using Visual Basic. This technique is useful when you want to create a component in Visual Basic that will interoperate with some client that demands support for a particular custom interface.
While each class module in Visual Basic defines only one class, a single class can implement multiple interfaces. The public properties, methods, and events of the class module define the default interface of the class. The Implements keyword can be used to implement additional interfaces in a class module. For example, a Math class might implement several different interfaces, as shown here:
Implements IArithmetic
Implements IGeometry

Private Function IArithmetic_Add(x As Integer, y As Integer) As Integer
    ‘ Code here...
End Function

Private Function IArithmetic_Subtract(x As Integer, _
    y As Integer) As Integer
    ‘ Code here...
End Function

Private Function IGeometry_TriangleArea(base As Integer, _
    height As Integer) As Integer
    ‘ Code here...
End Function
A client program written in C++ would navigate among these interfaces using the IUnknown::QueryInterface method; in contrast, a Visual Basic client would use the Set keyword to perform the typecast, as described in the earlier section of this article, COM Programming in Visual Basic. Note that the name of each class module becomes the name of the COM class, but the default interface defined by the class module is named using the class name prefixed with an underscore. For example, a Visual Basic class module named Math becomes a COM class named Math with a default COM interface named _Math.
Now that we have built a COM component containing a type library in C++, we can easily use this component from most other programming environments. Here are the steps required for building a client in Visual Basic:
Private Sub Command1_Click()
    Dim myRef As New Component.InsideDCOM
    MsgBox "myRef.Sum(5, 6) returns " & myRef.Sum(5, 6)
End Sub
Since we already have a C++ client that demands that a component support the ISum interface, let's use Visual Basic to create a component that implements ISum and then call it using the C++ client. To do so, follow these steps:
Private Function InsideDCOM_Sum(ByVal x As Long, _
    ByVal y As Long) As Long
    InsideDCOM_Sum = x + y
End Function
To test this Visual Basic component from C++, use easyclient.cpp presented earlier in this article as a starting point, or use the code shown below. The code shown below presents vbclient.cpp, a C++ client that uses a component created in Visual Basic. Be sure to include the component.h file that was generated by the MIDL compiler in previous exercises so that the compiler can find the ISum definition.
#import "C:\Program Files\DevStudio\VB\VBComponent.dll" no_namespace
#include <iostream.h>
#include "component.h" // Generated by MIDL for ISum definition

void main()
{
int result;

CoInitialize(NULL);
_COM_SMARTPTR_TYPEDEF(ISum, __uuidof(ISum));
ISumPtr myRef(__uuidof(VBInsideDCOM));
myRef->Sum(5, 13, &result);
cout << "5 + 13 = " << result << endl;
myRef = NULL;
CoUninitialize();
}
Although one of the major goals of COM is to be programming language independent, COM programming has until recently been almost exclusively the domain of C++. As you know, COM programming in C++ is not for the faint of heart. Many people who actually do COM programming use Visual C++, its wizards, and MFC. Although this makes COM programming significantly easier, it also means you have to wade through thousands of lines of code you didn't write and don't understand. Visual Basic can also be used for COM programming chores by making use of its ability to create ActiveX components, although most developers still don't consider Visual Basic a serious contender in the COM programming arena. Instead, Visual Basic is usually employed as a "glue" language to combine components created in lower-level languages such as C++.
Java is a smart, modern, object-oriented programming language that has received a tremendous amount of industry support. When Microsoft's developers began looking at the Java programming language, they realized that (a) Java was a nice programming language badly in need of some decent development tools and that (b) Java would make a great programming language for building and using COM-based components. Visual J++ is Microsoft's answer to both of these ideas; it is a great Integrated Development Environment (IDE) for Java development and provides Java/COM integration features.
You might be wondering what about Java makes it such a great language for COM programming. Table 3 that follows shows that, although they were developed completely independent of each other, Java and COM are complementary technologies. COM is an architecture for building components; Java is a great programming language in which to build and use those components. You might be surprised to see COM described as simple. The ideas put forth in the COM specification certainly are simple. It's the implementation and use of COM from languages like C++ that make people think COM is complicated. Once you start doing COM programming in Java, you too will agree that COM is simple.
Table 3. Comparison of Java and COM attributes
| Attribute | Java | COM |
| Programming language | Yes | No |
| Language-independent component architecture | No | Yes |
| Virtual machine | Yes | No |
| Simple | Yes | Yes |
| Robust | Yes | Yes |
| Object-oriented | Yes | Yes |
| Platform-independent | Yes | Yes |
| General-purpose | Yes | Yes |
| Multithread | Yes | Yes |
| Distributed | No (Java 1.1 supports RMI) | Yes |
It happens often in computing that two diametrically opposed technologies will be forced to coexist. As you will see, Microsoft has integrated COM and Java very cleanly, in a manner that does not conflict with the spirit of Java in any way. The integration of Java and COM has been accomplished without adding any new keywords or constructs to the Java language. Java already has the necessary constructs that allow implementation and use of COM objects. Most of the changes required to support the Java/COM integration model have been made to Microsoft's Java Virtual Machine (msjava.dll). A Java Virtual Machine (VM) is a module that translates binary .class files from Java byte code into native op-codes for execution on a particular platform.
To build and use COM objects in Java, Visual J++ includes a Java Type Library Wizard and an ActiveX Wizard for Java. The Java Type Library Wizard, shown in Figure 9, goes through the HKEY_CLASSES_ROOT\TypeLib keys in the registry looking for all COM objects with valid type library information. It then displays those entries with the user-friendly name found in the version number key for the type library settings. Normally the helpstring parameter for the library found in the IDL file.
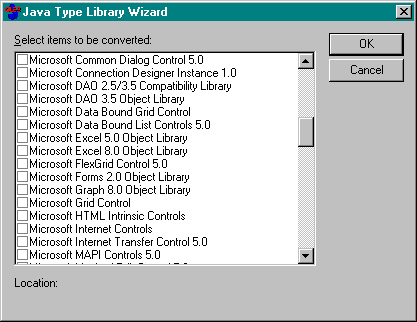
Figure 9. The Java Type Library Wizard, which displays the COM class with type libraries that are listed in the registry
It is important to understand that the Java/COM integration model is based on type libraries—a Java program can call any COM object for which type library information is available. This type library information might be available as a .tlb file or as a resource within the component. Let's assume that there is a particular component you would like to call from a program written in Java. The first step is to use the Java Type Library Wizard to create Java class wrappers for the COM classes in the component. Simply add a check mark next to the COM components you want to use in the list displayed by the Java Type Library Wizard and click OK. The Java Type Library Wizard then automatically converts the type library information to .class files. (In Java, files with the .java extension are source files and files with the .class extension are compiled binaries in Java byte code.) If you stop to think about it, the Java Type Library Wizard is a rather amazing utility. It takes the type library information contained in a type library and spits out Java .class files; one for each of the classes and interfaces described by the type library. By default, these class files are placed in a new subdirectory with the same name as the type library, in the C:\Windows\Java\TrustLib folder.
You might be wondering exactly how it is that a program crosses the bridge from Java byte code to a COM object. Well, each .class file generated by the Java Type Library Wizard contains a special attribute identifying it as a wrapper for a COM class. When the Microsoft Java VM (msjava.dll) sees this attribute in a class, it translates all Java method invocations in the class into calls to the COM class. So it is actually the Microsoft Java VM that is the bridge between Java and COM. For this reason, Java programs that use COM components will, at least for now, work only on platforms with the Microsoft Java VM.
In addition to the .class files, the Java Type Library Wizard generates a file named summary.txt that contains a summary of the generated .class files. The code below shows the summary.txt file produced when the Java Type Library Wizard was run on a previously built component to generate Java class wrappers:
public class component/InsideDCOM extends java.lang.Object
{
}
public interface component/ISum extends com.ms.com.IUnknown
{
public abstract int Sum(int, int);
}
NOTE For more information on building components that can be later processed into summary.txt files using the Java Type Library Wizard to generate Java class wrappers, see Chapter 2 "IUnknown and IClassFactory" of Inside Distributed COM by Guy Eddon and Henry Eddon.
Several items are worth noting about the summary.txt file. In the declaration of the class or interface, the packagename/classname format is used strictly to provide information about which package the class or interface belongs to. An identifier such as component/ISum is not legal in Java. Also notice that only the interface has methods, while the class does not. The InsideDCOM class extends (Java lingo for "inherits from") java.lang.Object, the root of all Java objects, while the ISum interface extends com.ms.com.IUnknown. At last, our friend IUnknown!
When you are using the Java-callable wrappers for COM objects, you must always call methods through an interface, not through the class itself. This technique is identical to the way in which COM objects are always called through an interface in C++. Here is a sample Java program that calls the InsideDCOM object, which has been wrapped in Java classes using the Java Type Library Wizard:
import component.*;

class TestingTheCOMComponent
{
    public static void main(String str[])
    {
        ISum myRef = (ISum)new InsideDCOM();
        int result = myRef.Sum(5, 4);
        System.out.println("Java client: myRef.Sum(5, 4) returns " +
            result);
    }
}
As in the Visual Basic code presented earlier, you won't recognize any COM calls in this code. No CoInitialize, no CoCreateInstance, and no IUnknown calls such as QueryInterface. The import statement makes the generated Java .class files in the C:\Windows\Java\TrustLib\component folder accessible. Note that this statement is not analogous to the C++ #import directive that generates code based on the contents of a type library, although the name of the C++ directive was inspired by the Java statement. In Java, any class can be referenced using its fully qualified name (for example, java.awt.component) as long as the class can be found in the class path. The import statement simply allows you to refer to the class using its short name (for example, InsideDCOM). If the class name is qualified by the package name (component.InsideDCOM), the import statement may be removed.
Java's new keyword instantiates the InsideDCOM class. This instantiation leads the Java VM into the InsideDCOM.class file generated by the Java Type Library Wizard, where the Java VM encounters the special attribute, indicating that this is a COM class. The generated .class file also contains the CLSID of the COM class. The Java VM then uses that CLSID to make a call to CoCreateInstance. The IUnknown pointer returned by CoCreateInstance is then cast by the Java code to ISum, as shown here:
ISum myRef = (ISum)new InsideDCOM();
Hidden from view is the call to the IUnknown::QueryInterface function that enables clients to choose among an object's supported interfaces. The simple typecast from the InsideDCOM class to the ISum interface forces the Java VM to call the object's QueryInterface function in order to request a pointer to ISum. In this manner, a Java program can retrieve an interface pointer for any interface supported by the COM object. Simply casting the object to the appropriate interface will yield correct results.
If the object does not implement the requested interface and the QueryInterface call fails, an exception of type ClassCastException is thrown when you attempt the cast. To determine whether an object implements the desired interface before casting, the instanceof operator may be used, as shown in the following code:
InsideDCOM myRef = new InsideDCOM();
if(myRef instanceof ISum)
{
    // Now we know that InsideDCOM implements ISum.
    // It is safe to cast (ISum)myRef.
}
Reference counting, another painful COM chore, is handled automatically in Java. As is the case with Microsoft's smart interface pointers in C++, you do not need to call IUnknown::AddRef when you are creating a new reference to an object, nor do you need to call IUnknown::Release when you've finished using a reference to an object. And as it did for Java's native objects, the garbage collector performs reference counting automatically and calls Release on object references that go out of scope. A call to IUnknown::Release can be forced by setting an interface reference to null, as shown here:
myRef = null;
Up to now, we have been examining how to call COM objects built in C++ from Java. It is also possible to implement COM objects in Java. These components can be called from languages such as C++ and Visual Basic as well as from Java itself. Like the rest of the Java/COM integration model, this functionality has been cleanly implemented. Let's assume you want to implement the InsideDCOM object as a COM class in Java, as shown here:
public class InsideDCOM
{
    public int Sum(int x, int y)
    {
        return x + y;
    }
}
Notice that the class and the Sum method are declared as public so that they will be accessible from outside the package. No destructor is provided because Java doesn't have destructors.
To make this Java class definition accessible as a COM object, the following steps are required:
These steps sound fairly involved, and they are. To help automate the process, use the ActiveX Component Wizard for Java.
The ActiveX Component Wizard will ask you some questions and then will complete steps 1, 2, 3, and 5 in the procedure listed above. You will have to modify the Java code only slightly in order to indicate that the Java class implements a particular COM interface, as shown here:
public class InsideDCOM implements ISum
{
    public int Sum(int x, int y)
    {
        return x + y;
    }
}
The ActiveX Component Wizard for Java, shown in Figure 10, will examine your Java code and generate an IDL file describing its interface. At your request, the wizard will compile the IDL file into a type library and then register the component. The wizard even gives you the option of creating a COM object supporting an IDispatch interface or a dual interface (both IDispatch and a custom interface).
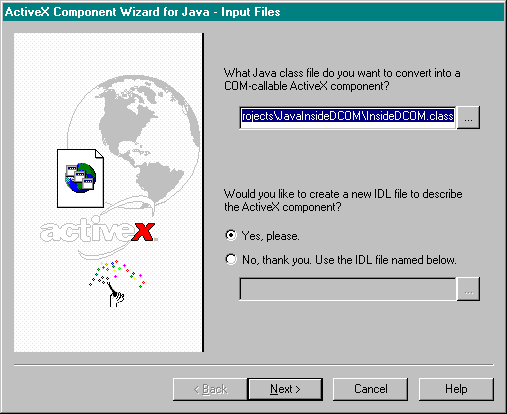
Figure 10. The ActiveX Component Wizard for Java, which is used to assist in converting a Java class to a COM object
Every Java class automatically implements IUnknown and IDispatch via the support in the Java VM. At run time, the Java VM will automatically provide type information for the IDispatch implementation via IDispatch::GetTypeInfo so that clients can avoid the overhead of using IDispatch::GetIDsOfNames to perform late binding. If you selected a dual interface using the ActiveX Component Wizard for Java, the Java VM would also generate a v-table for your interface. In this way, clients can avoid the overhead of IDispatch altogether.
The IDL file generated by the wizard for the InsideDCOM Java class shown above looks like this:
[
   uuid(59835a42-fc78-11d0-a6fb-0020aff4591e),
   helpstring("InsideDCOMLib Type Library"),
   version(1.0)
]
library InsideDCOMLib
{
   importlib("stdole32.tlb");
   [
      object,
      uuid(59835a41-fc78-11d0-a6fb-0020aff4591e),
      dual,
      pointer_default(unique),
      helpstring("IInsideDCOM Interface")
   ]
   interface IInsideDCOM : IDispatch
   {
      [ helpstring("Sum Method") ]
      HRESULT Sum([in] long p1, [in] long p2, [out, retval] long * rtn);

   }

   [
      uuid(59835a40-fc78-11d0-a6fb-0020aff4591e),
      helpstring("CInsideDCOM Object")
   ]
   coclass CInsideDCOM
   {
      interface IInsideDCOM;
   };

};
Notice that the parameter types used for the methods in the IDL file do not exactly match those used in the Java code. Because COM provides a language-independent binary standard, it needs to play referee among all the different data types used in the various languages.
Table 4 that follows shows the type mappings between native Java types and IDL types:
Table 4. Type mapping between native Java types and IDL types
| IDL Type | Java Type |
| boolean | boolean |
| char | char |
| double | double |
| int | int |
| float | float |
| long | long |
| short | short |
| unsigned char | byte |
| wchar_t | short |
| LPSTR | class java.lang.String |
| BSTR | class java.lang.String |
| CURRENCY | long |
| DATE | double |
| SCODE/HRESULT | int |
| VARIANT | class com.ms.com.Variant |
| IDispatch | class java.lang.Object |
| IUnknown | interface com.ms.com.IUnknown |
| SAFEARRAY (<typename.) | class com.ms.com.SafeArray |
| void | void |
The ActiveX Component Wizard for Java will, if desired, create all the necessary registry entries for a COM component. Here are some of the most interesting registry entries created by the wizard:
[HKEY_CLASSES_ROOT\CLSID\{59835a40-fc78-11d0-a6fb-0020aff4591e}]
@="Java Class: InsideDCOM"
"AppID"="{59835a40-fc78-11d0-a6fb-0020aff4591e}"

[HKEY_CLASSES_ROOT\CLSID\{59835a40-fc78-11d0-a6fb-0020aff4591e}\ Œ
InprocServer32]
@="MSJAVA.DLL"
"ThreadingModel"="Both"
"JavaClass"="InsideDCOM"
Notice that the in-process server for the InsideDCOM component is listed as msjava.dll (the Microsoft Java VM!). Since Java code is compiled into byte code, it can't be called directly from a language such as C++. Instead, the Java VM provides the COM support for your Java programs. COM clients think they are working with msjava.dll, but msjava.dll is actually running your Java code.
To build a COM client in Java, follow these steps:
import component.*;
//
//
// TestCOM
//
//
class TestCOM
{
    public static void main(String str[])
    {
        ISum myRef = (ISum)new InsideDCOM();
        int result = myRef.Sum(5, 4);
        System.out.println(
            "Java client: myRef.Sum(5, 4) returns " +
            result);
    }
}
To build a COM component in Java, follow these steps:
//
//
// SumClass
//
//
public class SumClass
{
    public int Sum(int x, int y)
    {
        return x + y;
    }
}
import sumclasslib.*;
//
//
// SumClass
//
//
public class SumClass implements sumclasslib.ISumClass
{
    private static final String CLSID =
        "????????-????-????-????-????????????";
    public int Sum(int x, int y)
    {
        return x + y;
    }
}
To test this Visual J++ component from C++, you can use easyclient.cpp presented earlier in this article as a starting point or enter the code shown below. The following code presents jclient.cpp, a C++ client that uses a COM object created in Visual J++:
#import "C:\Program Files\DevStudio\MyProject\JavaSum\\
SumClasslib.tlb" no_namespace
#include <iostream.h>

void main()
{
CoInitialize(NULL);
ISumClassPtr myRef(__uuidof(CSumClass));
int result = myRef->Sum(5, 13);
cout << "5 + 13 = " << result << endl;
myRef = NULL;
CoUninitialize();
}
JavaBeans is a component model designed for Java. At some point in the future, JavaBeans components might compete with ActiveX controls in the marketplace for reusable components. For Java developers to take advantage of the thousands of commercially available ActiveX controls, Microsoft has extended its Java VM so that ActiveX controls can be hosted in a Java applet. In addition, Microsoft's Java VM enables JavaBeans components to be exposed as ActiveX controls. As compelling JavaBeans components begin to become commercially available, they will immediately be usable by the large number of ActiveX control containers such as Visual Basic, Visual C++, Borland Delphi, and Powersoft PowerBuilder.
Thus, an ActiveX control will appear as a JavaBeans component to a Java programmer, and a JavaBeans component will appear as an ActiveX control to a developer using any of the wide array of development tools that support ActiveX. The Java VM is the bridge that makes this bidirectional support possible. This support enables all developers to work in the environment with which they are most familiar while still retaining the richness of all available components, regardless of which development tools or platforms were used to build the components. Exposing an existing JavaBeans component as an ActiveX control is as simple as running the JavaReg utility to register the control and generate a type library that describes its properties, methods, and events. After you run JavaReg, the JavaBeans component will look and function just like a native ActiveX control in any control container. For example, a Visual Basic application could take advantage of a JavaBeans component turned ActiveX control.
Since Java applets can be automatically downloaded over the Internet when a user browses a Web site, security is a big concern. To prevent Java applets from potentially damaging the user's system, applets typically run in a sandbox. A sandbox is a carefully delimited execution environment that prevents applets from posing a security threat. Local file access, for example, is off limits. COM services are also not available to applets running in the sandbox. Note that the sandbox restriction applies only to applets; standard Java applications do not run in the sandbox and therefore may use COM services. Running applets in the sandbox is a necessity for security reasons, but the restrictions imposed by the sandbox prevent applets from doing many useful and interesting things, such as accessing COM services. To overcome this limitation, the Java VM categorizes applets as either trusted or untrusted.
Untrusted applets run within the sandbox and cannot use COM services, as is the norm for untrusted applets. All .class files that aren't loaded from the class path (including those downloaded from the Internet) are considered untrusted. Trusted .class files are those that are either loaded from the class path or extracted from a cabinet (.cab) file that has a digital signature. By using .cab files, you can enable Java applets downloaded from the Internet to be considered trusted. Trusted applets run outside of the security sandbox; they can therefore read and write files and use COM services.
Four path-related registry values are relevant to the security of Java applets. These values are stored in the HKEY_LOCAL_MACHINE\SOFTWARE\Microsoft\Java VM key. The names and typical values are shown here:
Classpath = "C:\WINDOWS\java\classes\classes.zip;Œ
C:\WINDOWS\java\classes;"
LibsDirectory = "C:\WINDOWS\java\lib"
TrustedClasspath = "C:\WINDOWS\java\trustlib\tclasses.zip"
TrustedLibsDirectory = "C:\WINDOWS\java\trustlib"
During development in Visual J++, all .class files are considered trusted, so you don't have to worry about security issues. If you want to distribute a Java applet that uses COM services over the Internet, you will need to ensure that your applet runs outside of the sandbox on the user's machine. To do so, you can create digitally signed .cab files for your Java classes using the cabinet and code signing tools provided in the Cab&Sign folder included with Visual J++. In addition to enabling applets to run outside the sandbox, using .cab files for your classes speeds up downloading and makes installation more secure. Stand-alone Java applications that do not run in a Web browser are automatically executed outside the sandbox and can therefore use COM services.