Fitch & Mather Stocks 2000: Setup
Scott Hernandez and Scott Stanfield
Vertigo Software, Inc.
November 1999
Summary: Describes how to install the Fitch & Mather Stocks 2000 (FMStocks 2000) Web application. Covers system requirements and manual setup. Total estimated setup time: 15 minutes. (18 printed pages)
Contents
Requirements for Installing Fitch & Mather Stocks
Setup Overview
Simple Setup
Manual Setup
Optional: Install the ISAPI Security Filter
Test the Site
Uninstall Fitch & Mather Stocks 2000
About the Authors
For More Information
Requirements for Installing FMStocks
We developed FMStocks 2000 to run from a single machine or be scaled out to run in a large data center. For ease of exploration, we recommend installing all components on a single computer.
The database server requires Microsoft® SQL Server™ 7.0. The Web server must be running Windows® 2000 (Build 2128 RC2 or later) with Internet Information Server (IIS) 5.0. These can be the same machine.
Note If you are not running Windows 2000, and you’d like to install a similar application on Windows NT® 4.0, you can do so using the previous version of this application, FMStocks 1.0 (documentation available from “Fitch & Mather Stocks: Start Here”).
To work with the source code, you’ll need Microsoft® Visual Studio® 6.0 (or Microsoft Visual Basic® 6.0 and Visual InterDev® 6.0) with Service Pack 3 on Windows 2000.
Setup Overview
This setup article describes two ways of deploying the FMStocks 2000 Web Application on a single machine. Choose one of the two methods below.
- Simple Setup
If your system meets the requirements, Simple Setup will get FMStocks 2000 up and running in the easiest and fastest way.
- Manual Setup
If you encounter any problems running the Simple Setup, or you want to understand how to deploy FMStocks step by step, follow the Manual Setup instructions.
Simple Setup
Simple Setup is not completely automated: You need to run three batch files. Run these batch files only if you are sure you meet the Simple Setup requirements.
Simple Setup requirements:
Simple Setup batch files were written with the following assumptions:
- ISQL.EXE must be in the system path for the database scripts to work.
- The SQL Server 7.0 “sa” account password must be empty for database scripts to work.
- Windows 2000 Server Family RC3 or higher must be installed for Component MSI install to work.
- IIS 5.0 must be installed with a Default Web Site for Web site setup to work.
Also, if you previously installed FMStocks 1.0 or FMStocks 2000, the automated installation won’t work. Refer to Uninstall Fitch & Mather Stocks 2000 to remove FMStocks 2000 from your system.
If your computer doesn’t meet all of these requirements, please follow the steps described in Manual Setup.
- Set up the database.
Double-click setup-db.cmd. This batch file uses OSQL and the schema.sql file to create the Stocks database and schema. It also populates the database with raw data and 1,000 test accounts.
- Set up the COM+ Applications.
Double-click setup-components.cmd. This batch file uses four MSI packages to install the four COM+ Applications.
Note This script also sets up the FMStocks 2000 Office Extensions COM+ Application. The manual installation does not include this step.
Note Due to a bug in the release candidates, running the FMStocks components in a COM+ Library Application does not work. The bug currently affects passing non-objects using [in, out] (VB ByRef) parameters in our components. For our performance testing, we used a COM+ quick fix, not part of the regular Windows 2000 build, which allowed us to run as a Library Application.
- Set up the Web site.
Double-click setup-web.cmd.
When this step is finished, your screen should look similar to Figure 1.
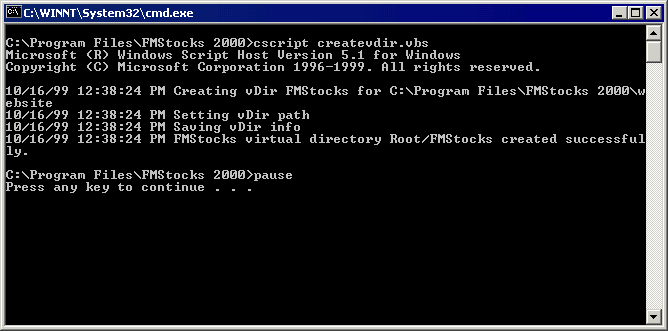
Figure 1. Successful Web installation
Note When you run the Simple Setup, the virtual directory isn’t created as an application root. This means the global.asa, if it were there, wouldn’t be used. All application properties are inherited from the root web. The Manual Setup creates the site as a virtual directory. You can turn the FMStocks virtual directory into a Web application by using the Property dialog. This creates a new Web application, which will have separate properties from the parent directory.
You are finished! Skip ahead to the section Optional: Install the ISAPI Security Filter.
Troubleshooting automatic setup
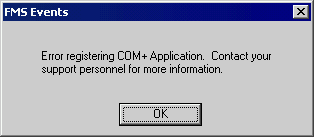
During Step 2, if you see a message box similar to the one shown in Figure 2, here are two possible causes and remedies:
Manual Setup
If you didn’t meet the requirements for the Simple Setup, or you wish to see how to deploy the Web application by hand, the instructions below walk you through the steps to create the FMStocks 2000 application.
Create the database
The following three steps create the Microsoft SQL Server 7.0 “stocks” database and populate it with the stock data and 1,000 test accounts.
- Load the database scripts.
Use the Query Analyzer to connect to your database using the “sa” account. Load the database/schema.sql script into the query window and run it by pressing F5. The script will create a database called “stocks” using the model database as a template. When finished, your query output will resemble the screen shot shown in Figure 3.
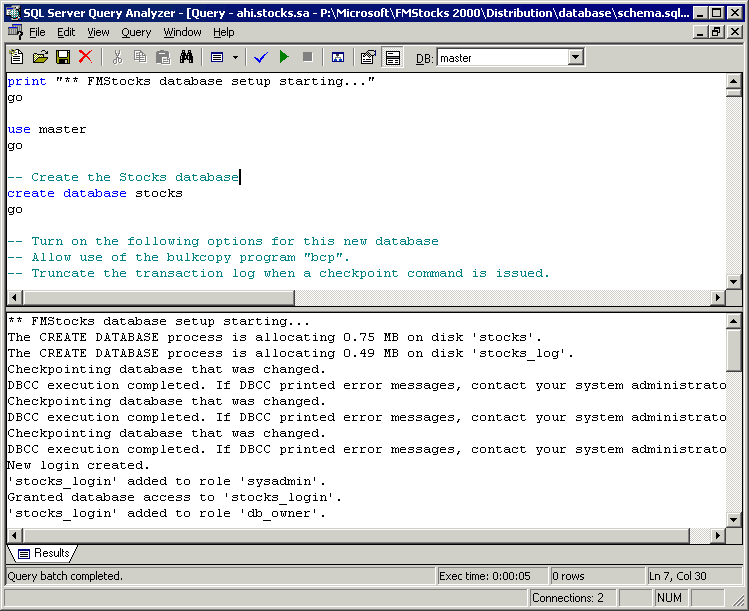
Figure 3. SQL Server output after creating the database
Close the query window (Ctrl+F4).
Time Estimate: This script takes about one minute to execute.
Note This SQL script creates a simple database layout. For better performance in a production environment, place the transaction log on a separate physical drive. Refer to the SQL Server 7.0 Performance Tuning Guide for more information.
- Load the stock data into the database.
Run the batch file database/rundts.bat to load the data from the rawdata.mdb file to the stocks database. You must run this script locally from the database machine.
Time Estimate: This script takes roughly 2 minutes to complete.
- Populate the accounts table.
Using Query Analyzer, press Ctrl+O to connect to your database using the new account “stocks_login” with the password “password”. It should open up a new query window and connect you to the “stocks” database. Now load the script called CreateAccounts.sql and execute it. You will receive a status message as each group of accounts is created. 1,000 test accounts, with names ta1 through ta1000, will be created. All have a password of “ta”.
Time Estimate: Depending on your database server, this could take up to 5 minutes to execute.
Note For benchmarking purposes, a script similar to this was used to generate over one million test accounts for a total database record count of over six million.
Register the components with COM+
There are four COM+ Applications (the new term for MTS “packages”) to set up.
- Create the FMStocks Core application.
Use the Component Services Explorer (Start | Programs | Administrative Tools | Component Services) to create an empty application called “FMStocks Core”. Do this by expanding the tree on the left window down to My Computer\COM+ Applications. Right-click on COM+ Applications and select Application from the New menu.
The New Application dialog box should now be on the screen. Click the Empty Application button and call it “FMStocks Core”. Leave the Application Identity option to Interactive User. This simply means that you must be logged into the application server in order to use these components.
Note Running in Server Application mode as the Interactive User may cause problems. If there is no one logged into the console, then the Web pages will fail when trying to create any of those objects. You may want to set the identity to a specific user context.
Press the Finish button. Drill into the FMStocks Core/Components icons on the right side of the window. Finally, drag the FMStocks_DB.dll and FMStocks_Bus.dll components from Components/Source/Distribution into the empty components window to register them.
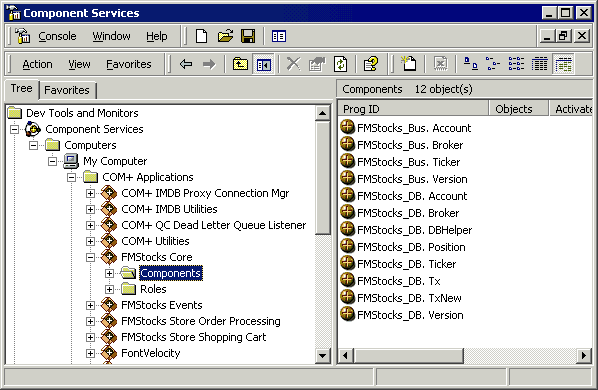
Figure 4. FMStocks components registered in COM+
When finished, the Component Services window should look similar to the one shown in Figure 4.
- Create the FMStocks Store application.
Repeat Step 1, registering the FMSStore_DB.dll and FMSStore_Bus.dll files in a new COM+ Application called “FMStocks Store Shopping Cart”.
- Create the FMStocks Events application.
Create another COM+ Application called “FMStocks Events”. Navigate to the Components item.
Up to this point, everything we have done matches the previous COM+ Applications. Now we need to register our Event Classes in a special way; this cannot be done by dragging and dropping the DLLs.
Right-click on the Components tree item and select Component from the New menu. This will bring up COM Component Install Wizard as in Figure 5.
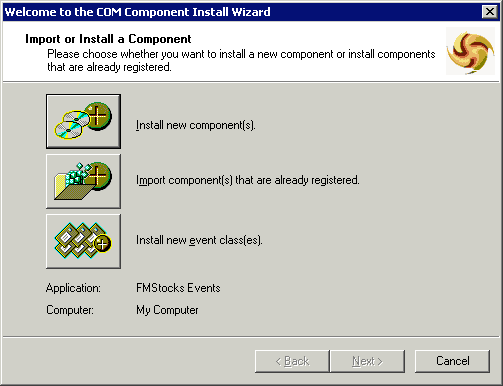
Figure 5. FMStocks Event Classes Registration
Note If you are familiar with the MTS Explorer in Windows NT 4.0, you will remember this dialog. You may also remember that there were only two options in NT 4.0. The Install new event classes(es) option is new.
Click the third button to install our Event Class. Click the Add button and you will be prompted to select the source files for the event stub DLLs. Select the FMSStore_Events.dll and FMSStocks_Events.dll components for installation. You should now see a screen similar to Figure 6. Press the Next button, then the Finish button.
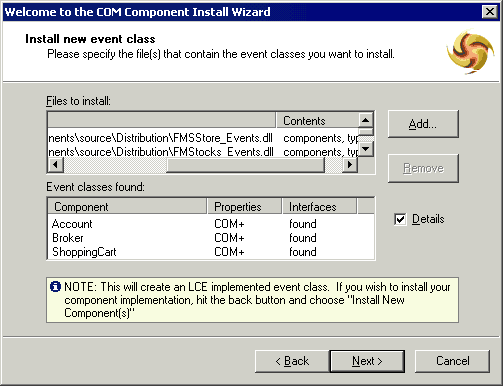
Figure 6. FMStocks Event Classes Registration Confirmation
- Create FMStocks Store Order Processing application
Create another COM+ Application called “FMStocks Store Order Processing”. Navigate to the Components item. Drag the FMSStore_EvtSub_OrderProc.dll component into the empty component window for registration.
Now we must register the Order Processing components’ Event Subscriptions. This step is done with each Event Subscriber that we will install.
Navigate to the FMSStore_EvtSub_OrderProc.ShoppingCart component and expand the tree. Select the Subscriptions item and select Subscription from the New menu. The New Subscriptions Wizard will guide you through registering a new subscription. When asked to choose the interface and methods in Step 2 of the wizard, select the second interface and press Next, as shown in Figure 7.
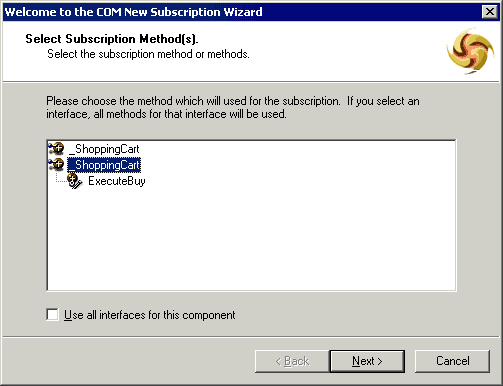
Figure 7. FMStocks Subscription Interface Selection
COM+ now identifies all the Events that are available for our interfaces and methods. There is only one option. Select the FMStore_Events item and click Next, as shown in Figure 8.
Note If the list is empty in the when you arrive at Select Event Class dialog (Figure 8, below), then you have may have selected the wrong interface in the previous step. Click Back and try again.
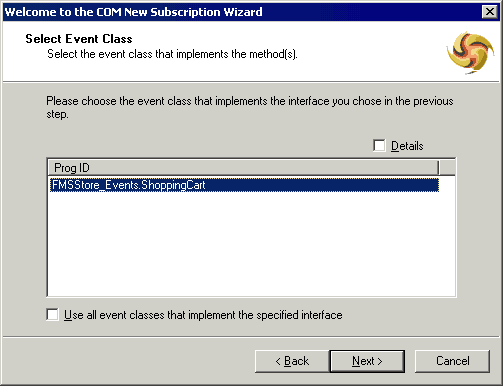
Figure 8. Matching Event Interface selection
We have now identified our Event Interface and the Event Class. In the next step of the wizard, we will describe the properties of the instance of the event. We will give the event instance a name and tell COM+ to activate that event. The name of the subscription needs to be unique across the subscriptions. Use the one shown in Figure 9.
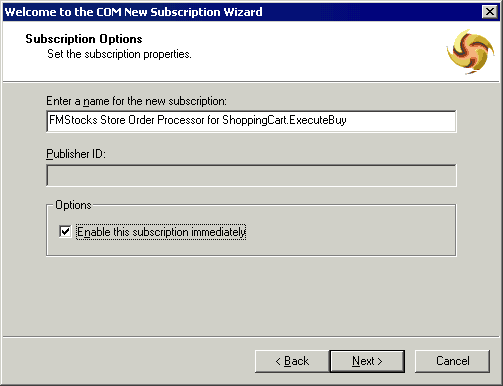
Figure 9. Event Subscription Properties
After this is done, we have a fully functional event that is ready to be fired. When finished with the Subscription Wizard, you should see a window like Figure 10.
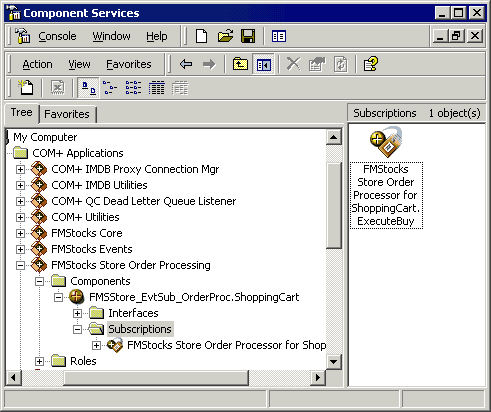
Figure 10. FMStocks Event Subscription completed
- Test the component and database setup.
We’re at a good point to stop and test the current component and database configuration. Position the Component Services window to see the components in the FMStocks Core Application. Choose the Status View from the View menu. Your screen should look like the one shown in Figure 11.
Double-click on the “Test FMStocks Installation.vbs” script, which is located in the setup folder. This simple VBScript creates an instance of the FMStocks_Bus.Account object and uses the Add method to add a new account to the database. While it’s running, you should see three objects activated and one of the balls spinning in the Component Services Explorer window, as in the screen shot shown in Figure 11.
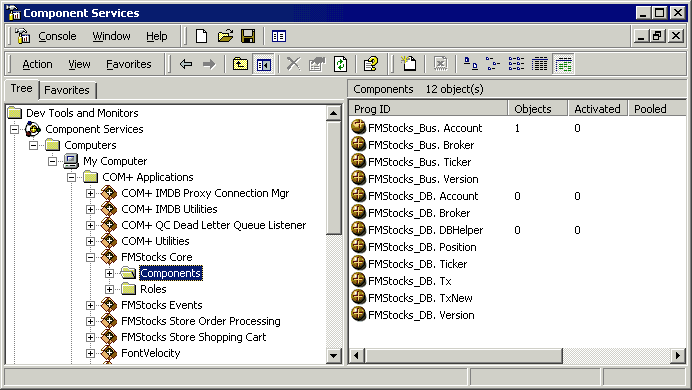
Figure 11. FMStocks components in action
If the VBS test script was able to add a new account to the database, you should see a dialog similar to Figure 12.

Figure 12. A new account was created
If you were successful, try to run the script again. You’ll see that it won’t allow another account with a duplicate e-mail address to be created.
Create the Web application
The final steps to create the Web application are listed below:
- Deploy the Web application directory.
Now that we have the plumbing and architecture in place for our application, the final addition is the presentation layer. In FMStocks 1.0, this step was accomplished by copying the entire Web application into a subdirectory of InetPub/wwwroot. This very simple way of deploying the new files makes removing the Web site a bit more tedious. It requires selectively removing files from the main directory on the Web server (wwwroot).
IIS provides several ways to deploy a new Web site, or add functionality to an existing Web site. In this case, all we need to do is create a new Virtual Directory for the existing Default Web Site. This operation will tell IIS that there is a new keyword, or virtual directory, to listen for on the Web server port. Whenever IIS receives a request for any file in that virtual directory, it will map that request to the application directory.
Launch the Computer Management Administrator tool by right-clicking on My Computer and selecting Manage. We create a new virtual directory by expanding out the tree to show Services and Applications/Internet Information Services/ Default Web Site. Right-click on the Default Web Site and select Virtual Directory from the New menu, as shown in Figure 13.
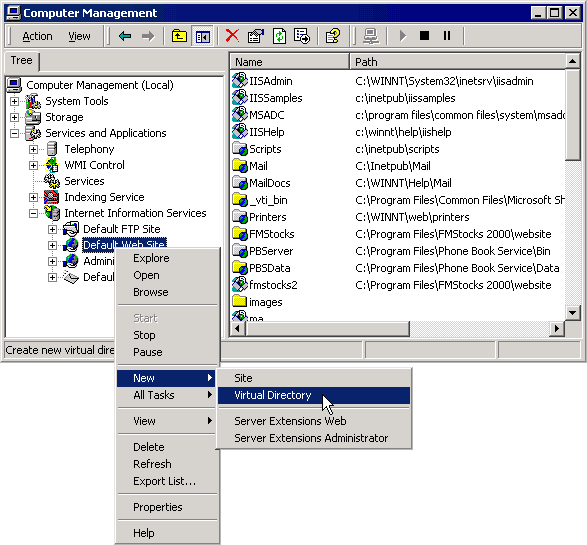
Figure 13. Creating a new Virtual Directory in IIS
A dialog appears, asking you for the Virtual Directory Alias. Enter “FMStocks” and press Next. The dialog prompts you for the path to the directory that contains the Web content. Point it to c:\Program Files\FMStocks 2000\website and press Next.
Optional: Install the ISAPI Security Filter
The last step to Web site deployment is to install the ISAPI Filter. This filter enables additional security for our users. The main purpose of the security filters is to expire in-active sessions and remove our dependency on browser cookies. With the security filter installed, our Web application no longer requires cookies stored on the client. We have also implemented a simple time-bucket-based expiration scheme for managing active users. If a user has not been active in last two time buckets, then his or her session will be expired. The user will be prompted to log in again. For a more detailed description of how the Filter, read Fitch & Mather Stocks 2000: Security.
Note This step is not required for the application to function. Without this step users will not be automatically logged off of the system until they have closed their browsers.
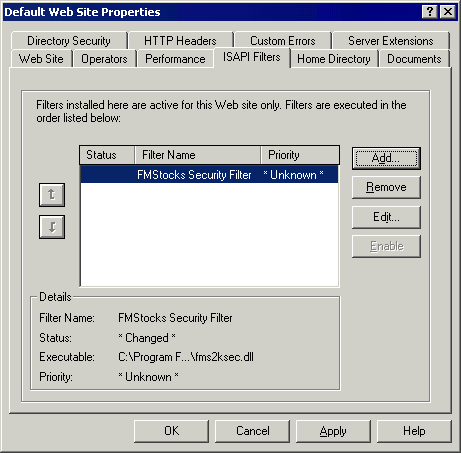
Figure 14. Optional ISAPI security filter
Select the Properties for the Default Web Site. Choose the ISAPI Filters tab and click Add. Locate the FMS2ksec.dll component as the filter and name it “FMStocks Security Filter”. Press OK; the resulting dialog should look like the one shown in Figure 14. Press the OK button and the filter will be installed.
Test the Site
Connect to the Web site using Internet Explorer 4.0 or later. The default page should look like Figure 15.
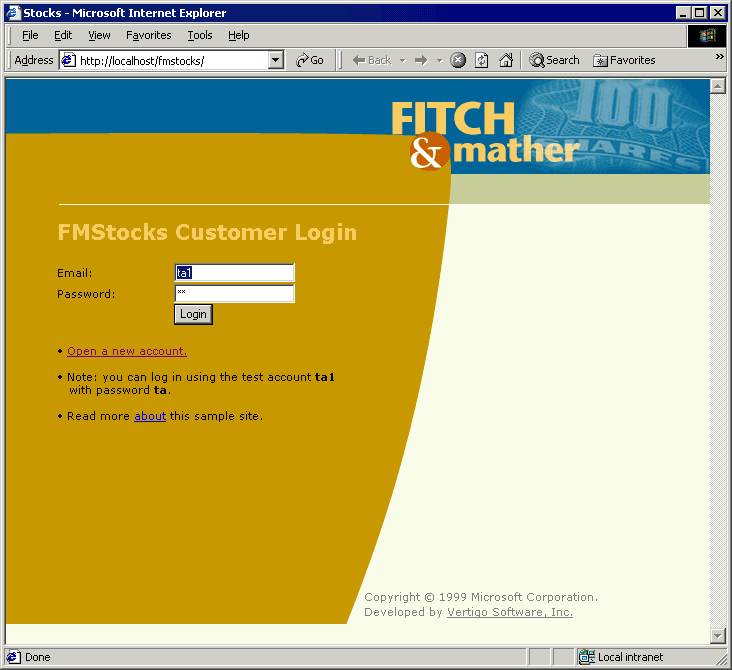
Figure 15. FMStocks Home Page
If you select the “about” link you get access to the “check file version” and “run a query” links that can be used for debugging and checking the live configuration.
Most configuration problems stem from having a bad database connection string for your database. You can troubleshoot the connection string and component registration by clicking on the “check file version” link. You can also execute queries directly by choosing the “run a query” link. The “run a query” pages will use the same connection string that the components do.
Finally, test the application by logging in as “ta1” with the password “ta” (ta is short for Test Account). To check the functionality of both the FMStocks Core and FMStocks Store Applications, browse for products, fill your shopping cart, and then check out. This tests all the component groups and will cause an event to be fired and the subscriber to be called.
Uninstall Fitch & Mather Stocks 2000
Follow the steps below to remove FMStocks 2000 from your computer.
- Drop the database.
Use the Query Analyzer to log into the database as the “sa” account. Delete the stocks database and drop the stocks_login using the four lines shown in Figure 16.
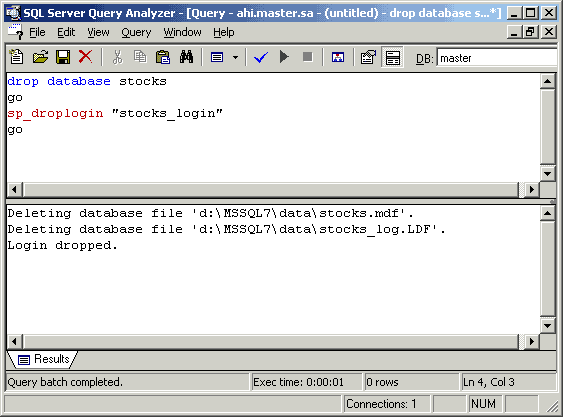
Figure 16. Removing the stocks database
- Remove the COM+ Applications.
Launch the Component Services application from the Administrative Tools program group. Delete the four FMStocks Application groups. You might need to shut down each group if the groups were recently used.
- Remove the FMStocks virtual root.
Locate the FMStocks virtual root entry under the Default Web Site entry in the Computer Management snap-in. Use the context menu to delete the entry.
- Remove the ISAPI Filter.
If you installed the optional ISAPI filter, you need to remove it before continuing. Display the Default Web Site properties using the Computer Management snap-in. Switch to the ISAPI Filters tab and delete the FMStocks Security Filter entry.
- Delete the local files.
You should now be able to delete the source files, installed under C:\Program Files\FMStocks 2000 by default.
About the Authors
Scott Stanfield is the author of FMStocks 1.0, and the President & CEO of Vertigo Software, Inc. (http://www.vertigosoftware.com/).
Scott Hernandez is a Senior Software Developer at Vertigo Software, Inc. As an MVP, he can be found roaming the Microsoft newsgroups.
They can both be reached at fmstocks@vertigosoftware.com. For your convenience, we have created a Web site to host a live version of the site, collect feedback, and report on bugs: http://www.fmstocks.com/.
For More Information
For a live version of the site, latest installation tech notes, bug fixes, and errata, visit http://www.fmstocks.com/.

