Scott Stanfield
Vertigo Software, Inc.
September 1998
Summary: Discusses the Fitch & Mather Corporation Web site. (34 printed pages) Covers:
Introduction
Web Site Architecture
Site Design
MainPage.asp
Subpage Template
Login and Security
Submitting Expense Reports
Using Design-Time Controls
Administration Pages
Conclusion
About the Author
For More Information
The FMCorp Web site is deceptively simple. It can be broken down into a few major components:
The FMCorp Web application uses four middle-tier components to handle the business logic. "Fitch & Mather Corporation: Web Application Components" describes the component's role in a Microsoft® Windows® Distributed interNet Applications Architecture (DNA) Web application.
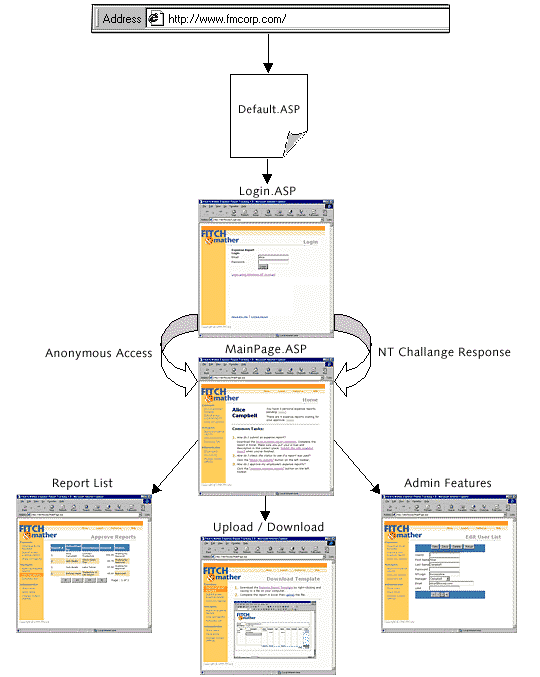
Figure 1 illustrates the FMCorp Web site navigation and architecture. This document will explain how the different pieces were built, starting from the site prototype and finishing with the final implementation in HTML.

Figure 1. High-level Web page architecture
We used a graphic designer to develop the site prototype and Fitch & Mather logo. The designer developed a new logo, color scheme, and overall prototype using traditional image tools like Adobe Illustrator. The final design was translated to HTML by the Web site programmers.
Fitch & Mather wanted a new logo for the site. After several iterations, everyone settled for the image shown in Figure 2.
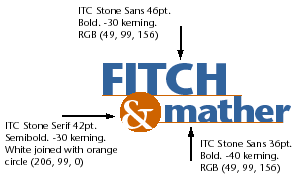
Figure 2. Fitch & Mather logo design in Adobe Illustrator
Our designer used Adobe Illustrator 7.0 to design the logo. She used the two Type 1 fonts from Adobe called ITC Stone Sans and ITC Stone Serif. The ampersand was layered over an orange circle.
The colors in the logo drove the color scheme used in the prototype.
After the logo was created, the artist developed a single image prototype using Illustrator to show the site design. The resulting Illustrator file, artwork\Prototype.ai, is shown in Figure 3.
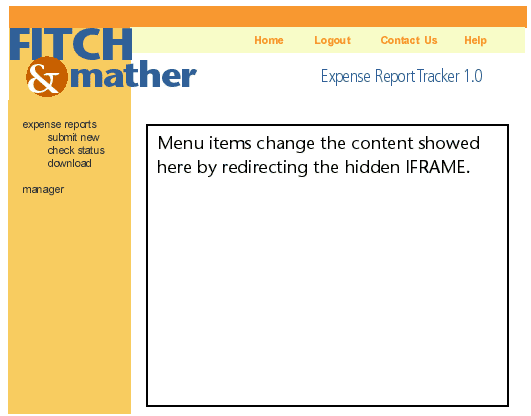
Figure 3. Illustrator prototype image
The key to this layout is the ability to change the inner box through an IFRAME. This technique will be explained next.
We determined that we could implement the design after creating a simple HTML prototype that depended strictly on tables. A special version of the logo was rendered, so it included the background orange and yellow colors. The image shown in Figure 4 is the one used in the Web site.

Figure 4. FMCorp logo used on Web site
The steps to create an optimized palette for Figure 4 took a few steps. First we exported the original site design from Illustrator to a .gif image with the anti-aliasing feature turned on. Next we loaded the .gif image in Adobe ImageReady 1.0. This is a great tool for tweaking .gif images, because it gives you precise control over the palette.
We cropped the image to 194 x 95 pixels in ImageReady. Next, we dropped the color palette down to a reasonable 32 colors. We're also using a special "perceptual" palette option in ImageReady. This palette is tuned for Web images and accounts for the eye's response to different color ranges.
To ensure the image looks good on a screen with only 256 colors, ImageReady includes a feature that simulates the browser's dither. Without making any changes but cropping the image, Figure 5 shows what the logo would look like.
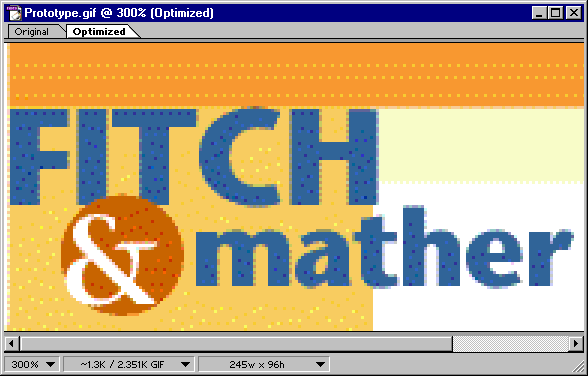
Figure 5. 32-color logo with simulated browser dither
Pretty bad, eh? We can tell ImageReady that certain colors are more important than others. You select the important color, like the dark orange in the top band, and choose the palette option that remaps the other colors close to the new locked color.
Next we removed some of the unwanted anti-aliasing artifacts from some of the hard edges. The color bleeding occurred mostly at the edges of the colored rectangles and the edges of the "FITH" characters in the word "FITCH." The final version is shown in Figure 6.
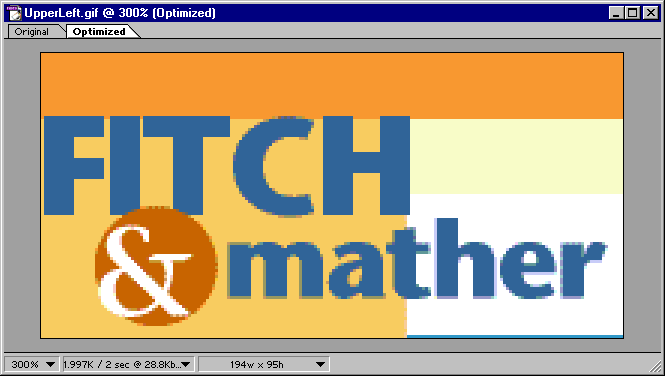
Figure 6. Hand-tuned 32-color image
This hand-tuned image is very important because it needs to sit side by side with table elements in HTML. The table cell background color must match the image precisely. We achieved this by hovering the eyedropper tool over the light yellow (#FFFFCC) and light orange (#FFCC66) colors and recording the HTML color values.
Notice that the original horizontal orange rules from the logo prototype in Figure 2 were removed. We thought they distracted too much from the overall presentation. Also, notice the addition of a thin horizontal blue line in the lower-left corner. That image is carried over in the other table cells.
The integration of the image in Figure 4 with the rest of the table cells resulted in the design shown in Figure 7.
It took a considerable amount of hand-tuned HTML code to get the design mode to accurately reflect what we wanted. The grid lines were turned on during the screen capture to delineate the grid borders in the table.
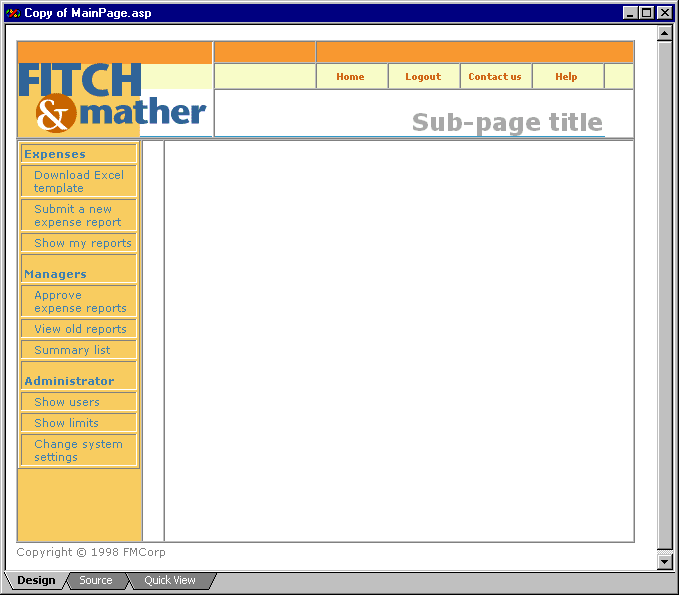
Figure 7. MainPage in design mode
The big white area in the center is an IFRAME. It will be explained next.
The complete source code for the main page prototype is shown here in the following code. This is the actual HTML prototype implementation. The mouse-activated script code and server-side Visual Basic® Scripting Edition (VBScript) was inserted later:
<%@ Language=VBScript %>
<HTML>
<HEAD>
<META HTTP-EQUIV="Expires" CONTENT="Tue, 04 Dec 1993 21:29:02 GMT">
<META NAME="GENERATOR" Content="Microsoft Visual Studio 6.0">
</HEAD>
<LINK rel=stylesheet href="fmcorp.css">
<TITLE>Fitch & Mather Expense Report Tracking 1.0</TITLE>
<BODY>
<TABLE border=0 cellspacing=0 cellpadding=0 width="619">
<td rowspan=3 valign=bottom align=left height=90 width=193><IMG border=0 SRC="images/UpperLeft.gif" height=95 width=194 alt="Fitch & Mather"></IMG></td>
<td width=100 height=22 bgcolor="#ff9933"> </td>
<td colspan=99 height=22 bgcolor="#ff9933"> </td>
<tr bgcolor="#ffffcc" align=middle>
<td height=25 width=100></td>
<td width=70 class=navmenu>Home</td>
<td width=70 class=navmenu>Logout</td>
<td width=70 class=navmenu>Contact us</td>
<td width=70 class=navmenu>Help</td>
<td> </td>
<tr>
<td width=390 align=right valign=bottom class=title colspan=99 height=48 bgcolor="#ffffff">
Subpage title
<div><IMG width=390 height=1 SRC="images/dot_blue.gif"></div>
</td>
</tr>
</TABLE>
<TABLE border=0 cellspacing=0 cellpadding=0 width="619">
<tr>
<td valign=top width=122 height=400 bgcolor="#ffcc66">
<table border=0 width=122 cellspacing=2 cellpadding=2>
<tr><td class=menuheading>Expenses
<tr><td class=menuitem>Download Excel template
<tr><td class=menuitem>Submit a new expense report
<tr><td class=menuitem>Show my reports
<tr><td class=menuheading2>Managers
<tr><td class=menuitem>Approve expense reports
<tr><td class=menuitem>View old reports
<tr><td class=menuitem>Summary list
<tr><td class=menuheading2>Administrator
<tr><td class=menuitem>Show users
<tr><td class=menuitem>Show limits </tr>
<tr><td class=menuitem>Change system settings</tr>
</table>
</td>
<td width=20>
<td valign=top>
<iframe id=myframe width=460 height=400 frameborder=no src="placeholder.htm" scrolling=no>
</iframe>
</td></tr>
</TABLE>
<span class=smalltext>Copyright © 1998 FMCorp</span>
</BODY>
</HTML>
That's it! The trick to this design is the use of tables to arrange the entire page. The subtle use of colors makes the overall effect look clean and well planned.
Notice the use of light yellow and light orange colors in the table cells. The lighter blue color for the menu text was derived from the dark blue color in the logo.
The initial style sheet, fmcorp.css, was created during the HTML prototype process. Cascading style sheets (CSS) are used extensively by the site.
The menu styles (menuitem, menuheading, menuheading2, and navmenu) are used for the vertical and horizontal menus. There are two sets of styles because of the different text and background colors. The vertical menu also has two top-level menu styles with different padding.
The A style turns off the underline style. The BODY tag sets the default font to Georgia, a nice serif font—good for reading lots of text. The BULLETNUMBER style is used in a few places where we need a nice looking numbered list.
BODY
{
    COLOR: black;
    FONT-FAMILY: Georgia, Verdana, Arial;
    FONT-SIZE: 10pt
}
TD.menuitem
{
    COLOR: steelblue;
    CURSOR: default;
    FONT-FAMILY: Verdana, Arial;
    FONT-SIZE: 8pt;
    PADDING-LEFT: 10px
}
TD.menuheading
{
    COLOR: steelblue;
    CURSOR: default;
    FONT-FAMILY: Verdana, Arial;
    FONT-SIZE: 8pt;
    FONT-WEIGHT: bolder
}
TD.menuheading2
{
    COLOR: steelblue;
    CURSOR: default;
    FONT-FAMILY: Verdana, Arial;
    FONT-SIZE: 8pt;
    FONT-WEIGHT: bolder;
    PADDING-TOP: 10px
}
TD.navmenu
{
    COLOR: chocolate;
    CURSOR: default;
    FONT-FAMILY: Verdana, Arial;
    FONT-SIZE: 7pt;
    FONT-WEIGHT: bolder
}
A
{
    BACKGROUND-COLOR: transparent
}
TD.title
{
    COLOR: darkgray;
    FONT-FAMILY: Verdana, Arial;
    FONT-SIZE: large;
    FONT-WEIGHT: bolder
}
.smalltext
{
    COLOR: gray;
    FONT-FAMILY: Verdana, Arial;
    FONT-SIZE: 8pt
}
TD
{
    FONT-FAMILY: Georgia, Verdana, Arial;
    FONT-SIZE: 10pt
}
DIV.pagetitle
{
    LINE-HEIGHT: 18pt
}
TABLE.gridtable
{
    COLOR: brown;
    FONT-FAMILY: Verdana;
    FONT-SIZE: 8pt
}
BUTTON
{
    BACKGROUND: steelblue;
    COLOR: white;
    FONT-SIZE: x-small
}
SPAN.BulletNumber
{
    COLOR: #cc9933;
    FONT-FAMILY: Verdana;
    FONT-SIZE: medium;
    FONT-WEIGHT: bold;
    LINE-HEIGHT: 14pt
}
input.BUTTON
{
    BACKGROUND: steelblue;
    COLOR: white;
    FONT-SIZE: x-small
}
MainPage is the heart of the Web application. Think of it as the "active" version of the preceding page. We'll add support for mouse-activated menus with extra bitmaps, a DHTML animated title, and a replaceable middle section using an IFRAME tag. Server-side code will protect access to the management and administrative features.
The first trick was to make the menus really work. The challenge was to give the user good feedback without hundreds of little images. If you look at a real Microsoft Windows menu, you'll see that the background and text color of a menu item changes when you point the mouse at it.
Instead of using a lot of extra .gif images, I decided to use a style-sheet technique. You can detect a mouse-activated event in a table row. Inside the mouse-handling code, we can change the background for the whole cell to a different color, simulating a menu or button.
First we add mouse handlers for one of the cell tags like this:
<tr onmouseover="m_over()" onmouseout="m_out()" onclick="m_click('UserDownload.asp')">
            <td class=menuitem>Download Excel template
Next, we add this client-side JScript® development software mouse-handling code to the MainPage.asp:
<script>
function m_over(x)
{
   if(x == null)
      x= window;
   x.event.srcElement.style.background="#ff9933";
   x.event.srcElement.style.color = "white";
   x.event.srcElement.style.cursor = "hand";
}

function m_out(x)
{
   if(x == null)
      x= window;
   x.event.srcElement.style.background="FFCC66";
   x.event.srcElement.style.color = "steelblue";
   x.event.srcElement.style.cursor = "default";
}

function m_click(dest)
{
   var url;
   url = baseURL + dest;

   document.all("myframe").navigate(url);
}

</script>
When the mouse moves over this table row, the m_over function runs. The function sets the background color to orange, the text color to white, and the cursor to a hand to indicate this item can be clicked. If the mouse moves out, m_out executes, resetting the default colors and cursor. On a mouse click, m_click navigates the embedded IFRAME to the new .asp file.
But, what's an IFRAME?
An IFRAME is a little-used HTML tag that delimits a floating frame. If you've designed a frames-enabled Web site, you know that frames neatly carve up a page into separate windows. IFRAMEs, however, can be placed anywhere on the page.
In our case, we have an IFRAME tag in MainPage.asp that sets up an area in the lower-right part of the page:
<iframe id=myframe width=460 height=400 frameborder=no
   src="placeholder.htm" scrolling=no></iframe>
The IFRAME has an ID (myframe), so it can be referenced easily in the m_down JScript function. The width and height are fixed at 460 x 400 pixels. The border and scrollbars are turned off, and the default HTML page is an empty page (placeholder.htm).
The menus simply change the location of the IFRAME. The menus could redirect the IFRAME to www.microsoft.com if they wanted to. Instead, they each point to different mini Active Server Pages (ASP). These ASP pages now behave like a traditional view in a multiple-document interface (MDI) window. They don't have to worry about the outer-menu structure or where they came from.
There are a few problems with this approach. The Back button and Refresh button cause havoc with this approach, because any state about the current subpage is lost. We handle this by setting a Session variable to the current subpage. That way, if the MainPage.asp page is refreshed, it can "remember" the current subpage and redirect the IFRAME to that page.
It appears the Internet Information Server (IIS) 5.0 will be adding a feature called Server.Execute. This function may allow us to achieve the same tricks without resorting to an IFRAME.
There are a few housekeeping duties each subpage must handle. Once we figured out what every subpage should have, we created the subpage template called empty.asp. Every subpage started out with this template before the guts were added:
<%@ Language=VBScript %>
<!--#include file="LoginVerify.asp"-->
<%Session("page")="empty.asp"%>
<HTML>
<HEAD>
</HEAD>
<LINK rel=stylesheet href="fmcorp.css">

<script>
function body_onload()
{
   <%SetTitle("not implemented")%>
}
</script>

<BODY onload="body_onload()">

</BODY>
</HTML>
The second line of code is a server-side include. It pulls in the LoginVerify.asp page into every subpage:
<%
Response.Buffer = true
if session("uid")="" then

   Response.Redirect("logout.asp")
   Response.End
end if
%>

<%
sub SetTitle(msg)
%>
   var title = top.document.all("title");

   if (title != null)
   {
      title.filters[0].Apply();
      title.innerHTML = "<%=msg%>";
      title.filters[0].Play();
   }
<%
end sub
%>
<META HTTP-EQUIV="Expires" CONTENT="Tue, 04 Dec 1993 21:29:02 GMT">
If there is no Session ("UID") variable, it probably means the session timed out. The user must be prompted to login, so control is redirected to the logout page. This trick also prevents people from pointing their browser directly at subpage. Try it, and you'll be sent directly to login.asp.
SetTitle is a server-side macro. It injects some JavaScript into the page that references the title tag in MainPage.asp. It sets the new title and then "plays" the DHTML filter on that tag. If you examine the title code in MainPage.asp, you'll find a filter that reveals the title text from right to left. This little effect occurs after the subpage is loaded. That's because the JScript code is inserted into body_onload().
The last line of LoginVerify.asp immediately expires the current page. I played with other tricks to allow pages to be cached, but I got into a lot of trouble with stale data. We think it is reasonable, in this case, to expire every page once it has been sent to the client.
The next line in the subpage template has to be modified for each subpage. It's one of the only state variables we need to keep track of. Because of the menu nature of MainPage.asp, we have to keep a bookmark on the current subpage in case the user clicks the Refresh button.
The LINK directive instructs the browser to use the FMCorp.css style sheet. The browser downloads the file if it doesn't already have it.
The BODY tag includes the onload parameter, which instructs the browser to execute the body_onload method after the page has fully loaded. That's where the title for the page is set.
Now that we know how the main page works, let's put up some security to control just who has access to the site.
The FMCorp Web site visitor encounters the default.asp page first. This page promptly redirects on the server-side to login.asp. This makes login.asp always the default page.
Login.asp is actually a copy of MainPage.asp with all the menus and mouse-activated code ripped out (see Figure 8). The original login page was a subpage displayed inside MainPage's IFRAME. This caused problems with cached pages, plus it made the logic in MainPage.asp too complicated. As it turns out, making a new stand-alone Login.asp page fixed the problems.
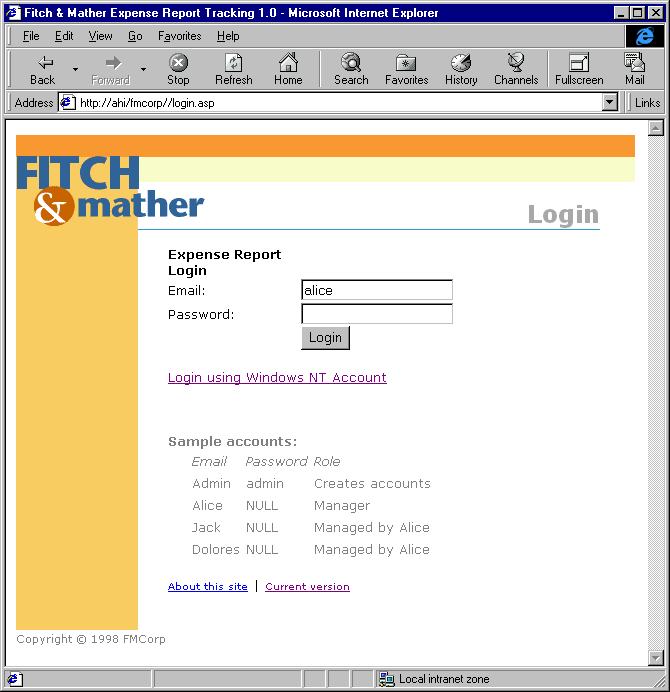
Figure 8. FMCorp login page
The login page offers users two ways to login to FMCorp. The first is the traditional name and password combination. Instead of a user name, though, we ask for the e-mail name, because that is guaranteed to be unique. The User table has a unique index on e-mail name but not FirstName. The entire e-mail name is not required—just enough to ensure uniqueness.
If the user chooses this route, the form posts the two parameters to LoginAction.asp. All the action in LoginAction takes place on the server. Its purpose is to validate the login information and redirect the user to Home.asp if it was successful or head the user right back to Login.asp if it was unsuccessful.
This code is also the first time we run into the middle-tier components (finally). An instance of FMCorp.ExpenseReadDB is created. The application data source name (DSN), e-mail, and password parameters are passed to login. If the return value is true, the other three parameters are valid. The UserID and FullName are cached in session variables.
If the ManageCount is greater than 0, we record the fact that this employee happens to be a manager. This fact is also recorded in a Session variable. MainPage.asp queries this value to determine whether to display the manager and administrative features.
If every thing is cool, we "remember" the subpage we want to visit by setting Session ("page") to home.asp. Then we redirect to MainPage.asp, and we're on our way:
<%@ LANGUAGE=VBScript %>
<%
Response.Buffer = true
Response.Clear
Session("UID")= ""
email = trim(Request("login"))

If email <> "" Then
   set login = Server.CreateObject("FMCorp.ExpenseReadDB")

   dim UserID, ManageCount, FullName

   if login.Login(Application("FMCorp_ConnectionString"), email,
         trim(Request("password")), UserID, FullName, ManageCount) then
      Session("UID") = UserID
      Session("name") = FullName

      if ManageCount > 0 then
         Session("Manager") = true
      end if
   else
      Response.Redirect("login.asp")
   end if
   set login = nothing

   Session("page") = "home.asp"
   Response.Redirect ("MainPage.asp")
else
   Response.Redirect ("login.asp")
end if
%>
The other way to login only works if the employee is using Microsoft Internet Explorer and has a valid Microsoft Windows NT® account on the domain with the Web server. The hyperlink directs the session to LoginNT.asp.
Now this file has some special permissions. Unlike all the other files in the Web site, it doesn't allow anonymous access. These permissions were set in the Setup program or when you followed the manual installation steps. Basically, the Web server only allows access to this file if your browser supports the Windows NT Challenge/Response authentication protocol. If you pass, your domain and username are now valid session parameters.
Let's see what LoginNT.asp does with this information:
<%@ LANGUAGE=VBScript %>
<%
Response.Buffer = True
Response.Clear
Session("UID")= ""
ntlogin= Request.ServerVariables("AUTH_USER")

If ntlogin <> "" Then
   set login = Server.CreateObject("FMCorp.ExpenseReadDB")

   dim UserID, ManageCount, FullName
   if login.NTLogin(Application("FMCorp_ConnectionString"), ntlogin, UserID,
         FullName, ManageCount) then
      Session("UID") = UserID
      Session("name") = FullName

      if ManageCount > 0 then
         Session("Manager") = true
      end if
   else
      Response.Redirect("login.asp")
   end if
   set login = nothing

   Session("page") = "home.asp"
   Response.Redirect ("MainPage.asp")

else
   Response.Redirect ("login.asp")
end if
%>
LoginNT.asp is similar to LoginAction.asp. Only in this case, it passes the server variable AUTH_USER as the only inward parameter to ExpenseReadDB.NTLogin. This is matched up to the database. If it exists, access to MainPage is granted.
Earlier in this document, you saw the contents of LoginVerify.asp. It is included at the top of each subpage to ensure that the session contains a valid UserID. Otherwise, the session has probably timed out, so the user is directed back to the Login.asp page.
Logout is easy to implement. We simply abandon the session and redirect the browser to the default page. Now the redirection is a little tricky. You can't use Session.Redirect ("default.asp"), because that will load the default Web page into the IFRAME. Instead, you have to do the redirection on the client side.
After the page loads, the body_onload() function finds the top-level window and redirects it back to default.asp. Because the session state was just abandoned, the login dialog box is shown.
The Logout.asp source code looks like this:
<%@ LANGUAGE=VBScript %>
<%
Session.Abandon()
%>

<HTML>
<HEAD>
</HEAD>
<BODY onload="body_onload()">

</BODY>

<script>

function body_onload()
{
   top.document.parentWindow.navigate(
   "http://<%=Request.ServerVariables("SERVER_NAME")%><%=getPath(Request.ServerVariables("URL"))%>/login.asp");
}
</script>
</HTML>
How does an employee submit an expense report? First, they must download a copy of the Expense Report Template (ExpenseReporteTemplate.xlt). This is a Microsoft® Excel 97 spreadsheet template that looks like the one in Figure 9. The template can be downloaded from the UserDownload.asp page.
The Email and Description fields are required. The e-mail address must correspond to a valid entry in the User table, otherwise the expense report will be rejected.
A special macro is triggered when the user saves the .xls file. It parses the spreadsheet data and creates an .xml file. Because .xml is a well-specified standard for creating ASCII files for data transmission, this was an ideal format for us.
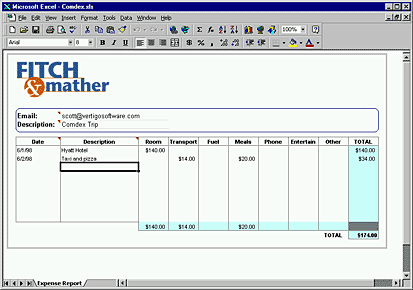
Figure 9. Expense report template
Originally we required the user to upload the .xls file. This presented a large problem, because we needed Excel on the server to parse the file. We felt this was not a scalable solution, and few Web server administrators would allow Excel to be placed on a Web server. The correct solution was to let the client do most of the work and create the .xml file locally.
The Excel macro is embedded in the downloadable template. The code looks like this:
Private Sub Workbook_BeforeSave(ByVal SaveAsUI As Boolean, Cancel As Boolean)
    createXMLfile (Left(ActiveWorkbook.FullName, _
      Len(ActiveWorkbook.FullName) - 4) & ".xml")
End Sub

Sub createXMLfile(filepath As String)
    Dim vbNewLine As String
    vbNewLine = Chr$(13) + Chr$(10)

    Dim XMLFileText As String 'working XML conversion of this speadsheet
    Dim ERsheet As Worksheet
    Set ERsheet = ActiveWorkbook.Worksheets("Expense Report")

    Const tagItemDescription = "ItemDescription"
    Const tagItemDate = "ItemDate"

    'list of Expense types
    Dim eTypes(6) As String
    eTypes(1) = "ItemRoom"
    eTypes(2) = "ItemTransport"
    eTypes(3) = "ItemFuel"
    eTypes(4) = "ItemPhone"
    eTypes(5) = "ItemEntertain"
    eTypes(6) = "ItemOther"
    eTypes(0) = "ItemMeals"

    XMLFileText = ""
    XMLFileText = XMLFileText & "<?XML VERSION=" & Chr(34) & "1.0" & Chr(34) & "?>" & vbNewLine
    XMLFileText = XMLFileText & tabs(0) & UCase("<ExpenseRequest>") & vbNewLine
    XMLFileText = XMLFileText & tabs(1) & "<VERSION>" & ERsheet.Range("ExpenseVersion") & "</VERSION>" & vbNewLine
    XMLFileText = XMLFileText & tabs(1) & "<USEREMAIL>" & ERsheet.Range("Email") & "</USEREMAIL>" & vbNewLine
    XMLFileText = XMLFileText & tabs(1) & "<DESCRIPTION>" & ERsheet.Range("description") & "</DESCRIPTION>" & vbNewLine

    XMLFileText = XMLFileText & tabs(1) & "<ITEMS>" & vbNewLine

    Dim nMaxItems As Integer
    nMaxItems = ERsheet.Range("ItemDescription").Count

    With ERsheet
        ' note we start with an index of 2 instead of 1
        ' the excel column ranges first index is the title
        ' of the column, the actual items start at index 2
        For col = 0 To UBound(eTypes)
            'for each column of data
            'set the column we are working on
            sColumn = eTypes(col)

            For nIndex = 2 To nMaxItems
                If .Range(sColumn)(nIndex) <> Empty And .Range(tagItemDescription)(nIndex) <> Empty Then
                    ' get the item information
                    XMLFileText = XMLFileText & tabs(2) & "<ITEM>" & vbNewLine
                    XMLFileText = XMLFileText & tabs(3) & "<TYPE>" & .Range(sColumn)(1) & "</TYPE>" & vbNewLine
                    XMLFileText = XMLFileText & tabs(3) & UCase("<Description>") & .Range(tagItemDescription)(nIndex) & UCase("</Description>") & vbNewLine
                    XMLFileText = XMLFileText & tabs(3) & UCase("<Cost>") & CCur(.Range(sColumn)(nIndex)) & UCase("</Cost>") & vbNewLine
                    XMLFileText = XMLFileText & tabs(3) & UCase("<Date>") & .Range(tagItemDate)(nIndex) & UCase("</Date>") & vbNewLine
                    XMLFileText = XMLFileText & tabs(2) & "</ITEM>" & vbNewLine
                End If
            Next nIndex
        Next col
    End With

    XMLFileText = XMLFileText & tabs(1) & "</ITEMS>" & vbNewLine

    XMLFileText = XMLFileText & tabs(0) & "</ExpenseRequest>" & vbNewLine

    'MsgBox XMLFileText
    Dim FSO As Object
    Dim newFile As Object

    Set FSO = CreateObject("Scripting.FileSystemObject")
    Set newFile = FSO.CreateTextFile(filepath)

    newFile.Write (XMLFileText)
    newFile.Close

    Set newFile = Nothing
    Set FSO = Nothing
End Sub

Function tabs(n As Integer) As String
    tabs = ""
    For x = 0 To n - 1
        tabs = tabs & vbTab
    Next
End Function
Workbook_BeforeSave is called right before the spreadsheet is saved. Because it is called before the employee has a chance to name the file, the default file name will be ExpenseReportTemplate.xml. Subsequent saves will pick up the saved file name, such as Jack1.xml.
One of the chief tasks of the FMCorp site is to receive expense reports submitted by employees. After the employee has completed and saved the Expense Report Template, they navigate to the UserUpload.asp page, as shown in Figure 10.
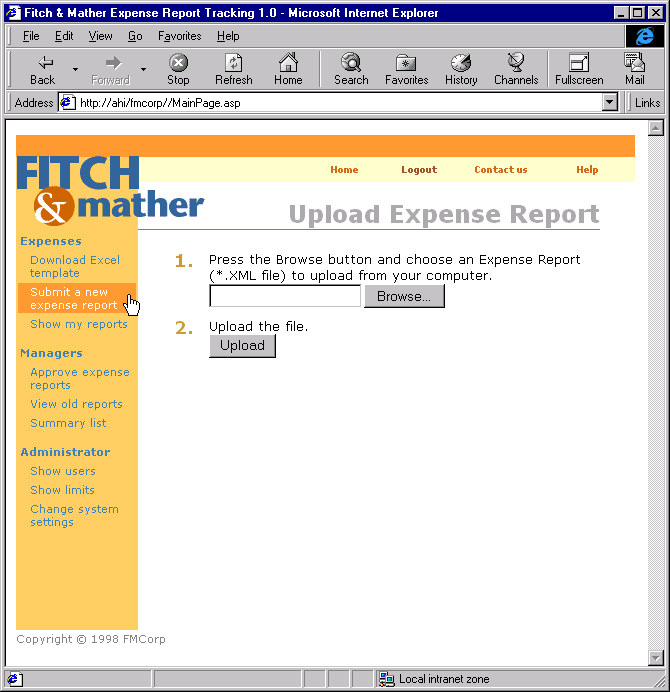
Figure 10. FMCorp Upload page
The Browse button is an HTML <INPUT> tag that displays a file browser. Here the employee locates the recently created .xml file. Unfortunately, we can't specify a file type, so the Open dialog box shows all files. We reasoned the only way we could browse specifically for an .xml file was to create our own ActiveX® control that displayed a File Open common dialog box. We'll leave that as an exercise to the reader.
The full source code for UserUpload.asp is as follows:
<%@ Language=VBScript %>
<!--#include file="LoginVerify.asp"-->
<%Session("page")="UserUpload.asp"%>
<HTML>
<HEAD>
<META NAME="GENERATOR" Content="Microsoft Visual Studio 6.0">
</HEAD>
<LINK rel=stylesheet href="fmcorp.css">
<script>
function body_onload()
{
<%SetTitle("Upload Expense Report")%>
}
</script>
<BODY onload="body_onload()">
<%
url= Application("BaseURL")
%>
<form enctype="multipart/form-data" action="<%=url%>/post/cpshost.dll?PUBLISH?<%=url%>/UserUploadAction.asp"
method=post id=form2 name=form2>
<table BORDER=0 CELLSPACING=3 CELLPADDING=3>
<tr>
<td valign=top><span class=BulletNumber>1. </span>
<td>Press the Browse button and choose an Expense Report (*.XML file) to upload from your computer.
<br><input type="file" id=file1 name=file1>
</td>
<tr>
<TD vAlign=top><SPAN class=BulletNumber>2. </SPAN>
<TD>Upload the file.
<br><input type=hidden size=80 name="TargetURL" value="<%=url%>/post">
<input type=submit value='Upload' id=submit1 name=submit1>
</td>
</table>
</form>
</BODY>
</HTML>
The first half of the file is the housekeeping required by the subpage template. The real upload work starts with setting the local server variable "url" equal to the global Application variable BaseURL. BaseURL is constructed in default.asp and points to the server and Web application name like "http://server/fmcorp."
Next, you'll find the traditional <FORM> tag. The enctype tag stands for encoding type. The value "multipart" tells the browser that you'll be uploading a file instead of just simple form data. The <INPUT> tag with type="file" indicates the local file name.
The action for this form is the content posting acceptor dynamic-link library (DLL). This DLL is normally installed as part of Site Server Express in the Windows NT Option Pack. A copy of the DLL is provided in the POST folder with FMCorp.
After the Internet Server API (ISAPI) DLL retrieves the file from the client browser, it redirects the server to process the UserUploadAction.asp file. It's in the context of this file that we'll parse the .xml file using a few special server-side form variables.
The source code for this page looks like the following:
<%@ LANGUAGE=VBScript TRANSACTION=Required %>
<% Response.Buffer = TRUE %>

<HTML>
<BODY>
<H3>
Upload Status:<BR>
</H3>

<span style="color:gray">
<HR>
<%
  For I = 1 To Request.Form("FileName").Count
    Response.Write "Uploaded File: <B>" & Request.Form("FileName")(I) & Request.Form("FileExtention")(I) &"</B><BR>"
    Response.Write "Server Path: <B>" & Request.Form("FilePath")(I) & "</B><BR>"
    Response.Write "Size: <B>" & Request.Form("FileSize")(I) & " bytes</B><br>"
  Next

  FileName = Request.Form("FilePath")(1) & Request.Form("FileName")(1) & Request.Form("FileExtention")(1)
%>
<hr><br>

<%
dim submit, erid, scode

dim result, fso, ufilepathm

if request.form("FilePath").count = 0 then
   Response.Write ("No file was received.")
   Response.End
else
   set submit = Server.CreateObject("FMCorp.ExpenseReports")
   result = submit.SubmitXMLFile(Application("FMCorp_ConnectionString"), FileName, erid, scode)
   set submit=nothing
end if

%>
</span>

<a class=smalltext href="<%=Application("BaseURL")%>/home.asp">[Home]</a><br>
<%
Sub OnTransactionCommit()
   strResult = "<br><i>Your expense report has been submitted.<br>The new ExpenseReportID is " & erid & ".<br>"
   Response.Write strResult
   RemoveFile()
End Sub

Sub OnTransactionAbort()
   'Response.Clear

   Response.Write("<i>Failed to create a new expense report<br>")
   Response.Write("Error text: " & scode)
   RemoveFile()

End Sub

sub RemoveFile()
   'Delete the file
   set fso = Server.CreateObject("Scripting.FilesystemObject")
   fso.DeleteFile FileName
   set fso=nothing
end sub
%>

</font>
</BODY>
</HTML>
The very first line of this file is the single most important line in order for a Windows DNA application. The Transaction=Required line packages this Web page, the FMCorp.ExpenseReports and Microsoft SQL Server™ into one atomic package. If for some reason the submission process fails, OnTransactionAbort() will be called. This can occur for a variety of reasons:
Any unexpected behavior will be caught by the FMCorp.ExpenseReports component and the entire transaction will be aborted. Note that some of the failure scenarios just shown are actually caught deep within the database by triggers.
The ExpenseWriteDB and ExpenseReports components were designed to work with transaction server just for this purpose. It removes a lot of error handling code from the developer and places the burden on the Distributed Transaction Controller.
I encourage you to try to break the submission page. Try uploading a .gif file instead of a valid .xml file. Upload an expense report with an invalid e-mail address. Upload one for Alice, but set her spending limit to $5. (You can do this in AdminUsers.asp.) As you're doing this, keep an eye on the Committed and Aborted statistics in the Transaction Server Console window, like the one shown in Figure 11.
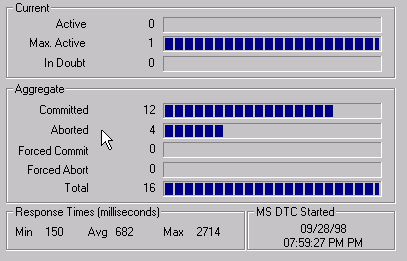
Figure 11. Transaction statistics
Microsoft Visual InterDev™ 6.0 supports a feature called Design-Time Controls, or DTCs. We use the DTCs that abstract the ActiveX Data Objects (ADO) recordset to quickly build an expense report list, as shown in Figure 12. Note that the orange menus were cropped from this image for better readability—this list always appears as a subpage in MainPage.asp.
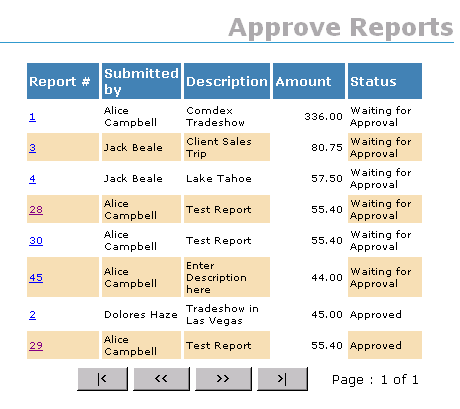
Figure 12. Manager expense report list
This page is surprisingly easy to build. It was created using two DTCs (Recordset and Grid) and a stored procedure that takes a single argument. First, let's examine the stored procedure:
Create Procedure sp_GetMgrSummary
(
   @UserID int
)
As
   -- Differs from sp_GetUserSummary only in the WHERE clause
   SELECT er.ExpenseReportID,
      convert(char(12),er.Submitted) as Submitted,
      ER.Description,
      ER.UserID,
      Users.FirstName + ' ' + Users.LastName as Name,
      Users.Email,
      S.Description as Status,
      convert(char(12), ER.StatusDate) as StatusDate,
      ER.StatusID,
      str(SUM(Amount), 6, 2) as Amount
   FROM
      ExpenseReports as ER JOIN
      StatusTypes as S ON ER.StatusID = S.StatusID JOIN
      Users ON Users.UserID = ER.UserID JOIN
       Items ON Items.ExpenseReportID = ER.ExpenseReportID
   WHERE Users.ManagerID = @UserID
   GROUP BY er.ExpenseReportID, convert(char(12),er.Submitted), ER.Description,
      ER.UserID,   Users.FirstName + ' ' + Users.LastName, Users.Email, S.Description,
      convert(char(12), ER.StatusDate), ER.StatusID
   ORDER BY ER.StatusID, ER.Submitted
This select statement isn't too complicated. It simply gets a list of all the expense reports from the employee that this manager manages. The current manager UserID is passed as the only parameter. The stored procedure was executed for Alice (UserID = 2) within Visual InterDev by right-clicking sp_GetMgrSummary and choosing Execute. The results are shown in Figure 13. There are seven more columns scrolled out of view, but you get the idea.
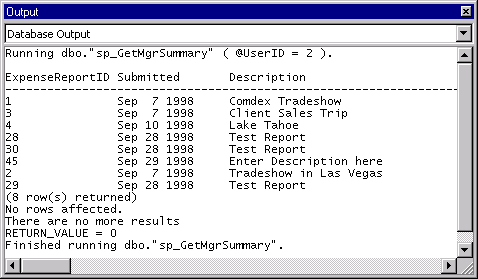
Figure 13. Results of sp_GetMgrSummary for Alice
The challenge is to display these results in a Web page with minimal effort and maximum flexibility. DTCs do that for you. Take a look at this file in Source Mode, as shown Figure 14.
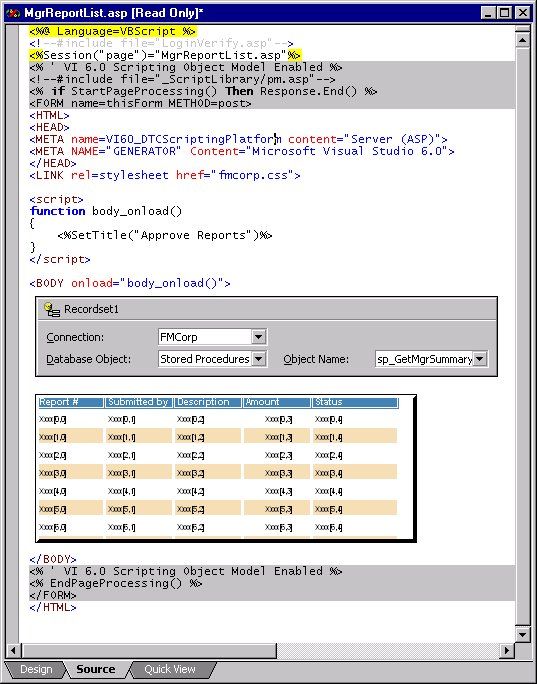
Figure 14. MgrReportList.asp in Visual InterDev source mode
As you can see, there is very little visible HTML code. Most of the code comes from the subpage template. Visual InterDev adds the code in the two gray blocks when you drop the first DTC on a page. Note that this page does all of its processing on the server, so no special features are required on the client side.
The first DTC, the Recordset, represents a server-side ADO recordset. It has been configured to run the stored procedure sp_GetMgrSummary. The stored procedure requires one parameter, the UserID for the manager in question. By right-clicking the recordset DTC, we can gain access to its property page, as shown in Figure 15. The value of the parameter is just the Session ("UID") variable. This was set when the user first logged in.
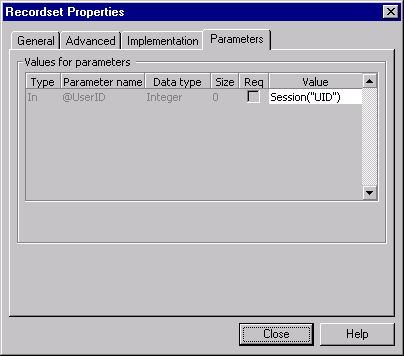
Figure 15. Recordset properties
Now that the Recordset DTC is configured, how do we wire it to the grid? First, we drop the Grid DTC on the page and display its properties like the ones shown in Figure 16.
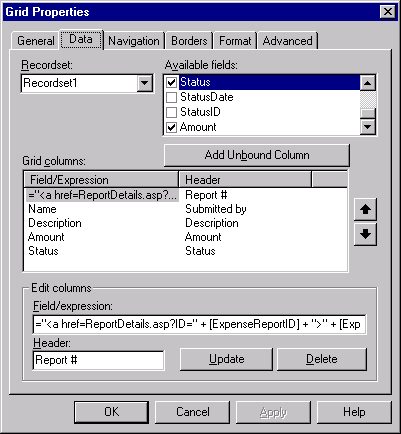
Figure 16. Grid properties
The Recordset drop-down combo box allows us to choose which Recordset DTC to wire the grid to. Because there's only one, it is populated by default. The available fields list displays the columns returned by the stored procedure.
We want to show the ExpenseReportID in the first column and have it act as a hyperlink to the ReportDetails page. The grid allows us to display any arbitrary expression. In our case, the following text converts the ExpenseReportID into a hyperlink:
="<a href=ReportDetails.asp?ID=" + [ExpenseReportID] + ">" + [ExpenseReportID] +"</a>"
When constructing these expressions, keep in mind they are executed on the server in JScript. The actual evaluation takes place deep in the Recordset.asp file in your _ScriptLibrary folder in the Web site.
We encountered a couple of problems with the current version of the Grid DTC.
If you turn on the option to alternate the background color and then change one of the column's alignment, the background color always defaults to white. To fix this, right-click the DTC, and choose Always View as Text. Ignore the warning, and locate a line of code that looks like this:
<PARAM NAME="DetailBackColor" VALUE=",,,White,">
Simply delete the word "White." Right-click the text, and turn off the Always View as Text option.
Another problem occurs if the last grid column is right justified. For some reason, the last couple of characters are clipped. To compensate for this, turn the last column into a field expression, and pad it with a couple of spaces. We do this in the ReportDetails.asp grid:
=[Amount] + " "
The ReportDetails page displays information about a particular expense report. If the manager of the user who submitted the report is viewing the page, two buttons allowing the report to be approved or denied will appear.
The source view for this page is a little more complicated than the previous. It uses two recordsets— one to display the expense report summary and the other to list the details in a grid.
A screen shot wouldn't work in this case, because the code is too long. Instead, we'll walk through the major code blocks.
The first bit of code is a combination of server-side VBScript and client-side JScript:
<script>
function body_onload()
{
<%
if isManager then
   SetTitle("Approve or Decline")
else
   SetTitle("Report Details")
end if
%>
}
</script>

<!-- Recordset2 DTC goes here -->
<%
dim id
id = Request("ID")

dim rs
dim isManager
isManager = false
set rs=Recordset2.getRecordSource()
if rs("ManagerID") = Session("UID") then
   isManager = true
end if
%>
The isManager variable is actually set further down in the code. I'm not sure why this works, but it does. The subpage title is set depending on whether this user is an administrator.
The next block of code lends itself well to a screen shot, as shown in Figure 17. The five blocks are label DTCs. They get their contents from Recordset2, which wraps the call to sp_GetExpenseReport. Like we saw in Figure 15, the Recordset2 parameter dialog box allows us to pass the ExpenseReportID as a parameter to the stored procedure sp_GetExpenseReport. The parameter was passed as part of the URL specified in Figure 16.
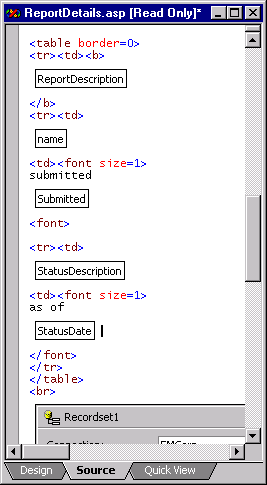
Figure 17. ReportDetails with DTCs
The next block of code links Recordset1 to a grid to display the expense report line items. The stored procedure sp_GetExpenseItem provides the data for the grid.
The final block of code displays an Approve and a Decline button if the current user has approval permissions. Both buttons redirect the current page to MgrApprove and pass the current ExpenseReportID along with a Boolean representing the action to perform:
<%
if isManager and rs("StatusID") = 1 then
%>
<button id=nav onclick="document.location='MgrApprove.asp?id=<%=id%>&approve=1'"
type=button>Approve </button>
<button id=nav onclick="document.location='MgrApprove.asp?id=<%=id%>&approve=0'"
type=button>Decline </button>
<br><br>
<%end if%>
<% if isManager then%>
<a class=smalltext href="MgrReportList.asp">[Back to Approve Reports]</a>
<%else%>
<a class=smalltext href="ReportList.asp">[Back to Report List]</a>
<%
end if
%>
MgrApprove.asp is similar to the upload page. Because it uses transaction-enabled components, the first line of code TRANSACTION=Required places the whole page under control of the transaction coordinator.
After retrieving the ExpenseReportID and approval action, the VBScript calls ExpenseReports.ApproveReport:
<%@ Language=VBScript TRANSACTION=Required%>
<!--#include file="LoginVerify.asp"-->
<%Session("page")="MgrApprove.asp"%>
<HTML>
<HEAD>
<META NAME="GENERATOR" Content="Microsoft Visual Studio 6.0">
</HEAD>

<LINK rel=stylesheet href="fmcorp.css">

<script>
function body_onload()
{
   <%SetTitle("Approve a Report")%>
}
</script>

<BODY onload="body_onload()">

Approve Reports

<%
dim approveObj, scode, erid, approve

erid = CInt(Request("ID"))
approve = CInt(Request("approve"))

set approveObj = Server.CreateObject("FMCorp.ExpenseReports")

if approveObj.ApproveReport(Application("FMCorp_ConnectionString"), erid, approve, scode) = false then
   Response.Write("approve/decline failed: " & scode & "<br>")
else
   Response.Write("Approve/decline succesful.<br>")
end if

set approveObj = nothing
%>

<%
Sub OnTransactionCommit()
   Response.Write("Approve committed.<br>")
End Sub

Sub OnTransactionAbort()
   Response.Write("Approve/decline aborted.<br>")
   Response.Write("Error=" & scode)
End Sub
%>

Back to <a href="MgrReportList.asp">Approve Reports</a><br>
</BODY>
</HTML>
The ApproveReport method in ExpenseReports sends an e-mail message to the employee who submitted the report, notifying him or her of the action.
We wanted to provide an easy way to modify the contents of the Users and Limits table. We downloaded a trial copy of RuleZero 1.0 from Vertigo Software, Inc. (see Figure 18).
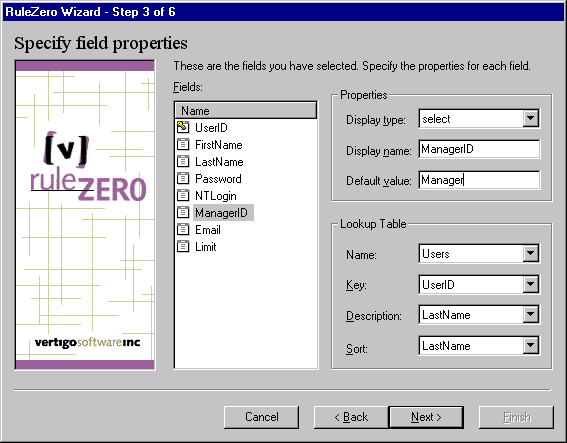
Figure 18. RuleZero
The RuleZero wizard walked us through a few steps and generated an ASP page called AdminUsers (Figure 19). We integrated the template subpage code and within a few minutes had a fully functional administrative Web page. Because RuleZero emits code based on DTCs, making modifications was easy.
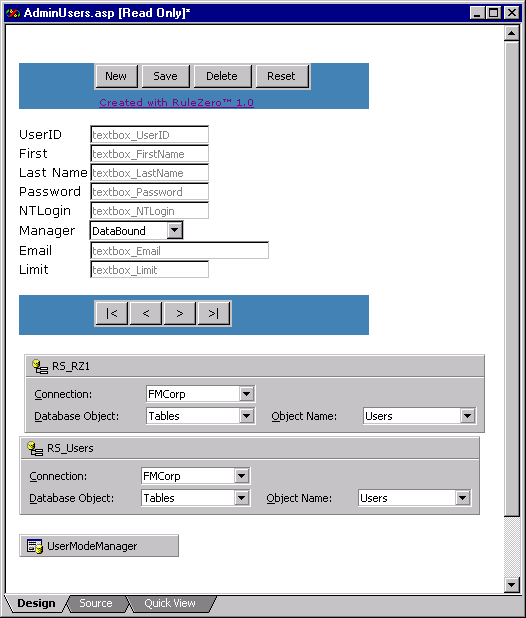
Figure 19. AdminUsers page
The same procedure was applied to AdminLimits. You can use these two pages to set individual spending limits to test the database triggers. Use the AdminUsers page to add new users to the system.
In our opinion, the major Web site architecture points you can take away from this article include:
Scott Stanfield is the president of Vertigo Software, Inc. Vertigo Software is a San Francisco Bay Area-based consulting firm that specializes in the design and development of Windows DNA applications and components. He can be reached at scott@vertigosoftware.com or on the Web at http://www.vertigosoftware.com/.