Fitch & Mather Stocks: Setup Documentation
Scott Stanfield, Michael Hanley
Vertigo Software, Inc.
July 1999
Summary: Describes how to install the FMStocks database, components, and Web site. Covers system requirements and manual setup. Total estimated setup time: 20 minutes. (10 printed pages)
Click to copy the FMStocks sample files.
Requirements
The database server requires Microsoft® SQL Server™ 7.0. The Web server must be running Microsoft Internet Information Server (IIS) 4.0.
The development machine needs the Microsoft Visual Studio® 6.0 development system (or just Microsoft Visual Basic® 6.0 and the Microsoft Visual InterDev® 6.0 development system).
Important Step 4 below will require you to compile a Visual Basic DLL. If you skip over this step, the middle-tier components will not be able to connect to the database.
Setup
For the following steps, we'll assume the Web server and database server are installed on the same machine "Server1."
Load the Database Scripts
- Use the Query Analyzer to connect to your database under the "sa" account. Load the database/schema.sql script into the query window and run it by pressing F5 or clicking Play. The script will create a database called "stocks" using the model database as a template. When finished, your query output will resemble the screen shot shown in Figure 1.
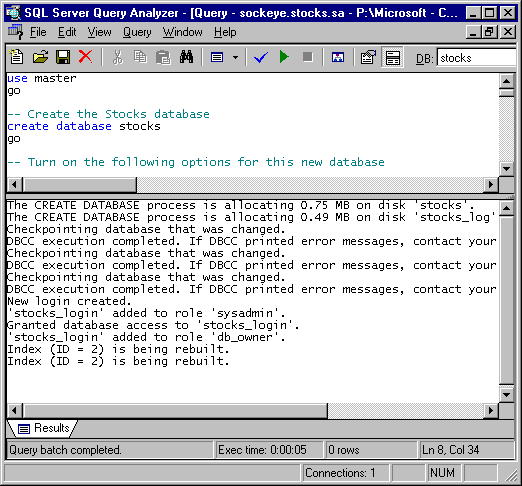
Figure 1. SQL Server output after creating the database
Close the query window (Ctrl+F4).
Note This SQL script creates the database without regard to tuning. A proper installation, for example, would place the transaction log on separate physical drive from the drive holding the data. Refer to the FMStocks Tuning Guide for more information.
- Run the batch file database/rundts.bat to transfer the data from the rawdata.mdb file to the stocks database. You must run this script on the database machine.
This script takes roughly 30 seconds to complete. When finished, the final line will say "DTSRun: Package execution complete."
For benchmarking purposes, this script was used to generate one million test accounts.
- Using Query Analyzer again, press Ctrl+O to connect to your database using the new account "stocks_login" with the password "password". It should open up a new query window and connect you to the "stocks" database. Now load the script called "Create 10,000 test accounts.sql" and execute it.
Depending on your database server, this could take up to 5 minutes to execute. Close the Query Analyzer.
Update the DSN for Your Database
- Load the objects/FMStocks_DB project into Visual Basic 6.0. Open the database.bas file and locate the GetConnectionString() method. Replace the text (local) with the name or IP address of your database server, as shown in Figure 2.
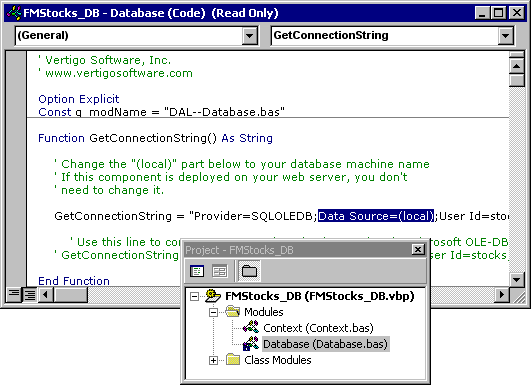
Figure 2. Changing the hard-coded DSN
Note the DSN is hard-coded purely for performance reasons. It could have come from the registry or a file-based DSN, but with measurable performance loss.
Save the file and compile the FMStocks_DLL using the File | Make command. By default, the new FMStocks_DLL file will be created in the objects/Distribution folder. Quit Visual Basic.
- Use the Microsoft Transaction Server Explorer to create an empty package called FMStocks. Do this by expanding the tree on the left window down to My Computer/Packages Installed. Right-click Packages Installed and select Package from the New menu.
The New Package dialog box should now be on the screen. Click the Empty Package button and call it "FMStocks". Leave the Package Identity option to Interactive User. This simply means that you must be logged into the application server in order to use these components.
Click Finish. Drill into the FMStocks/Components icons on right side of the window. Finally, drag the FMStocks_DB.dll and FMStocks_Bus.dll components into the empty package window for registration.

Figure 3. FMStocks components registered in MTS
When finished, your MTS window should look similar to the one shown in Figure 3.
Test the 2nd and 3rd Tiers
Before continuing, this would be a good time to stop and test the current configuration. Position the MTS window so you can see the FMStocks_Bus and FMStocks_DB components. Choose the Status View from the View menu.
Double-click the "Test FMStocks Installation.vbs" script, which is located in the database folder. This simple VBScript creates an instance of the FMStocks_Bus.Account object and uses the Add method to add a new account to the database. While it's running, you should see two objects activated and one of the balls spinning in the MTS Explorer window, like the screen shot shown in Figure 4.
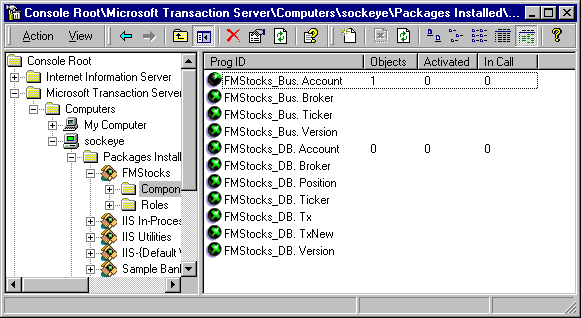
Figure 4. FMStocks components in action
If the VBS test script was able to add a new account to the database, you should see a dialog similar to the one shown in Figure 5.
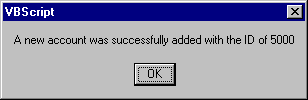
Figure 5. A new account was created.
If you were successful, try to run the script again. You'll see that it won't allow another account with a duplicate e-mail address to be created.
Create the Web Site
Use Visual InterDev 6.0 to create a new, empty Web site called FMStocks, as shown in Figure 6.
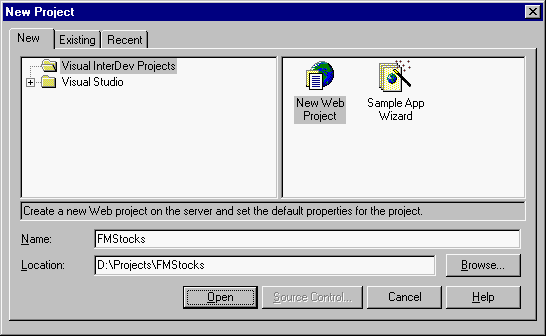
Figure 6. Visual InterDev New Project dialog
Enter your Web server name in the next dialog. This should be the same server where you registered your MTS components in the previous steps.
Step 2 prompts you for a Web site name—use the name FMStocks. Turn off the Full Text searching option. Press the Finish button when you get to Step 3.
After the project is loaded, right-mouse click on the project name in the Project Explorer, as shown in Figure 7. Choose the Add | Add Item option from the popup menu.
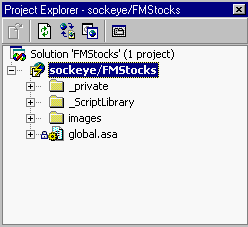
Figure 7. Visual InterDev Project Explorer
In the resulting dialog, click the Existing tab, navigate into the "website" folder from the setup distribution, change the "Files of type" filter to "All Files (*.*)", press Ctrl+A to select all files, then click Open. After a few seconds, all the FMStocks ASP and HTML files will be added to your project.
Right-click the project name again for the Add Item menu, but this time select the Images folder and click Open Folder. This adds the contents of the images folder to the site. You will be prompted to overwrite the existing image folder—choose OK.
Your Project Explorer window should now look like the one shown in Figure 8.
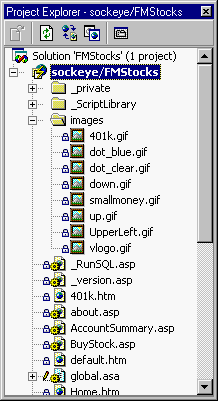
Figure 8. The Web project after adding all the files
Before testing, we have to change a couple of IIS settings for your Web site. Launch the Internet Service Manager and locate the FMStocks Web site in the tree list. Right-click FMStocks and show the site Properties. Press the Configuration button, choose the App Options tab and first clear the Enable Session State option, then turn on the Enable Buffering option, as shown in Figure 9.
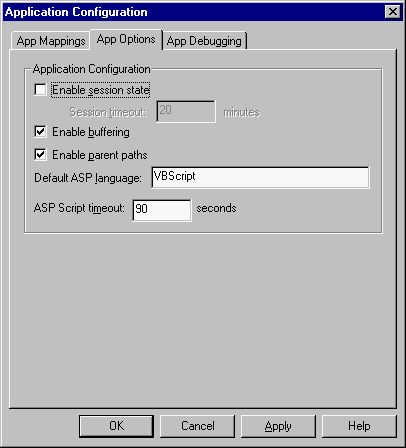
Figure 9. FMStocks Web configuration
Test the Site
Connect to the Web site using Internet Explorer 4.0 or greater. The default page should look like the one shown in Figure 10.

Figure 10. FMStocks Home Page
Most configuration problems stem from having a bad DSN for your database. You can troubleshoot the DSN and component registration by clicking on the "check file version" link. You can also execute queries directly by choosing the "run a query" link.
Finally, test the application by logging as "ta1" with the password "ta" (ta stands for Test Account).
About the Author
Scott Stanfield is the president of Vertigo Software, Inc. Vertigo Software is a San Francisco Bay Area-based consulting firm that specializes in the design and development of Windows® Distributed interNet Architecture (DNA) applications and components. He can be reached at scott@vertigosoftware.com or on the Web at http://www.vertigosoftware.com/.
For More Information