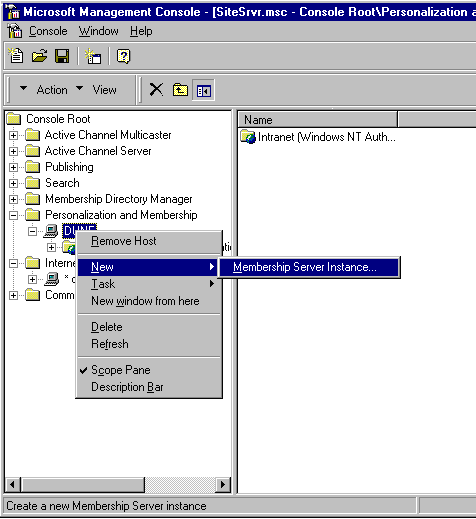
Figure 1. Creating a new Membership instance
You will need your password later. Write it down someplace you will not lose it. Click the Next button when finished. (See Figure 2.)
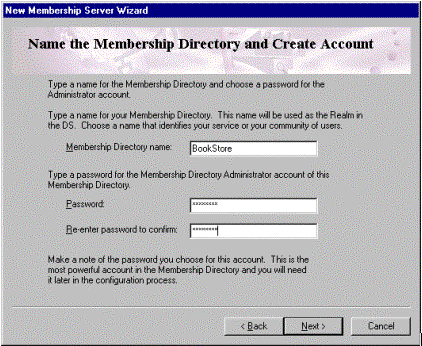
Figure 2. Naming the Membership Directory
Kevin Durr
www.notsoldseparately.com
January 1999
Summary: Discusses how to use Microsoft® Visual InterDev™ version 6.0 with Site Server 3.0 Membership services. Covers how to create a Web development system with Visual InterDev that uses Membership authentication, and then shows how to use the Membership design-time controls (DTCs) to create some sample user registration pages. (29 printed pages)
Introduction to Site Server 3.0 Membership
Directory Services and the Membership Directory
Lightweight Directory Access Protocol
Active Directory Service Interfaces
Active User Object
Membership Directory Authentication
What Are Design Time Controls?
Introduction to Site Server's P&M DTCs
Getting Started
Setting Up Your Server
Setting Up Your Visual InterDev 6.0 Workstation
Creating a Visual InterDev Project
Creating Registration Pages
Creating an Update Page
Adding HTML Tables to Your Forms
Resources
Site Server
LDAP
ADSI
Visual InterDev
Microsoft Site Server 3.0 is a suite of products and application development tools used to create dynamic interactive intranet and Internet Web sites. Site Server is available in two versions: Site Server and Site Server Commerce Edition. Site Server contains the following features:
Commerce Edition is the same suite with the addition of Commerce Server and Ad Server. Although Microsoft has positioned Site Server as an intranet platform, it may be used equally as well for Internet sites. This is particularly true for the Personalization & Membership services. P&M may be used to deliver personalized content for users as well as to restrict users to areas of a site for which they have been given privileges. It provides several membership authentication methods and is tightly integrated with Microsoft Windows NT® Server's Internet Information Server (IIS) technology.
First, let's cover some of the basic technologies utilized by Site Server Membership, including directory services, Lightweight Directory Access Protocol (LDAP), and Active Directory Service Interfaces (ADSI). A general knowledge of these technologies is important as you build your Membership site.
A directory service is a database that stores organizational data and is highly optimized for database lookups (reads). Directory services provide an index of users and network resources. Site Server 3.0 contains Microsoft's most recent directory service, the Membership Directory. It is the central repository for user data, including member accounts, permissions, and site resources. All directory services use LDAP as their communicating protocol. In the future Microsoft Windows® 2000 Server will implement the much-talked-about Active Directory, which will take the Membership Directory to the next level. The Active Directory will also be responsible for storing all the information needed for the Windows NT domain architecture.
Lightweight Directory Access Protocol (LDAP) is the underlying protocol used by Site Server Membership to communicate with the Membership Directory. LDAP was designed to be the standard Internet protocol for accessing directory services. LDAP runs on TCP/IP networks and is independent of platform, allowing directory-based information to be shared across operating systems. Site Server Membership implements an LDAP service for reading and writing information to the Membership Directory database.
As stated previously, the Membership Directory must be accessed using the LDAP protocol. Rather than making raw LDAP calls to the Membership Directory, Site Server Membership uses Active Directory Service Interfaces, better known as ADSI. ADSI provides a common standard interface to multiple directory services (through ADSI providers) and communicates with the directory services using LDAP. ADSI makes life easier by allowing the developer to write code to one API while working with multiple directory services.
Site Server provides the Active User Object (AUO) as a single component that aggregates all of a user's attributes from multiple Active Directory Service (ADS) providers. The primary provider is always the Membership Directory. The AUO is a COM object called membership.userobjects. It uses ADSI to retrieve a user's information from the Membership Directory and greatly simplifies the code a developer writes by automatically binding to the current user's information in the Membership Directory. The binding occurs when the component is created, but requires that the Web site be mapped to a Membership Server and that the user is authenticated.
When you set up a Membership Directory for a Web site, you must choose the type of authentication to be used. Membership may be set up to use Windows NT accounts (Windows NT Authentication) or accounts that reside solely in the Membership Directory database (Membership Authentication). Windows NT Authentication is most useful for intranet sites where you wish to leverage existing accounts. However, Membership Authentication is a good choice for Internet sites, especially sites in which the number of users will increase dramatically over time. As your user base grows, it is much easier to administer your accounts and privileges using Membership Authentication.
It is important to note that Membership Authentication maps Membership groups to proxy Windows NT group accounts to determine a member's security permissions. You still have the benefit of the strong security of Windows NT and can administer security permissions for a Membership group by assigning permissions (ACLs) to the proxy account. For every group in the Membership Directory, Membership creates a corresponding Windows NT group called Site_directoryname_groupname, where directoryname is the name of the Membership Directory and groupname is the name of the Membership group.
For our example code, we'll be creating a new Membership Directory called BookStore. When the BookStore Membership Directory is created, an administrator group, called AdminGroup, is also created. The corresponding Windows NT group is therefore called Site_BookStore_AdminGroup.
Design-time controls (DTCs) are a special class of Microsoft ActiveX® Control that act as visual helper applications for Web developers and can automatically generate the HTML and server-side or client-side script required to accomplish simple or complex tasks within a Web site. Because DTCs have no binary run-time component, their output can be viewed on any platform in any browser. DTCs help to reduce development time by generating common code that is repeated many times to perform common tasks within Web pages.
For more information, please see: http://msdn.microsoft.com/vinterdev/technical/techfaq.asp.
Creating a registration page that adds a user to the Membership Directory can be a fairly complex task. To help solve this problem, Site Server provides a set of DTCs for creating user registration pages and forms. The Membership DTCs consist of three DTCs that must be used together. They are as follows:
The Membership Header DTC is used only once per page or form. It defines whether you will be creating a new user or updating an existing user. It also defines which Membership Directory to add the user to and which administrative account to use when doing this.
The Membership Attribute DTC is inserted for each member attribute that you want to include on the registration form. The only required attribute is the username, called cn (Common Name). Even though it's not required, you will most likely want to insert the userpassword attribute as well.
The Member Footer DTC is used only once per page or form. It places the Submit button on the form and allows you to specify the URL the user will be sent to upon successful completion of registration. You may also specify the Membership group to which the user is added.
You need to have Site Server 3.0 with Site Server Service Pack 1 installed on the server. If you do not have Site Server, you may order an evaluation CD or download an evaluation copy from the Microsoft Web site at http://www.microsoft.com/siteserver/. The Site Server Service Pack 1 may be downloaded from http://www.microsoft.com/backoffice/downloads.htm#Site.
Site Server 3.0 has the following hardware and software requirements:
Hardware requirements
Software requirements
Note Actual requirements will vary based on your system configuration and on the features you choose to install.
Site Server 3.0 Membership Directories can be created using a Microsoft Access or Microsoft SQL Server™ 6.5 database. In our example, we will create the Membership Directory with an Access database. Because Access databases do not require a server component to run, there is no additional installation required. If you choose to implement your Membership Server with an SQL Server database, you must install SQL Server on the server. An evaluation copy of SQL Server 6.5 and its installation documentation is included on the Site Server 3.0 evaluation CD.
To utilize the Direct Mail feature of Site Server 3.0 Membership, a valid SMTP server that can be reached from your Web server is required. If you do not have an SMTP server available, you can install the Microsoft SMTP server that is included with the Windows NT Server 4.0 Option Pack.
Once you have Site Server installed, you'll need to create a Membership Server instance for your Web site. The Membership Server instance contains your Membership Directory.

Figure 1. Creating a new Membership instance
You will need your password later. Write it down someplace you will not lose it. Click the Next button when finished. (See Figure 2.)

Figure 2. Naming the Membership Directory
After the Membership Server instance is created, the next step is to create a Web site and map the new Web site to the Membership Server that you have just created.
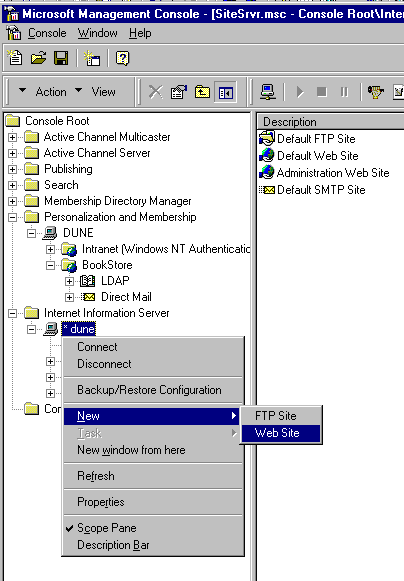
Figure 3. Creating a Membership Web site
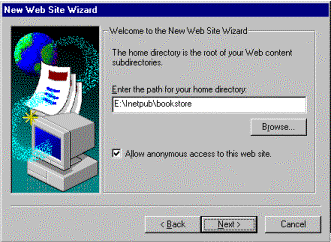
Figure 4. Setting the home directory path
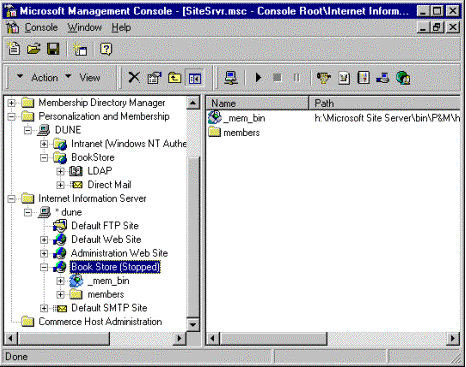
Figure 5. The new virtual directory "_mem_bin"
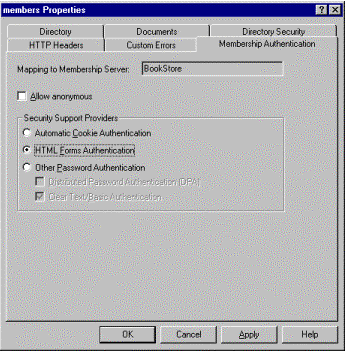
Figure 6. Properties dialog box
The actions just described will force the user to log in using an HTML form rather than a dailog box before accessing the content contained in this directory. As you create other directories that require authentication using Visual InterDev, you can set the Membership Authentication property using this technique, or through the WebAdmin pages provided by Site Server. (See the Site Server documentation for more information regarding WebAdmin.)
Now you need to install and configure Microsoft FrontPage® Extensions on your new Web site. FrontPage Extensions enable you to attach to the site using Visual InterDev. It's important to map the new Web site to a Membership Directory before beginning this task. As you begin development of the site and connect to it with Visual InterDev, your authentication should be through Membership accounts rather than Windows NT accounts.
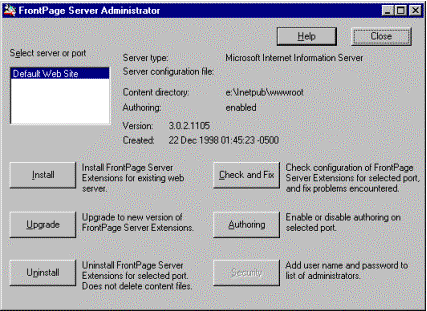
Figure 7. FrontPage Server Administrator dialog box
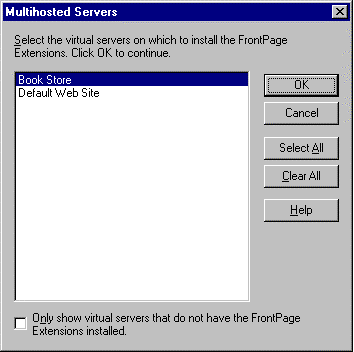
Figure 8. Multihosted Servers dialog box
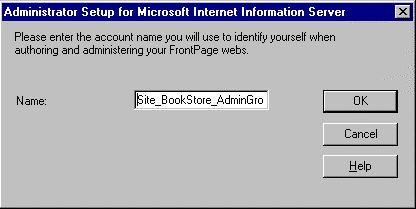
Figure 9. Entering the corresponding Windows NT group
If you're installing Visual InterDev 6.0 on the same computer as Site Server, you must install Visual InterDev after the Site Server and Site Server Service Pack 1 (SP1) installation.
Important SP1 installation is necessary to ensure the interoperability of Site Server 3.0 and Visual InterDev 6.0.
If you are not developing on a server, you must install the Site Server Tools on your client workstation. You can do this by inserting the Site Server 3.0 CD-ROM and selecting Tools Installation. If you downloaded a Site Server evaluation copy, run the install program and select Tools Installation.
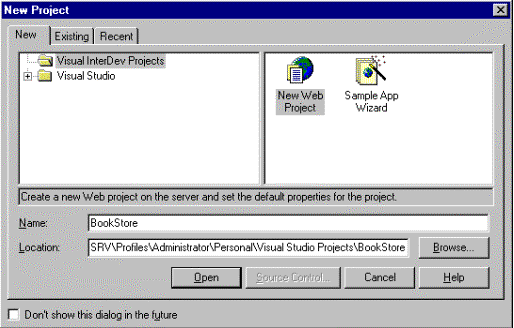
Figure 10. Creating a new project in Visual InterDev
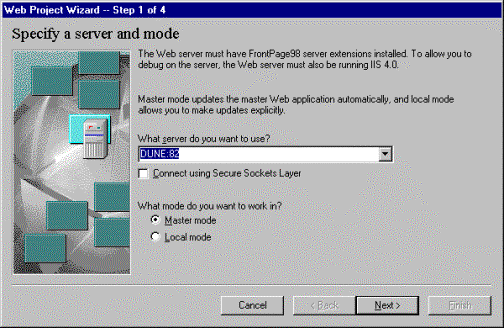
Figure 11. Specifying the server and port
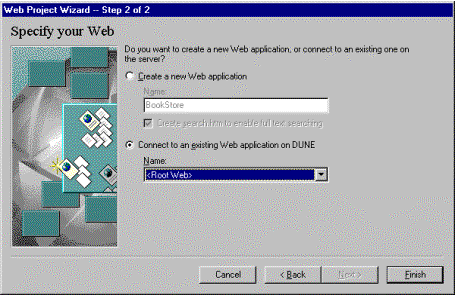
Figure 12. Connecting to your existing Web site
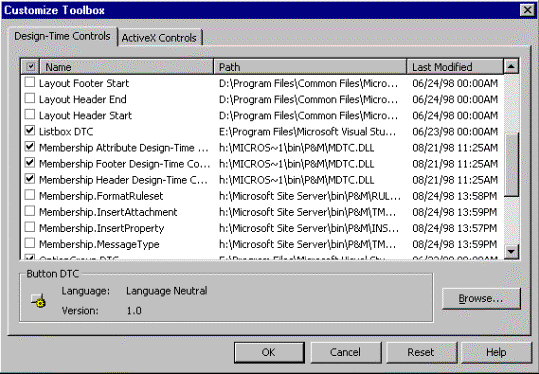
Figure 13. Adding the Membership DTCs
You are now ready to start developing your project. Before we begin coding, we need to add some pages to the project using Visual InterDev.
In the root directory add the following files:
In the members directory add the following files:
Your project should resemble Figure 14.
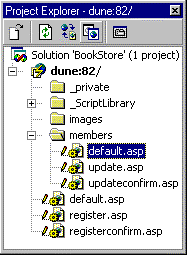
Figure 14. BookStore Web site project view
Welcome to our book store! <br>
Sign up for a <A href="register.asp">free member account</a>.
<br>
If you already have an account, you may enter the <A href="members/ ">members</A> section.
<P>Welcome to the members section.</P>
You may <A HREF="update.asp">update your account</A>
or go back to the <A HREF="../default.asp">home</A> page.
Thanks for registering. <BR>
You may login into our <A HREF="members/">members section</A>.
Thanks for updating your information.
<A HREF="default.asp"> Continue </A>
Now we're going to use the Membership DTCs we just installed to create a page where users may create their own accounts.
![]()
When the ToolBox is displayed, click Design Time Controls. You should see the Membership DTCs listed in the ToolBox, displayed with the following names:
If you do not see these in the ToolBox, perform the following: From the menu select Tools, and then Customize Toolbox. Next, deselect the Membership DTCs and click the OK button. Then reinsert them using the same process by selecting rather than deselecting them.
![]()
![]()
(See Figure 15.)
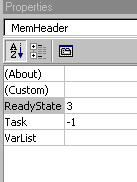
Figure 15. Property Pages window
If you do not wish to use the Property Pages window, you may select the DTC by clicking it. Next, from the menu choose View, and then Property Pages. This accomplishes the same task.
The Script ID and Script Password correspond to the account that the script uses to create our new user. This account must have sufficient privileges in the Membership Directory to create accounts. For our example, we'll use the Administrator account. However, when you go into a production environment, you should change this to another account with the minimal permissions required. (See the Site Server documentation for more information.)
The HTML value is self-explanatory.
Click each variable and enter the following values:
Click the OK button when finished.
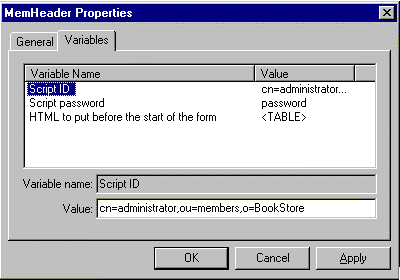
Figure 16. Entering the values for the Membership Header variables
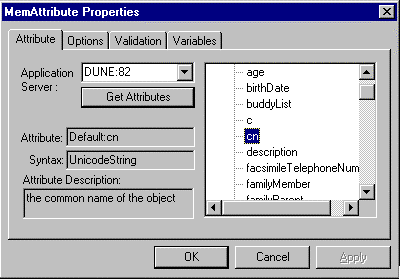
Figure 17. Adding username to the registration form
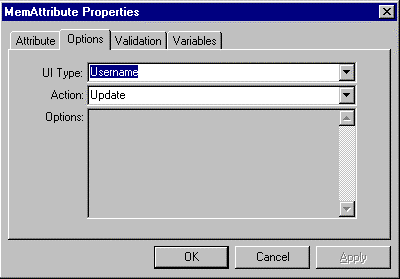
Figure 18. Choosing UI type and action
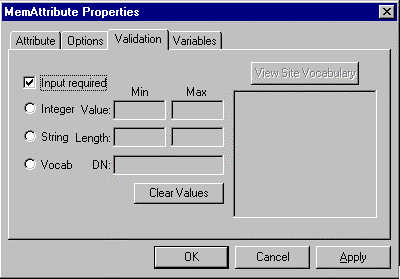
Figure 19. Forcing the login
The Validation tab is already set, so click the OK button when finished.
![]()
The default values for the other variables are fine. Notice the Name of Group to add member to variable. This is Public by default. As you develop your Web site you may want to create several different groups to apply different restrictions to various user subsets. You may change this group to match the restrictions you wish to place on your users.
Click the OK button when finished.
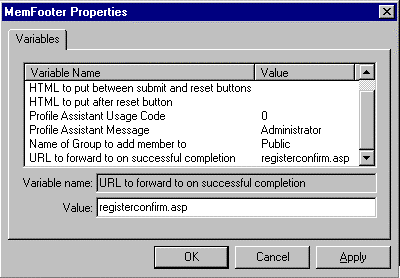
Figure 20. Setting the forwarding URL
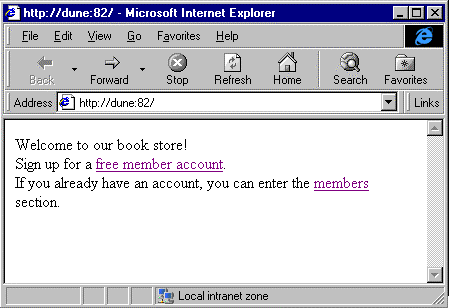
Figure 21. Default.asp
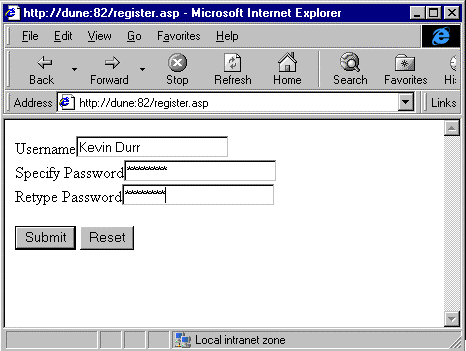
Figure 22. Register.asp, the registration form
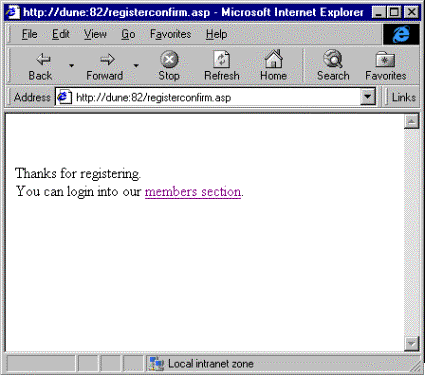
Figure 23. Registerconfirm.asp, the registration confirmation page
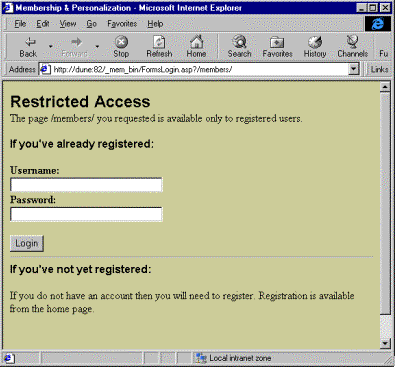
Figure 24. FormsLogin.asp, the default login page
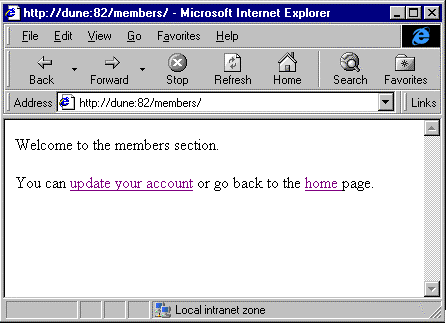
Figure 25. The default page for the member subsite
View the registration page again using Internet Explorer 4, and see what happens after you make the changes just described to the form. The dialog box that appears on the screen automatically is called the Internet Explorer Profile Assistant.
Now that we've created a self-registration page, you may use the same techniques to create a user update page. Here are some tips on creating the update page.
C:\Microsoft Site Server\Bin\P&M\html\verifpwd.asp
Important Please note that this file is shared by all Membership sites. If you plan on making extensive changes to either FormsLogin.asp or verifpwd.asp, you should make copies of them and place them in the root directory of your Web site. Membership handles HTML forms authentication by looking for a file called FormsLogin.asp, starting from the parent directory of the request and working backwards to the root. If it does not find one, it uses the default FormsLogin.asp located in the "_mem_bin" virtual directory. If you decide to use copies of the files, you need to make sure that FormsLogin.asp posts to the Verifpwd.asp that is in the your Web site directory, by changing the action link specified in the <FORM> tag of the FormsLogin.asp file.
if strURL = ""  Then
    strURL = Request.QueryString("URL")
End if
if "updateconfirm.asp" = "" Then
Replace this line with the following code:
if Request.Form("userPassword") <> "" then     x.CancelCookie("FormsAuth")
    Session.Abandon    Response.Redirect( "http://SERVER:82/_mem_bin/verifpwd.asp?URL="  _
       & server.URLEncode("/members/updateconfirm.asp") & _
       "&username=" & server.URLEncode(GetAttributeValue(gMemUserObject, "cn", "Default",  "", "))&  _
       "&password=" & server.URLEncode( Request.Form("userPassword")) )
    Elseif "updateconfirm.asp" = "" Then
Next, replace SERVER:82 in the preceding code with your Web Site server and port number.
This code automatically calls the same code (verifpwd.asp) that FormsLogin.asp uses to authenticate the user. FormsLogin.asp is the default HTML login page that is provided with Site Server. Verifpwd.asp takes three parameters: username, password, and URL. It also attempts to retrieve the URL from an HTML form element called "URL." Because we do not have a URL form element in our page, we have modified the verifpwd.asp code to look for the URL on the query string when it does not locate a URL form element.
Once you've got the hang of using the DTCs, you may want to rework your pages and use an HTML table to align the registration form elements. Let's try this with register.asp.
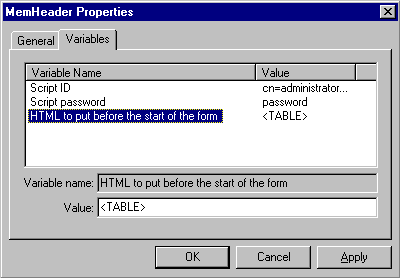
Figure 26. Entering the <TABLE> tag
| DTC | Variable | Value |
| Cn | HTML inserted before the field on input error | <TR><TD>Username</TD><TD> |
| Cn | HTML inserted after the field on input error | ERROR</TD></TR> |
| Cn | HTML inserted before the field | <TR><TD>Username</TD><TD> |
| Cn | HTML inserted after the field | </TD></TR> |
| Userpassword | HTML before error password specify input | <TR><TD>Specify Password</TD><TD> |
| Userpassword | HTML after error password specify input | ERROR</TD></TR> |
| Userpassword | HTML before error verify password input | <TR><TD>Retype Password</TD><TD> |
| Userpassword | HTML after error verify password input | ERROR</TD></TR> |
| Userpassword | HTML before password specify input | <TR><TD>Specify Password</TD><TD> |
| Userpassword | HTML after password specify input | </TD></TR> |
| Userpassword | HTML before verify password input | <TR><TD>Retype Password</TD><TD> |
| Userpassword | HTML after verify password input | </TD></TR> |
| HTML inserted before the field on input error | <TR><TD>Email : </TD><TD> | |
| HTML inserted after the field on input error | ERROR</TD></TR> | |
| HTML inserted before the field | <TR><TD>Email : </TD><TD> | |
| HTML inserted after the field | </TD></TR> | |
| Footer | HTML to put before submit button | <TR><TD COLSPAN="2" ALIGN="CENTER" > |
| Footer | HTML to put after reset button | </TD></TR></TABLE> |
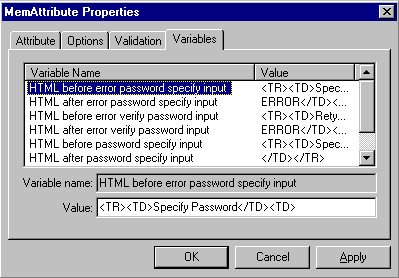
Figure 27. Continue adding HTML table tags
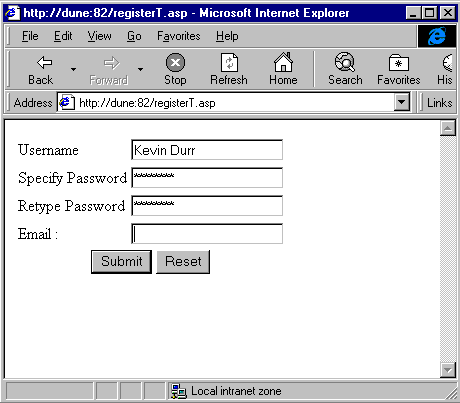
Figure 28. The new registration form using an HTML table
To follow is a list of resources that are pertinent to the technologies discussed in this article.
http://msdn.microsoft.com/workshop/server/nextgen/perstutor.asp
http://msdn.microsoft.com/workshop/server/nextgen/siteservfeat.asp
http://support.microsoft.com/support/kb/articles/q187/0/36.asp
LDAP IETF RFC-1777:
http://info.internet.isi.edu/in-notes/rfc/files/rfc1777.txt
ADSI FAQ:
http://www.microsoft.com/NTServer/nts/exec/overview/ADSIfaqs.asp