Rishi Rana and Doug Yoder
Microsoft Corporation
January 3, 2000
Click here to open or copy the utilities discussed in this technical article.
Summary: This article explains how to take advantage of the Call Tracking sample team solution for the Microsoft Office Developer Access Workflow Designer for SQL Server 7.0. (18 printed pages)
With Microsoft® Access Workflow Designer for Microsoft® SQL Server™, developers can build Web-based workflow and tracking solutions. One common scenario for this type of application is tracking customer support or help-desk calls. When a new call comes in, it must be assigned to a member of the help-desk group and then tracked through a series of steps, or a workflow process, to ensure the customer’s request is resolved properly.
The Call Tracking sample is a simple call-tracking system designed specifically to help departmental customer support or help-desk groups. Calls can be organized by problem-area and customer and sorted by category and priority. This sample contains data access pages where customers and the support staff can view and edit call and customer information and view graphs and charts for each call.
This sample takes advantage of the following Microsoft Office Developer concepts:
This article describes how to take advantage of the Call Tracking team solution, illustrating the type of solutions that can be developed using the Access Workflow Designer. The appendix in this document describes how the Call Tracking sample team solution was built using the Access Workflow Designer.
Departments that commonly receive incoming customer requests must assign these requests to appropriate members in their department, as well as ensure the request is followed through to completion. Many times, these requests are recorded manually on paper and passed around the group. Other times, a simple spreadsheet or database is used to track the incoming requests.
Although this might work with a limited number of daily or weekly requests, even with a small number of requests, it can be difficult to keep track of the status of all the requests and to ensure each follows the proper procedure. Who is working on this customer request? Has it been resolved? This customer is calling back on a request we completed—where is the customer’s original request? Developers can use the Access Workflow Designer to create a solution to enforce the flow of tasks required to complete a customer request
The Call Tracking System, developed using the Access Workflow Designer, provides a way for a department to automate the call tracking process, making it easier to manage the status of requests and guaranteeing that each request is followed through specific steps to completion.
With this sample solution, when a customer calls, help-desk personnel create a record. The category and priority are set for the call, and then it is assigned to member in the help-desk group. At this point, the person creating the call record also can set row-level security and add detail information about the call if required. In cases where the issue has been reported already, the person entering the record can search through existing call details pages to locate a resolution for the customer.
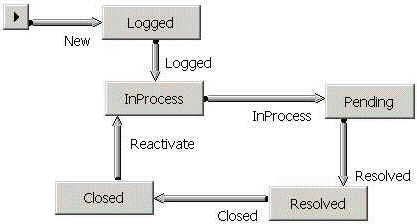
All new calls created are set to “Logged” status and cannot be deleted after they are logged. This maintains all records intact, so it is easy to reactivate the record later.
With the Call Tracking System workflow process, users can perform help-desk tasks in the following order:
The process and states of each call are enforced in the Call Tracking solutions as shown graphically here:

Figure 1. Call Tracking workflow
In addition, the Call Tracking System provides a number of additional features. These include:
Access Workflow Designer for SQL Server is required to use this sample. This component is available with Office 2000 Developer.
To deploy the Call Tracking solution template (MOD_CallTrackingSample.tpl), use the Team Solutions Manager to import the template on the server where Access Workflow Designer server components are installed. After importing the template, create a new solution from this template using the New Team Solutions wizard. For details about using templates with Access Workflow Designer, consult the Access Workflow Designer Administrator’s Guide online Help.
This sample uses the Microsoft Office Workflow Toolbar control. Pages that use this control must be edited to correct the toolbar control database connection string; otherwise, the call-tracking solution will not function correctly. In this sample, the CallsView.htm page uses the toolbar control. To correct this problem, you must edit the CallsView.htm page with the Access 2000 data access page designer. Opening the page in the designer in Design view and saving it will correct the problem.
When the Call Tracking System is opened, the home page is displayed in the main view. The main view provides access to all of the calls in the database and is used to move a call from one step in the process to another. In addition, the main view is used to navigate to other features of the solution, such as additional views, offline features, and additional security features.
All of the calls in the database are listed individually on the home page in main view. To move between calls, use the previous and next buttons on the navigational control at the bottom of the page. The list of calls can be sorted to monitor the status of all calls.
The tasks defined by the workflow process are available in the blue toolbar directly above the call information. Depending on the current state of a call, only those tasks that are valid for that specific call are enabled. The New and Edit tasks are always available, no matter what state the call is in. The Microsoft Office Developer Workflow Toolbar control provides this task-enabling functionality. The Workflow Toolbar control, included with the Access Workflow Designer, provides an easy-to-use interface for enforcing the workflow process for users of the application without requiring any extra coding.
Additional features of the Call Tracking system solution, such as the ability to set permissions for individual calls and display different views of the calls, are available from the links at the top of the page.
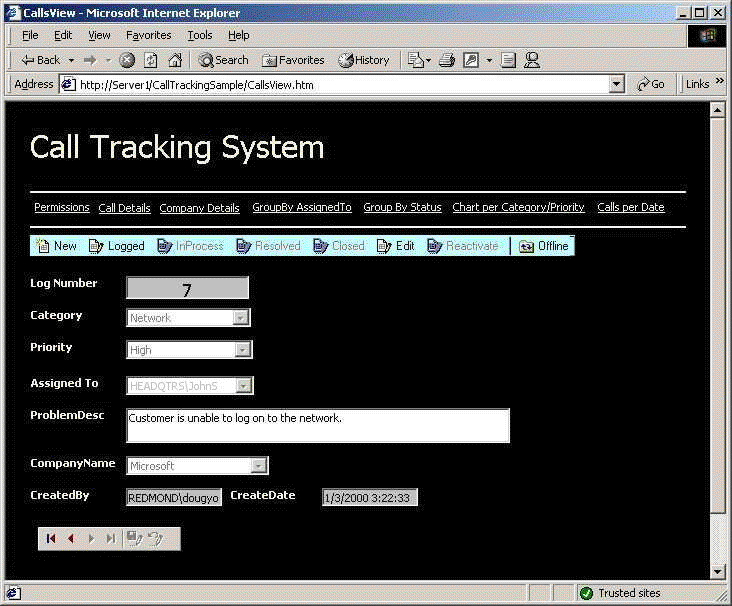
Figure 2. Call Tracking System home page
The first task in the workflow process is to enter a new customer call, adding the required information to the database. A member of the help-desk group might do this or, if you have made the solution available to customers, the customer can create a record for a new call.

As soon as the new call has been saved, the Workflow Toolbar control is updated automatically, so only the New, Logged, and Edit tasks are available. Because Logged is the only task available for a new call, it is the only task enabled in addition to New and Edit.
When the call information has been saved in the database, the call must be logged and assigned to a member of the help-desk group by executing the Logged task on the Workflow Toolbar control.

The Workflow Toolbar control is updated, so only the tasks available for a logged call are available. In this case, the next task available in the process is the InProcess task.
Members of the help-desk group look for calls that have been logged and assigned to them. To accept the call and begin working on it, the call is moved into the InProcess task to indicate that the call is being investigated and worked on currently.

The Workflow Toolbar control is updated to reflect that the next task in the process is the Resolved task.
While the call is being investigated, the member of the help-desk group might be required to contact the customer or others for additional information. This information can be recorded using the Call Detail feature. For more information about using this feature, see the section Adding Call Detail Information.
When the help-desk member solves the call and has communicated with the customer, the call can be resolved. While resolving the call, the help-desk member typically assigns the call to another member of the group to verify the call has been resolved properly.

The Workflow Toolbar control is updated to reflect that the next task in the process is the Closed task.
After the help-desk member has verified that the call has been resolved properly, the call status is changed to Closed.

Typically, most calls stay in a closed state. However, at times a customer might call back if the problem returns or if is not resolved as expected. In this case, rather than re-entering the call information in new record, the call can be reactivated.

When a call has been reactivated, it is in the logged state and begins the workflow process again. The Workflow Toolbar control is updated to reflect that the next task in the process is the InProcess task.
For each call, additional call detail information can be included. For example, while the call is being investigated, the help-desk member might want to contact the customer or others for additional information. This information can be added to the call detail information easily.
The call detail information is accessed by clicking the Call Detail link at the top of the home page in main view. This will display the Call Details dialog box.
Note If there is no existing call detail information, the dialog box is blank when it appears.
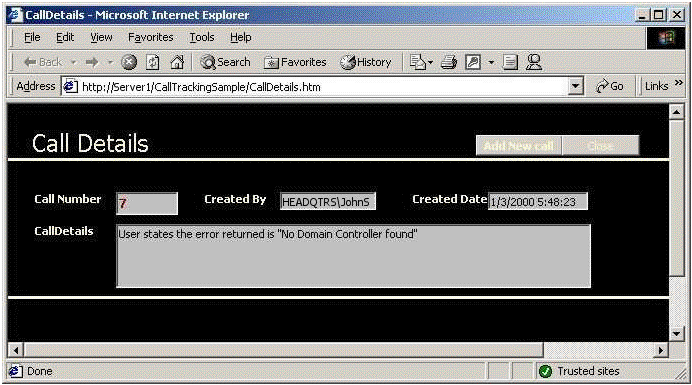
Figure 3. Call Detail dialog box
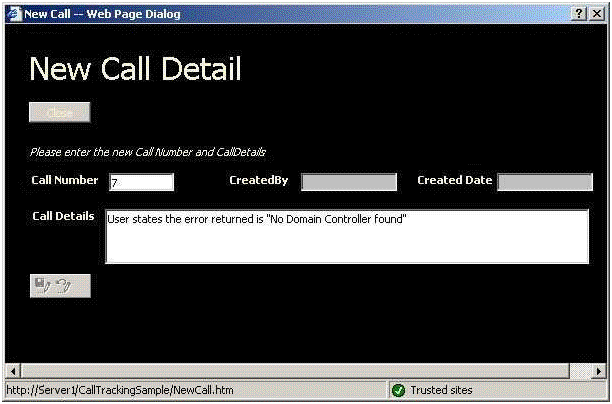
Figure 4. New Call Detail dialog box
Note For the call detail information to be saved, you must enter the call number of the call to have the detail information associated with it. To find this number, display the Call Tracking solution main view, and find the Log Number associated with the call.

Note If you click Close without first saving the changes, your call detail information will not be saved.
The call detail section can contain multiple items associated with each call. To add additional information to the Call Details section, repeat the previous procedure.
Security is important when you are dealing with data that is available to many people. In the Call Tracking solution, you can set permissions for each call to specify which users can read or modify it. A person who can edit a call also can change that call’s permissions.
Permissions are set on a per-call basis. When a call is created, by default, the call can be read and modified by all users who have access to the database. Permissions are granted based on the options selected in the Item Permissions dialog box. For example, you can hide calls from members of the Customer role by selecting No Access for the Customer role.
Item permissions can be useful when a highly controversial problem is being investigated and you do not want customers to be able to view it until a resolution is identified.
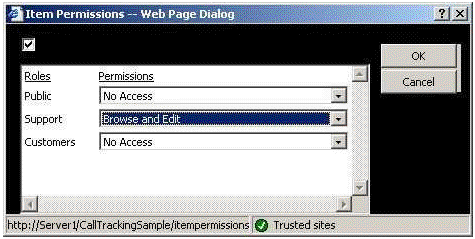
Figure 5. Item Permissions page
In addition to using the main view to list all of the calls, the Call Tracking solution provides other views of the calls in the database. These views make it easier to find specific calls in the database and some provide summary information about the calls. Note, however, that these views do not let users to modify the call records. To modify a call, users must use main view.
As each call is entered in the Call Tracking solution and, as it is moved from one task to another, the call always is assigned to a member of the help-desk team. That person is responsible for dealing with the call. Using the All Calls grouped by AssignedTo view makes it possible for members of the help-desk team to quickly view all of the calls assigned to them. To display this page, click GroupBy Assigned To in main view.
The AssignedTo view lists the name of each person in the system with an expand (plus/minus) button. To see the calls assigned to a particular person, click the expand button.
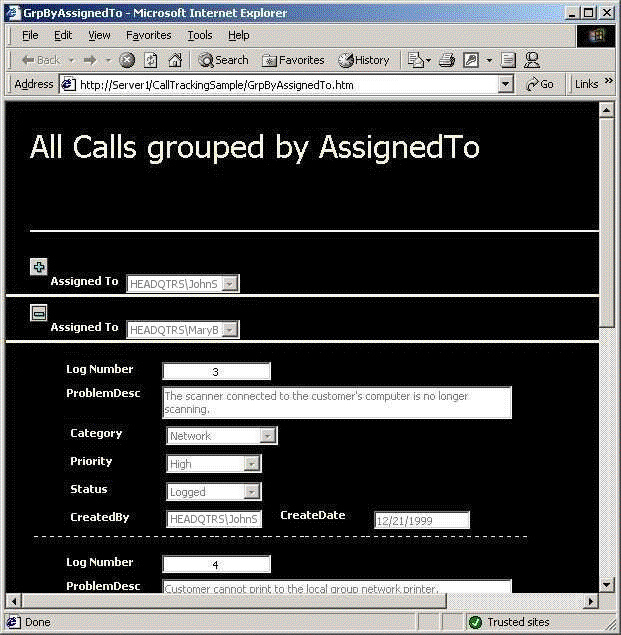
Figure 6. AssignedTo view
In addition to the AssignedTo view, it is also important to be able to find all of the calls associated with a specific task or state. For example, by viewing all of the calls in the InProcess state, the user can see which calls are currently under investigation.
The All Calls grouped by Status view lists the different states in the system with an expand (plus/minus) button. To see the calls in a particular status, click the expand button. To display this page, click GroupBy Status in the main view.
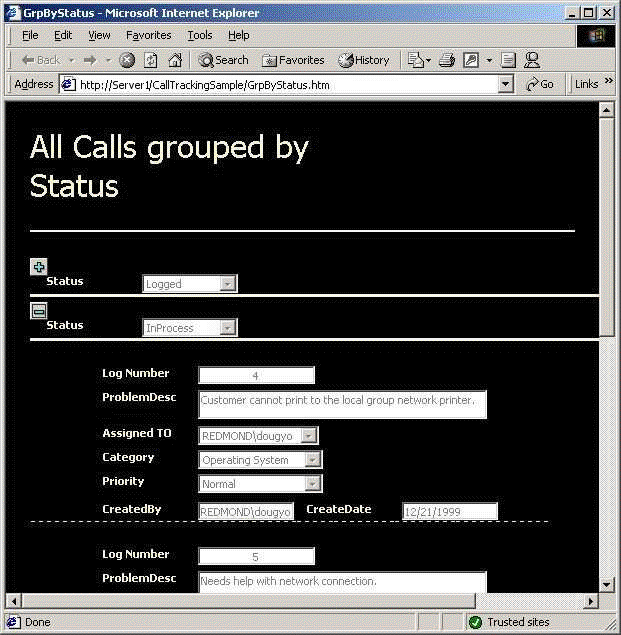
Figure 7. GroupBy Status page
By viewing a summary of the calls in the database in a chart form, you can identify trends in the calls received quickly. One trend to watch is the area or category to which the calls apply.
Using the Total Calls logged in each CATEGORY view makes it possible for help-desk members to display graphically the number of calls within each category. This page uses the Microsoft Office Web Components Chart Control to display the graph. To display this page, click Chart per Category/Priority in the main view.
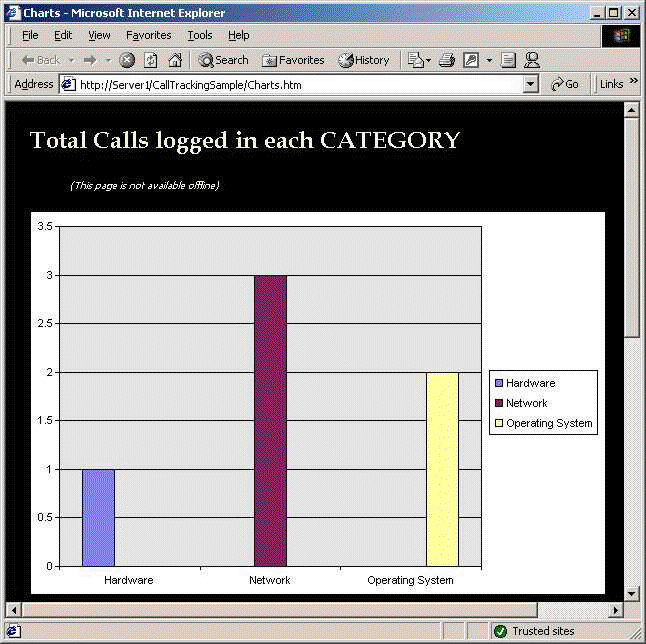
Figure 8. Chart of calls per category
Another useful view lists all of the calls by the date they were received. In addition, you might want to search for particular call records by specifying filter criteria and sorting conditions interactively.
Using the All Calls logged sorted by Created Date view makes it possible for help-desk members to display calls within a specific date criteria. This page uses the Microsoft Office Web Components Pivot Control, which makes it possible for you to interactively change the filter and sort criteria. To display this page, click Calls per Date in main view.
The All Calls logged sorted by Created Date view displays the calls in an interactive grid. To view the calls by date, click CreateDate By Month, and select the date range to display.
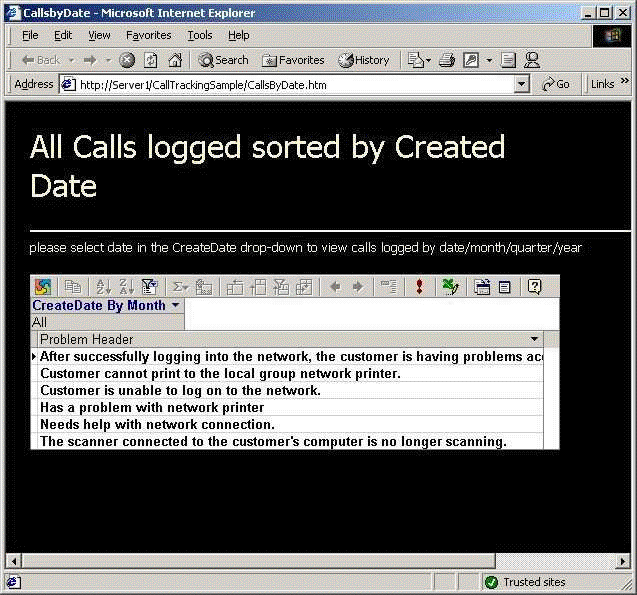
Figure 9. All calls logged sorted by CreatedDate view
By using the Call Tracking System, departments can track incoming customer calls easily, ensuring the calls follow the process required to complete the request successfully. In addition, users can find calls existing in the system quickly by using views that list calls by whom the call is assigned to or the status of the call.
For the latest information about Microsoft Access Workflow Designer for SQL Server, see the Microsoft Office Developer Web site at http://msdn.microsoft.com/OfficeDev/.
To access Knowledge Base information, consult the Product Support section of the Office Developer Web site.
For additional information about developing team solutions, consult the Access Workflow Designer Developer’s Guide online documentation.
This section describes the technical details of the Call Tracking sample solution.
The solution architecture consists of the SQL Server database schema, a workflow process, and a user interface created using data access pages.
The call-tracking database has a single main table, Calls. This table stores the log numbers of calls entered in the tracking system. Associated with the Calls table is a detail table, CallsDetails, which stores additional information for each call. There are four lookup tables in the solution. The Customers table stores information about the customers, the Status table stores workflow status information, the Category table stores the categories to which a call can be assigned, and the Priority table stores priority data.
For each call, information about who logged the call and when it was logged is entered directly into the main and detail tables. These tables have CreatedBy and CreatedDate columns that default to the current user and current date respectively. This helps track information about the person who worked on the call from the beginning to the end and helps provide information about how the call was handled. In addition, these columns are present in the Customers lookup table, because there might be a need to create new customers. Other lookup tables do not have a user interface and cannot be edited from data access pages.
The Calls table has an associated workflow process developed using the Access Workflow Designer. The workflow process for the Calls table tracks the call from when it is logged in the system through InProcess and finally resolves and closes the call.
When a new call is entered, it is set to a status of Logged, and then it can be set ultimately to status of Closed. Calls cannot be deleted, but they can be reactivated from a status of Resolved or Closed. This is by design, so information is not lost, and problem areas can be retraced.
The workflow process also includes script that sends an e-mail reminder to the owner of a call after the call has remained in the Pending state for more than two days.
The user interface for this sample is based on data access pages and was developed using Access 2000 and the Microsoft Script Editor.
There are two primary data access pages used in this sample: CallsView.htm, which shows a summary of calls logged, and CallDetails.htm, which shows detail information about a specific call. The CallDetails page shows how to set a filter within the main data access page, CallsView.htm. This hyperlink filter can be based on any set of criteria. The steps used to create this hyperlink filter are as follows:
To create a hyperlink filter between data access pages:
Another example of filtering is filtering customer information based on the Customer selected in CallsView.htm page. In this case, the same hyperlink method as the Call Details filter is used, except the filter is on the CustomerID field, because Customer is a lookup table.
The Charts.htm and CallsByDate.htm data access pages were created to show how to display data using Office 2000 Office Charts and Pivot Table.
Each user who connects to the call-tracking solution is a member of one or more roles. The actions that users can perform depend on which roles they belong to. The roles are described here:
Public—Members, by default, can view all calls but cannot edit or update calls until and unless there is row-level security added to the call for the Public role.
Customers—Members, by default, can view all calls but cannot edit or update them until and unless there is row-level security added to the call for the Customers role.
Support—Members can edit, update, and add new calls to the solution and can change the status of calls. When assigning row-level security, the user must assign a minimum of Change/Edit/Delete permissions to this role.
DB_Owner—Members have full administrative capability over the call-tracking database and the Web site.
Row-level security uses the ItemPermissions.htm page, which queries the database directly based on the connection string provided in the Connect.vbs file. It is the ItemPermissions.htm page that determines whether the user belongs to a particular role and whether the user/role has the ability to change/grant row-level permissions.
To make changes to the call-tracking solution, such as adding or removing users, changing the database schema, and customizing Web pages, you can use Access 2000 or other database and Web design tools. You can use the Access Workflow Designer for SQL Server to customize the workflow that drives the tracking process.
| File | Description |
| CallView.htm | Data access page that lists all calls logged in the system. |
| CallsDetails.htm | Data access page that shows all call details for a particular call. |
| Charts.htm | Data access page that shows Office 2000 charts for all calls logged, sorted by Category and Priority. |
| Common.vbs | Script file that is used to access the permissions table and all existing roles in the database. |
| CompanyDetails.htm | Data access page that makes it possible for users to add, view, and update information about customers. |
| Connect.vbs | Script file that helps point the page to the local server when online and offline. |
| Default.htm | Call-tracking home page. |
| EnterPassword.htm | HTML file that is required for offline usage in case the offline user changes the password to a local SQL store. |
| GrpByAssignedTo.htm | Data access page that shows how to group and to display data based on fields (AssignedTo). |
| GrpByStatus.htm | Data access page that shows how to group and to display data based on fields (Status). |
| ItemPermissions.htm | HTML file that retrieves information about the user and role and displays settings for row-level permissions on calls. |
| MobConstr.vbs | Script file automatically created when the solution is created that stores the SQL Server database name. |
| ModWC.cab | A .cab file that contains the Workflow Toolbar control. |
| NewCall.htm | Data access page that makes it possible for a user to enter details for a new call. |
| Images | Folder containing miscellaneous image files. |
Permissions issues might result when changing the login defined as database owner (DBO) before registering a database.
If the person who created the database is not the person who is registering database tables, permissions problems might occur. Specifically, during registration of database tables, Select permissions to Public on the primary key column will not be granted under the following conditions:
This is a known SQL Server issue. Because data access pages require Select permissions on the table’s primary key to be able to update the database using a view, this will cause your workflow solution to fail.
To work around this issue:
-or-
-or-