Nancy Winnick Cluts
Microsoft Developer Network Technology Group
July 1994
Revised: June 1995 (removed "Fun with Rectangles" section because functionality no longer exists)
Click to open or copy the files in the CHICOAPP sample application for this technical article.
If you have been reading the trade magazines lately, you undoubtedly know that the next version of the Microsoft® Windows® operating system (called Windows 95) sports a new shell. The new shell looks quite a bit different from the current shell used by Windows version 3.1 and Windows NT™. This new shell includes the Explorer, which integrates the functionality of the Windows 3.1 File Manager and Program Manager. The Explorer uses many of the new Windows 95 common controls and follows the guidelines specified in the User Interface Design Guide for Windows 95. (For a preliminary version of this guide, see Product Documentation, SDKs, in the MSDN Library.)
Because the Explorer follows the User Interface Design Guide so closely and uses many of the new Windows 95 controls, many developers will want to use it as a model for their new Windows 95–based applications. This article explains how a developer can create an Explorer-like application that displays real-estate listings for houses, as demonstrated by the CHICOAPP sample application that accompanies this article.
This article is based on preliminary information that is subject to change before the final version of Windows 95.
The Explorer includes some cool new interface objects, such as a toolbar, a status bar, a tree view control, and a list view control. These controls work together to provide a usable and intuitive interface to the objects contained in the system. For more information on these new controls, see my six-part series of articles titled "Win32 Common Controls" in the Microsoft® Development Network (MSDN) Library (under Technical Articles). These controls are provided in a new dynamic-link library (DLL) called COMCTL32.DLL. COMCTL32.DLL is included with Windows® 95 and will also be supported in Win32s® (running on Windows version 3.1) and in Windows NT™. Note that these controls are 32-bit only—they will not be supported in 16-bit Windows environments.
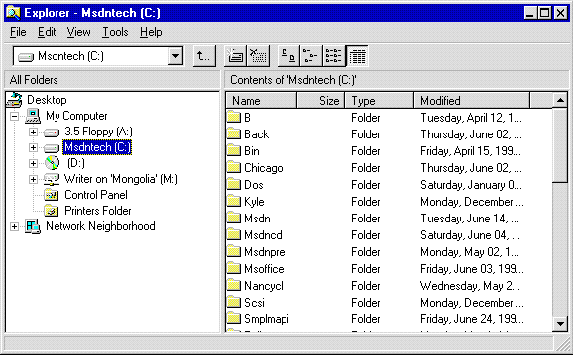
The figure below shows the new Explorer. It will give you an idea of how our Windows 95–based application will look when we finish it.

Figure 1. The Windows 95 Explorer
I began my work by using the samples that I had written for my Win32® common controls series, which demonstrate the toolbar, status bar, tree view, and list view common controls. I decided that the toolbar would be at the top of the screen and that the status bar would be at the bottom of the screen (how creative!). I did not know how much time it would take to simply integrate my samples, so I thought I would get a head start. Having no real life to speak of, I brought my Windows 95 machine home on the weekend and started working on my Windows 95–based application in earnest. I was amazed at the amount of work I was able to accomplish in two days. Over the weekend, I was able to get the major user interface components displaying, working, and sizing in an orderly fashion. It did, however, take me more time to add all the features you see in the final version of CHICOAPP.
I decided to create an application that would display a real-estate listing with the following functionality:
Figure 2 gives you a sneak peek at the finished application. It displays the main screen with an open listing for the city of Seattle. Let me point out that the listings you see in my application's text files and screen shots are purely fictitious—if you are shopping for a house, don't rely on this information.
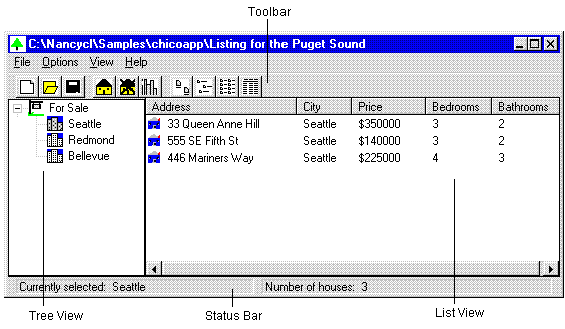
Figure 2. CHICOAPP main screen
To create the basic windows I needed for my application, I wrote a function that would call worker functions that actually created the windows. Because these windows are part of the new Windows 95 common-control library, I had to call InitCommonControls to ensure that COMCTL32.DLL was loaded before I called any functions that used the new common controls.
The status bar has two parts: The left part displays the currently selected city, and the right part displays the number of houses listed for that city. The code below demonstrates how the status bar was implemented:
g_Listing.hWndStatus = CreateStatusWindow(
      WS_CHILD | WS_BORDER | WS_VISIBLE,  // window styles
      "",                                 // default window text
      hwndParent,                         // parent window
      ID_STATUS);                         // ID

// Make the status bar multiple parts.
lpSBParts[0] = (rcl.right - rcl.left) / 2;
lpSBParts[1] = -1;
SendMessage( g_Listing.hWndStatus, SB_SETPARTS, (WPARAM)2,
      (LPARAM)(LPINT)&lpSBParts);
Next, I created the toolbar by calling the CreateToolbarEx function. Simple enough. The third step was to create the list view and tree view windows. I used helper functions to create these. I made the tree view control one-fourth the width of the window's client area and accounted vertically for the toolbar and status bar. The code below demonstrates how I created the tree view window. Note that for this sample, I hard-coded the values that determined the size of the controls. If I were writing an application for general consumption, I would obtain these values by calling GetSystemMetrics instead.
HWND TV_CreateTreeView (HWND hWndParent, HINSTANCE hInst, int NumCities,
    CITYINFO *pCity)
{
 HWND hwndTree;      // The handle to the tree view window.
 RECT rcl;           // A rectangle for setting the size of the window.
 HBITMAP hBmp;       // A handle to a bitmap.
 HIMAGELIST hIml;    // A handle to the image list.

 // Get the size and position of the parent window.
 GetClientRect(hWndParent, &rcl);

 // Create the tree view window, make it 1/4 the width of the parent
 // window, and take the status bar and toolbar into account.
 hwndTree = CreateWindow (
        WC_TREEVIEW,                // window class
        "",                         // no default text
        WS_VISIBLE | WS_CHILD | WS_BORDER | TVS_HASLINES |
           TVS_HASBUTTONS | TVS_LINESATROOT,
        0, 27,                      // x,y
        (rcl.right - rcl.left)/4,   // cx
        rcl.bottom - rcl.top - 45,  // cy
        hWndParent,                 // parent
        (HMENU) ID_TREEVIEW,        // identifier
        hInst,                      // instance
        NULL );
if (hWndTree == NULL)
  return NULL;
// First, create the image list we will need.
hIml = ImageList_Create( BITMAP_WIDTH, BITMAP_HEIGHT,FALSE, 2, 10 );

// Load the bitmaps and add them to the image lists.
hBmp = LoadBitmap(hInst, MAKEINTRESOURCE(FORSALE_BMP));
idxForSale = ImageList_Add(hIml, hBmp, NULL);
hBmp = LoadBitmap(hInst, MAKEINTRESOURCE(CITY_BMP));
idxCity = ImageList_Add(hIml, hBmp, NULL);
hBmp = LoadBitmap(hInst, MAKEINTRESOURCE(SELCITY_BMP));
idxSelect = ImageList_Add(hIml, hBmp, NULL);

// Make sure that all of the bitmaps were added.
if (ImageList_GetImageCount(hIml) != 3)
  return FALSE;

// Associate the image list with the tree.
TreeView_SetImageList(hwndTree, hIml, idxForSale);

// Initialize the tree view by adding "Houses For Sale".
TV_InitTreeView(hInst, hwndTree);

return (hwndTree);
}
I created the list view window, made it three-fourths the width of the parent window's client area, placed it on the right side, and accounted vertically for the toolbar and status bar, using the code below:
HWND LV_CreateListView (HWND hWndParent, HINSTANCE hInst, int NumHouses,
    HOUSEINFO *pHouse)
{
 HWND hWndList;      // handle to the list view window
 RECT rcl;           // rectangle for setting the size of the window
 HICON hIcon;        // handle to an icon
 int index;          // index used in FOR loops
 HIMAGELIST hSmall, hLarge; // handles to image lists
 LV_COLUMN lvC;      // list view column structure
 char szText[64];    // place to store some text
 int iWidth;         // column width

 // Get the size and position of the parent window.
 GetClientRect(hWndParent, &rcl);

 // Create the list view window, make it 3/4 the size of the
 // parent window, and take the status bar and toolbar into account.
 iWidth = (rcl.right - rcl.left) - ((rcl.right - rcl.left)/4);
 hWndList = CreateWindowEx( 0L,
     WC_LISTVIEW,                        // list view class
     "",                                 // no default text
     WS_VISIBLE | WS_CHILD | WS_BORDER | LVS_REPORT,  // styles
     (rcl.right - rcl.left)/4, 27,       // x, y
     iWidth, rcl.bottom - rcl.top - 42,  // cx, cy
     hWndParent,                         // parent
     (HMENU) ID_LISTVIEW,                // identifier
     hInst,                              // instance
     NULL );

 if (hWndList == NULL )
  return NULL;

 // First, initialize the image lists we will need.
 // Create an image list for the small and large icons.
 // FALSE specifies large icons--TRUE specifies small icons.
 hSmall = ImageList_Create( 16, 16, TRUE, 1, 0 );
 hLarge = ImageList_Create( 32, 32, FALSE, 1, 0 );

 // Load the icons and add them to the image lists.
 hIcon = LoadIcon ( hInst, MAKEINTRESOURCE(HOUSE_ICON));
 if ((ImageList_AddIcon(hSmall, hIcon) == -1) ||
     (ImageList_AddIcon(hLarge, hIcon) == -1))
     return NULL;

 // Associate the image list with the list view.
 ListView_SetImageList(hWndList, hSmall, LVSIL_SMALL);
 ListView_SetImageList(hWndList, hLarge, LVSIL_NORMAL);

 // Initialize the LV_COLUMN structure.
 // The mask specifies that the .fmt, .ex, width, and .subitem members
 // of the structure are valid.
 lvC.mask = LVCF_FMT | LVCF_WIDTH | LVCF_TEXT | LVCF_SUBITEM;
 lvC.fmt = LVCFMT_LEFT;  // left-align the column
 lvC.cx = iWidth / NUM_COLUMNS + 1; // width of the column, in pixels
 lvC.pszText = szText;

 // Add the columns.
 for (index = 0; index < NUM_COLUMNS; index++)
 {
  lvC.iSubItem = index;
  LoadString( hInst,
     IDS_ADDRESS + index,
     szText,
     sizeof(szText));
  if (ListView_InsertColumn(hWndList, index, &lvC) == -1)
     return NULL;
 }
return (hWndList);
}
When I finished creating my windows, I had to find an easy way to resize my application's main window. I used the handy DeferWindowPos function to resize all of the windows at the same time. For those of you who are new to Win32, DeferWindowPos updates a structure that contains multiple window positions. You use this function as you would use the window enumeration functions—that is, you begin, defer, and end. The following code illustrates how I resized all of my windows:
BOOL ResizeWindows(HWND hwnd)
{
    RECT rcl;
    HDWP hdwp;

    // Get the client area of the parent window.
    GetClientRect(hwnd, &rcl);

    // We will be deferring four windows.
    hdwp = BeginDeferWindowPos(4);

    // First, reset the status bar size.
    DeferWindowPos(hdwp, g_Listing.hWndStatus, NULL, 0, 0,
         rcl.right - rcl.left, 20, SWP_NOZORDER | SWP_NOMOVE);

    // Next, reset the toolbar size.
    DeferWindowPos(hdwp, g_Listing.hWndToolBar, NULL, 0, 0,
         rcl.right - rcl.left, 20, SWP_NOZORDER | SWP_NOMOVE);

    // Next, reset the tree view size.
    DeferWindowPos(hdwp, g_Listing.hWndTreeView, NULL, 0, 0,
         (rcl.right - rcl.left ) / 4, rcl.bottom - rcl.top - 45,
         SWP_NOZORDER | SWP_NOMOVE);

    // Last, reset the list view size.
    DeferWindowPos(hdwp, g_Listing.hWndListView, NULL,
         (rcl.right - rcl.left ) / 4, 25,
         (rcl.right - rcl.left) - ((rcl.right - rcl.left)/4),
         rcl.bottom - rcl.top - 42,
         SWP_NOZORDER );

    return (EndDeferWindowPos(hdwp));
}
Now that my windows are created and resized, I had to come up with a method for reading in, and storing, the house-listing data. In my original samples, I used static arrays that were filled with dummy information. This technique is great if you plan to never change the information you are displaying, but if you want to show a reasonable facsimile of an application, it makes sense to provide for dynamic data changes.
The easiest way to store the house-listing data was to save it out to a file. I decided to use an ASCII file because it was easy to test and easy to alter. The file contained the following information:
Here's what the ASCII file looked like:
3
Bellevue
Redmond
Seattle
9
 100 Main Street,Redmond,175000,3,2,Joan Smith,555-1212
 523 Pine Lake Road,Redmond,125000,4,2,Ed Jones,555-1111
 1212 112th Place SE,Redmond,200000,4,3,Mary Wilson,555-2222
 22 Lake Washington Blvd,Bellevue,2500000,4,4,Joan Smith,555-1212
 33542 116th Ave. NE,Bellevue,180000,3,2,Ed Jones,555-1111
 64134 Nicholas Lane,Bellevue,250000,4,3,Mary Wilson,555-2222
 33 Queen Anne Hill,Seattle,350000,3,2,Joan Smith,555-1212
 555 SE Fifth St,Seattle,140000,3,2,Ed Jones,555-1111
 446 Mariners Way,Seattle,225000,4,3,Mary Wilson,555-2222
Parsing the file was simply a matter of using sscanf, converting some of the strings to integers, copying the data to my data structure, and updating my file pointer. The data structures I used contained information about the houses, the cities, and the current state of the application. I filled out a CITYINFO structure for each city listed, and a HOUSEINFO structure for each house listed. When saving the information out to a file, I reversed the procedure. The structures are listed below.
typedef struct tagCITYINFO
{
    char szCity[MAX_CITY];  // city name
    int NumHouses;          // number of houses listed in this city
    HTREEITEM hItem;        // handle to tree view item
} CITYINFO;

typedef struct tagHOUSEINFO
{
    char szAddress[MAX_ADDRESS];  // address
    char szCity[MAX_CITY];        // city
    int iPrice;                   // price
    int iBeds;                    // number of bedrooms
    int iBaths;                   // number of bathrooms
    int iImage;                   // bitmap index for this house
    char szAgent[MAX_CITY];       // listing agent
    char szNumber[MAX_CITY];      // listing agent's phone number

} HOUSEINFO;
To support long filenames (and to save myself some time), I used the new common dialogs to open and save the house-listing information. I was actually able to use some of the code I had written for the Windows 3.1 common dialogs. When I recompiled, the application displayed the new dialog boxes. I had to strip off the file extension (.TXT, in this case) before I set the caption text for the main window. As you can see in the figure below, the new File Open common dialog box has no problem with long filenames such as "Listing for the Puget Sound" or "Another saved listing".
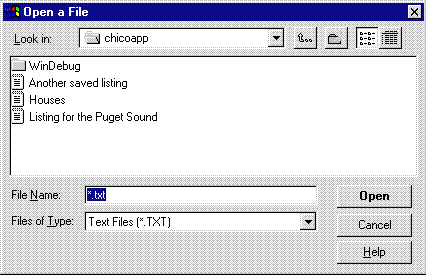
Figure 3. The File Open common dialog box
As I mentioned in my articles on the Win32 common controls, notifications are used extensively to manipulate the behavior and appearance of the controls. Because status bars, toolbars, list views, and tree views all expect notifications, I had to ensure that each control was getting the notifications it needed. In the main window procedure for my application, I simply trapped the WM_NOTIFY message and either handled the toolbar notifications directly, or passed the notifications to the handlers I wrote. (If you are writing a Microsoft Foundation Class Library [MFC] application, you would use an OnNotify function instead.)
For the toolbar, I was interested only in the TTN_NEEDTEXT notification, which is sent whenever the system needs to display a ToolTip associated with a toolbar button. In response to this notification, the application must load the appropriate text string into the lpszText member of the LPTOOLTIPTEXT structure.
My tree view window had a very simple notification handler (see the "Fun with Rectangles" section later in this article) that only handled the TVN_SELCHANGED notification. This notification is sent to the tree view window whenever the selection changes. In response, I needed to update the list view and status bar to reflect the house listings for the newly selected city. I used the following code to update the list view:
VOID UpdateListView( HWND hwndLV, int iSelected )
{
  int count, index;

  // Remove the previous items.
  LV_RemoveAllItems(hwndLV);

  // Loop through the house listings.
  for (index = 0, count = 0; count < g_Listing.NumHouses; count++)
  {
   // If the house is listed for the new city, then...
   if (strcmp(rgHouses[count].szCity, rgCities[iSelected].szCity) == 0)
   {
       // Add the house to the list view.
       if (!LV_AddItem(hwndLV, index, &rgHouses[count]))
           MessageBox(NULL, "LV_AddItem failed!", NULL, MB_OK);
       index++;
   }
  }
}
Handling notifications for the list view window was a bit more complicated. I implemented my list view using a callback that received the text for each item, so the notification handler needed to trap the LVN_GETDISPINFO notification and fill in the pszText member of the LV_ITEM structure with the appropriate text, depending on the column. I also had to process the LVN_COLUMNCLICK notification in my list view notification handler. This notification is sent whenever the user clicks a column heading in the list view. In response, the application must sort the items in the list view based on the criteria presented in the selected column. For example, if the user clicks the Bedrooms column, my application sorts the list in ascending order by the number of bedrooms for the item (the house). I provided a simple callback procedure that is called through the ListView_SortItems function. My callback procedure then sorted the data using simple math (returning the greater of two values) for the columns that had integer sort criteria, and using the strcmp function for the columns that had string sort criteria.
At this point, my application was functional, but I still needed to add the pop-up menu that is displayed when the user clicks the right mouse button. This required handling one more notification, NM_RCLICK, in my list view window. NM_RCLICK is sent whenever the user clicks the right mouse button in the list view window. The notification handler uses the ListView_HitTest function as shown below to determine which item (if any) the user has clicked:
LV_HITTESTINFO lvH;
NM_LISTVIEW *pNm = (NM_LISTVIEW *)lParam;

case NM_RCLICK:
   lvH.pt.x = pNm->ptAction.x;
   lvH.pt.y = pNm->ptAction.y;
   idx = ListView_HitTest(hWnd, &lvH);
   if ( idx != -1)
   {
      GetCursorPos(&pt);
      ListViewPopUpMenu(hWnd, pt, hInst);
      return idx;
   }
   break;
Once I knew that the cursor was on a list view item, I needed to display a context menu for that item. This is straightforward: Basically, you load the menu and call TrackPopupMenu, as you would in a 16-bit Windows-based application. When the user chooses an item from the menu, the appropriate command is generated and sent to the window procedure in the form of a WM_COMMAND message.
One of the design goals for my Windows 95–based application was to add at least one property sheet to the application. Property sheets (also known as tabbed dialogs) allow users to view and change the properties of an item. In this case, the item is a house listing. Each property sheet contains one or more overlapping windows (called pages) that contain a logical grouping of properties. The user switches between pages by clicking tabs that label each property page. I implemented two property sheet pages: One allows the user to view and change the properties for a particular house listing (for example, address and city), and the other displays information about the listing agent (for example, name and phone number). The figure below shows the House Listing property sheet page. (See Figure 5 for a screen illustration of the Listing Agent page.)
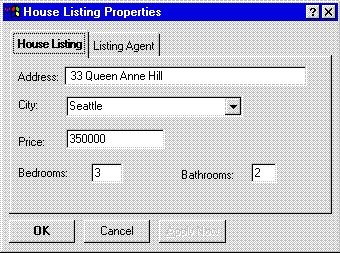
Figure 4. The House Listing property sheet page
Processing a property sheet page is similar to processing a dialog box, with one major difference: When you process a property sheet page, you handle notifications instead of the commands generated for the OK and Cancel buttons. I processed my property sheet pages as follows:
To initialize my property sheet pages, I had to determine which house was currently selected and save that information for future reference. The first property sheet page displayed is the House Listing page. Responding to the WM_INITDIALOG message gave me the first chance to determine the currently selected house. I used the following code to determine the index of the selected house within my global array of houses:
char szTemp[MAX_ADDRESS];
static char szAddSave[MAX_ADDRESS];
static char szCitySave[MAX_CITY];
static int iPrice, iBeds, iBaths;
BOOL bErr;
int index, count;
LV_ITEM lvItem;
.
.
.
  case WM_INITDIALOG:
    // Fill in the list box with the cities.
    for (index = 0; index < g_Listing.NumCities; index++)
       SendDlgItemMessage( hDlg, IDE_CITY, CB_INSERTSTRING, (WPARAM)(-1),
            (LPARAM)(rgCities[index].szCity));

    // Get the index to the selected list view item.
    index = ListView_GetNextItem(g_Listing.hWndListView,
            -1, MAKELPARAM(LVNI_SELECTED, 0));

    // Get the house address.
    lvItem.iItem = index;
    lvItem.iSubItem = 0;
    lvItem.mask = LVIF_TEXT;
    lvItem.cchTextMax = sizeof(szAddSave);
    lvItem.pszText = szAddSave;
    ListView_GetItem(g_Listing.hWndListView,&lvItem);

    // Find the house in the list.
    for (count=0; count < g_Listing.NumHouses; count++)
    {
       if (strcmp(lvItem.pszText, rgHouses[count].szAddress) == 0)
          break;
    }
    g_Listing.iSelHouse = count;
.
.
.
My other property sheet page, Listing Agent, allows the user to view and change the name and phone number of the listing agent associated with the selected house. The code that I used to handle this page was quite similar to the code I used for the House Listing page, except that I modified the szAgent and szNumber members of my array of HOUSEINFO structures instead of altering the other house-specific fields. Figure 5 shows the Listing Agent property sheet page.
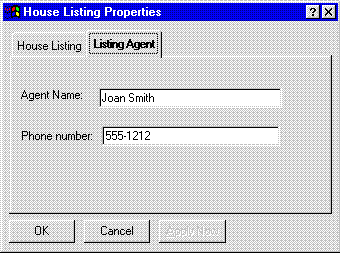
Figure 5. The Listing Agent property sheet page
The CHICOAPP sample described in this article demonstrates some of the things that a developer must do to create an Explorer-like application. When you build and run CHICOAPP, you will notice that it is a fairly minimal application, although it does more than most sample applications. For example, although this application demonstrates many new Windows 95 components and follows the requirements of the new style guide, it does not qualify for the new Windows logo detailed in Tammy Steele's article, "How to Adapt an App for Chicago," in the July 1994 issue of the Microsoft Developer Network News (in the MSDN Library Archive CD, see Books and Periodicals, Microsoft Developer Network News, July 1994 Number 4, July Features).
To make CHICOAPP qualify for the new Microsoft Windows logo, I need to make a few changes and add some features to the application. The most noteworthy feature to add is OLE container and/or object support and OLE Drag and Drop support. The best way to add OLE support is to rewrite CHICOAPP using C++ and MFC, because OLE development is much easier in these two development environments. Of course, rewriting an application (even a simple one) is a lot of work. MFC does not currently support the new Windows 95 common controls, although a future version of MFC (after the final release of Windows 95) will provide this support.
Qualifying for the new Windows logo also requires support for the common messaging call (CMC) API, so I need to add minimal support for the Send or Send Mail command from CHICOAPP's File menu. Making this change would allow the user to mail a house listing to another person or listing agent.
Even without these changes, CHICOAPP is a good head start if you want to create an Explorer-like application. At the very least, you now know how to integrate the new Windows 95 controls into one application. If you have read this article and are wondering about support in MFC and Visual C++ for the new controls, let me assure you that the work is under way, but you will have to wait for it. If you want to be on the cutting edge now, you will need to do the extra work that I have demonstrated in this article.