Kevin Marzec
MSDN Content Development Group
February 2, 1998
Click to copy the setup files for the MSDN HelpDesk sample.
This article first explains the four installation processes for the HelpDesk sample: the server setup, the client setup, the non-MTS setup, and the SQL Components setup. Then it describes how a HelpDesk client application uses the services of another component, be it local or remote, and examines architectural options for deployment of the sample.
Important It is highly recommended that you read the installation section of this article before attempting to install the HelpDesk sample.
Note that the server installation must be completed before client installation can take place. Also carefully note the software requirements before attempting to install this sample.
You may choose any of the four installation options:
Note Do not attempt to install the Non-MTS option on any computer that contains HelpDesk MTS components, as it may result in registry conflicts.
The server components and the database need not be set up on the same computer. In fact, for the sake of performance in a distributed environment, it is recommended that they are located on separate computers.
Requirements:
Note The Service Pack must be installed after all other software products listed above.
There are four main steps to the HelpDesk server components installation:
You must set up an ODBC data source entry to allow the DBExec component to connect to the SQL Server database. You need to perform this step first so that the setup program can create the stored procedures on the database. On a computer running SQL Server, create a database using the SQL Enterprise Manager and name it ("HelpDesk" is recommended). You then need to create the data source (if you are installing the server components and the database on separate machines, you must create the data source on each machine):
Note You want to use Windows NT user authentication and a trusted connection.
To set up the database, you need to run the setup program on the same computer that you created the database on, and select the SQL Components option. This will create all the database tables and stored procedures that are required by the HelpDesk sample application. You will have the option of installing either the MTS or the non-MTS versions of the components. Note that if you install the MTS versions, you will need to set up a MTS package through Transaction Server Explorer before the components will work correctly. See the instructions under the Server Installation for more details on how to generate a MTS package.
The setup program will prompt you for the name of the database you are using. Enter the name of the database that you created above. A set of batch files will then be executed, creating the tables and stored procedures for the database.
The next step is very straightforward: simply run the Server setup option on your Server computer and follow the instructions. Setup will copy all of the required files to your local hard drive.
There are two optional components: the Windows CE server and the HelpDesk source code. The Windows CE server is a collection of HTML and ASP pages that are required for the Windows CE technician client. After selecting which components you would like to install (both are selected by default), you are asked to provide destination folders for each one. The Windows CE server files should be installed in a folder beneath your web document directory (for example, C:\InetPub\WWWRoot\WinCE). Note that if you wish to use the source code, you will need to have Visual Studio 97 SP2 or later installed.
This step is a bit more daunting—it requires building a Microsoft Transaction Server package that will point client computers to the server-side components. To assemble the MTS package:
Note If you are installing the Client and Server on the same computer, you should not follow steps 5 and 6. When you build an MTS package on a computer, the components are registered automatically on that computer. Exporting and executing the package will result in duplicate registry entries and can potentially cause problems. The exported package should be run only on separate client computers.
Repeat Steps 2 through 4, creating a new package for the DBExec component (dbexec.dll). Note that it is possible to add DBExec to the same package as HDServer, but you do not want to expose the functionality of DBExec to the clients. For this reason, build a new package for DBExec, but do not export it.
Uninstalling the server components is again a three-step process, similar to the installation procedure, but in reverse.
Requirements:
Note The Service Pack must be installed after all other software products above
The client-side installation is very straightforward—run the setup program and select the client installation. You are prompted for a local directory to install to (setup defaults to C:\Program Files\HelpDesk) and then you are asked to select which client components you wish to install. Note that the Performance Monitor and the DHTML Technician Client require Internet Explorer version 4.0 or later. If you do not have Internet Explorer or later installed, you will not be given a choice to install these clients. If you wish to install any pieces at a later date, simply run the setup program again.
The last step of the installation requires you to specify a full path to the server-side MTS package created during the Server installation. This must be a fully qualified pathname, such as \\MYSERVER\HDServer\HDServer.exe. After all of the files are copied, this package will be executed, registering the server-side components and installing server proxies in your Program Files\Remote Applications folder.
Note If you are running this setup over an existing setup, you do not need to specify the MTS package location again unless the server has been reinstalled. Simply leave the field blank.
To remove the HelpDesk client applications from your computer, run Remove HelpDesk Client from the MSDN HelpDesk Sample program group in the start menu. This will remove all installed files and delete all registry entries created by the setup program. To remove the server-side components that were added by executing the server-based MTS package, go to Add/Remove Programs in the Control Panel and select Remote Applications—HDRemote (remove only) and click Add/Remove. This will unregister the server-side helpdesk components.
Requirements:
Note The Service Pack must be installed after all other software products above
The Non-MTS installation provides you with the non-MTS versions of each component. It installs each component onto your local computer, so DCOM for Windows 95 is not necessary. However, the database can be located on a remote computer. Therefore, this setup option is the default for Windows 95 users.
Before starting installation, you will want to make sure that you set up your data source and run the SQL Components setup option on the computer that is hosting your database. See the instructions under "Creating the Database and Setting up the Data Source."
Once your database is ready, execute setup, selecting the Non-MTS option. After selecting the components that you wish to install, and selecting the destination folder(s), setup will copy all the required files to your hard drive, registering any necessary DLLs as it goes. That's all there is to it!
This application has not been tested with Windows NT version 5.0 or Windows 98. If you are using Windows 95, the only supported option is the Non-MTS setup.
The HelpDesk administrative tool, HDExplorer will allow any user to logon as an administrator for the system. For this reason, this application should be placed in a secure location.
Let's consider the path that the system follows—from the client application down to the database.When a client application attempts to create and use an HDClient object, COM attempts to locate the component based on the object's Application ID (for example, HDClient.CAdmin or HDClient.CTech). This information is stored in the Windows Registry. (When you execute the install program, the component DLLs are automatically registered for you. To manually register a DLL, you can use the regsvr32.exe application, usually located in the System32 folder, with the command "regsvr32 <filename>". To remove a component from the registry, use "regsvr32 /u <filename>".)
Now things get a little bit more interesting. When the client application calls a method on the HDClient object, it is likely that the HDClient object will attempt to access some data on the SQL Server database. To do this, the HDClient object needs to pass a request to the remote HDServer object located somewhere out in cyberspace. Microsoft Transaction Server (MTS) makes this very simple. When the client computer executes the distributed MTS package (generated on the server computer), the HDServer component is registered in the client registry. Generally, the CLSID registry will provide the file location of the component from which the object is to be served. However, when the MTS package is executed, the registry entry essentially stores the name of the server computer where the object is to be found. Once the server name is found, the object can be requested from the server and the client can use it just as it would use any other service.
This same process occurs during communication between each "layer" of the application. Each layer may reside locally or remotely, completely transparent to the application. It doesn't matter where each piece of the application is located, as long as it can be found when a client application asks for an object. COM takes care of all this for you.
When using MTS to manage your components, the details are slightly different. Instead of storing the full path to the component (.dll or .exe) in the registry, MTX.exe is listed as the LocalServer, along with a parameter containing the component's CLSID. This allows MTS to control the lifetime of your object and keep track of transactions, object pooling, and so on.
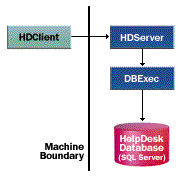
The architecture of the HelpDesk setup program is fairly simple. It relies on a very linear flow of data (see Figure 1). Information travels from the Client to the HDClient object, over the wire to the HDServer object, from there to the DBExec object, then (possibly over the wire again) to the SQL Server database. The installation program and the above instructions will deploy the HelpDesk application in this manner.
Figure 1. Simple client/server install process
However, let's assume that you're a very large corporation trying to implement a fully distributed helpdesk application. In that case, you are going to want more scalability. You may want to split your database over multiple servers and you might want to have a handful of computers with the HDServer object installed, each taking client requests and passing them on to any number of computers providing the DBExec services. A more scalable architecture is depicted in Figure 2. Note that this architecture is logically equivalent to the first architecture presented. It follows the same n-tier distribution system. The difference is in the physical distribution of the components. The system was designed from a logical standpoint—it makes no difference how the physical components are distributed.
It makes sense to increase the number of computers dedicated to HDServer in proportion to the number of computers dedicated to DBExec because the HDServer component is more CPU-intensive. A single DBExec object can handle requests from multiple HDServers. The exact proportion is probably best achieved through testing various scenarios for performance.
Note that if you follow this more scalable approach, the distribution method, though similar to that given in the setup instructions, will be modified slightly. The HDServer computers will have to execute the DBExec package generated on the DBExec computers and the clients will execute the HDServer package. This is in contrast to generating only a single package containing both server components. To find out more about creating and distributing packages, see the Microsoft Transaction Server documentation.
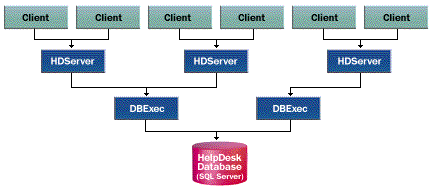
Figure 2. Fully distributed n-tier system