Microsoft Corporation
September 1, 1998
Visual J++™ 6.0 supports the creation of the next generation of Web-based applications using Dynamic HTML classes. Dynamic HTML is the most reliable way to create cross-platform applications. Soon to be a W3C standard, Dynamic HTML is a uniform language for creating applications across browsers, operating systems, and hardware configurations. It provides for user interaction and data presentation in an easy-to-understand combination of HTML, script code, and a robust document object model (DOM).
In this sample you will learn to use the following key technologies:
Visual J++ 6.0 contains a rich set of classes that enable developers to generate Dynamic HTML code without having to learn a scripting language or the nuances of the Document Object Model (DOM). The Dynamic HTML class library gives developers control over the Web page hosting the application, allowing for a richer Web client application. The WFC Dynamic HTML class library can be used to build enterprise client/server applications that adhere to Internet standards of HTTP and HTML. The same class library can be used to build richer client applications when used in conjunction with Internet Explorer 4.0, Win32®, and ActiveX® controls.
Using the Dynamic HTML Class library, developers can author Dynamic HTML pages using only the Java language. The resulting Java application can directly render Dynamic HTML on the fly. With Visual J++ 6.0’s Dynamic HTML library, developers have the ability to design and deploy truly integrated Web– and Windows–based applications that can be executed on multiple platforms.
Developers can also build server-side components that can generate HTML and pass it back to the client. Rather than writing script code or generating HTML strings manually, the WFC Dynamic HTML class library can be used to create a Dynamic HTML page using the Java language, and output a simple String representing the HTML that is created. In so doing, developers can continue to author HTML using a high-level object-oriented language, while still preserving the ability to deploy their applications to as many clients as needed.
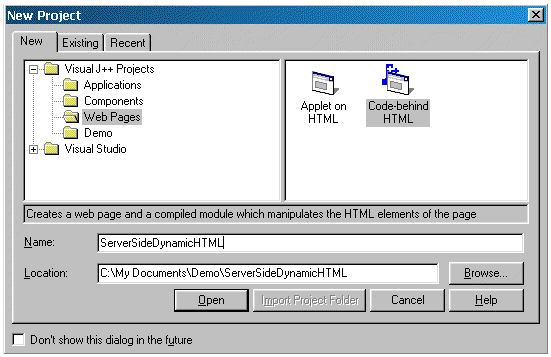
After launching the Visual J++ 6.0 development environment, create a new project by selecting the "Code Behind HTML" template in the Web node. Name the project "ServerSideDynamicHTML" and press Open to generate code.

Figure 1. Creating the Visual J++ project
The template will generate two Java files and one HTML file. The two Java files contain the interaction between the WFC object hierarchy and the Document Object Model (DOM) in the browser.
As the following example demonstrates, building a simple Dynamic HTML page using Java is easy and straightforward. You must first extend the DhDocument class. This ensures that the Java object can connect to the HTML document container. The container refers to the initForm method as the entry point into the Java object. Once the HTML container calls the initForm method, the class will enable you to manipulate the page. In the example below, a new HTML text element is added to the document.
public class MyDHTMLClass extends DhDocument
{
public void initForm()
{
this.add(new DhText("This will show up in a web page"));
}
}
The files that are generated by the template are initially intended for use on the client side. By using the Dynamic HTML library on the client side, you can get finer-grained control over the behavior of the individual HTML intrinsics you place on a document. For example, a button can have an event handler that exists not in the HTML and script code, as with traditional Dynamic HTML applications, but in a Java class. In this example, a button is added to the document, and an OnClick event handler is added so that when the button is pressed the button_click method is called:
public class MyDHTMLClass extends DhDocument
{
public void initForm()
{
DhButton b = new DhButton("Press Me");
b.addOnClick(new DhEventHandler(this.button_click));
}
private void button_click(Object source, DhEvent e)
{
// TODO: Insert event handler logic here.
}
}
In this sample, however, we will build a server-side Dynamic HTML application using the Windows Foundation Classes. We will embed this server-side application within an Active Server Page (ASP). Within the server-side component we will add several HTML intrinsics to the document. The ASP will call into the server-side component and obtain an HTML string representing the document and all of the child elements we added to the document.
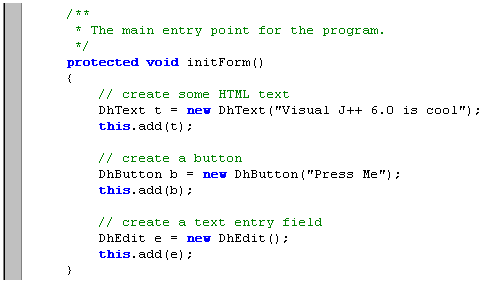
Inside the Code Editor for Class1.java, replace all of the code in the initForm method with the following lines of code. This will add a text field, a button, and some HTML text to the document.

Figure 2. Code to add a text field, a button, and text
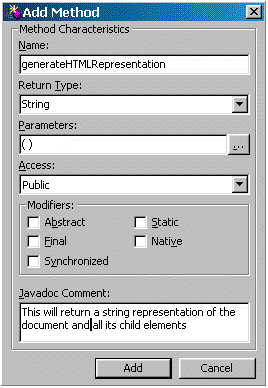
We also need to add a method that the Active Server Page can call later. Right click on the name of the class in the Class Outline for Class1.java, select "Add Method" and fill in the dialog box like this:

Figure 3. Adding a method
Inside the generateHTMLRepresentation function that is created, enter the following code to call initForm and create the document itself, and to call the generateHTML function to get the string representation to pass back:

Figure 4. Code to create the document
Since Active Server Pages can only call into COM components, we will need to make sure that when this component is compiled, a Type Library is created and registered on the system. We will then be able to use the server-side component from within an Active Server Page. To turn Class1.java into a COM component, right click on the class name in the Class Outline and select "Class Properties". In the dialog box, make sure that the COM support is enabled.

Figure 5. Setting properties for Class1.java
A GUID and Class ID is placed in the code, indicating to the compiler that it should generate the Type Library and register the component on the system. Compile the component to complete the registration of the server-side component.
We will now create a simple Active Server Page that will instantiate the component and call generateHTMLRepresentation to obtain a string that it can display on the Web page. Right click on the solution name in the Project Explorer and select "Add Web Page". Name the Web Page "Web.asp" and press Open to create the page.
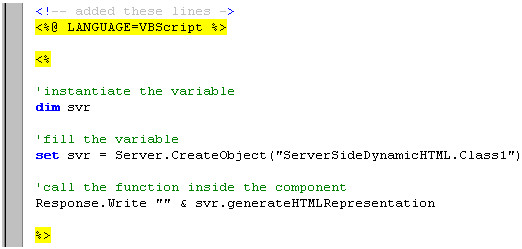
You should notice that the icon for the Web.asp file is slightly different from the icon for the Page1.htm file. Double click on the Web.asp file and select the "Source" tab in the Visual HTML Editor. Add the following lines of code to set the language for the Active Server Page, create the server side component, and call the generateHTMLRepresentation function.

Figure 6. Code to set language, create server-side component, and call generateHTMLRepresentation
Once the Active Server Page and Java source files are complete for the application, we will need to deploy the application to a remote server. Using the Automatic Packaging and Deployment features in Visual J++ 6.0, this normally complicated and often frustrating step becomes quite simple.
First, we will need to determine how to package the application. By default, we will be packaging this Code-Behind HTML application as a digitally signed CAB file. To change these options, select the "ServerSideDynamicHTML Properties" item of the "Project" menu. Navigate to the "Output Format" tab and change the setting as you see fit.
Next, we need to add a remote deployment target to which we will copy the application, the COM component, and any other associated files. In fact, you can specify which project outputs you would like copied to the remote destination from the "Deployment" tab of the "Properties" dialog. To add a remote deployment target, simply select "New Deployment Target" in the Deployment Explorer and select a remote URL. The Deployment Explorer, found on the "Other Windows" selection in the "View" menu, can be used to set up multiple locations to which you can deploy. In the example below, the current machine ("http://localhost/") is selected.
Note The remote URL must be a Microsoft® Personal Web Server or a Microsoft Internet Information Server.

Figure 7. Deploying the application
Now, whenever you need to deploy the application, simply press the "Deploy" button and the files will be copied and enabled on the remote server.
Once the application is deployed, you can run it by typing the URL to the Active Server Page (in this case, http://localhost/Web.asp) inside any browser. When the Active Server Page is executed, it will instantiate the server-side component and invoke the generateHTMLRepresentation function. The browser will then receive a string containing the HTML for the page.
While this example is small and rather unsophisticated, it does demonstrate how the Windows Foundation Classes can be used to develop cross-platform applications. In fact, the same code written for cross-platform deployment can be used within Internet Explorer for a richer client experience including better event handling, support for styles, absolute positioning, and more. But, for those cases where cross-platform deployment is necessary, the WFC Dynamic HTML library will more than meet your needs.