John Clarkson
Microsoft Corporation
October 1998
Summary: Second of two articles on creating the HTML Tag Extractor tool to view and compare HTML tags across large numbers of separate files. (10 printed pages) This article describes how to build the tool using Microsoft® Visual Basic® version 6.0.
This is the second of two articles that look at how you can use Microsoft Office object models to build useful tools—quickly and cheaply. The tool in this case does a bulk extract of HTML tags. It allows the user to point to a folder where HTML files are stored, and to select one of a list of HTML tags. Then the tool walks the folder, opens each HTML file in turn, extracts the content of the tag and pastes it and the file name to an Excel worksheet, and then moves on to the next HTML file.
The first part of this article, "Creating an HTML Tag Extractor," showed you how to build an Office-only version of the tool, using a UserForm for a user interface, and the Excel and Word object models for the file and text work. This version shows you how to build the same tool in Microsoft Visual Basic 6.0. The key differences between this method and the previous are that you can use Visual Basic file and directory controls for a more complete user interface; and the Package and Deploy Wizard allows you to create an .exe file all nicely wrapped up in a setup package.
| Object | Property | Setting |
| Form | Caption | TagXtractor |
| Form | Name | frmTagXtract |
| First command button | Name | cmdOK |
| First command button | Caption | OK |
| Second command button | Name | cmdCancel |
| Second command button | Caption | Cancel |
| First label control | Caption | Select tag |
| First label control | Name | lblTagSln |
| Second label control | Caption | Enter file pattern |
| Second label control | Name | lblPattern |
| DriveListBox control | Name | drvDrive |
| DirListBox control | Name | dirFolder |
| FileListBox control | Name | filFile |
| ListBox control | Name | lstTag |
| TextBox control | Name | txtFilePattern |
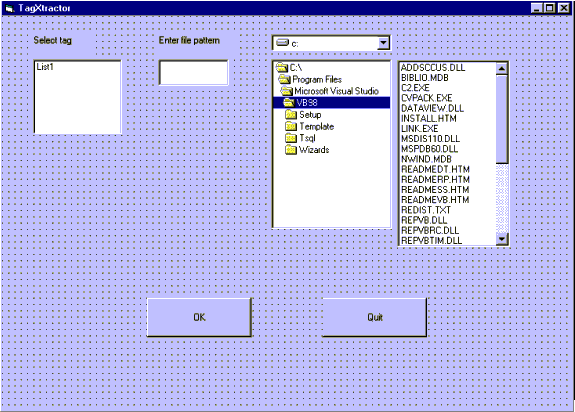
Figure 1. TagXtractor UI using Visual Basic 6.0
Copy the following statements and procedures to the form:
Option Explicit

Private Sub cmdEnd_Click()
    'Close the application.
    End
End Sub

Private Sub cmdOK_Click()

    'Sets file specification according to user input in text box.
    filFile.Pattern = txtFilePattern.Text
    txtFilePattern.Text = ""

    Set wrdApplication = New Word.Application

    'Initialize the Excel worksheet.
    Call SetupWorksheet

    Dim lngCounter As Long
    Dim strFlNm As String

    'This loop walks the selected folder,
    'opening each file in turn.
    For lngCounter = 0 To filFile.ListCount - 1
        DoEvents
        'Set the current file in the FileListBox control.
        filFile.ListIndex = lngCounter
        'Get the filename from the FileListBox control.
        strFlNm = dirFolder.Path & "\" & filFile.FileName
        'Open the file in Word.
        Set wrdDocument = wrdApplication.Documents. _
        Open(FileName:=strFlNm, Format:=wdOpenFormatText)
        'Get tag contents in the file.
        Call FindTags(lngCounter)
        wrdDocument.Close
    Next lngCounter

    'Clean up object variables.
    Set xlApplication = Nothing

End Sub

Private Sub Dirfolder_Change()
    'Set the folder displayed in the FileListBox
    'control to the user's selection.

    filFile.Path = dirFolder.Path

End Sub

Private Sub drvDrive_Change()
    'Set the drive displayed in the DirListBox
    'control to the user's selection.

    dirFolder.Path = drvDrive.Drive

End Sub

Private Sub Form_Load()

    'Load the ListBox control with two items.
    lstTag.AddItem "title only"
    lstTag.AddItem "descr only"

End Sub
Copy the following statements and procedures to the module:
Option Explicit

Public xlApplication As Excel.Application
Public wrdApplication As Word.Application
Public xlWorkBooks As Workbooks
Dim xlReportFile As Workbook
Public wrdDocument As Document

Sub FindTags(lngCounter As Long)
'Called from cmdOK_Click.
'This procedure runs the Find to get tag contents.
'The parameter lngCounter is a counter representing
'the file's position in the target folder.

    'Declare and set an object variable containing a Selection object.
    Dim wrdSelection As Selection
    Set wrdSelection = wrdApplication.Selection

    Dim bolFound As Boolean
    Dim strSln As String
    Dim strDescr As String

    'This defines what to look for when we want description tags.
    'See how this is used in the With...End With block below.
    strDescr = "<META name=" & Chr$(34) & "description" & Chr$(34)

    'Ensure that formatting is not included
    'as a criteria in the search.
    wrdSelection.Find.ClearFormatting

    'Search for either a title or description tag,
    'depending on user selection in the ListBox control.
    With wrdSelection.Find
        Select Case frmTagXtract.lstTag.ListIndex
            Case 0
                'Search for title tag.
                .Text = "<title>"

            Case 1
                'Search for description tag.
                .Text = strDescr
        End Select

        .Forward = True
    End With

    'Determine whether the search was successful.
    bolFound = wrdSelection.Find.Execute

    'If successful, parse text and add to worksheet.
    If bolFound = True Then
        'Select the paragraph containing the result.
        wrdSelection.MoveDown unit:=wdParagraph, Extend:=wdExtend
        strSln = wrdSelection.Text
        'Remove unneeded text.
        Call RemoveTags(strSln)
        'Add results to the worksheet.
        Call Report(strSln, lngCounter)

    'If search is unsuccessful, add a note to the worksheet.
    Else
        strSln = "no tag found"
        Call Report(strSln, lngCounter)
    End If

End Sub

Sub Report(strSln As String, lngCounter As Long)
'Called from FindTags.
'This procedure pastes strings into the worksheet.
'The parameter strSln is either the string containing
'the tag, or a "not found" note.
'The parameter lngCounter is a counter representing
'the file's position in the target folder.

    With xlReportFile.Worksheets(1).Rows(lngCounter + 3)
        .Cells(, 1).Value = frmTagXtract.filFile.FileName
        .Cells(, 2).Value = strSln
        .Cells(, 3).Value = ""
    End With

End Sub

Sub RemoveTags(strSln As String)
'Called from FindTags.
'This procedure strips unneeded text from the
'beginning and end of the search result.
'The parameter strSln is the string containing the tag.

    Select Case frmTagXtract.lstTag.ListIndex

        Case 0
            'The user selected title tag in the ListBox.
            strSln = Mid(strSln, 8, (Len(strSln) - 17))

        Case 1
            'The user selected description tag in the ListBox.
            strSln = Mid(strSln, 34, (Len(strSln) - 36))
    End Select

End Sub

Sub SetupWorksheet()
'Called from cmdOK_Click.
'This procedure opens an instance of Excel and
'initializes the report worksheet.

    'Open a new instance of Excel.
    Set xlApplication = New Excel.Application

    'Create a reference to a workbook.
    Set xlWorkBooks = xlApplication.Workbooks

    'Add a new workbook.
    Set xlReportFile = xlApplication.Workbooks.Add

    'Add header text to the workbook.
    With xlReportFile.Worksheets(1)
        .Cells(1, 1).Value = "Filename"
        .Cells(1, 2).Value = "Tag"
    End With

    'Create a reference to an Excel Range object.
    Dim rngHeaders As Excel.Range
    Set rngHeaders = xlReportFile.Worksheets(1).Range("a1")

    'Widen the 'a' column in the worksheet.
    rngHeaders.ColumnWidth = 30

    'Expand the range to include both 'a' and 'b' columns.
    Set rngHeaders = xlReportFile.Worksheets(1).Range("a1:b1")

    'Format the header text.
    With rngHeaders.Font
        .Bold = True
        .Color = vbRed
        .Size = 14
    End With

    'Make Excel visible.
    xlApplication.Visible = True

End Sub
We've already seen most of the code in this application in the first article in the series, where we created the same application using Office object models alone. There are three unique elements in the Visual Basic 6.0 version of the Tag Extractor:
The three file system controls are designed to play together. Use the DriveListBox control to select a drive, which sets the context for the DirListBox. Select a folder using the DirListBox control, which sets the context for the FileListBox control, and then of course you use FileListBox to select files. It's very simple in code:
DriveListBox passes the baton to DirListBox in the DriveListBox Change event:
dirFolder.Path = drvDrive.Drive
DirListBox passes the baton to FileListBox in the DirListBox Change event:
filFile.Path = dirFolder.Path
Both Excel and Word are single-use applications, which means that a new instance is created whenever an object variable referring to them is instantiated. In the Tag Extractor application the Excel and Word object variables are both declared as Public in the General section of the standard module.
Public xlApplication As Excel.Application
Public wrdApplication As Word.Application
Word is opened in the cmdOK Click event.
Set wrdApplication = New Word.Application
Excel is opened at the top of the SetupWorksheet procedure.
Set xlApplication = New Excel.Application
One advantage of the Visual Basic version of the Tag Extractor over the pure Office version is that the file system controls provide some UI features not available with Office object models. In the Visual Basic version users can point and click their way to the target folder. Then, once the OK button is clicked the FileListBox control acts as a progress indicator as focus changes from file to file, as well as provides file names to Word.
In the Office version of the Tag Extractor the FileSearch object provides access to the files in the target folder, with the Count property of the FoundFiles object returning the number of files in the folder and setting the end point for the For...Next loop:
    With Application.FileSearch
        For intCounter = 1 To .FoundFiles.Count
          .
          .
          .
        Next intCounter
    End With
In the Visual Basic version we use the ListCount property of the FileListBox control to set the end point for the loop:
    For lngCounter = 0 To filFile.ListCount - 1
          .
          .
          .
    Next lngCounter
To get Word to open a file you need to provide it a file name, which is easy to build by concatenating the current values of the FileListBox and DirListBox controls:
        strFlNm = dirFolder.Path & "\" & filFile.FileName
        Set wrdDocument = wrdApplication.Documents. _
        Open(FileName:=strFlNm, Format:=wdOpenFormatText)
The Tag Extractor application is a good example of how effective Visual Basic and the Office object models can be when used together. We saw in the previous article how you can build this tool solely with Office components. You could also build it with Visual Basic alone, but when you can easily harness Word's text search capability and display your results on an Excel spreadsheet it's silly to pass up the chance.
In this case the combined Visual Basic/Office approach has two advantages over the Office-only approach. First, with the combined Office/Visual Basic solution you can compile the solution into an .exe file, and use the Page and Deployment Wizard to create a custom setup package. With Office you can use the Setup Wizard available with the Office Developer Edition, but you can't compile your application into an .exe file.
The second advantage of the combined approach described here is that Visual Basic's file system controls allow us to build a more complete user interface. In the Office-only solution the user has to enter the path to the target folder in a text box. In the combination solution we have the advantage of Visual Basic's file system controls, allowing the user to point and click their way to the target folder. Also, at least partly because of the extra power we get from Visual Basic's controls, it takes less code to deliver the combined solution—3.41K against 3.91K for the Office-only version.
Visual Basic and Office are great partners. Office provides world-class document management and office productivity tools exposed for Automation. Visual Basic offers a great forms package, lots of controls not available in Office, and professional development features like control creation support for multithreading, and lots of new Web development features. Use Visual Basic and Office together to build better applications, faster!