Creating Secure Data Access Pages
Clint Covington
Microsoft Corporation
January 1999
Summary: An introduction to data access pages for secured databases. Includes step-by-step examples showing how to use Microsoft® Access 2000 to create data access pages for secured Microsoft Access and Microsoft Data Engine (MSDE) databases. (16 printed pages)
Contents
Introduction
What Is a Data Access Page?
Why Secure a Database or Data Access Page?
Access 2000 Security and Database Formats
Installing MSDE and Working with MSDE Databases
Securing Data Access Page Files
See Also
Introduction
This article explains how to use Microsoft Access 2000 to create data access pages for secured databases. It covers the differences between data access pages and other traditional Access objects and provides step-by-step examples showing how to create data access pages for secured Microsoft Access (.mdb) and Microsoft Data Engine (MSDE) databases.
After following the examples, you should be able to:
- Identify some of the differences between Microsoft Access (Microsoft Jet database engine) and Microsoft SQL Server™ security.
- Create a data access page for an Access database that is secured with a database password.
- Create a data access page for an Access database that is secured with user-level security.
- Create a data access page for a secured SQL Server database by using your own Microsoft Windows 2000® logon validation for authentication.
- Create a data access page for a secured MSDE database with and without connection information saved in the page.
This article does not explain in detail the Access 2000 or SQL Server security models and features. For more information about the Access security model, see Chapter 18, "Securing Access Databases," in the Microsoft Office 2000/Visual Basic® Programmer's Guide (Microsoft Press®, 1999). For more information about SQL Server security, see the documentation provided with SQL Server.
For the latest information on data access pages, see http://www.microsoft.com/officedev/.
What Is a Data Access Page?
Data access pages are new to Access 2000. A data access page is a special type of Web page that allows users to view and work with data stored in an Access database (.mdb), a SQL Server database, or an MSDE database from Microsoft Internet Explorer 5. Data access pages use HTML code, HTML intrinsic controls, and a group of ActiveX® controls called the Microsoft Office Web Components to display data from a Web page. Unlike other Access database objects, such as forms and reports, a data access page is a separate file (.htm) that is stored outside of an Access database (.mdb) or Access project (.adp) in the file system or on a Web server.
In many respects, data access pages provide similar features to Access forms and reports from a Web page. Like Access forms, you can create a data access page to view, edit, add, or delete records in an underlying record source. You can also include the Microsoft Office PivotTable®, Microsoft Office Chart, and Microsoft Office Spreadsheet ActiveX controls to display data as in an interactive PivotTable list, chart, or spreadsheet. And, as with Access reports, you can sort, filter, and group the displayed records according to criteria you specify. Data access pages can also display data in an interactive hierarchical format by using expand indicators. These allow users to change from a view that displays a general summary of information, such as a list of all regions and their combined sales total, to a listing of specific details about individual sales in each region.
Why Secure a Database or Data Access Page?
There are many reasons why you would want to secure a database or data access page:
- To protect sensitive information that is stored in the database. A good example is salary information stored in an Employees table. Management and accounting frequently use this information, although it is generally not published to the entire company.
- To protect data access page .htm files and Access database objects from being changed. Inadvertent and malicious changes to the database or data access page .htm files can cause them to stop working or malfunction.
- To protect the intellectual property of the database design and code in the application. (This applies more to traditional Access objects and databases than to the HTML code used to create a data access page.)
When you are setting up security for data access pages and the network databases that are their data sources, the first step is to think about what type of security you need. You need to consider the answers to the following questions:
- What groups of people need to access the database?
- What sensitive information should be restricted from certain groups?
- Do I care if users change the design of my data access pages?
- Do I want to protect the intellectual property of my data access pages?
- How are my network and my file system set up to handle file privileges?
The answers to the first two questions help you to organize user groups and set database object permissions for the database, while the answers to the rest determine how you configure file system and Web server security for the data access page .htm files.
Access 2000 Security and Database Formats
Access 2000 works with three types of databases: traditional Access databases, MSDE databases, and databases stored on machines running SQL Server 6.5 or later. Access databases are stored in .mdb files that can be shared with other users by putting them in a shared network folder. MSDE is a new technology that can be installed on computers running Microsoft Windows® 95, Microsoft Windows 98, or Microsoft Windows 2000 Professional to provide local or shared storage capabilities that are compatible with SQL Server 7.0. When you access SQL Server and MSDE databases, connection information and Access-specific objects (such as forms, reports, modules, and links to data access pages) are stored in an Access project (.adp) file that serves as an interface to the database.
Because the Microsoft Jet, SQL Server, and MSDE database engines support different security features, you will find that the security features exposed in the Access user interface are different depending upon whether you are working in an Access database (.mdb) or an Access project file (.adp).
The user-level security feature set provided by Access and the Microsoft Jet database engine for Access databases (.mdb) is one of the best in the desktop database management market. When deciding whether to use an Access database or an Access project connected to an MSDE or SQL Server database, you should consider your multiuser requirements, database size, need to scale, and network configuration.
User-level security for an Access database requires you to set up a separate workgroup information file (System.mdw) to contain its own native security groups and user accounts, whereas MSDE and SQL Server security can be integrated to use Windows 2000 domain-security accounts. If your application requires a robust set of security features that is tightly integrated with a Windows 2000 Server network, you should consider using MSDE or SQL Server.
Installing MSDE and Working with MSDE Databases
To install MSDE, run Setupsql.exe, which is located in the \SQL\x86\Setup subfolder on Disc 1 in the Microsoft Access 2000, Microsoft Office 2000 Professional, Microsoft Office 2000 Premium, and Microsoft Office 2000 Developer versions.
After installing MSDE, you can create a new MSDE database in Access by clicking New on the File menu, and then double-clicking Project (New Database). You can connect to an existing to MSDE or SQL Server database by double-clicking Project (Existing Database), or by using the Microsoft Access Upsizing Wizard to convert an existing Access database (.mdb) to an MSDE or SQL Server database.
To do this:
- Open your .mdb file.
- Point to Database Utilities on the Tools menu, and then click Upsizing Wizard and follow the wizard's directions.
Securing Data Access Page Files
Because data access page files are stored as individual .htm files that are external to the database application file, you cannot assign database permissions (such as read and write) to them. How you control read and write access to data access page files depends on their location. If a data access page file is accessed from a network shared folder, you must use the security features of the file system. For example, under all versions of Windows you can control access to shared folders; other network operating systems, such as Novell NetWare, also provide features to control access to files and folders. If a data access page file is located on a Web server, you must use the Web server's security features. For example, Microsoft Internet Information Server (IIS) 4.0 or later and the Microsoft FrontPage® Web-management tools provide support for controlling access to files.
Microsoft Jet and Data Access Page Security
Access and the Microsoft Jet database engine provide share-level security and user-level security for Access databases (.mdb files). With share-level security, you assign a password to the database, and anyone who knows the password can open the database. User-level security requires a little more work but offers many more features. You can create users and groups and then give them permissions to database objects (such as tables and queries).
Share-level security and database passwords
Adding a database password is an easy way to prevent unauthorized users from opening a database. Use this approach when you need to control which users can open the database, but not what they do after providing the correct database password. This method can be used only with .mdb files.
To set a database password:
- Close the database. If the database is being shared on a network, make sure no other users have it open.
- Make a backup copy of your database and store it in a secure place.
- On the File menu, click Open.
- Move to the folder that contains the database and select it in the file list, click the arrow next to the Open button, and then click Open Exclusive.
- On the Tools menu, point to Security, and then click Set Database Password.
- In the Password box, type the password. Passwords are case-sensitive.
- In the Verify box, type the password again to confirm it, and then click OK.
The password is now set. Each time a user tries to open the database, a dialog box appears that requests the database password. If you create a data access page that connects to this database, when a user opens the data access page, Internet Explorer displays a dialog box requesting the database password before displaying data in the data access page.
User-level security
With user-level security, you create users and groups and then give them permissions to database objects (such as tables and queries). Implicit permissions are granted to groups of users. Explicit permissions are granted directly to individual users. As mentioned previously, data access pages are stored outside the database and cannot be assigned permissions (such as read and write) within the database. This must be done either through a Web server or the file system.
Access stores security information as permissions in the database itself and stores user and group account information in a workgroup information file (System.mdw). By default, the user and group account information is stored in the workgroup information file named System.mdw that is found in the C:\Program Files\Microsoft Office\Office folder. Individual object permissions are stored in the specific database file. The best way to set up user-level security for a database is to use the User-Level Security Wizard. This wizard helps you set up group and user accounts and create a new workgroup information file.
To secure your database with the User-Level Security Wizard:
- Open the database you want to secure.
- On the Tools menu, point to Security, and then click User-Level Security Wizard.
- Follow the directions in the wizard.
For detailed information about the Access security model and user-level security, see Chapter 18, "Securing Access Databases," in the Microsoft Office 2000/Visual Basic Programmer's Guide.
Note When you are creating data access pages that connect to Access databases that are secured with user-level security, you must join (specify) the security workgroup information file before creating and editing the data access page. To do this, launch the database by using the icon created on your desktop by the User-Level Security Wizard. An alternative way to join the workgroup is to use the /wrkgrp startup command-line option followed by the full path to the workgroup database. For example:
"c:\Program Files\Microsoft Office\Office\msaccess.exe" c:\apps\myapp.mdb /wrkgrp c:\apps\wrkgrp.mdw
Note that if the path contains spaces, you must enclose it in double quotation marks.
When you are authoring a page that connects to an Access database that has user-level security enabled, the path to the current default workgroup information file is always saved in the ConnectionString property of the Data Source control on the data access page. If you do not properly join the workgroup information file before creating a data access page, the data access page will not reference the correct user and group information when you deploy the page to other users. If you have created data access pages before running the User-Level Security Wizard, you can retarget the Jet OLEDB:System database parameter in the ConnectionString property of the Data Source control (ID attribute = MSODSC) on the data access page by using the Microsoft Script Editor (on the Tools menu, point to Macro and then click Microsoft Script Editor) or a text editor such as Notepad.
When a user opens a data access page, if Internet Explorer can't open the workgroup information file specified by the author of the data access page, it will use the user's current default workgroup information file. This creates no problems for unsecured databases, but a data access page that accesses a secured database must be able to open the correct workgroup information file or the Data Source control on the data access page won't be able connect to the database and show data, after the data access page is loaded in Internet Explorer. The easiest way to ensure that the data access page points to the correct workgroup information file is to put the file in a shared file location, and then join that workgroup information file prior to opening the database and creating the data access page. Once Access itself is pointing to a shared workgroup information file, any data access pages authored in Access will also point to that shared file.
Limitations of data access pages and Microsoft Jet security
You can't use the CurrentUser method to return the name of the current security user account from script running in a data access page. This is an Access-specific method that is not supported by ActiveX Data Objects (ADO) or Data Access Objects (DAO) and is not available from script running in a data access page.
Data Access Pages and MSDE Security
MSDE provides two modes for logon security: Windows 2000 integrated security and SQL Server authentication. The integrated mode uses Windows 2000 accounts (which are authenticated when the user logs on to the network) to validate users logging on to the database server. The SQL Server authentication mode uses native security accounts and passwords that are defined on the MSDE server to authenticate all connections to databases. Microsoft Internet Information Server (IIS) treats integrated security as a trusted connection and SQL Server authentication is considered a nontrusted connection. Both types of authentication are available when you are setting up MSDE and when you are defining the connection information for a data access page.
Both SQL Server 7.0 and MSDE provide a new built-in function (SUSER_SNAME) that returns the Windows 2000 user name of the current user without requiring that user to enter new logon and password information. This feature allows you to create views that intelligently use the current user's logon information.
Note MSDE on Windows 95 and 98 doesn't support Windows 2000 integrated security but does support SQL Server authentication. The integrated security examples that follow will not work unless the database server is built on Windows 2000 technology.
To set up MSDE and user accounts:
- Install MSDE, as described in "Installing MSDE and Working with MSDE Databases."
Even if you have another MSDE database or SQL Server 6.5 or 7.0 server available on the network, you must install MSDE locally in order to run the Access project security features.
- Install the SQL Server Northwind project file sample database.
The examples below use the project file (.adp) version of the Northwind sample database, which is not installed by default. To install the Northwind project file sample database:
- Start Microsoft Access.
- In the Access startup dialog box, in the Open an existing file list, double-click Northwind SQL Project File.
- When asked whether to install the file, click Yes to install and open the Northwind SQL Project file.
The Northwind SQL Project file is installed in your C:\Program Files\Microsoft Office\Office\Samples folder as the NorthwindCS.adp file. (You can also install the Access sample database files by double-clicking the Add/Remove Programs icon in Windows Control Panel and rerunning the Microsoft Office installation program.)
- The first time you open the Northwind SQL Project file, when prompted to install the sample database, click Yes to create the tables and other database objects on your local MSDE server.
- Give your Windows 2000 logon account permission to the database.
By default, the connection string in a data access page uses the SQL Server system administrator (sa) account to log on to the database.
- Point to Security on the Tools menu, and then click Database Security.
The SQL Server Security dialog box opens.
- On the Server Logins tab, click Add to add yourself or your group.
- On the General tab, in the Name box, type your domainname\username (for example, MyDomain\johndoe). Then choose the default language and database for the new account.
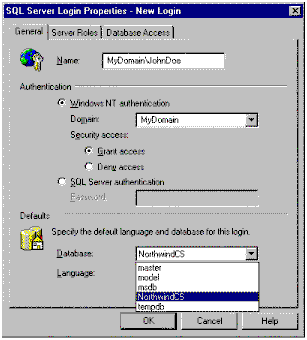
Note You must have MSDE installed locally in order to manage the security of different MSDE and SQL Server 7.0 databases.
This is a good time to think about the users and groups that should have access to the database. One of the great features about MSDE is the way it allows you to take advantage of your Windows 2000 network configuration. For example, you can add a Windows 2000 user group as a user and then assign privileges to the user group instead of the individual users. This feature makes setting up security much faster and lowers the cost of supporting the application.
- If applicable, give access to a Windows 2000 user group.
- On the General tab, in the Name box, type the name of the group you want to add, using the domainname\groupname format.
- Click OK to add the new logon account to the SQL Server database.
- Grant specific user database and object permissions.
- In the SQL Server Security dialog box, click the Database Users tab.
- Select the account or group for which you want to grant permissions, and then click Edit.
- In the Database User Properties dialog box, click Permissions.
- Assign the appropriate permissions to the database user account or group.
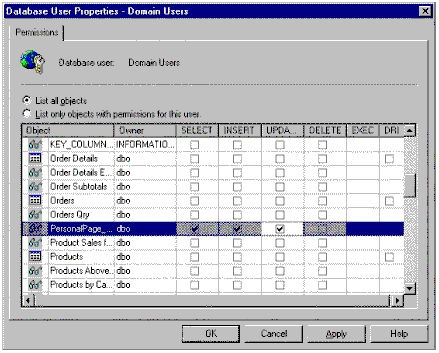
Note Make sure you grant the appropriate permissions. By default, MSDE revokes all permissions unless they are otherwise granted.
Creating a personalized data access page
Now it's time to start dazzling people with some cool features of MSDE and data access pages. One way is to create a page that instantly loads the user's personal information. To do this, you'll use the SUSER_SNAME function to determine who a particular user is and match that user's name to a table that links the user to their personal information. The SUSER_SNAME function is a SQL Server 7.0 and MSDE system function that returns the domain and user name of the person who is currently viewing the data access page.
- First, modify the Employees table to include the user name information.
- In the Database window, click Tables under Objects.
- Click the Employees table, and then click Design.
- Insert a new row, name the column Username, and set its data type to varchar.
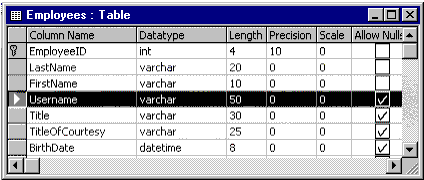
- Save the changes to the Employees table, and then switch to Datasheet view and add the user name of the account that you want to set up (for example, MyDomain\johndoe).
| LastName |
FirstName |
UserName |
| Doe |
John |
MyDomain\johndoe |
- Create a view that will automatically load the personalized information by using the SUSER_SNAME function.
- In the Database window, click Views under Objects and then click New.
- Click Show Table, and then drag the Employees table from the Show Table list to the View designer.
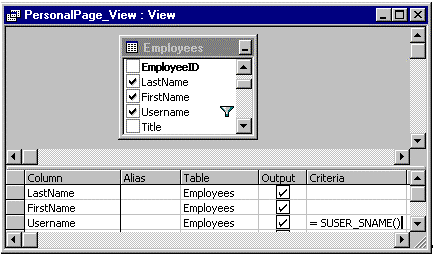
- In the field list for the Employees table, select the fields that you would like to be available in the view.
For the purposes of this example, select the LastName, FirstName, and Username fields.
- In the Criteria column for the UserName item, type = SUSER_SNAME ( )
- Save the view and name it PersonalPage_View.
- After you have created the view, but before you create and deploy the data access page, choose the logon and user groups to which you want to grant permission to perform SELECT, INSERT, UPDATE, or DELETE operations. To grant permissions:
- Point to Security on the Tools menu, and then click Database Security.
- Click the Database Users tab.
- Select the user or group account that you want to execute the view, and click Edit.
- In the Database User Properties dialog box, click Permissions.
- Give the user or group account the appropriate object permissions for the PersonalPage_View.
For the purposes of this demonstration, grant SELECT, INSERT, and UPDATE permissions to your Windows 2000 logon account.
- Now that you have permission to execute the PersonalPage_View view, you need to test the view by logging on using Windows 2000 Integrated Security instead of SQL Server security.
- Click Connection on the File menu and select Use Windows NT Integrated Security.
Note that you don't have to supply a user name and password! MSDE, Windows 2000, and Access worked together to figure out who you are and whether you have permissions to the database.
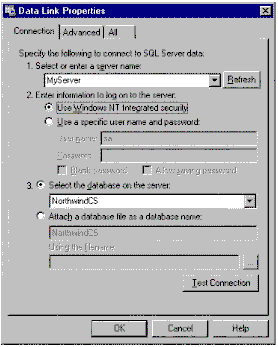
- After logging on using Windows NT Integrated Security, you should test the view.
- In the Database window, click Views under Objects.
- Double-click PersonalPage_View.
The view should return all the records where the current user's domain and username match the values in the UserName column.
- Now, create a data access page that uses the recordset returned by our new view (query).
- In the Database window, click Pages under Objects.
- Double-click Create data access page in Design view.
- On the View menu, click Field List.
- Expand the Views folder and then expand PersonalPage_View.
- Drag the three fields in PersonalPage_View from the field list to the design surface of the page.
- Save the data access page.
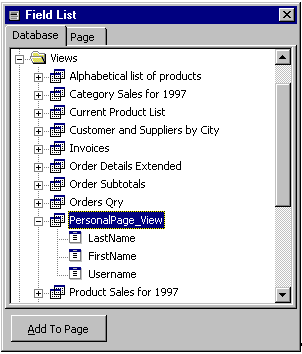
- Preview the data access page.
Note that the only records that are returned are those that match the value in the Username column with your Windows 2000 logon user name. If you shut down Access and run the page directly from Internet Explorer, the page will also show only personalized information.
MSDE name and password
Another way in which you can use data access pages with MSDE is by requiring the user to enter an MSDE (SQL Server) logon user name and password. The process for doing this is quite simple.
- On the Tools menu, point to Security, and then click Database Security.
- In the SQL Server Security dialog box, create a group or individual user account that uses SQL Server authentication, and then assign that account specific object permissions.
- Create a new data access page and add the appropriate fields to the design surface.
- On the View menu, click Field List.
- In the field list, right-click the database/server name and then click Connection on the shortcut menu.
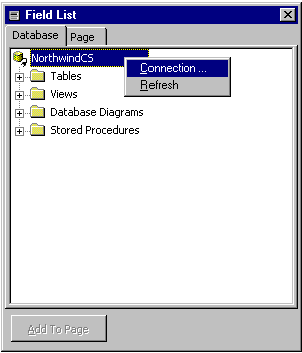
- To use SQL Server authentication, select the Use a specific user name and password check box on the Connection tab.
- To prevent storing any password information in the data access page's connection string, clear the Allow saving password check box.
When a user opens the data access page, they must provide a valid user name and password to display data.
Data access page encapsulated logon information using MSDE
The features described in these procedures allow you to create data access pages that display personalized information or prompt for a user name and password when they are opened. There may be situations where you want to publish the same information to everyone. In this case, you want to provide everyone with the same user name and password. Data access pages allow you to save the user name and password in the HTML document. If you elect to do this, remember that anyone can open the HTML document and find the user name and password. The account information that you save in the page can be used with the Access database. Therefore, make sure that you restrict the permissions of this user name accordingly.
Let's take a look at how we would create a data access page with embedded logon information.
- On the Tools menu, point to Security, and then click Database Security.
- In the SQL Server Security dialog box, create a group or individual user account that uses SQL Server authentication, and then assign that account specific object permissions.
- Create a new data access page and add fields to the design surface.
- On the View menu, click Field List.
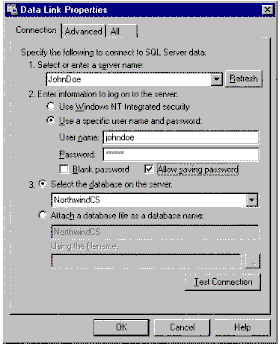
- In the field list, right-click the database/server name and then click Connection on the shortcut menu.
- To use SQL Server authentication, select Use a specific user name and password on the Connection tab and type the user name and password of the account that you want stored in the page.
- Select the Allow saving password check box underneath the Password box.
- Save the data access page to the file system or Web server.
See Also
For more information about data access page security issues, see the "Data Access Page Security Issues" section in Chapter 18, "Securing Access Databases," in the Microsoft Office 2000/Visual Basic Programmer's Guide (Microsoft Press, 1999).
For more information about working with data access pages, see "Programming Data Access Pages" (DAP Programming.doc), "Deploying Data Access Pages on the Internet" (DAP Internet Deployment.doc), and "Connecting Data Access Pages Together" (Connecting DAPs.doc) in the Appendixes folder on the companion CD-ROM to the Microsoft Office 2000/Visual Basic Programmer's Guide.
The information contained in this document represents the current view of Microsoft Corporation on the issues discussed as of the date of publication. Because Microsoft must respond to changing market conditions, this paper should not be interpreted to be a commitment on the part of Microsoft, and Microsoft cannot guarantee the accuracy of any information presented after the date of publication.
This document is for informational purposes only. MICROSOFT MAKES NO WARRANTIES, EXPRESS OR IMPLIED, IN THIS DOCUMENT.
Microsoft, ActiveX, FrontPage, Microsoft Press, PivotTable, Visual Basic, Windows, and Windows NT are either registered trademarks or trademarks of Microsoft Corporation in the United States and/or other countries.


