Authoring Stored Procedures with Visual Studio 6.0 and Microsoft SQL Server 7.0
Dave Mendlen
Visual Studio
November 1998
Summary: Examines the use of the new Visual Database Tools in Visual Studio® version 6.0 for creating and editing Microsoft® SQL Server™ 7.0 stored procedures. (3 printed pages) Covers:
- Visually creating stored procedures in SQL Server 7.0.
- Visually editing existing stored procedures in SQL Server 7.0.
Introduction
Transact-SQL (or T-SQL) is a language. Traditionally, that meant that you had to memorize all the syntax associated with it before you could begin creating SQL Server stored procedures. Well, that's not the case anymore.
The Visual Design tool isn't just for creating new stored procedures. You probably have hundreds of stored procedures in your database today. Point this tool at your most complex stored procedure and whammo!—you're suddenly able to see what all that T-SQL is doing. Benefits include:
- Works on existing stored procedures.
- Works with SQL data queries as well as "Action" queries—Insert, Update, Delete, and so on.
Note This particular technique works only when developing within Visual InterDev™, Visual J++™, or with a Visual Studio database project.
Tutorial
- Create a new data connection to a SQL Server database (if you don't already have a connection). Right-click the project root in Visual InterDev 6.0. Select Add Data Connection…. Connect to SQL Server (choose the PUBS database).
- In the Data View window, expand the Stored Procedure tree.
- Right-click the Stored Procedures tree and select New Stored Procedure.
- When the new stored procedure comes up, highlight "/* set nocount on */" and delete it.
- Right-click in the white space between As and Return. Select Insert SQL.
- From the Data View window, drag the Authors table to the gray area in the Query Builder window.
- Select the au_id, au_lname, and au_fname columns.
- Click the Run Query toolbar button.
- Find the Criteria column in the Query Builder grid. Select the criteria for the au_id column. Type in ""=@au_ID""
- Rerun the query. When prompted for Query Parameters, type in 409-56-7008.
- The results should show Abraham Bennett.
- Close the Query Builder window.
- When prompted to save "StoredProcedure1", click Yes.
- You'll then see the SQL for the stored procedure in your original stored procedure window.
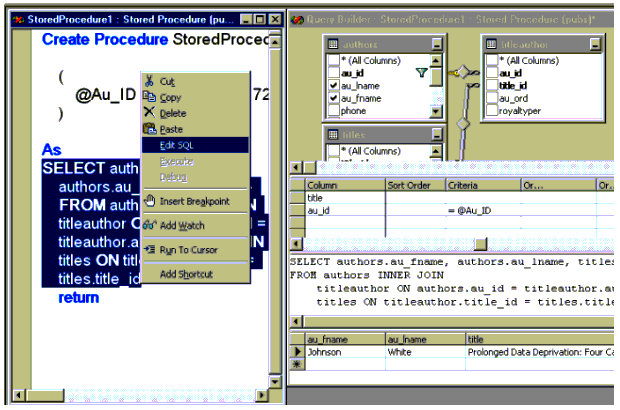
- What's great about this tool is that you can use existing SQL to do the same thing. Select the SQL statement and then right-click and select Edit SQL.

- Notice the Query Builder was invoked exactly as you left it. Close the Query Builder.
- Highlight the first remark characters "/*" and delete them.
- Highlight the second remark characters" */" and delete them.
- Highlight the second line "@parameter2 datatype OUTPUT" and delete it.
- Highlight the "," on the first line and delete it.
- Now add the parameter for au_id. Highlight "parameter1" and change it to "au_id".
- Highlight "datatype" and change it to "varchar(11)"
- Highlight the default value and change it to "409-56-7008" (make sure the quotes are included).
- Close and save the stored procedure.
- In the Data View window, right click the stored procedure and select Execute. When prompted for a parameter value, leave the default selected and click OK.
- You'll see the final results in the database output window. (You may have to scroll up to see your results).
Summary
You don't have to be a Transact-SQL guru in order to build stored procedures now. The most important thing to understand, however, is that the Database Design tool works with the complex stored procedures you already have. So it provides a great way to see and understand the relationships in these stored procedures.

