Dave McVie
MCSE, Microsoft Product Support Services
November 1998
Summary: Provides information on the conversion of Microsoft® SQL Server™ version 6.0 or 6.5 databases to SQL Server 7.0. (21 printed pages)
Process Overview
The Conversion Process Step-by-Step
Upgrade Wizard Screens
Data and Object Transfer
Logon Information
Choose Databases to Upgrade
Database Creation
System Configuration
Completing the Upgrade Wizard
Tape-Specific Screens
Directory Structure
File Extensions
Because of physical changes in the on-disk storage and features that add enhanced functionality, it is necessary to convert SQL Server 6.x databases and data (.dat) files to the new SQL Server 7.0 format. Only conversion from Microsoft Windows NT® platforms to Windows NT platforms is supported. An Upgrade Wizard is included with SQL Server 7.0 to help you through the database conversion process. When you perform the conversion process, there are two different types of upgrade provided: the one-computer process and the two-computer process.
During this process, there are two ways of performing the upgrade: Pipeline or Tape.
This process will require one and one-half times the amount of disk space in use by the SQL Server 6.x databases. During the process, the SQL Server 6.x devices and databases will remain intact and will not be affected in any way. The SQL Server 7.0 installation will create new device files and databases, and copy the data from the SQL Server 6.x databases into the SQL Server 7.0 databases. This will enable you to switch back to the SQL Server 6.x installation using the SQL Switch utility. You are responsible for removing the SQL Server 6.x installation and .dat files after the upgrade is completed. This option is not designed to let you move between the two SQL Server installations—after the data has been converted from the 6.x server to the 7.0 server, there is no way to maintain the integrity between the two. If data is modified in the 6.x server, it is not automatically updated in the 7.0 server.
The data from the SQL Server 6.x databases is dumped (a modified SQL dump) to tape. Optionally, the .dat devices are deleted before the dump is imported from tape into the new SQL Server 7.0 databases. This process also gives you the option of backing up the .dat devices to a tape, a local disk drive, or a network shared directory. This backup process is in addition to the SQL dump and is an actual file copy or Windows NT backup of the .dat files, not a SQL dump. Depending on the selections you make, the Backup 6.x devices before exporting data option in the Upgrade Wizard will either prompt you to back up the .dat files (it does not check or verify that you actually do back it up), or it can automatically copy the .dat devices to a specified location. This option will free up disk space by deleting the .dat files before creating the new databases and importing data into the new SQL Server 7.0 databases. On large installations or installations with a limited amount of disk space, this will be the most frequently used option.
Note Selecting the Delete 6.x devices before importing data will delete all existing .dat files, not only the ones in use by databases selected to upgrade.
During a two-computer conversion, all of the objects and data are copied from the source (SQL Server 6.x) computer to the new (SQL Server 7.0) computer. All of the data, objects, and devices are left intact on the source computer.
Note If the computers are not in the same domain, a trusted connection must be established between the two domains.
You can configure the Upgrade Wizard to transfer:
With the Upgrade Wizard, you can upgrade SQL Server 6.x databases in stages. However, this option should only be used for testing. It does not enable you to replicate or synchronize data between SQL Server computers running versions 6.x and 7.0. It may also break cross-database dependencies.
You can choose to skip the transfer of:
In either of the conversion processes, the majority of the steps are the same. The following are the key steps performed by the process:
Log files are generated that contain all objects and table names with row counts. A comparison will later be done using these files and similar files generated on the SQL Server 7.0 databases.
CREATE DATABASE statements are used to create new files and databases for each SQL Server 6.x database.
The default option is to configure all of the new databases to Autogrow, creating the same number of device files as in the 6.x installation. These defaults can be changed by clicking the Edit button on the Database Creation screen. User-supplied scripts or existing databases in SQL Server 7.0 can also be used for upgrading SQL Server 6.x databases. For more information on Autogrow, refer to SQL Server Books Online included with SQL Server.
Each object type is created in all databases before the next type is created.
Note Objects that already exist are not re-created on import.
Each object type (that is, user-defined data types, tables, indexes, rules, defaults, stored procedures, triggers, and views) is built in all databases before the next object type.
The Replication format is different in SQL Server 7.0; replication information is converted to the new format.
Multiple concurrent export/import streams are created if the server has multiple CPUs (named-pipe only).
Data is exported from SQL Server 6.x.
The bulk copy program (bcp) is not used.
Only page allocations are logged (UNDO, no REDO).
Dataflow parallelism is used to minimize I/Os.
A COMMIT occurs after each table, and a restart on error is provided.
Nonclustered Indexes are created upon import complete.
Application validates successful object transfer for each database.
Verifies that all objects were transferred successfully.
Verifies that the row counts are correct.
This can be configured to validate successful data transfer using cyclic redundancy checks (CRCs). This option is off by default in the Update Wizard. Enabling this option can considerably increase the amount of time required for the conversion. Each row of data in the 6.x database has a CRC value generated for it; this is compared with the SQL Server 7.0 data after the conversion is completed.
The Upgrade Wizard performs a version upgrade using the options you specify. The SQL Server 6.x server and data are left intact throughout the version upgrade process if the Pipeline option is used. (See the "Using the Pipeline Upgrade Option" section earlier in this document.) Your SQL Server 6.x catalog data, objects, and databases are upgraded and converted so that they are compatible with SQL Server 7.0. After the version upgrade is complete, SQL Server 7.0 becomes your production system. This section shows the various Upgrade Wizard screens that you will see, and explains the options available on each screen.

Figure 1. Welcome screen
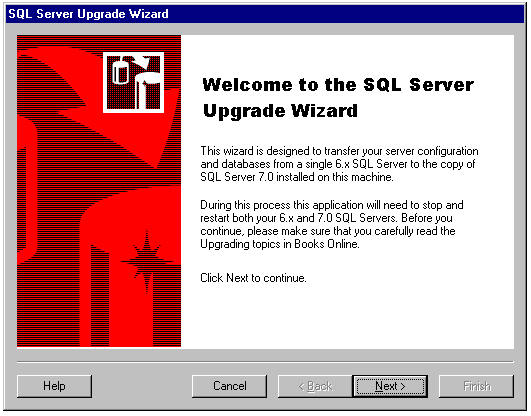
As shown in the preceding dialog box, only SQL Server 6.x databases can be upgraded to SQL Server 7.0. SQL Server 4.2 software and databases must first be upgraded to SQL Server 6.0 or 6.5 before being upgraded to SQL Server 7.0.
Note Although SQL Server 6.0 is not supported on Windows NT Server 4.0, it is supported on Windows NT Server 4.0 Service Pack 4 (or later) for purposes of conversion to SQL Server 7.0.
The following are some helpful guidelines to keep in mind when you upgrade to SQL Server 7.0:
Important Do not switch between the active and dormant versions of SQL Server while the Upgrade Wizard is running.
Note If you have installed the shell update (also called Active Desktop™) feature of Internet Explorer 4.0, your Start menu may not always refresh properly. If this happens, right-click the Start menu, select Explore All Users and double-click the Programs folder to see your actual Start menu. This problem does not occur if you have installed Internet Explorer 4.0 without the shell update. You may also log off, log on, or reboot to refresh your Start menu after a version switch.
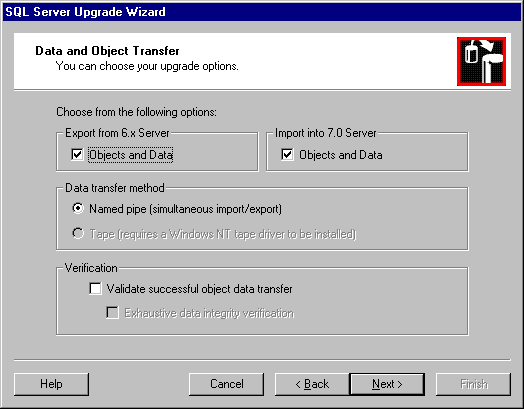
Figure 2. Data and Object Transfer dialog box
Enables the Upgrade Wizard to export catalog objects, such as the definitions of tables and stored procedures, from SQL Server 6.x in the form of SQL script files. The Upgrade Wizard uses these scripts to import the objects into SQL Server 7.0. The script files are created and stored in the Mssql7\Upgrade directory within folders whose name corresponds to the name of the database.
Enables the Upgrade Wizard to export data, consisting of all rows of all user tables, according to the data transfer method chosen.
Enables the Upgrade Wizard to import catalog objects, such as the definitions of tables and stored procedures, from SQL Server 6.x in the form of SQL script files. The Upgrade Wizard uses these scripts to import the objects into SQL Server 7.0. The script files are created and stored in the Mssql7\Upgrade directory within folders whose name corresponds to the name of the database.
Enables the Upgrade Wizard to import data, consisting of all rows of all user tables, according to the data transfer method chosen.
Named Pipe (simultaneous import/export): Enables the Upgrade Wizard to transfer data in memory from SQL Server 6.x to SQL Server 7.0. This data transfer method is the most reliable because it leaves the SQL Server 6.x server intact and provides the best performance. However, you cannot reuse the disk space occupied by SQL Server 6.x until the version upgrade process is complete.
If you chose Named Pipe as the data transfer method, the Upgrade Wizard upgrades the server in the following order:
Tape (requires a Windows NT tape driver to be installed): This option is normally used when there is insufficient space on the hard disk to use a pipeline conversion. Using the Tape option will enable you to safely delete your existing SQL 6.x .dat files after they have been dumped and backed up to tape. This will free all of the disk space currently used by SQL Server 6.x data devices.
For more information on the Tape option, see the "Tape-Specific Screens" section later in this document.
The Validate successful object data transfer option enables the database consistency checker (DBCC) to check the consistency of your catalog data, database tables, and database text.
Note If you have not recently run DBCC to check the catalog data, database tables, and database checks, this option is recommended to rule out any database corruption that may jeopardize a successful upgrade from SQL Server 6.x to SQL Server 7.0.
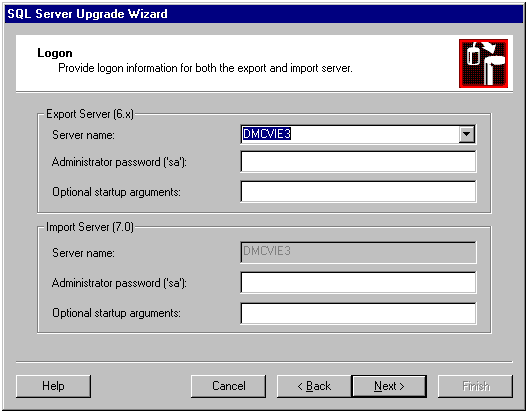
Figure 3. Logon information dialog box
Server name: When exporting objects and/or data, the Upgrade Wizard defaults to the name of the local SQL Server 6.x from which you are running the Upgrade Wizard.
Administrator password (sa): When exporting objects and/or data, type the system administrator (sa) password for the SQL Server 6.x server.
Optional startup arguments: When exporting objects and/or data, type any trace flags or other startup parameters you want to be used when the Upgrade Wizard starts SQL Server 6.x.
Note If a precision of more than 28 is required for a data type, use the /p trace flag. Setting any options here is only required if they were not already defined as startup parameters or in the registry.
Server name: When importing objects and/or data, the Upgrade Wizard defaults to the name of the local SQL Server 6.x from which you are running the Upgrade Wizard.
Administrator password (sa): When importing objects and/or data, type the system administrator (sa) password for the SQL Server 7.0 server.
Optional startup arguments: When importing objects and/or data, type any trace flags or other startup parameters you want to be used when the Upgrade Wizard starts SQL Server 7.0.
Note If a precision of more than 28 is required for a data type, use the /p trace flag.
These startup parameters will only be used during the upgrade process. Any of these parameters that are needed for the SQL Server 7.0 server while it is in production (such as /p) must be added using the Server Configuration dialog box in SQL Server 7.0 Enterprise Manager.
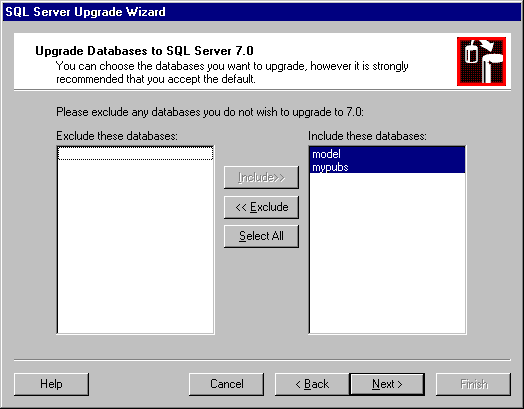
Figure 4. Upgrade Databases to SQL Server 7.0 dialog box
In the Upgrade Databases to SQL Server 7.0 dialog box (Figure 4), select or exclude the databases to be included in the upgrade. The server configuration and master database security (login information) are handled through a separate option. Including the master database in the list of databases to upgrade directs the Upgrade Wizard to transfer user-created tables and objects in the master database to SQL Server 7.0. Upgrading the MSDB database used by SQL Executive is handled through a separate option.
Note Be cautious about upgrading only one database on a server; doing so may break cross-database dependencies. If all databases on a server are upgraded at once, such dependencies will be maintained.
By default, the system configuration and SQL Executive and replication settings (in MSDB) are converted. If you perform several conversions from the same server, you may not want to upgrade these settings each time.
The Upgrade Wizard cannot upgrade the pubs database; a new sample database is created.
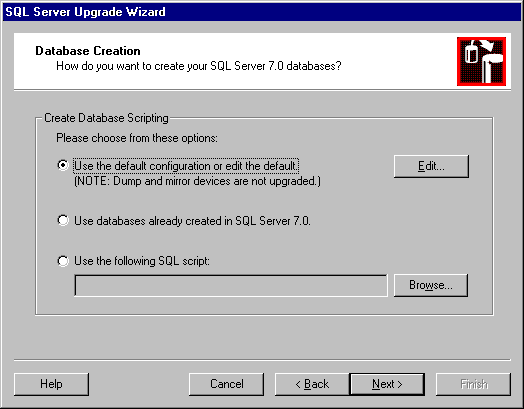
Figure 5. Database Creation dialog box
Use the default configuration or edit the default: This option enables the Upgrade Wizard to estimate how much space is needed to hold transferred objects and data for each selected database and create database files of the estimated sizes. No allowance is made for free space beyond the loaded data; the database can be expanded after the conversion is complete. By default, the data file for a database is placed in the MSSQL\Data directory. The Upgrade Wizard also creates a log file. The log files are the same size as the existing log segments allocated to the database in your SQL Server 6.x installation and will "autogrow" as necessary to accommodate the transaction log. That log file is placed in the same location as the first device used for log space in the SQL Server 6.x installation.
Note Click Edit to view the Data File Layout utility. With this utility, you can view the default configuration and make adjustments to accommodate your storage limitations.

Figure 6. Data File Layout screen
Use databases already created in SQL Server 7.0: The Upgrade Wizard assumes you have already allocated space for your data and logs for each selected database.
Use the following SQL script: This option enables the Upgrade Wizard to use a SQL script file (that you provide) to create the selected databases and allocate space for their data and logs.

Figure 7. System Configuration dialog box
Server configuration: Login and remote login registrations and server configuration options relevant to SQL Server 7.0 are transferred as part of version upgrade. The SQL Server 6.x configuration options that are not used in SQL Server 7.0 or those that are not recommended to be set to values other than the default values are not transferred.
Replication settings: All articles, subscriptions, and publications of each selected database, in addition to the distribution database, if any, are transferred and upgraded.
SQL Executive settings: All tasks scheduled by the SQL Executive are transferred and upgraded so that SQL Server 7.0 can schedule and run those tasks as jobs using the SQL Server Agent.
ANSI nulls: American National Standards Institute (ANSI) nulls control the database default nullability. When not explicitly defined, a user-defined data type or a column definition uses the default nullability setting. SQL Server defaults to OFF (NOT NULL). However, the ANSI-standard is ON (NULL). Nullability is determined by session settings and database settings.
For ANSI compatibility, setting ANSI nulls to ON changes the database default nullability to NULL. In this case, all user-defined data types or columns not explicitly defined as NOT NULL during a CREATE TABLE or ALTER TABLE statement default to allowing NULLs. Note that columns defined with constraints follow their constraint rules, regardless of this setting (for example, PRIMARY KEY columns, IDENTITY columns, and columns of type bit cannot be NULL). Furthermore, session settings override the default database setting for ANSI null default.
Quoted identifiers: Each SQL Server connection has the option to operate with ANSI quoted identifier conventions. When the QUOTED_IDENTIFIERS setting is off, double quotation marks delimit a string—for example, "this is a string". When the setting is on, double quotation marks delimit an identifier that may contain characters otherwise not legal in an identifier, including spaces and punctuation. For more information on quoted identifiers, see either the SQL Server Books Online or the upgrade Help file in the Upgrade directory.
Toward the end of the conversion process, user-stored procedures are verified against the contents of the syscomments table for inconsistencies. Also, all logins, users, and permissions are checked to ensure their validity. The following screens show this process.

Figure 8. Verifying syscomments for corruption
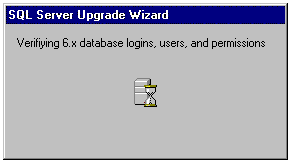
Figure 9. Verifying validity of logins, users, and permissions
If any problems are detected, the following dialog box will be displayed. For more information on the specific errors, check the Mssql\Upgrade\<servername_date_time> directory for any .err files.

Figure 10. Upgrade error dialog box
If any inconsistencies were found in the user objects, they are displayed in the Summary of Warnings section of the following dialog box. Do not continue with the conversion process or migration to the SQL Server 7.0 server until these inconsistencies are resolved. The output file is located in the MSSQL\Upgrade\<servername_date_time> directory. The file name in that directory is associated with the database name and ID, as in: "check65-<dbid><dbname>_err.out". For example, a file might be named Check65-007mypubs_err.out.
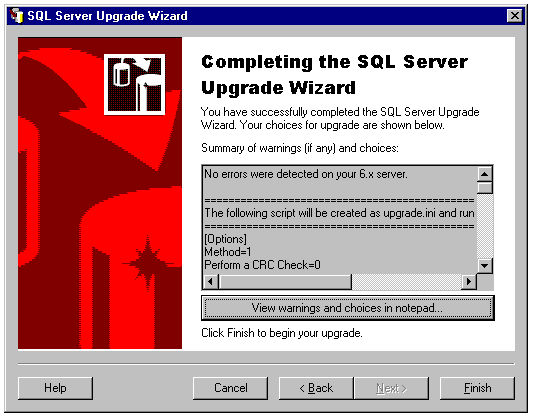
Figure 11. Summary of Warnings dialog box
The preceding screen shows that the stored procedure named "dbo.mybyroyalty" has been renamed and the source code for the stored procedure does not match the contents of the syscomments table. The syscomments table stores the original source code for the stored procedure when it was created; renaming the stored procedure does not change the original source in the syscomments table. This might occur if the sp_rename stored procedure was used to rename the dbo.myroyalty stored procedure. In this case, you must change the source in syscomments. To do this, drop and re-create the procedure, using the new name in the CREATE PROCEDURE AS <new_name> syntax.
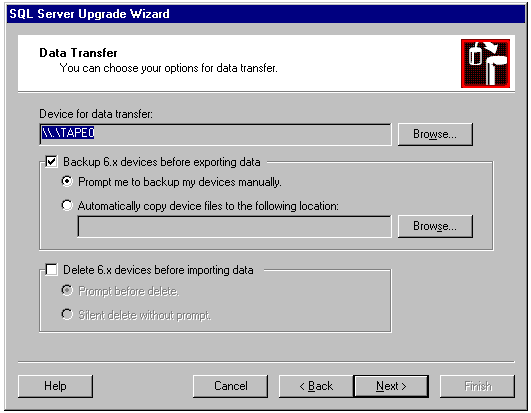
Figure 12. Data Transfer dialog box
This can only be a local tape drive.
This option is the most likely choice when using the tape transfer option because disk space will be reclaimed for use by the new SQL Server 7.0 data files. The prompting options in this section are self-explanatory. This option will remove all existing 6.x device files, not only the ones in use by the databases selected to be upgraded.
The following graphic shows the prompt that is generated from the Prompt me to Backup before exporting option.
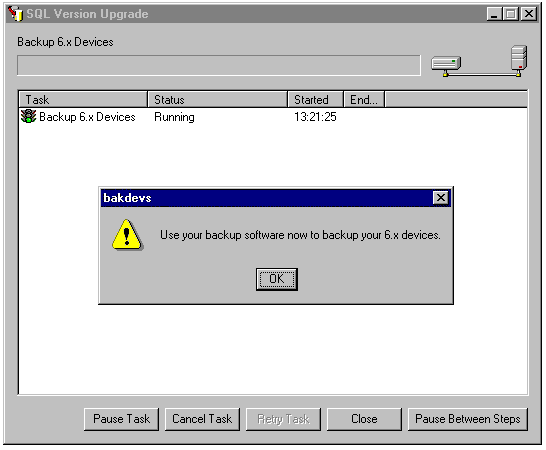
Figure 13. Backup 6.x Devices dialog box
If the tape to be used already contains data, you will be prompted to overwrite the tape or replace it with another, as shown in the following dialog box.

Figure 14. Prompt to overwrite or replace tape
Note If this dialog box is not dismissed within five minutes the upgrade will continue and delete any existing information on the tape. The dialog box will remain as an indicator the tape was overwritten.

Figure 15. Directory structure
As shown in Figure 15, each database has a separate directory created, and the directory name is derived from the DBid (as in sysdatabases) and database name. This database directory contains a result file for each type of object in the databases. The following table shows the possible file extensions and the type of file to which they refer.
| Extension | Type of file |
| .tab | Table definitions |
| .prc | Stored procedure definitions |
| .viw | View definitions |
| .trg | Trigger definitions |
| .bnd | Column bindings |
| .def | Defaults |
| .rul | Rules |
| .udt | User-defined data types |
| .idn | Identity |
| .drn | Declarative referential integrity (DRI) |
| .fky | Foreign key constraints |
| .prv | Object permissions |
| .log | Logins |
| .usr | Users |
| .grp | Groups |